The alarm on my phone has gone off three times, which means I’ve done nothing for three of the minutes I’ve been given. At the moment I’ve got a hair tie in my mouth, and I’m standing in front of the mirror like it can give me an answer as to why I don’t have an outfit ready or some semblance of a hair-do. The situation might look bad, but I’m sure there are many people who go through the same thing every school day; and people with hair that is over four inches long have definitely been in a similar position. Getting ready for school, especially when your hair is long, is a quick math problem: you can’t spend too much time getting ready or else you miss the bus or your mom will start honking and screaming at you. braids.
Over the years I’ve noticed a lot of people (including myself) panic-braid their way out of the house. What actually works for the full day at school aren’t the overly complicated styles from YouTube tutorials that have a million steps, they’re the styles that use maybe 1-2 accessories to keep things simple, and use the fact that hair that looks slightly messy is way better than hair that has fallen out of the style perfectly styled hair during the first class. For pic day I spent 40 minutes doing an incredible fishtail braid that lasted about as long as it took me to walk from the bathroom to the car. Meanwhile a friend of mine looked great all day with just a twist back and a clip. It was an incredible moment. So here are styles that keep it simple and respect your time.
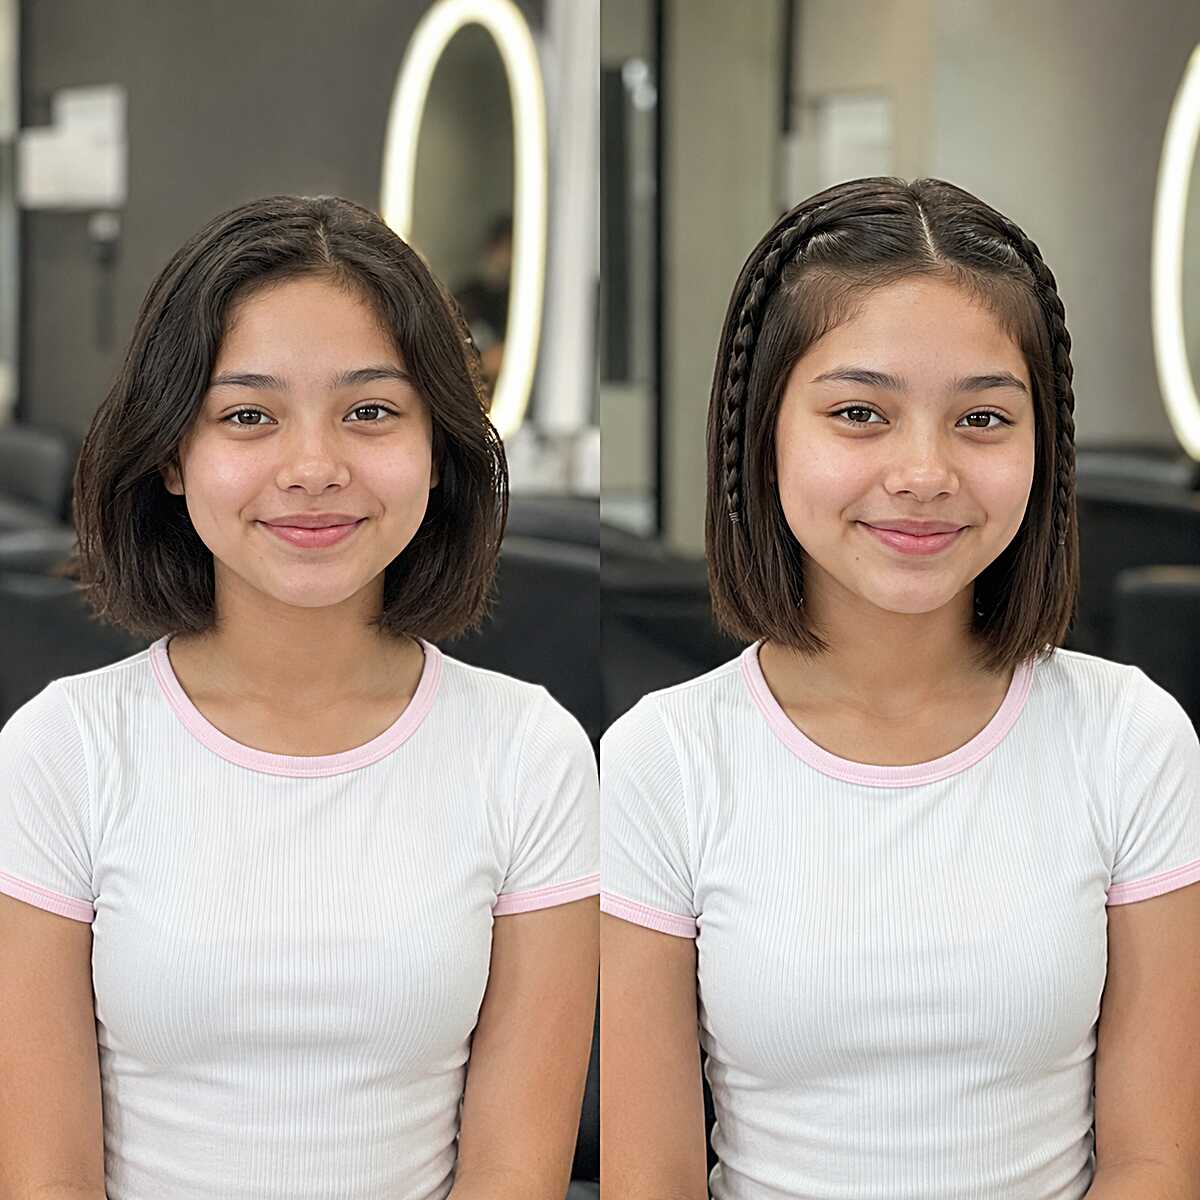

#1: Two Small Crown Braids on a Chin-Length Bob That Went From Flat to Done
In the left picture, that bob looks like it is just laying against her head with no movement, the way slightly wavy hair does when it air dries with no product. A couple of little three-strand braids at the top, really pulled tight from the part line, and pinned back behind the ear changed the whole look. They lift the crown area and keep the front polished without using any heat. This style is most suitable for chin-length hair, especially medium to thick hair because the braids need enough bulk to hold them without falling out by third period. With fine hair there is too much scalp showing through the braid sections. That’s not a styling problem, it’s a density issue and no amount of technique can fix that. The rest of the hair is left completely untouched, which is the whole point of this style. Round and oval faces suit this style really well as the braids pull hair off the forehead and provide more space at the sides of the head.
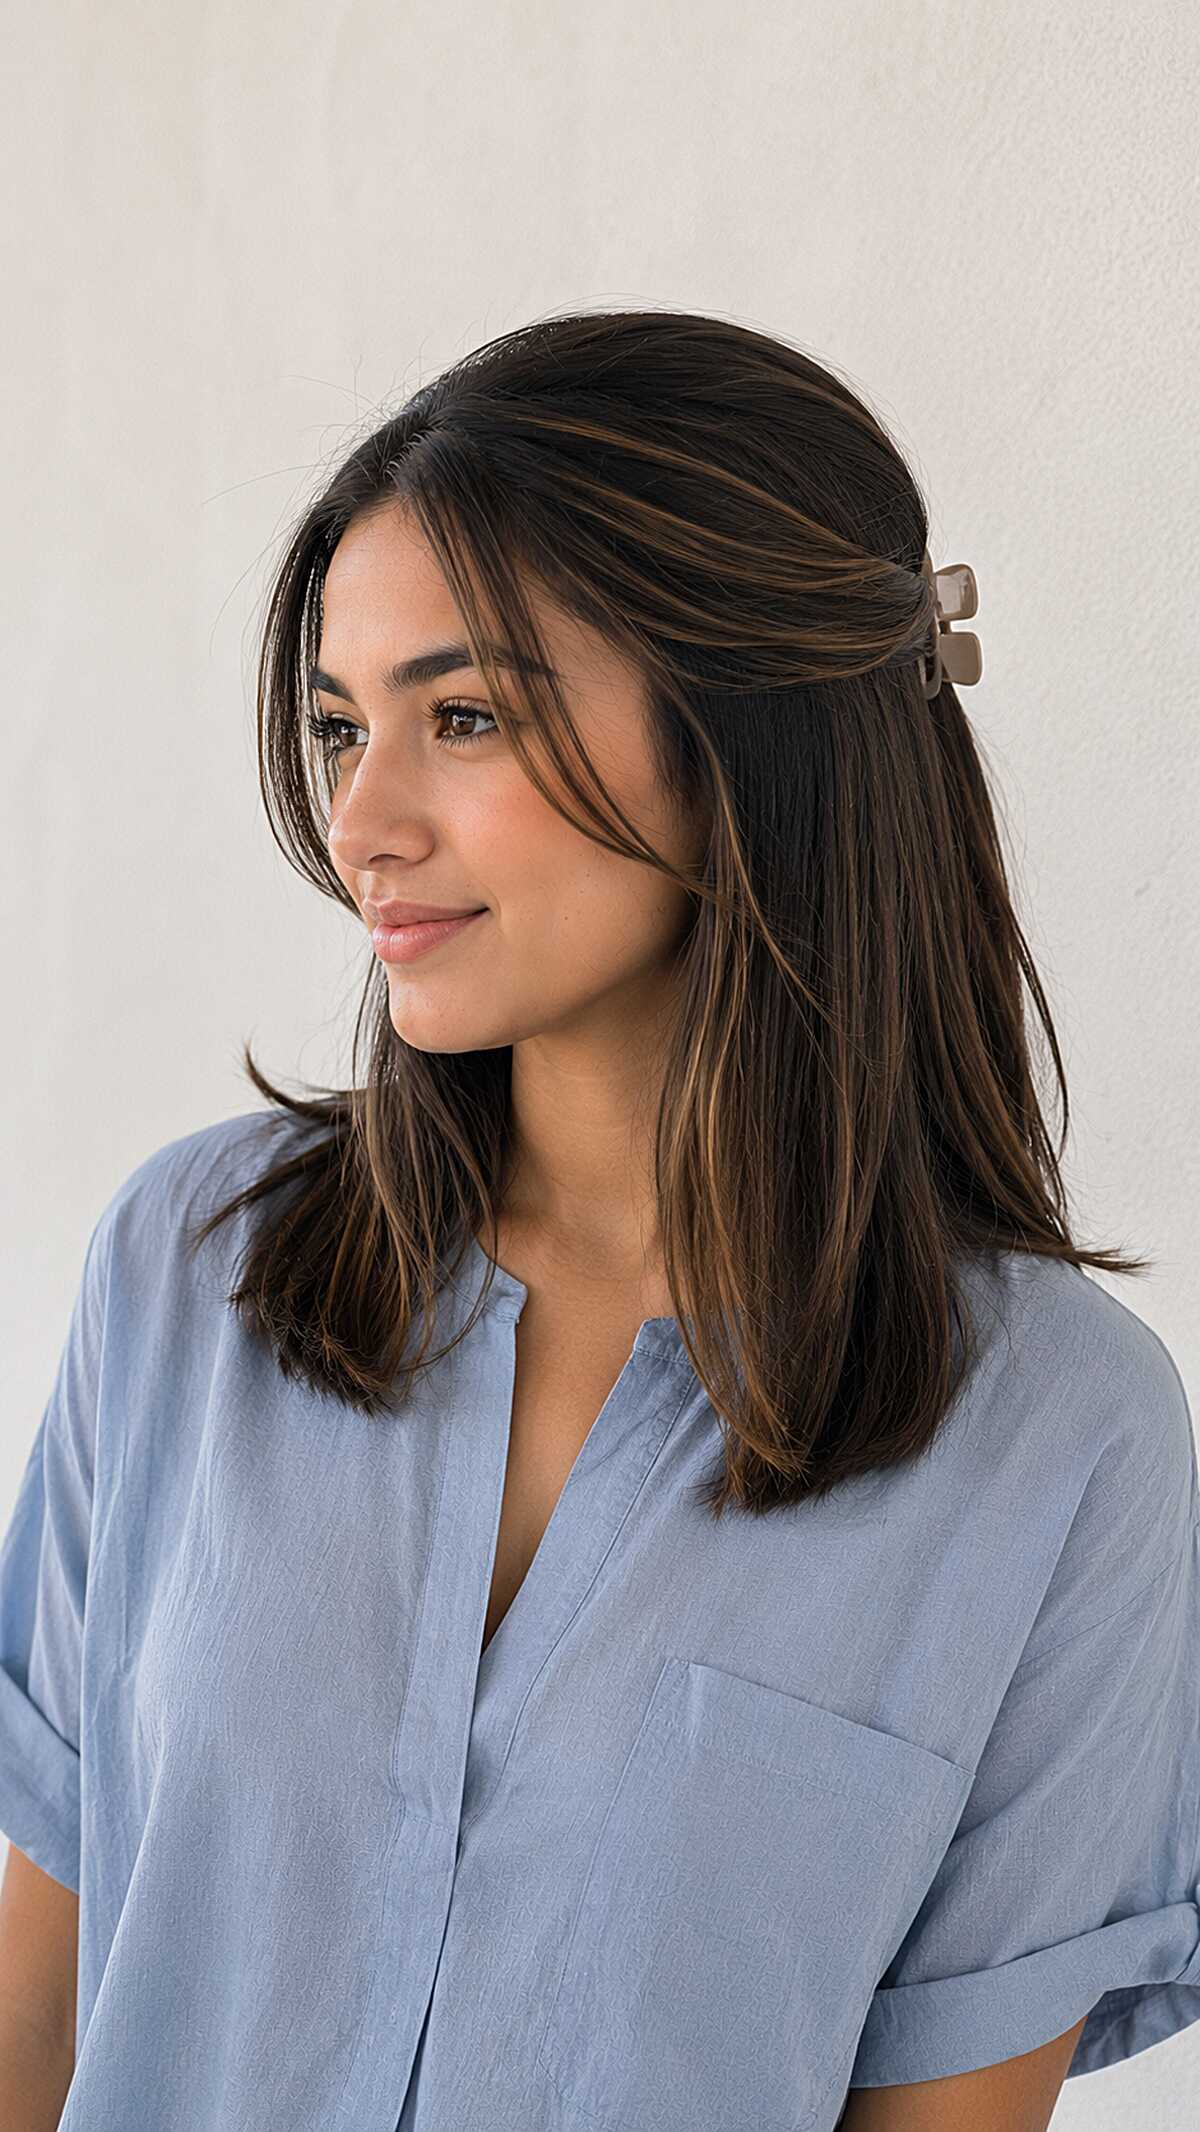
#2 Half-Back Mini Clip on a Collarbone Lob With Caramel Ribbons
This clip is actually doing almost nothing structural to your hair, and that is the point. It only pulls back the hair on one side and makes it look intentional, while the rest is straight and slightly flipped out at the ends. The base cut is a blunt lob at the collarbone with no layers which is why the ends look so clean and heavy. Notice the texture is straight and fine to medium. The highlights are hand-painted in thin ribbons around the face and through the middle leaving the underneath and roots a deep brown so the regrowth is invisible for months. This will not work on thick coarse hair because without layers, the weight just hangs and that little clip won’t hold it back. Those front pieces that land at the jaw are perfect for ovals and heart shapes and soften everything, while square faces lose that benefit really quickly.
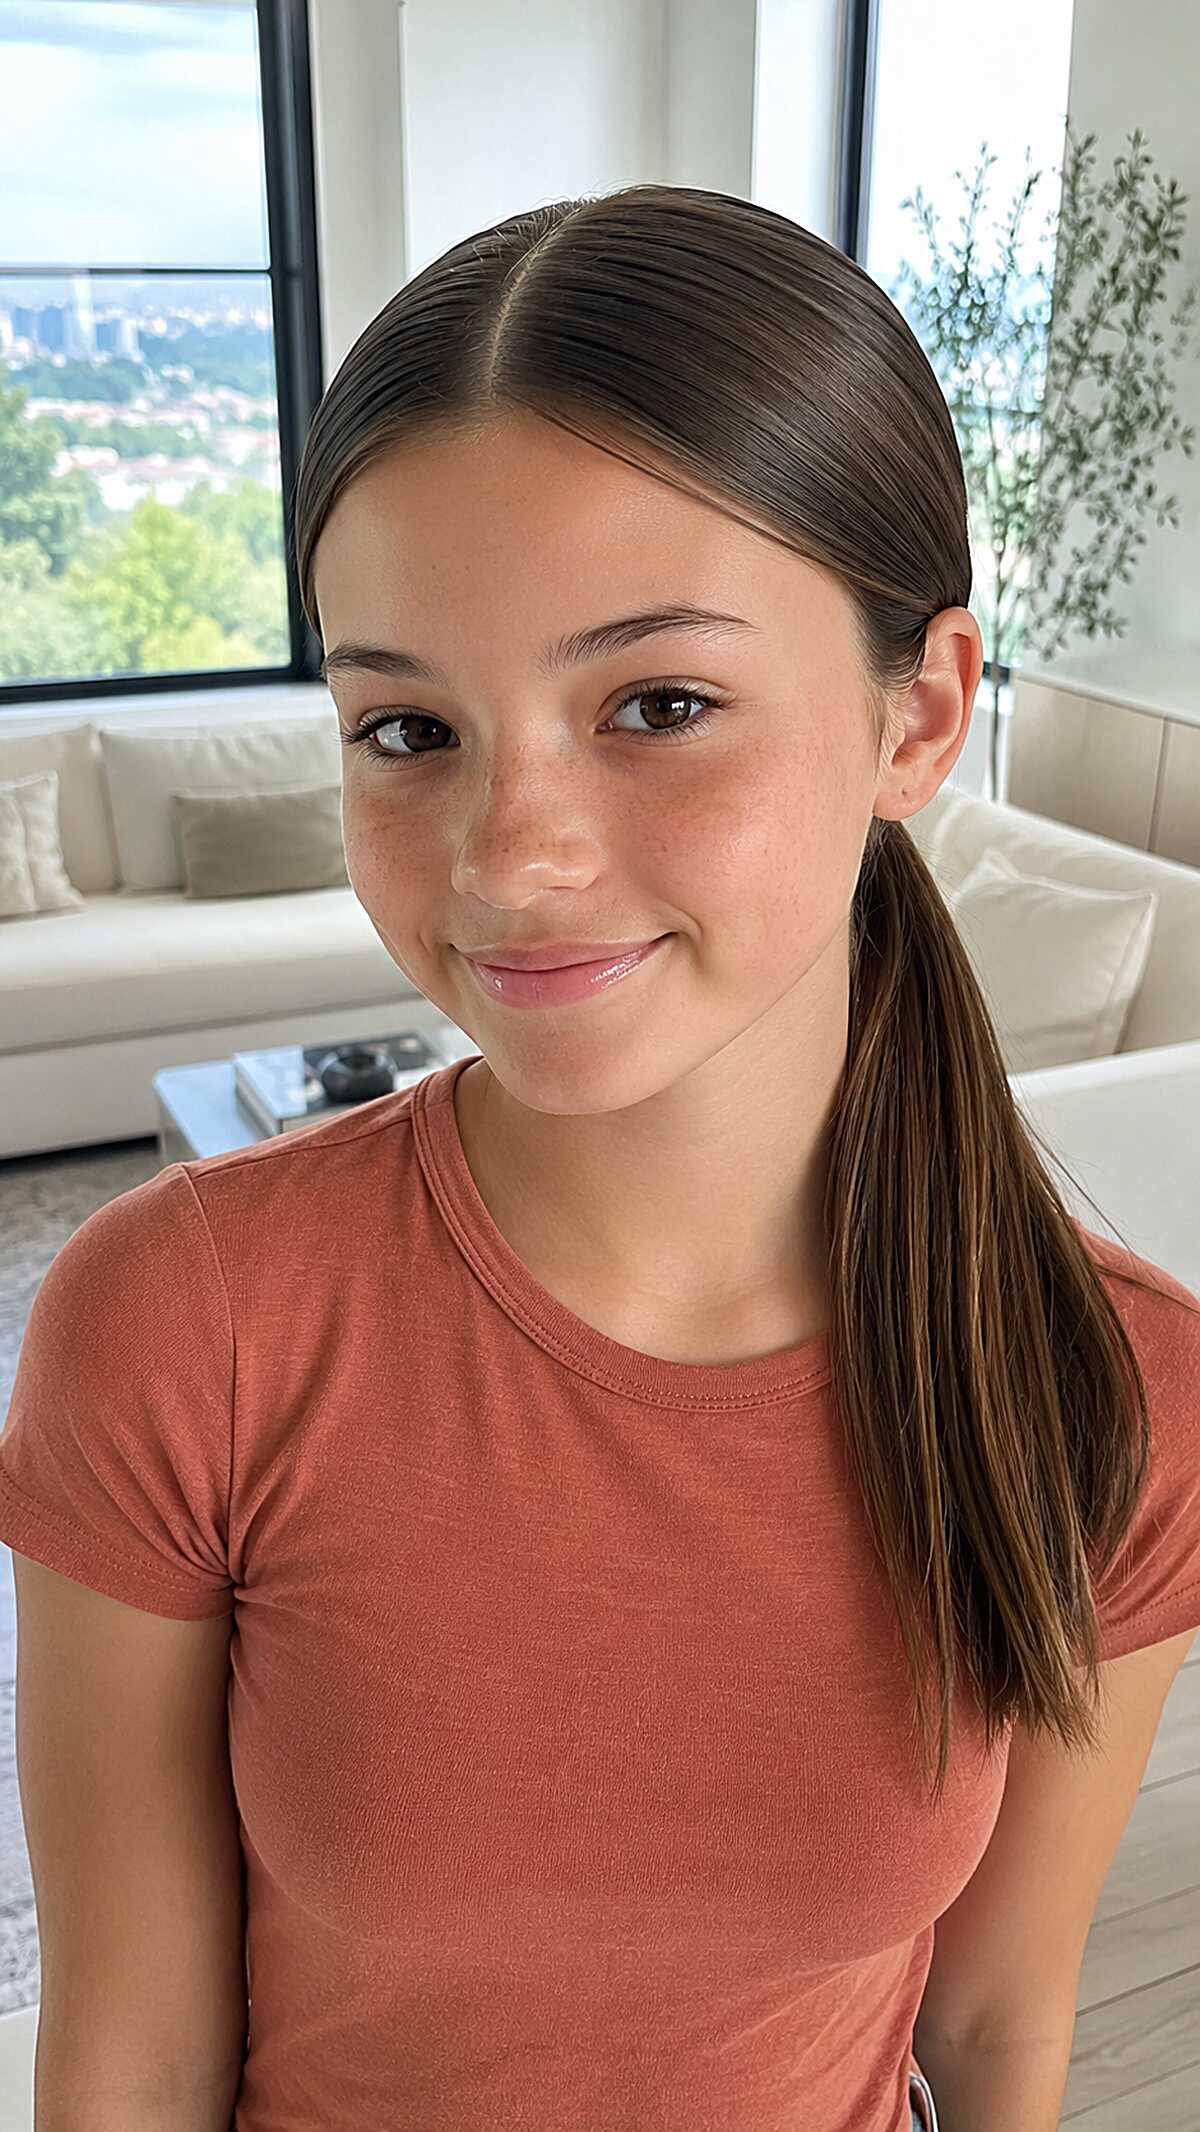
#3 Slicked Side Pony on Straight Medium Hair That’s Already Out the Door
The first noticeable thing is that the part is gone. For the record, smoothing everything one side and securing it low behind the ear means no one will have to hunt for a clean part at 6:45 a.m. This works on medium density straight hair at collarbone length (or longer). The natural brunette color here is not colored so there is no color work to maintain, which is honestly part of the appeal. If your hair is thick or wavy, expect this flat, swept back look to fight you all morning. By 2nd period, it will have completely lost its shape. Fine to medium straight hair can hold this style with nothing more than a brush and an elastic. The placement sits right behind and slightly below the ear, so it won’t pull on rounder face shapes as much as a tight center back pony does. Without heat and product, it isn’t going to look intentional on curly texture. And at that point, you’ve lost the whole reason for doing it.
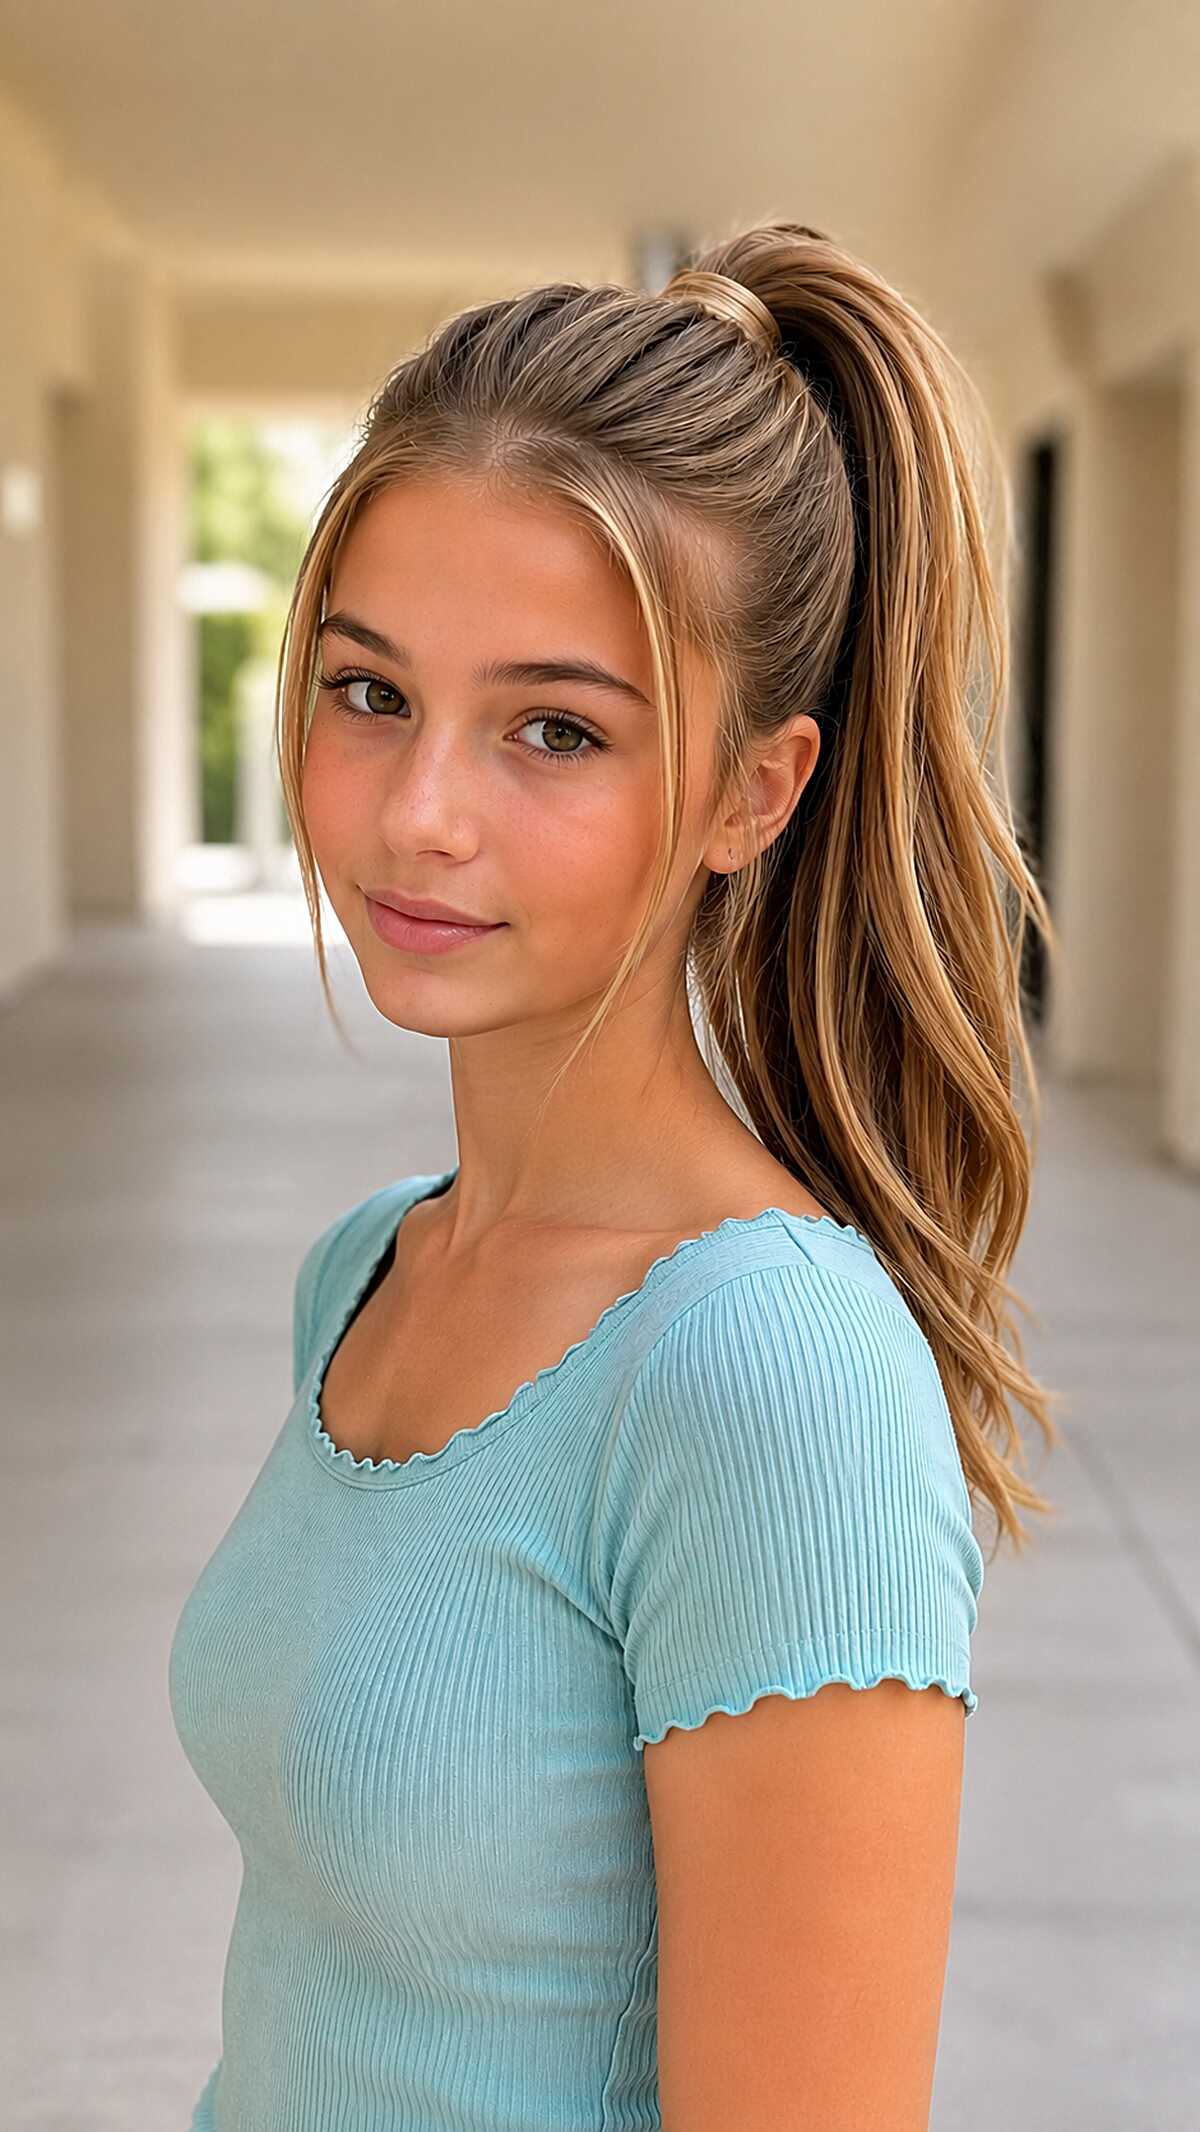
#4 Wrapped High Pony With One Front Piece That Earned Its Spot
That face-framing piece on the left is doing some work here: it’s cut to hit at the jaw, which keeps this from looking like a gym ponytail. The wrap at the base is a small section of hair just wound around the elastic, nothing fancy, maybe four extra seconds. This is best on medium-density, straight to slightly wavy hair that is past the shoulders, because with fine hair, the scalp will show at the crown pull and the ponytail itself will look thin. The dimensional blonde here looks like a partial foil with a warm natural base untouched, and that contrast is what gives the tail body even without heat. Avoid this placement if your forehead is on the smaller side, because the height will elongate the face in an unflattering way for some. It will not look this good after a full school day.
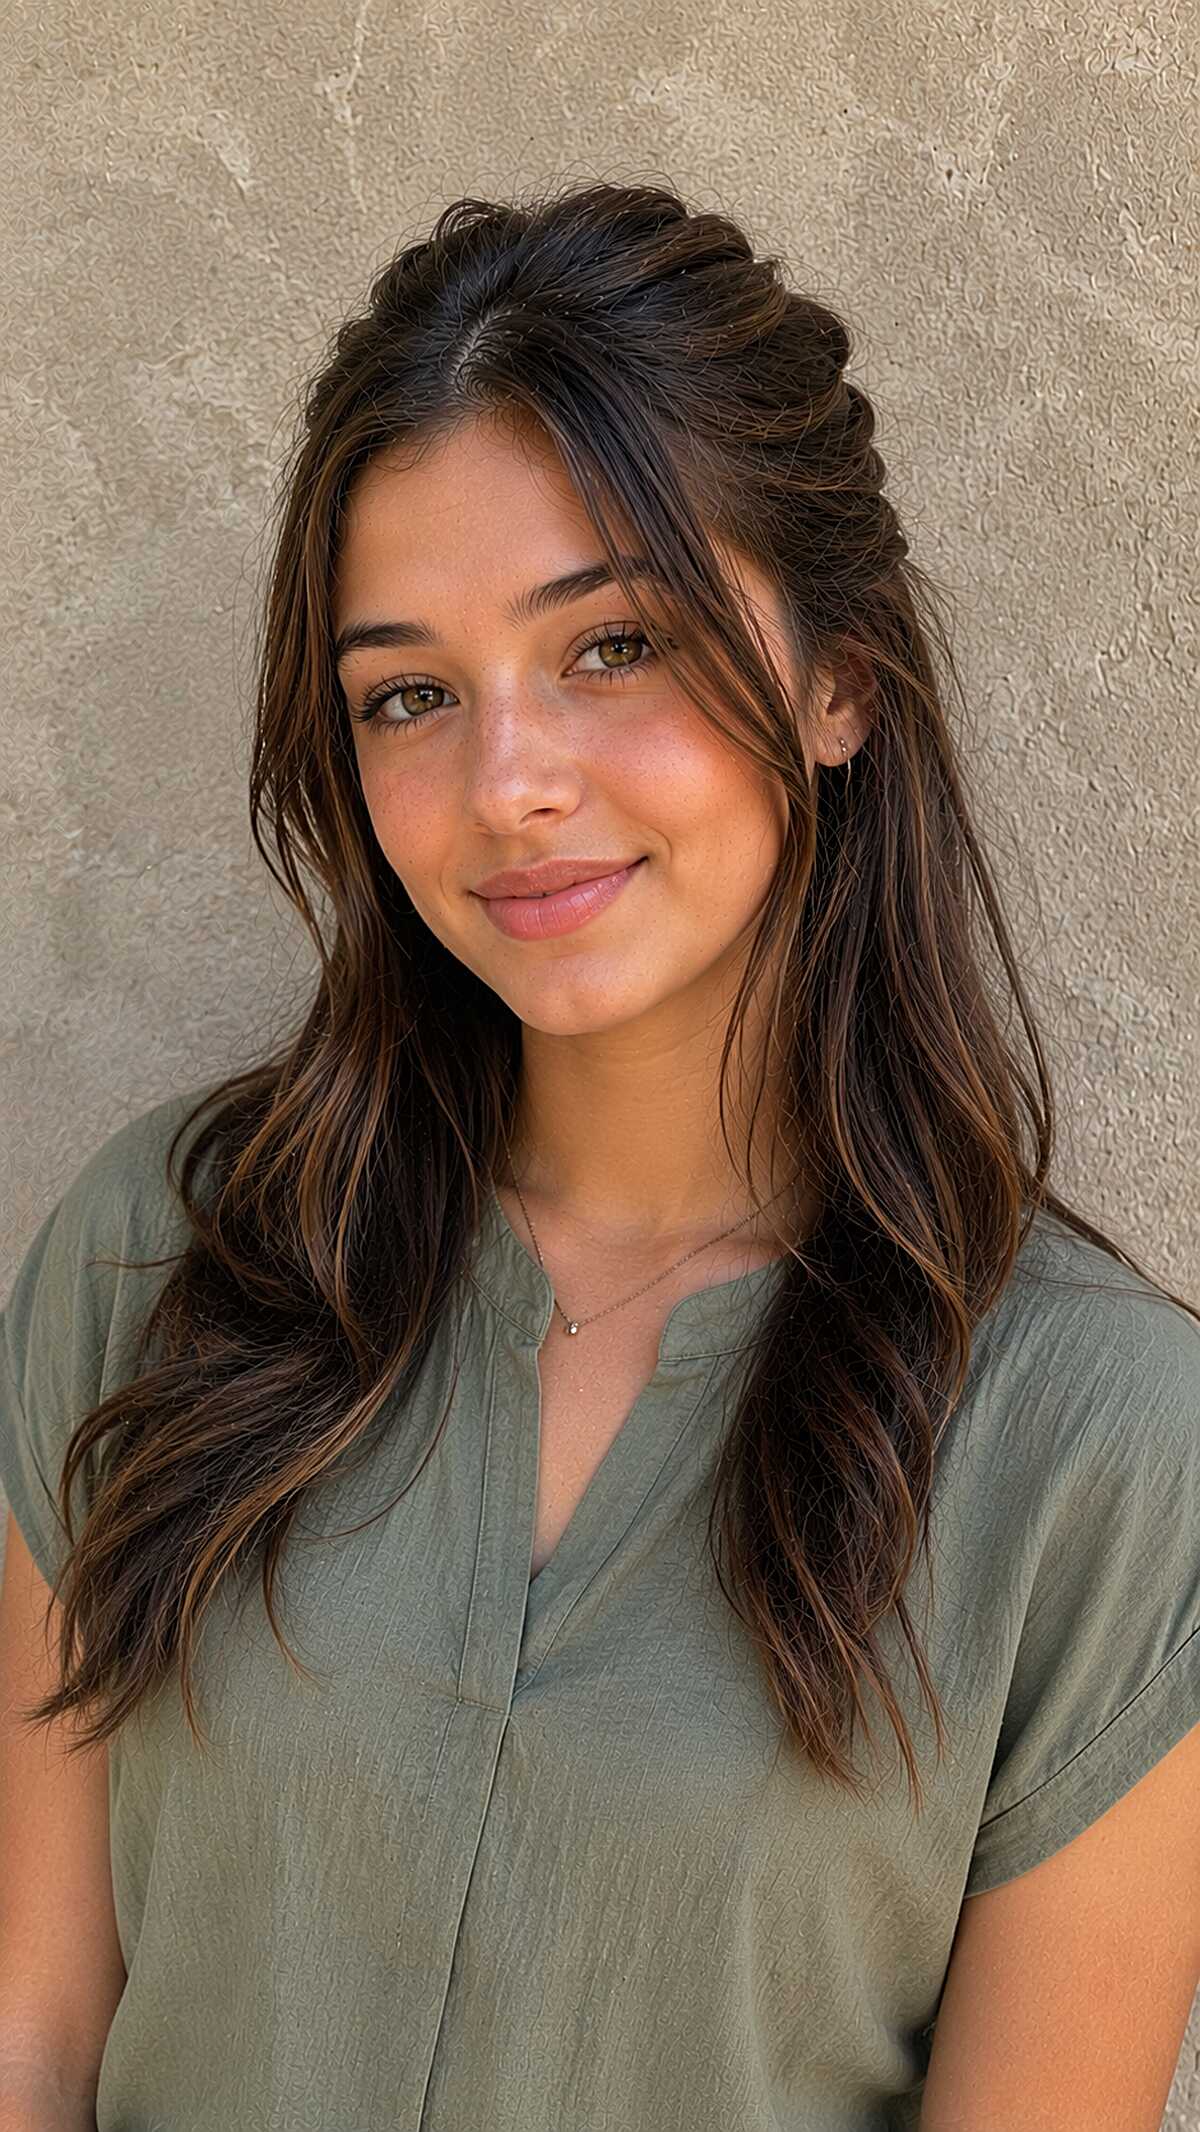
#5 Half-Back Twist on Long Dark Hair That Handles Second-Day Texture Well
Those with thin and straight hair will find this technique ineffective. It needs some texture and thickness for the twisting section at the top of the head to stay put. All it takes is one slip for your hair to fall down before you even make it to class. Most people do not secure the twist at the back of their head tightly, creating the bubble effect, and then cover it, with one bobby pin, so the volume looks fully constructed. Ideally, you want this style on someone with straight, medium to thick hair that is at least shoulder length and has some waves. The framing pieces should reach down to the chin, and have been cut with a technique to blend and not look like curtains. The pieces sitting in the front of the hair with round or oval faces help to sculpt the shape of the face. For a square jaw, the pieces should go longer or you lose the effect entirely. Without looking over done, the chocolate brown base color is blended with hand-painted pieces of caramel throughout. Once the motions are learned it takes very little time to do this style, about 40 seconds.
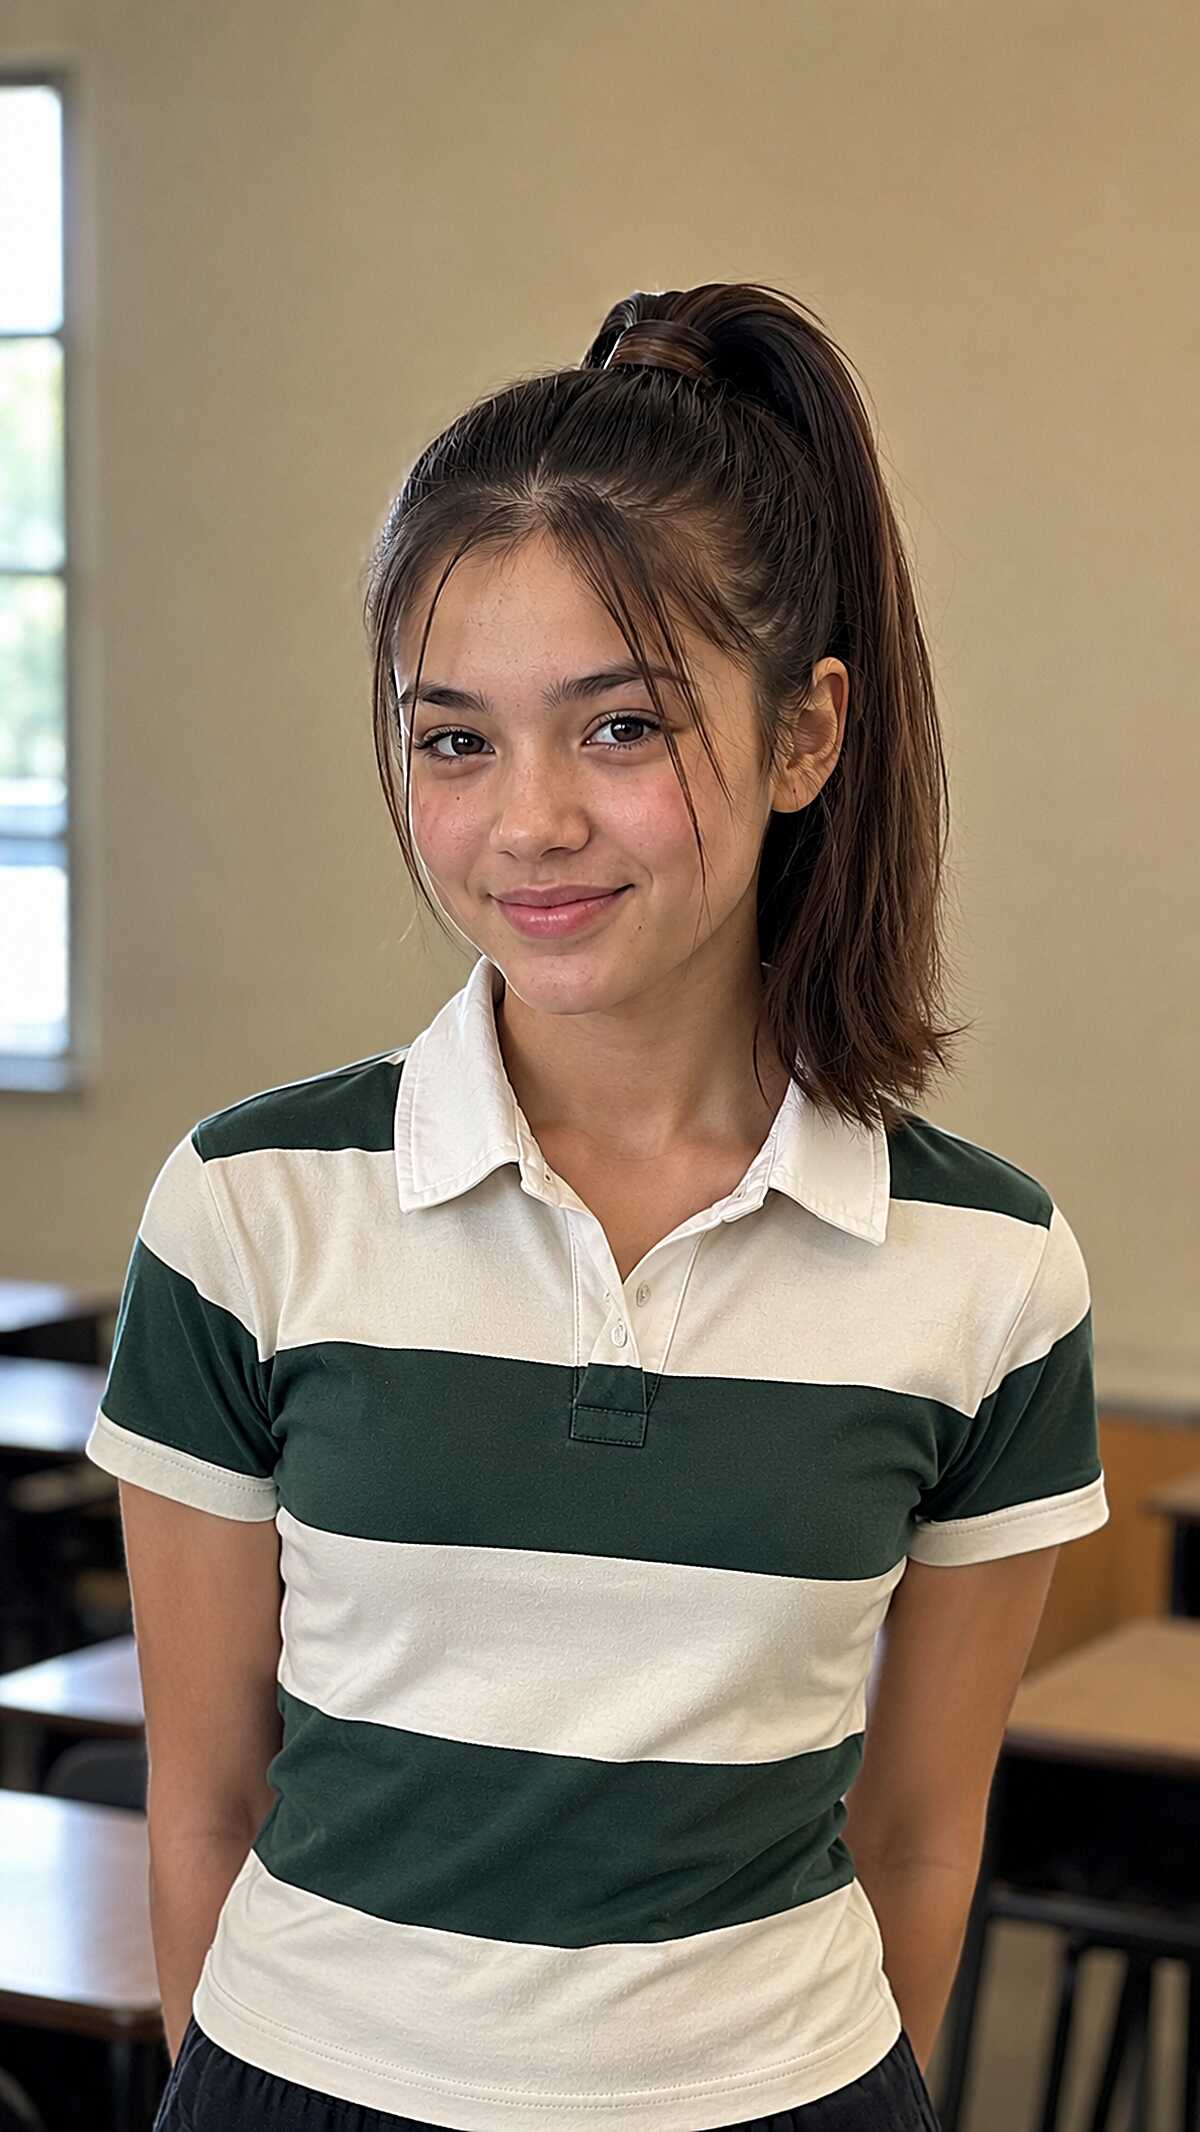
#6 High Ponytail With Long Curtain Pieces That Were Never Going to Make It Into the Elastic
The chin-length, face-framing pieces have a certain intention behind them: they physically cannot reach the ponytail. They’re cut that way because of a layered look. These example show the medium density and straight to slightly wavy brunette hair which is around shoulder length, or just past. You can see her texture where those pieces were gathered. The ponytail is sitting quite high, but as you can see, it isn’t a tight one. This looks best on oval or heart-shaped faces as the long front pieces visually narrow the frame. If your face is already narrow, they will just create the illusion of length. Thick hair won’t work without feeling incredibly bulky at the base of the ponytail. The whole look is super easy, taking just one hair tie and maybe 30 seconds. That’s the honest appeal.
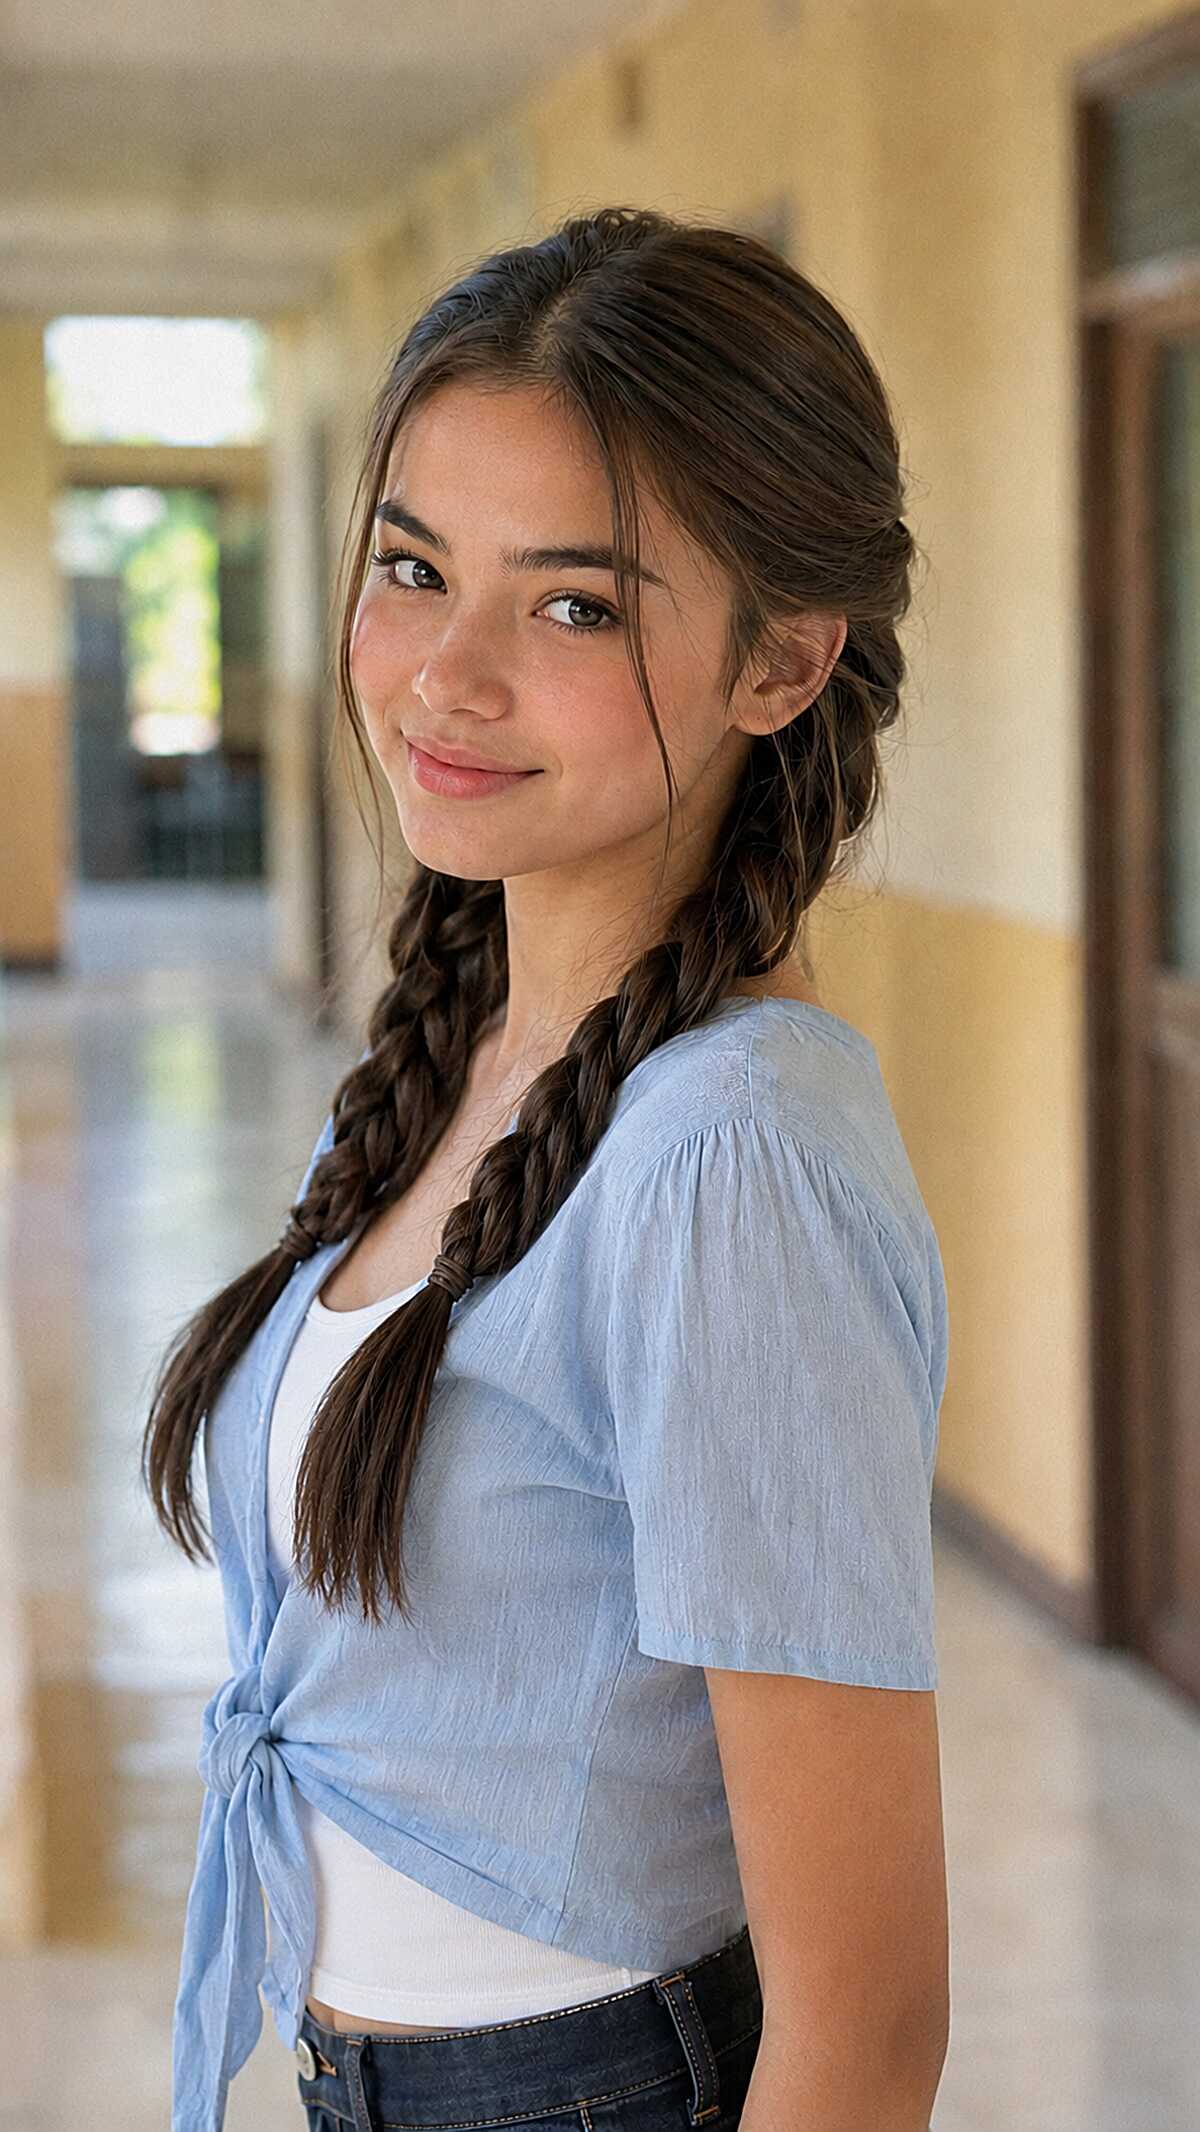
#7 Single Side Braid With Front Pieces That Got Away on Purpose
While this braid may look simple being a three strand braid, let’s draw attention to the placement of the part. The part is off centre and a bit messy at the crown, this is what tricks the viewer into thinking this is a casual, quick style rather than an intentional style. The model has medium densely populated hair, which is most likely brown and at a mid back length before being braided. While braids on fine hair will look different, as fine hair will not hold the braid in a shape where it leans forward over the shoulder, this braid has enough volume to create that illusion of a rope effect. All the face framing pieces are short enough to have not been able to be stuck in. This prevents the style from looking like a little girl style. This braid is ideal for oval and heart shaped faces. The loose strands soften the look without hiding anything important. It is also important to avoid round faces as they can look bad without the definition. If you are not concerned about the style pulling at the nape of your neck evenly, the style will be worth the short time it takes to do the style.
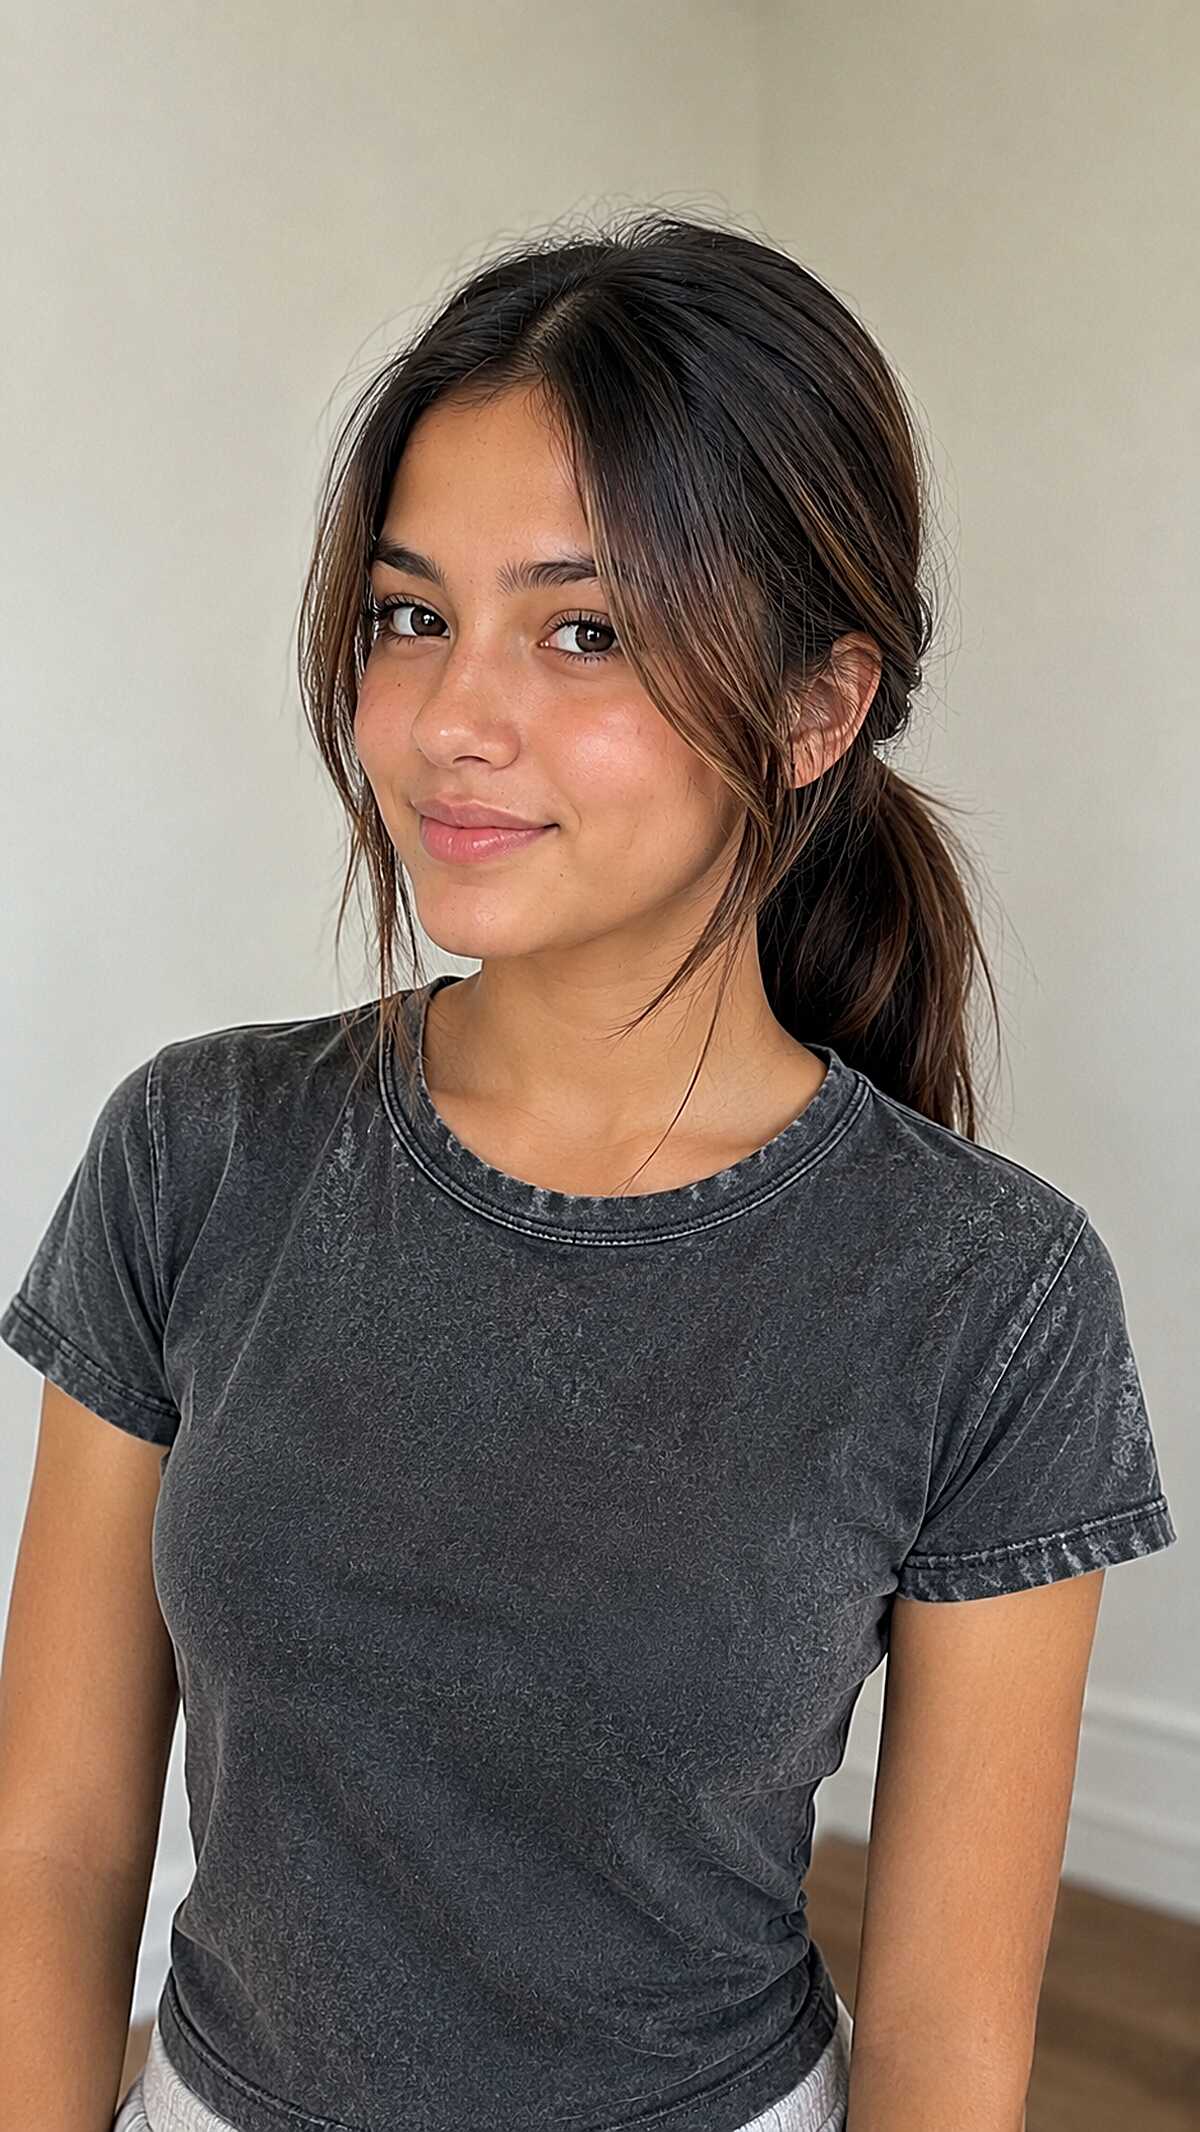
#8 Loose Low Pony With Curtain Pieces That Look Better Unwashed
The ponytail is sitting just low enough that the elastic is about to release, and that is just how this style works. The most important part of the style is the pieces that frame the face. The taper cut is initiated with a soft point cut which helps it to taper as opposed to sitting blunt against the cheek. This style works best for medium density hair that is straight, slightly wavy, and falls just further than shoulder length. Also pay attention to the fact that the pieces on each side are not the same length. One is over the jaw, while the other is not. That type of length asymmetry helps keep a round or oval face from looking wider. If your hair is thick and coarse, this look will not be as relaxed. It will puff up a lot around the crown and the front pieces will stick straight out instead of draping down. This style is really meant for hair that has been washed a couple of days ago. Ideally, it should have this little grip at the elastic so that it doesn’t just slide right out by the end of the period.
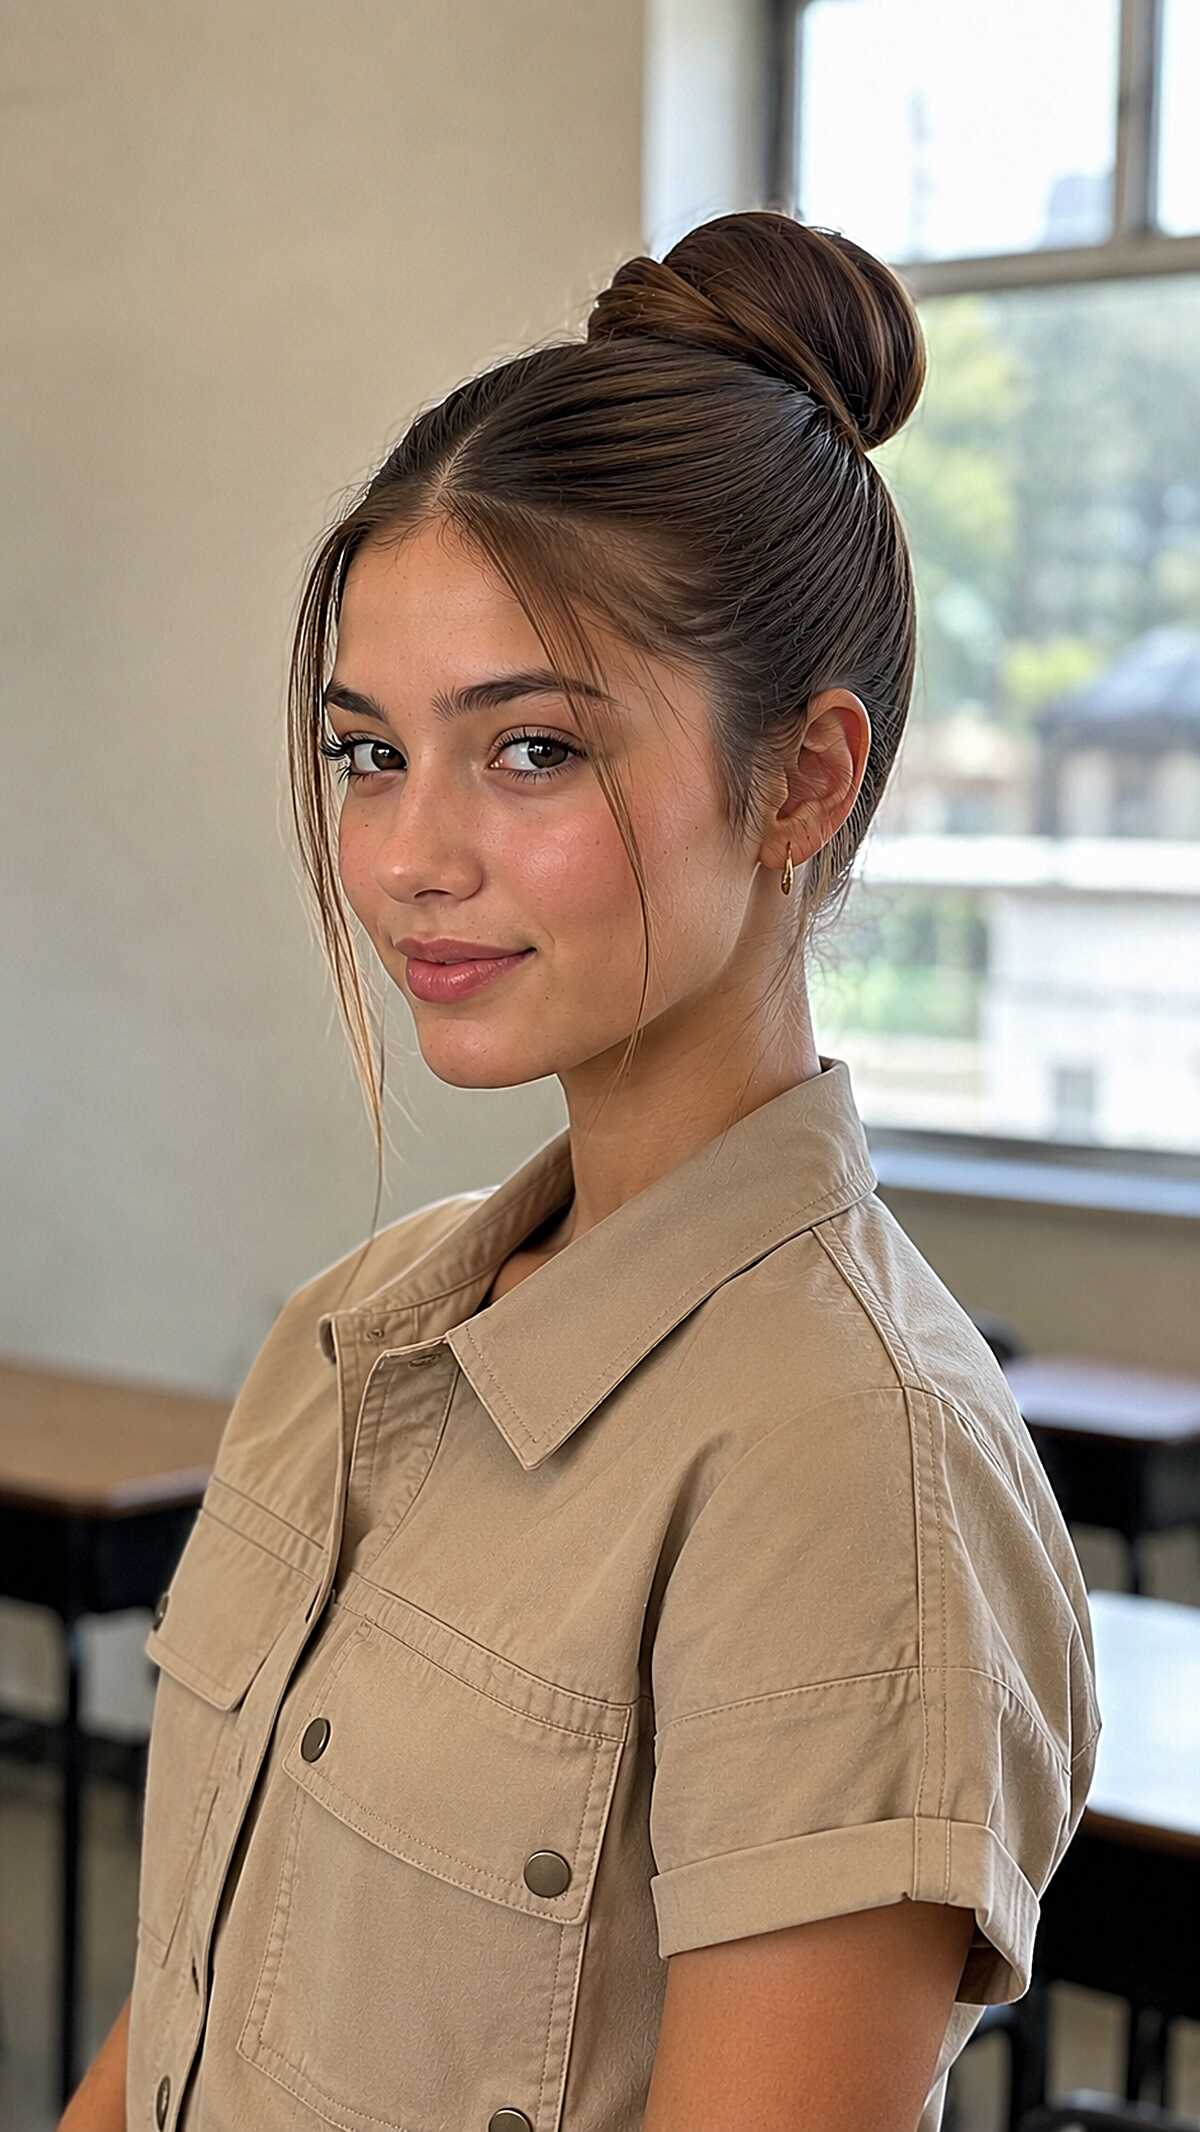
#9 Smooth High Bun With Two Wispy Pieces That Aren’t Accidental
The bun is wrapped, not twisted. This is what allows it to be compact and round instead of lumpy. This is important. A twist would make the bun too bulky, especially with hair at medium density like this. That said, you’d need at least shoulder length hair to achieve a bun this neat and clean without a donut insert. Her hair being straight or slightly wavy is doing the most because with coarser or curlier hair, it definitely wouldn’t lay this flat at the crown without using a product and spending some time on it, which then defeats the purpose. You can also see her two framing pieces have been cut shorter, around the chin length, so that way they fall forward on their own once everything gets pulled back. If you don’t already have hair like this, you will have breakage sticking out, and it will just not look identical to this style. This is such a quick style for the right type of hair, and finer hair will have the bun looking like the size of a walnut. Oval and heart shaped faces suit this style well because pulling everything back opens up the entire face, but round faces lose the framing they rely on too.
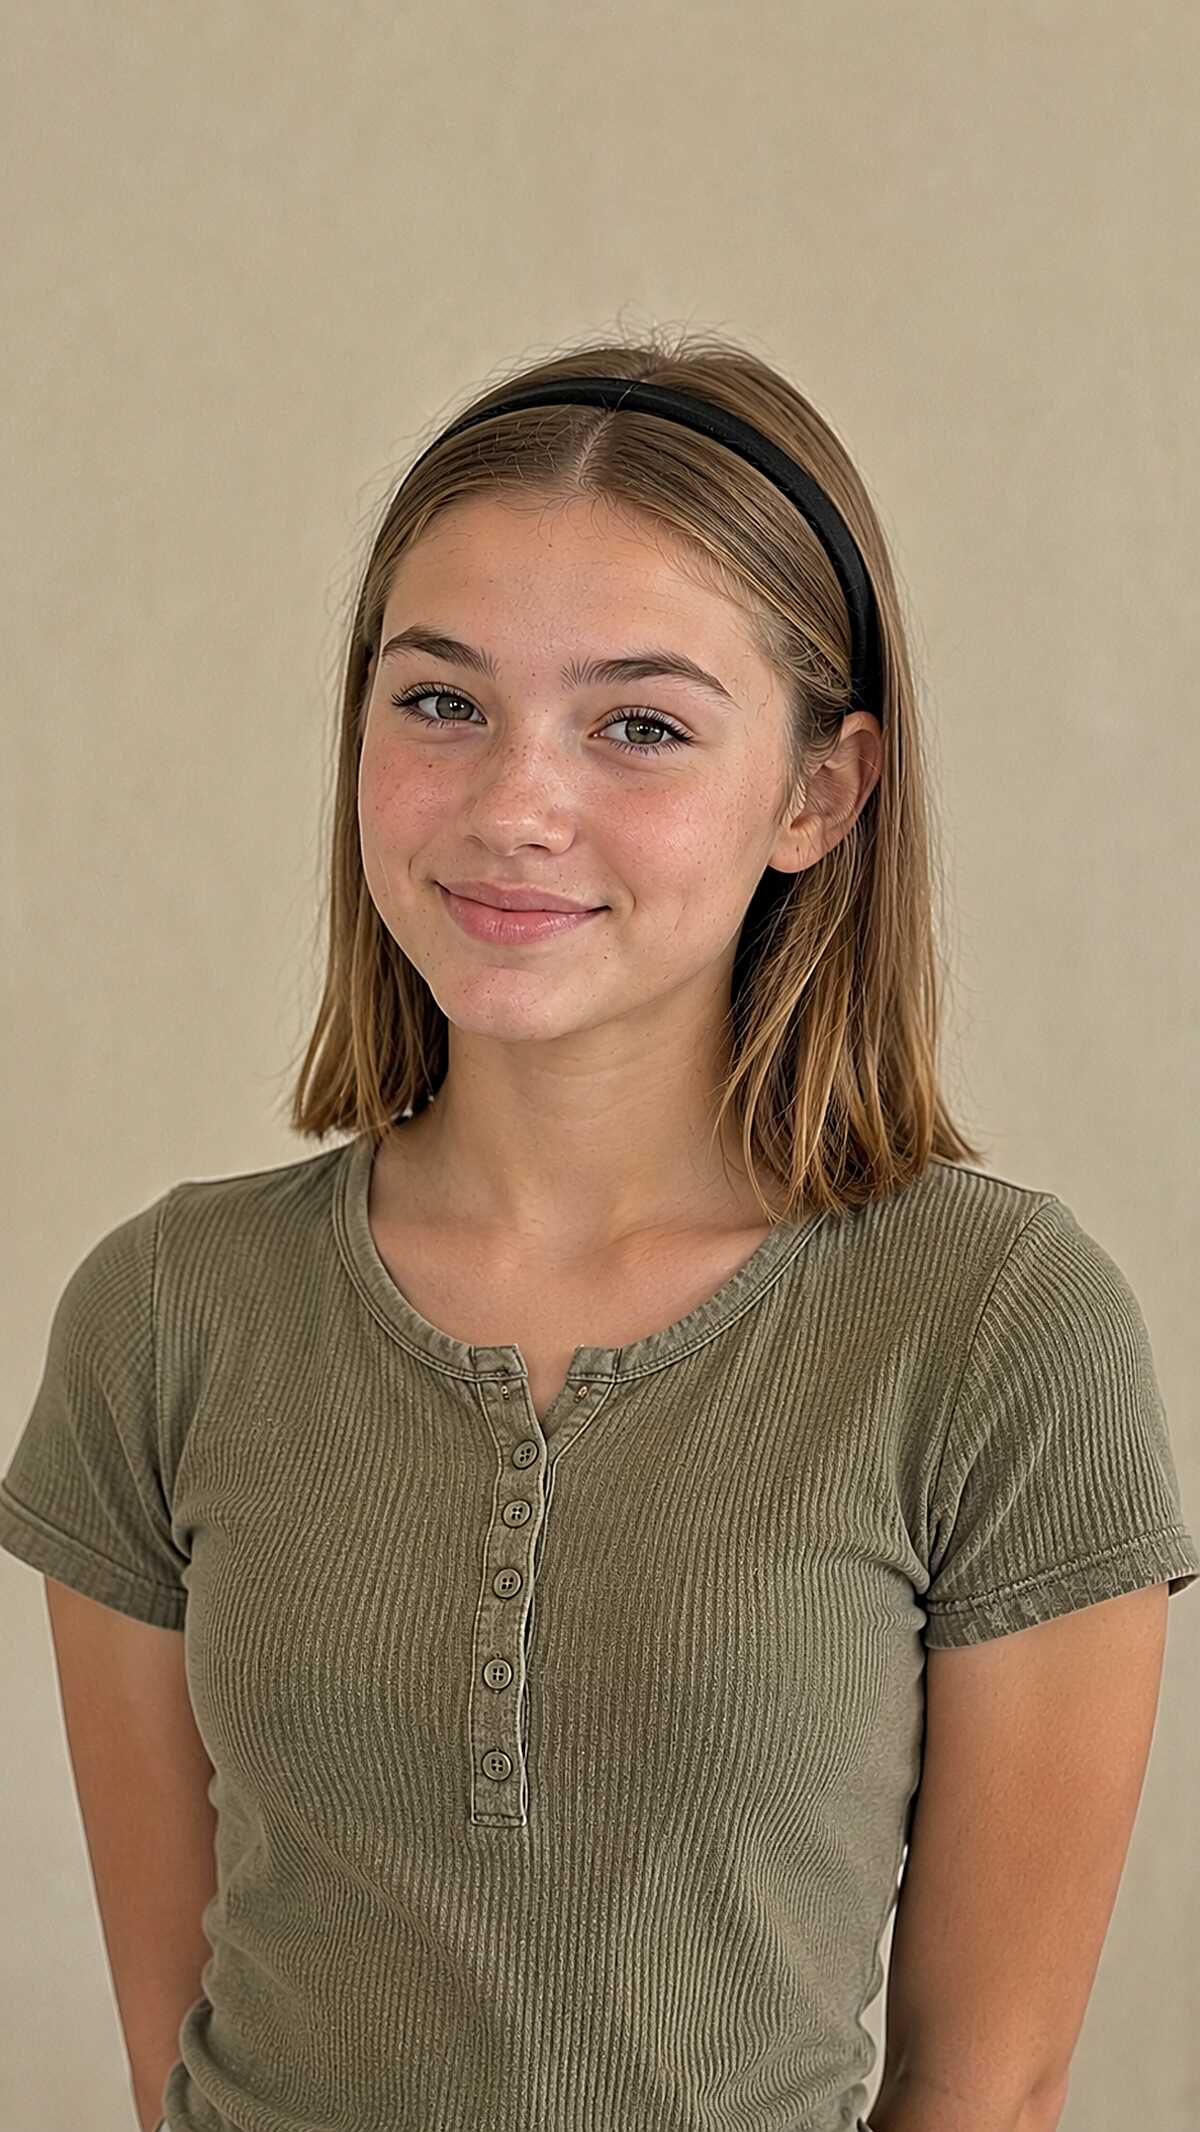
#10 Thin Black Headband on a Blunt Bob That Didn’t Need a Mirror
A headband is meant to do nothing structurally to the look, and that’s exactly how it’s meant to be worn here. It will most likely create the most push back on the chin length blunt straight cut hair and will do nothing except push the front pieces back just enough for it to look like there is some intention. The headband will not accomplish anything if the hair still sits forward on both sides of the head and not behind the ears. That will frame the face and elevate this look from an afterthought. For course or thick hair, this band will slide all the way to the back of the head in less than an hour. If your hair is fine or medium density and straight, this is the headband for you. The hair at the jaw level is what a round face or wide face shape needs so it creates a nice framed look without a lot of bulk. The color is a dark blonde that is natural with no dimension or highlights that are visible. That means there is no upkeep which is good But from a color perspective it is also very boring. If your hair has any curl in it, it will not sit anywhere close to this.
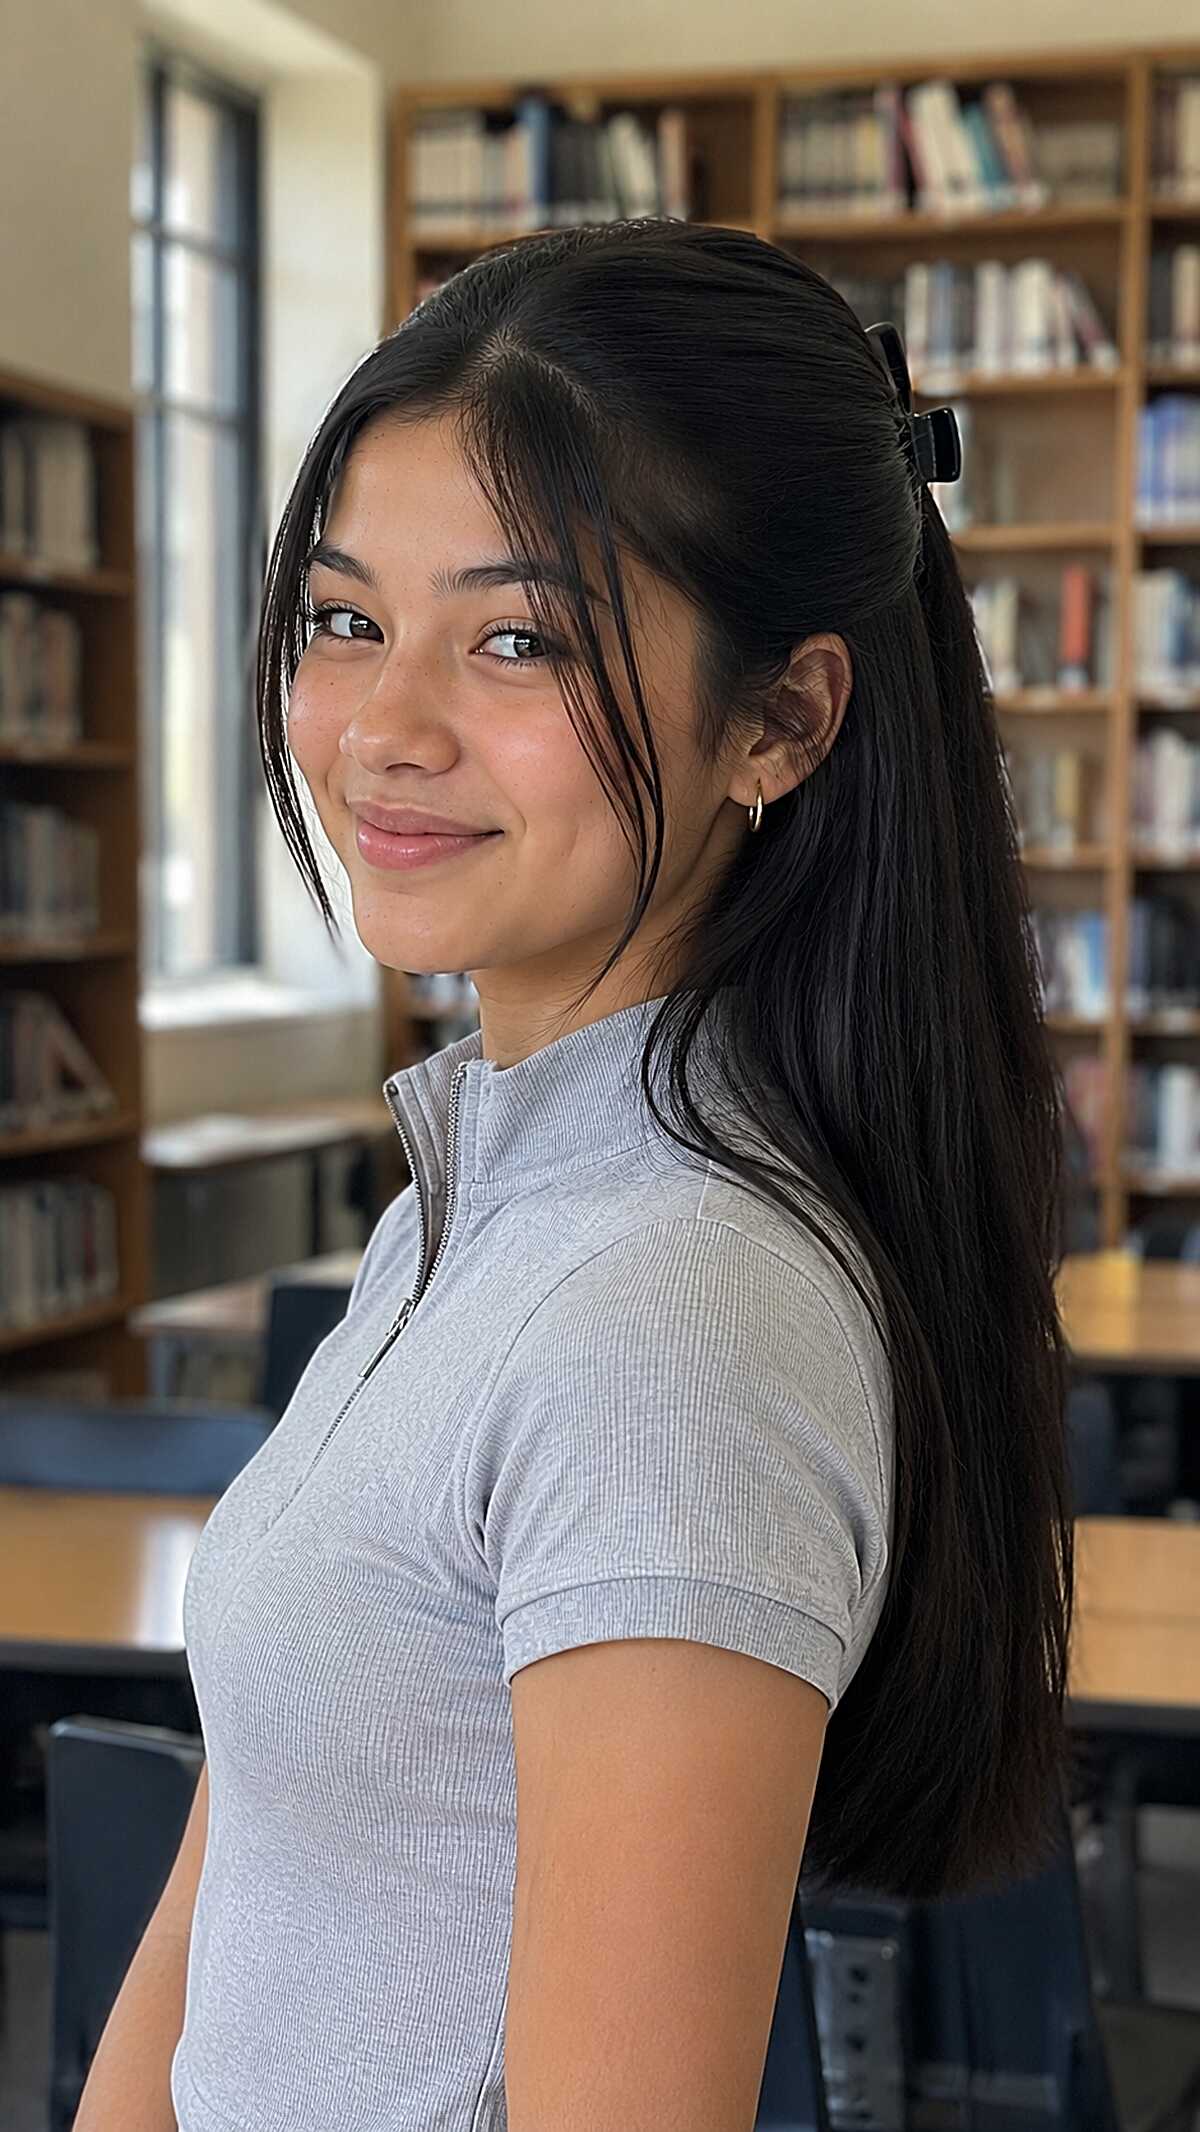
#11 Half-Back Clip on Long Dark Hair With Face-Framing Pieces That Weren’t an Accident
That little matte clip is doing the bare minimum, and that’s exactly the point. It is only holding back the top section at crown height, allowing the length to fall straight and heavy behind the shoulders. I notice the face framing pieces are pulled out to be slightly different lengths on each side, which reads intentional without looking fussy. It works best on thick straight to slightly wavy hair that has enough density that a half back pull still leaves a lot of volume below. Fine hair will look thin where it drapes. On round or oval face shapes those front pieces narrow everything nicely, but if your face is already long, it would be better to skip the framing strands and clip further back. The natural level 1 black here adds no dimension at all which keeps it low maintenance, but means every flyaway and every piece of lint shows. No way around that.
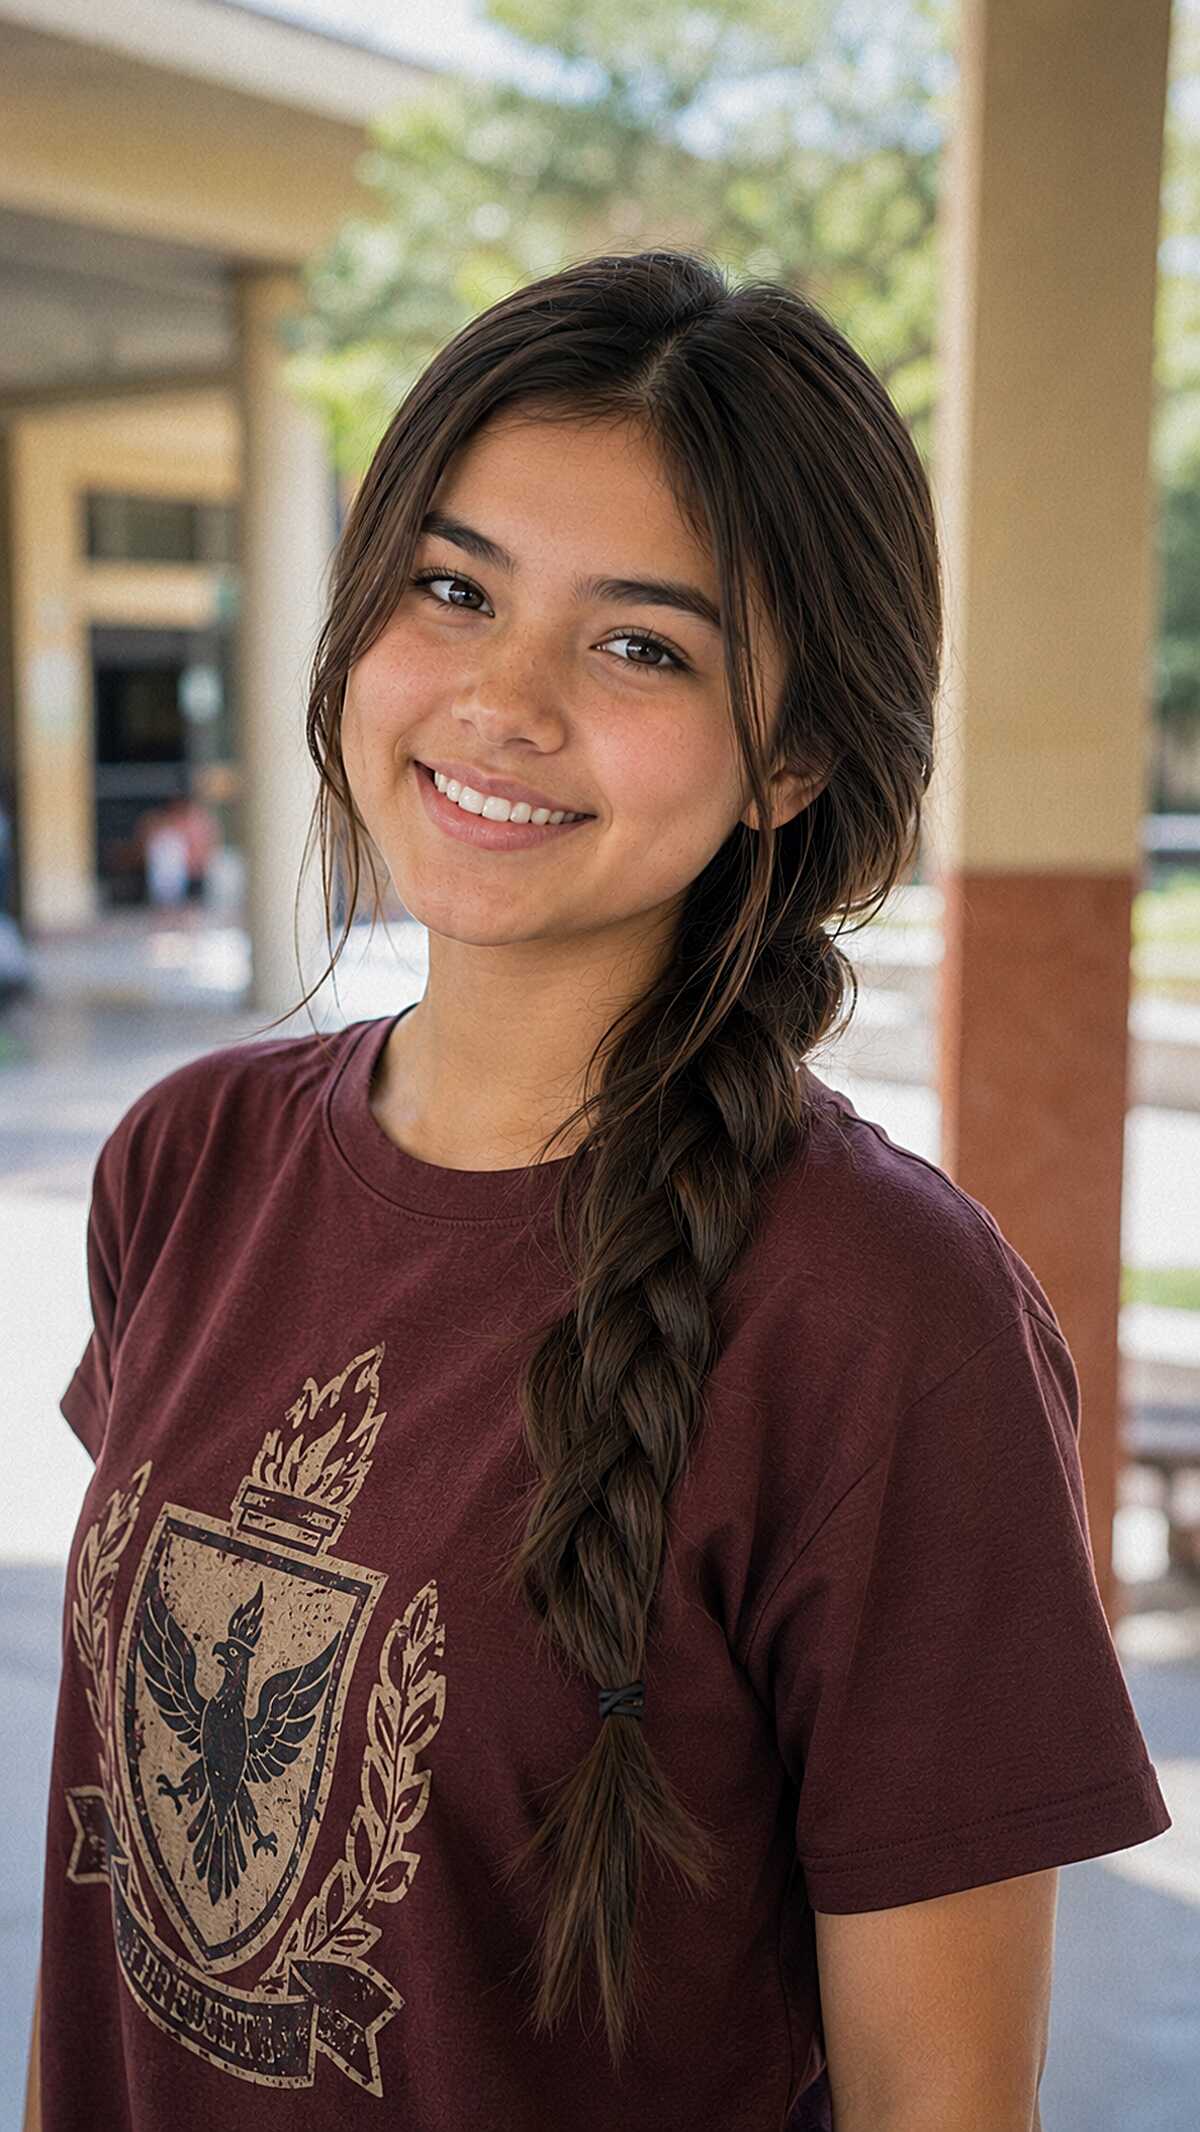
#12 Draped Side Braid With Pieces That Slipped Out Before First Period
Since the braid begins loose at the nape, not the crown, it appears relaxed rather than athletic. Look at the top of the head and the volume present without teasing or product. That is thick, medium to coarse hair doing whatever it wants. A fine or silky texture will not hold this without a texturizing spray and it will still flatten by lunch. On the left, the face-framing pieces are at different lengths with one curving at the cheekbone and the other hanging past the jaw. This asymmetry is what makes it all feel unstudied. If you have round or oval features, those loose strands will complement your face nicely.
It is a simple three-strand braid pulled to one side which is just one shoulder, tied off low with a thin elastic, and the sections are not even. That unevenness is the point.
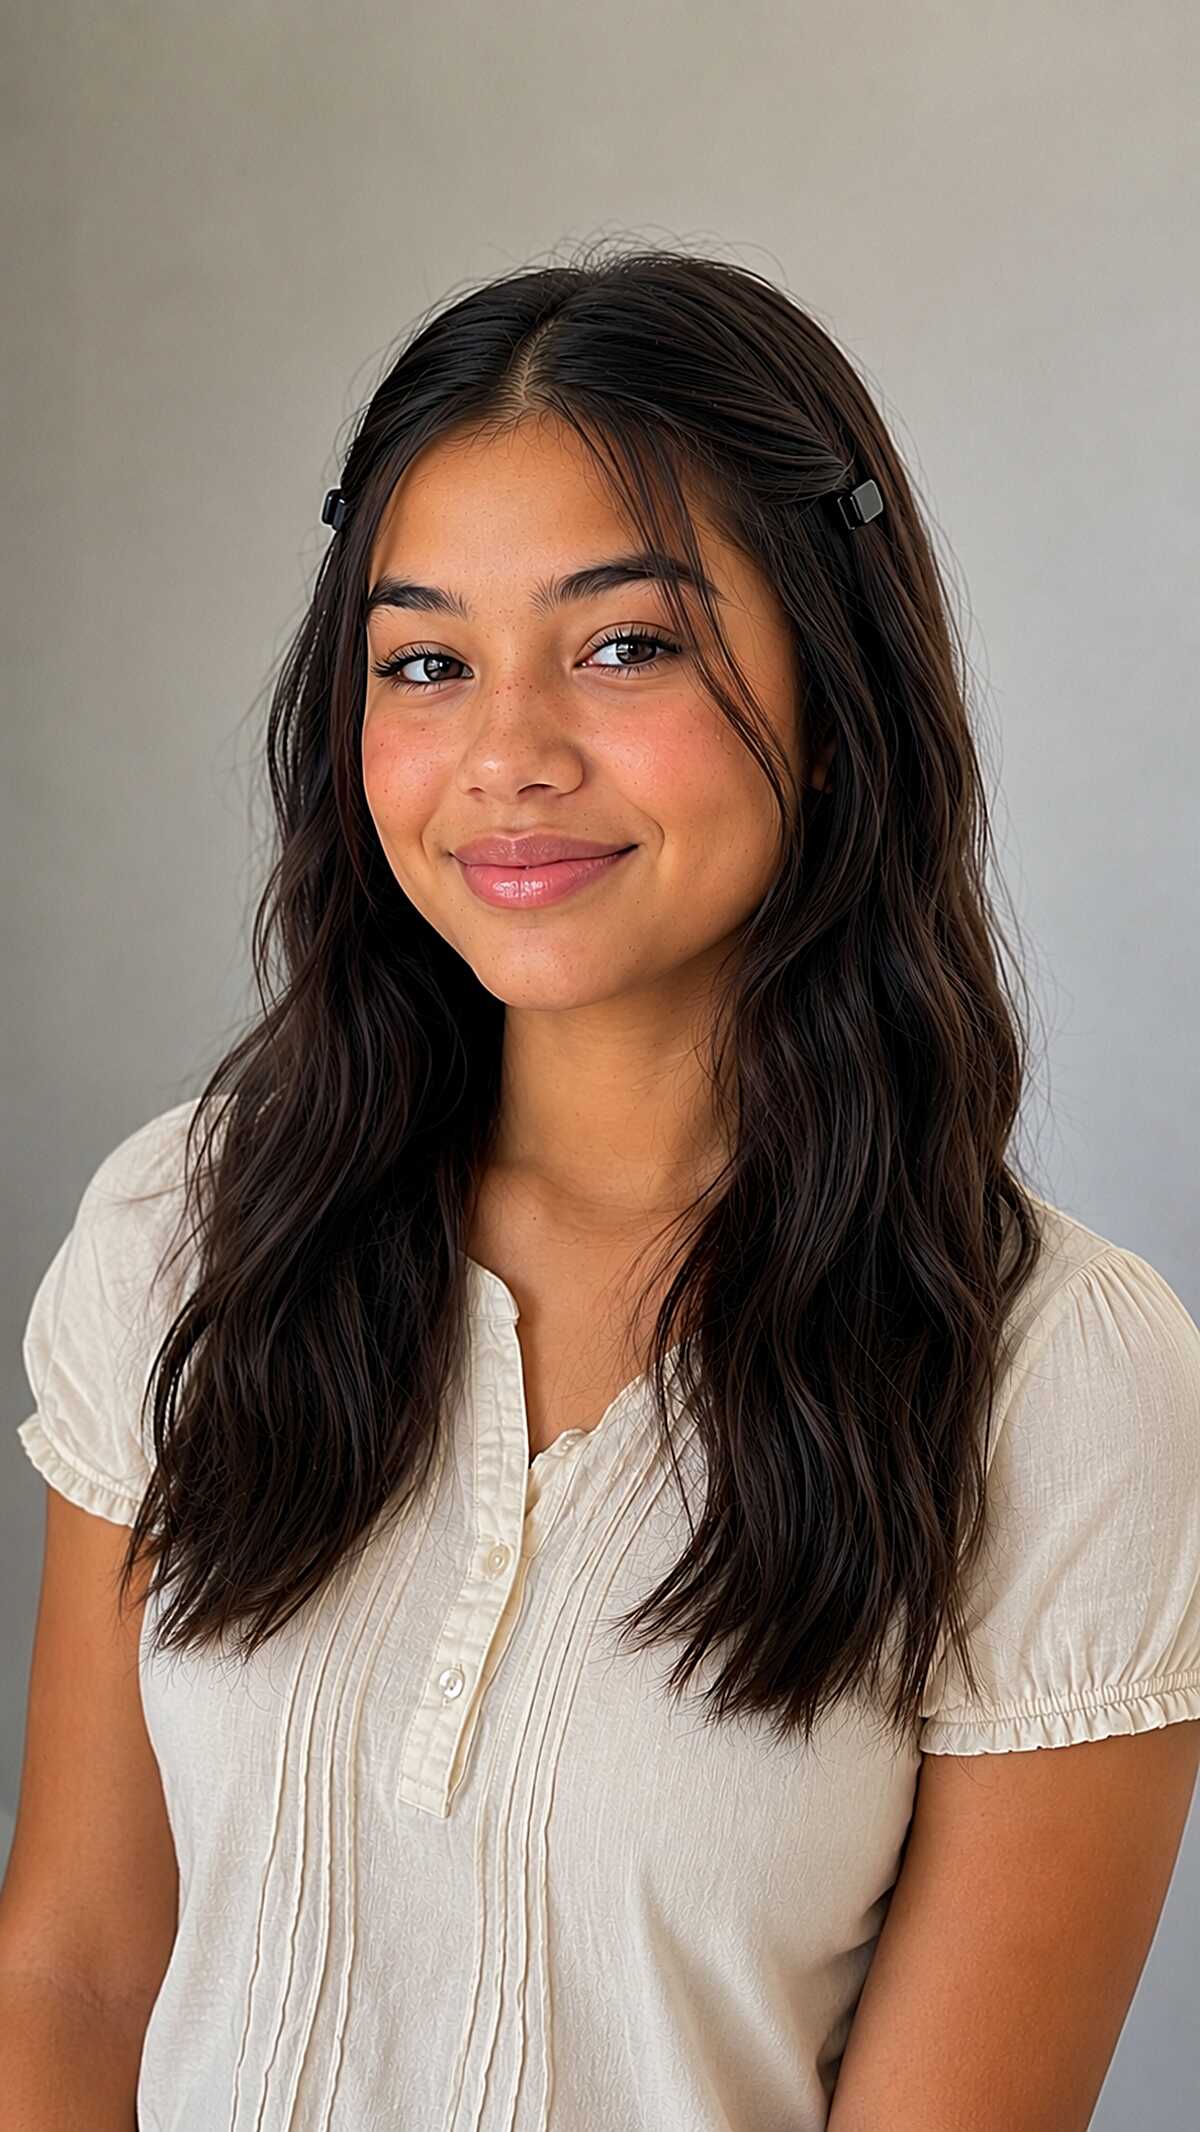
#13 Two Small Clips Holding Back a Center Part on Wavy Dark Hair
Those clips are meant to do almost nothing structurally. Each clip pulls back just a little bit of hair on either side of a center part to stop it from flopping forward, while the pieces in the front are left loose and flowy. This works best with medium to thick hair that has a natural wave or texture at the mid-length and beyond, since the natural volume at the crown will fill in the space left by the clips. On fine, straight hair, the clips will give the appearance of gripping nothing. Her long layers have been point cut at the very ends, which prevents the waves from clumping into triangles and allows them to separate on their own overnight. Round and oval face shapes will appreciate how the loose strands narrow the shape below the cheeks. If your hair is shorter than collarbone length, it will not be balanced.
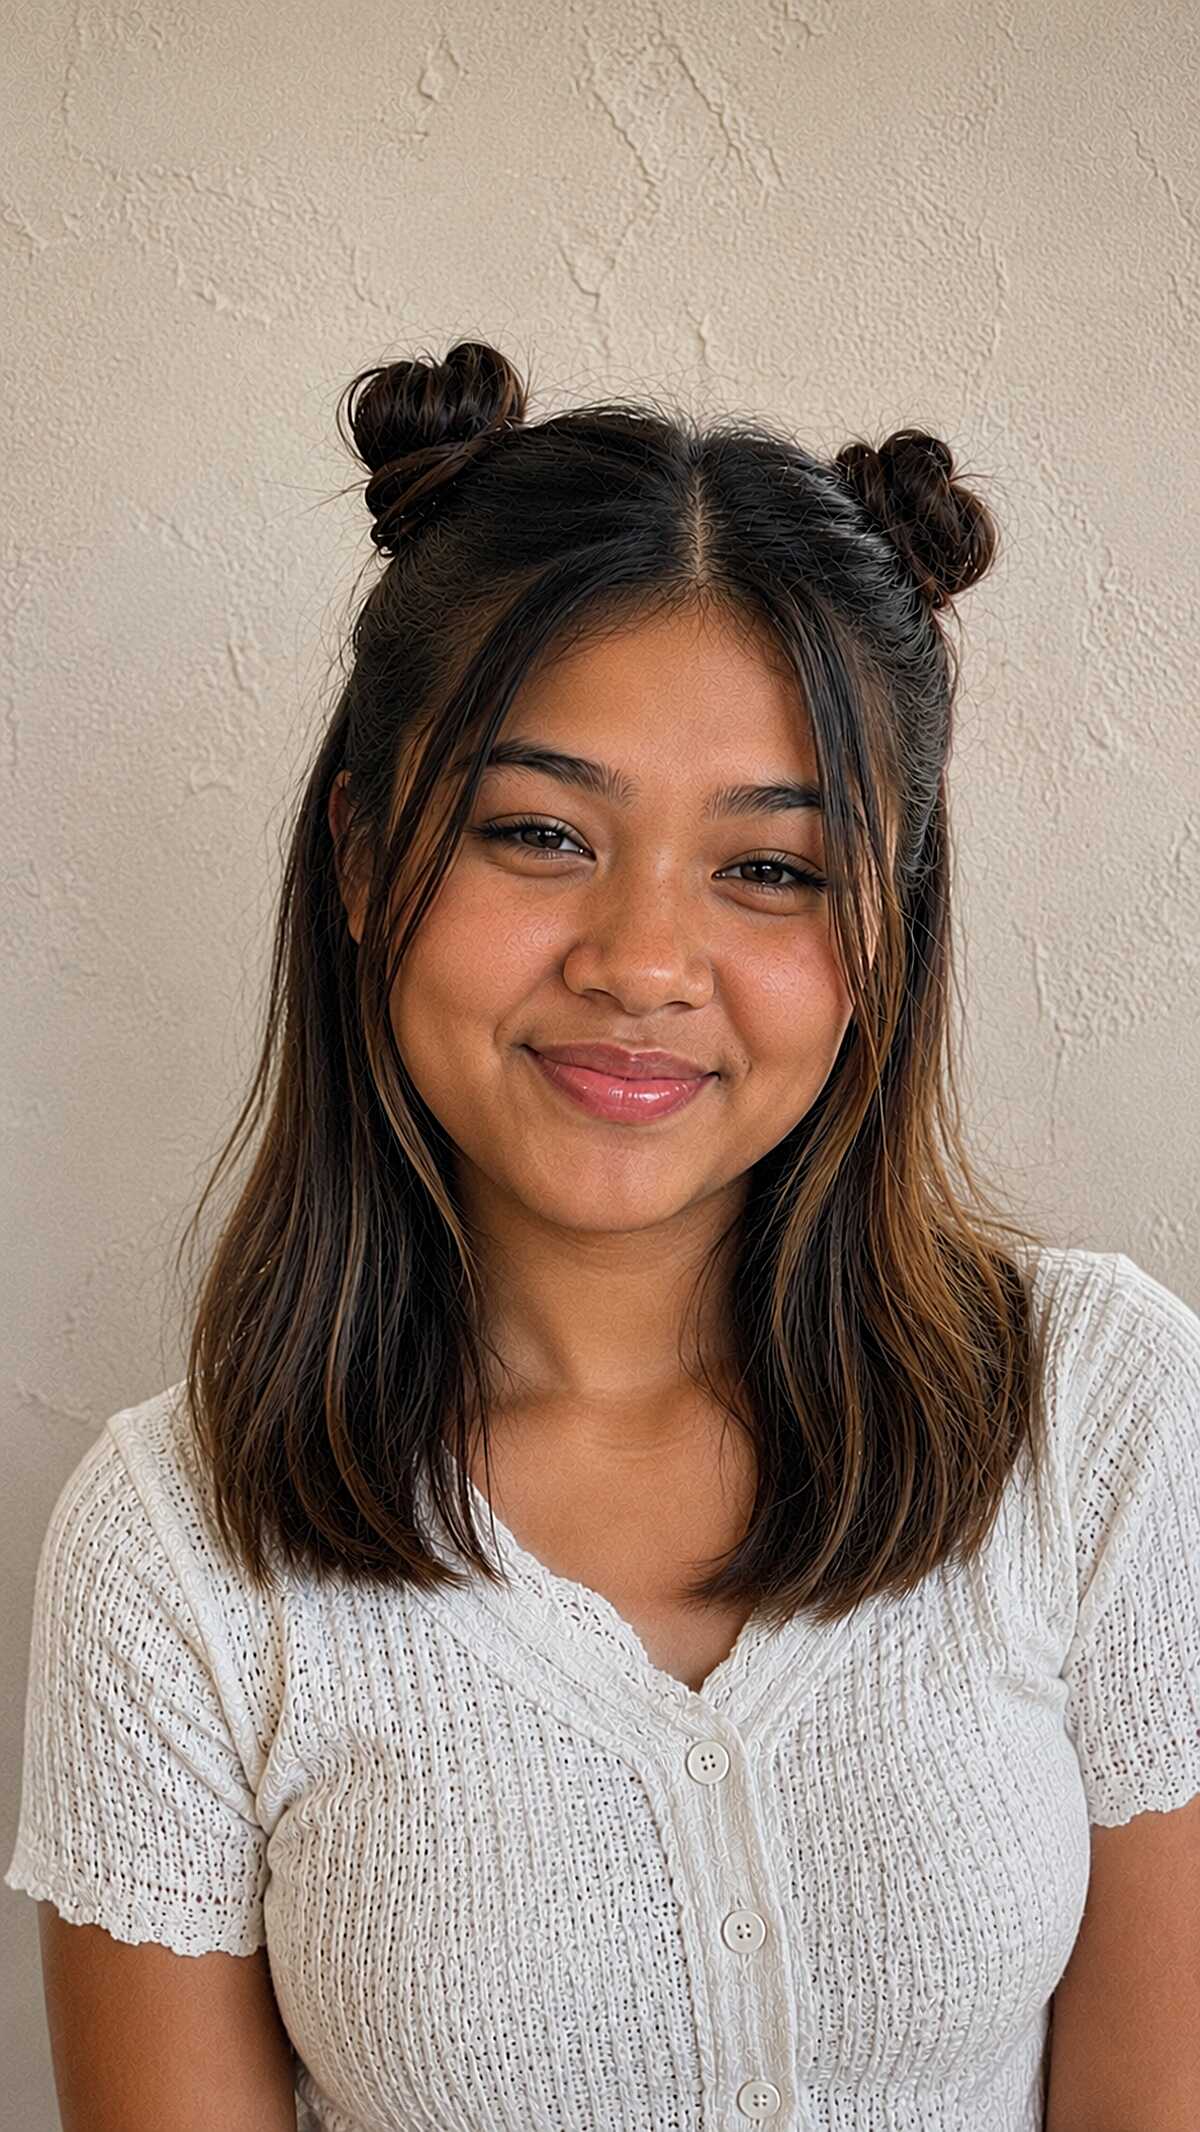
#14 Half-Up Space Buns on a Shoulder-Length Cut That Hides the Part You Didn’t Brush
The trick is how tiny the buns are. She has twisted maybe two inches of hair into each one which means this works on medium density should length hair without looking like you ran out of length halfway through. Notice how the center part just feeds right into each bun without clean sectioning, and the pieces around the face are just the front layers left out and not deliberately pulled. If your hair is thick and coarse, those little knots are going to puff out and just refuse to stay small. The caramel balayage on dark brunette hair catches light right at the ends and around the face which gives the whole thing more dimension than if it was just a single process color all over. Round and wider face shapes get real structure from the height of the buns drawing the eye up. This style will definitely loosen throughout the day.
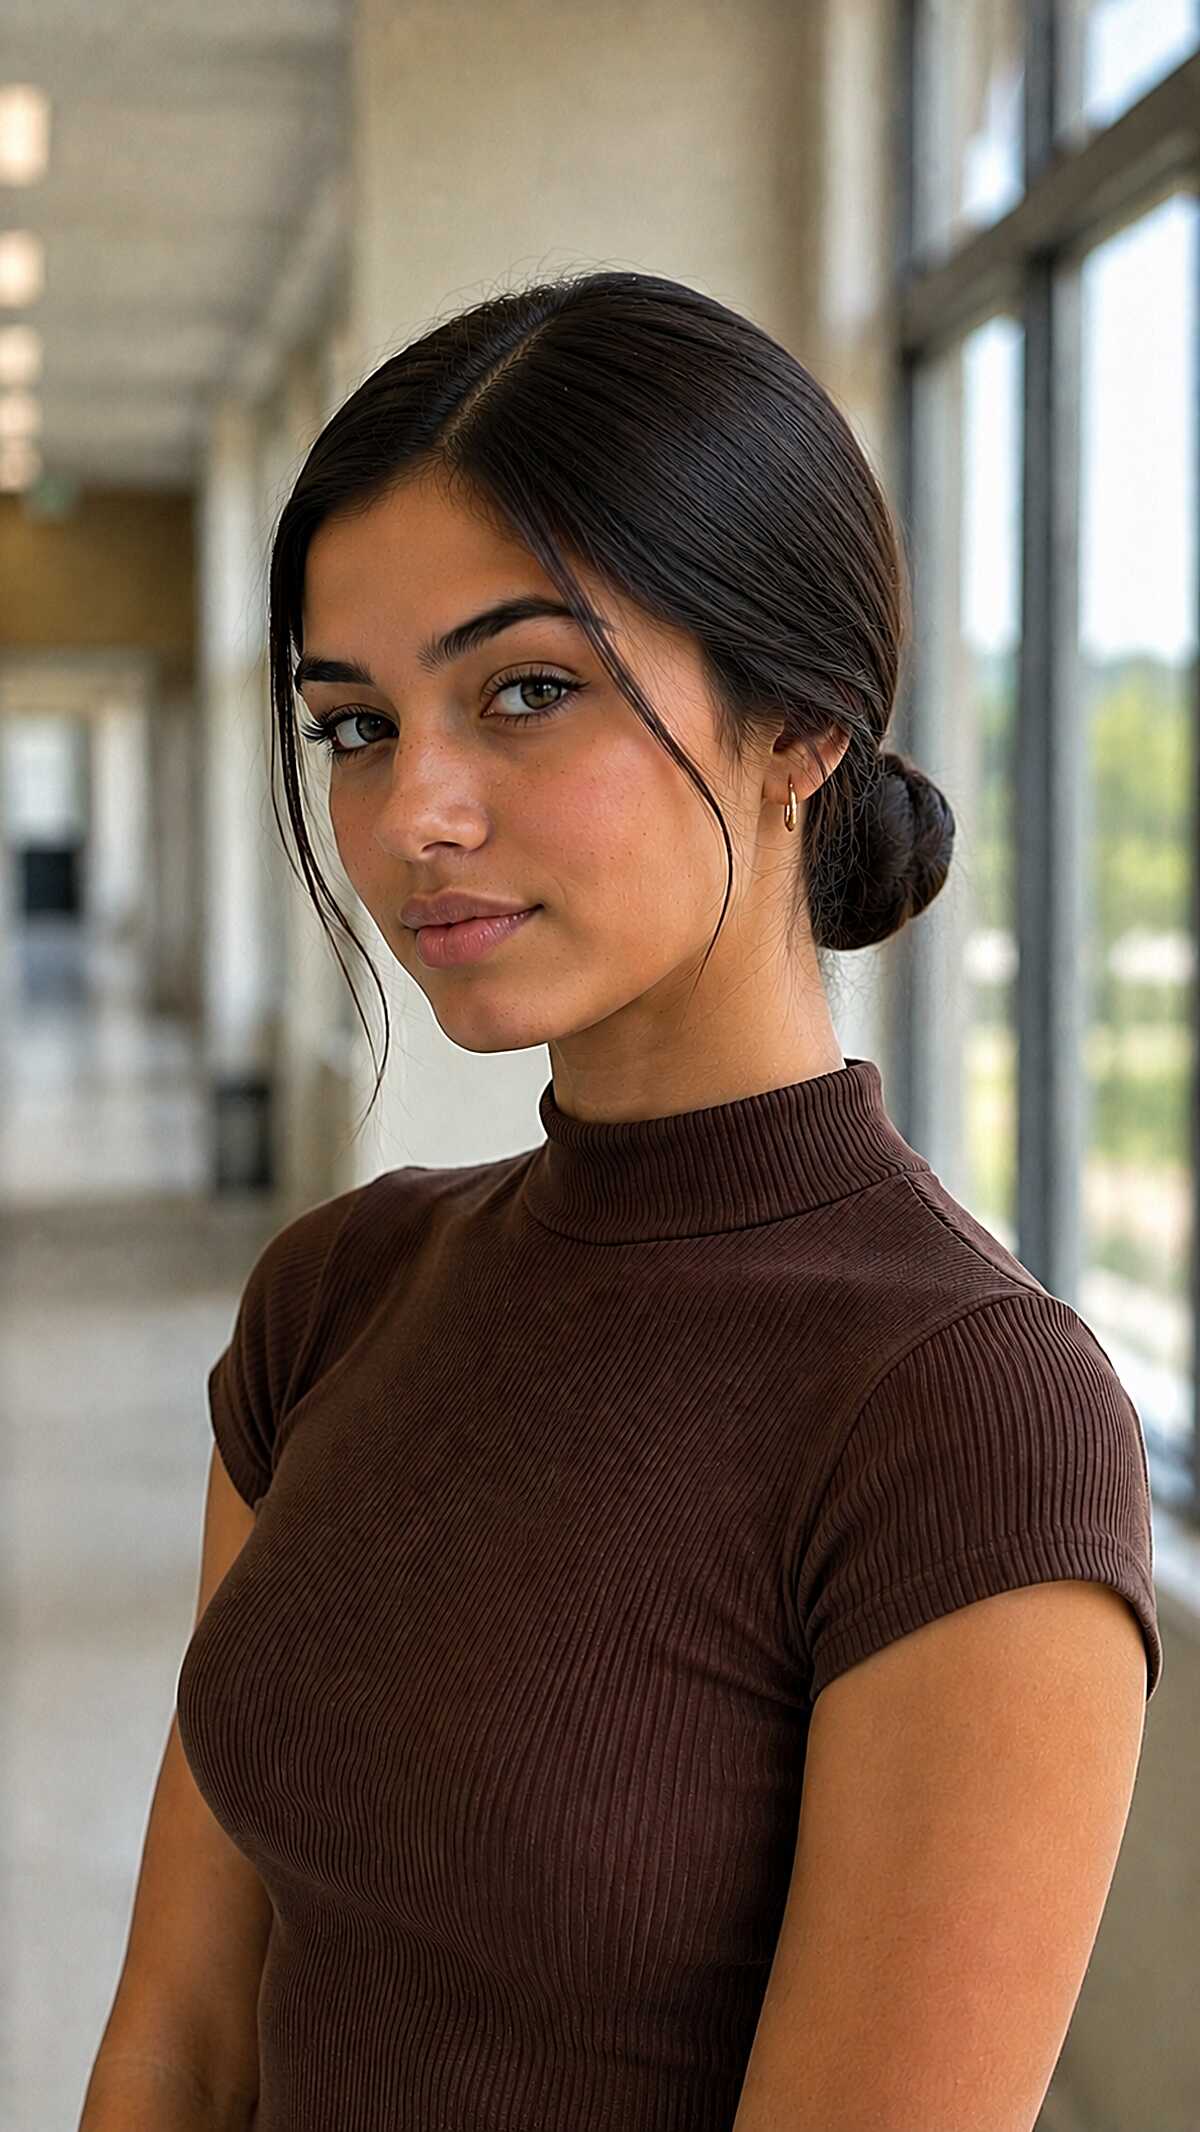
#15 Twisted Low Bun With One Tendril That Knows Exactly What It’s Doing
As for the look, it’s all about the face-framing curls, which are pulled forward with purpose, then styled into a wave, and finished with just the right amount of bounce, which certainly looks less worked than the style. It definitely steals the show from the bun, which is a small, tight, low, twisted bun at the nape just low enough to avoid hitting a headrest or snagging on a backpack. This is a style that requires medium to thick hair that goes at least past the shoulders to achieve a substantial twist without the bun looking like a sad little knot. In fact, it will collapse to nothing, by period 2. The center part is quite clean but is not ruler-straight, which says to me it was finger parted, not combed. It’s a small detail that makes a difference. If the part were too straight then it would look too polished. However, this look does suit oval and heart shapes particularly because it showcases a fully exposed jawline. If you’re self-conscious about your ears or forehead though, you may feel a little exposed.
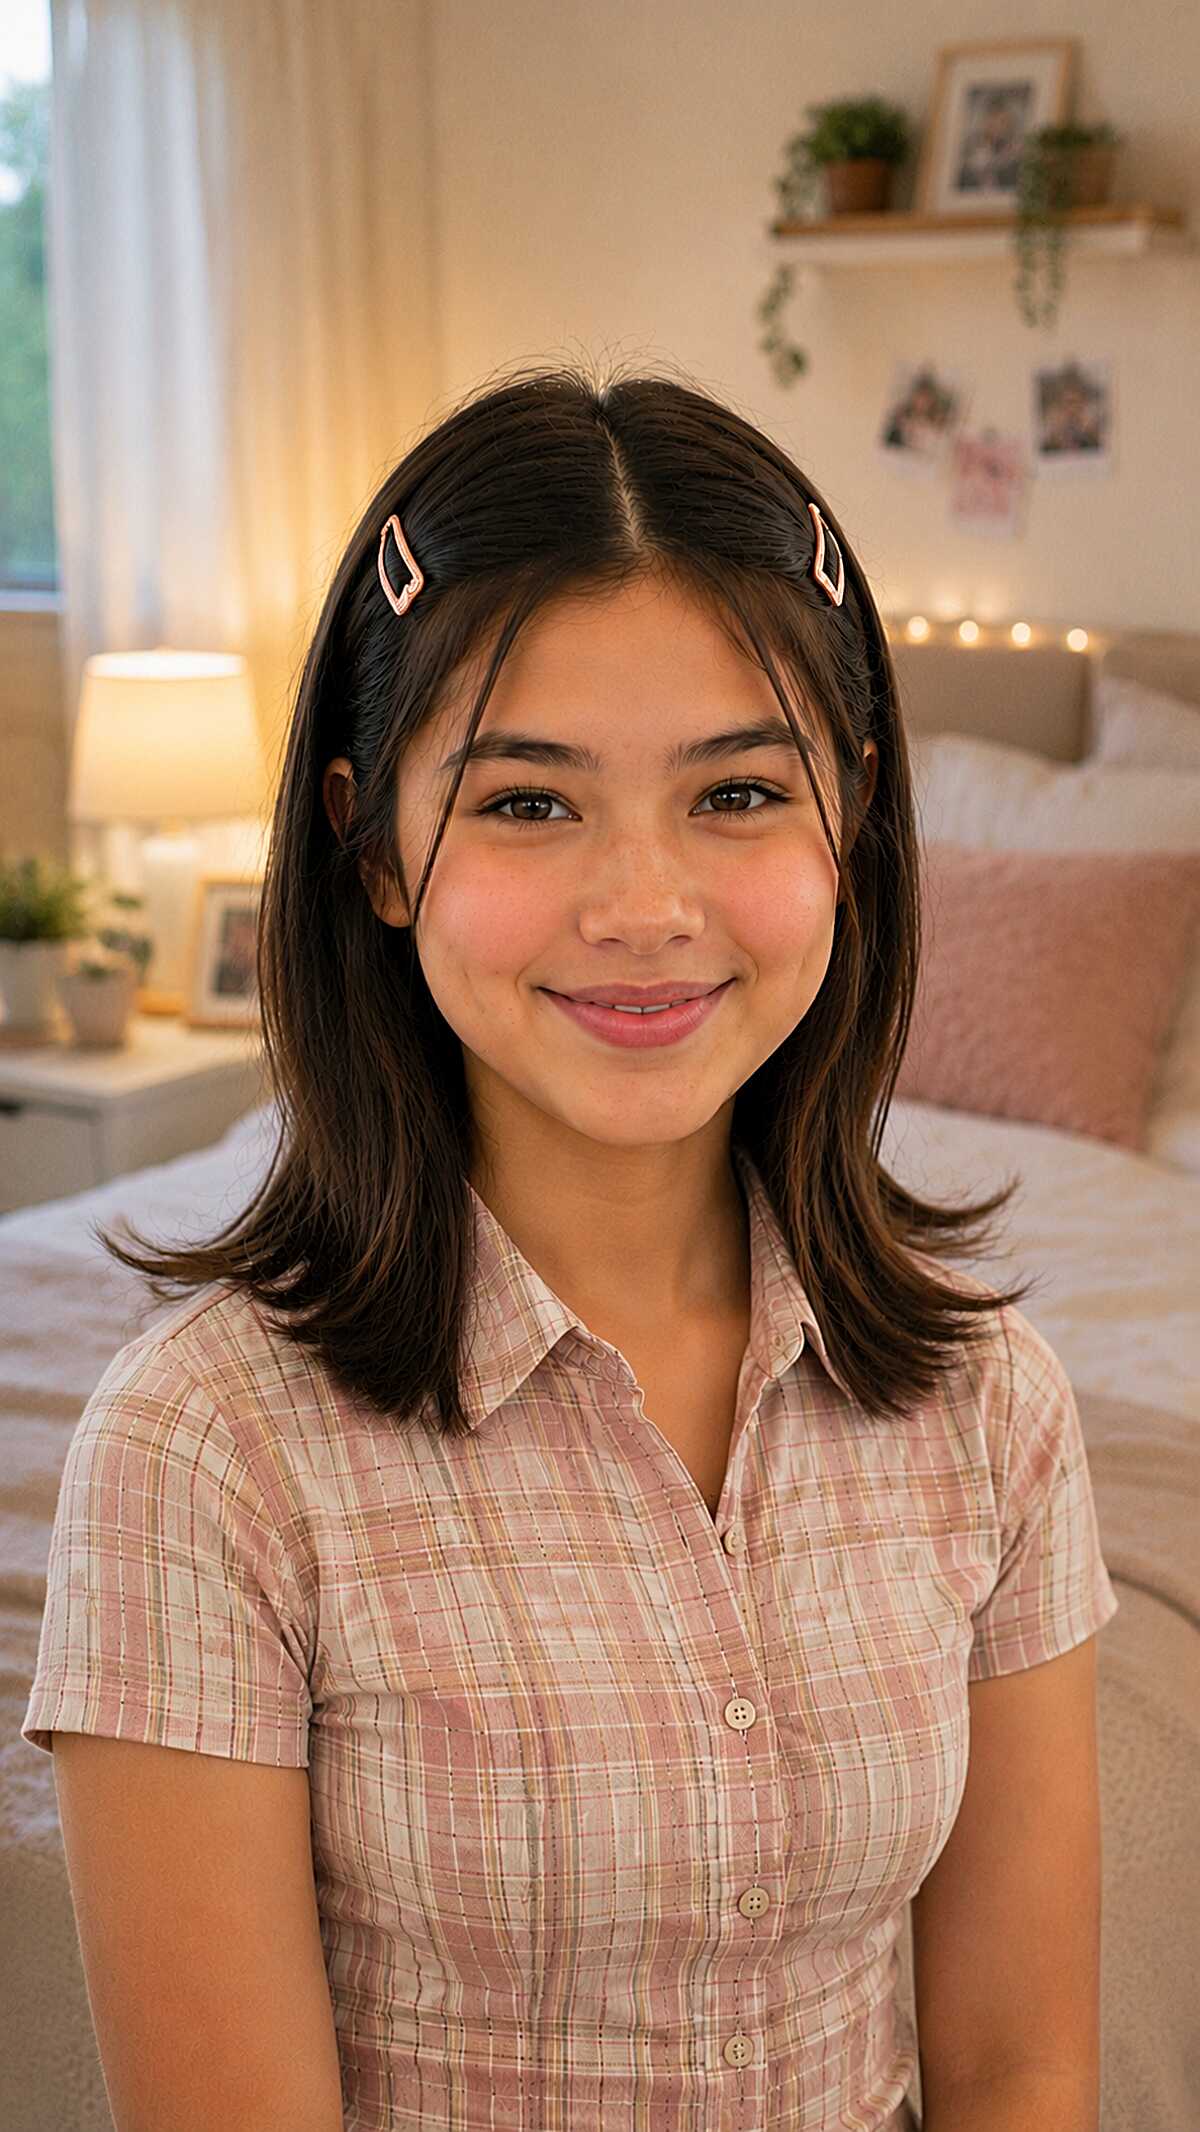
#16 Matching Snap Clips on a Center Part That Took Ten Seconds Flat
The clips are purposefully just decorative and non-functional. They sit equally on both sides of the middle part and hold back maybe 0.5 inches of hair on medium density dark straight to slightly wavy hair that extends to the shoulders. The layering is what stood out to me most, as there is a subtle interior layer around the jaw that makes the ends move and flip out without heat. Small snap clips will sit flat on fine hair and look perfect. On thick/coarse hair, they will be popping open before second period. This is not a styling fail, but a limit of the hardware. This cut features long layers that have been point cut around the mid lengths, which prevents the ends from looking too blunt and heavy while giving a clean and uniform look from a distance. It compliments both round and oval face shapes as the center part adds a lot of length. If your hair has a noticeable wave, the symmetry of the clips will work against it and the whole style will look very unintentional.
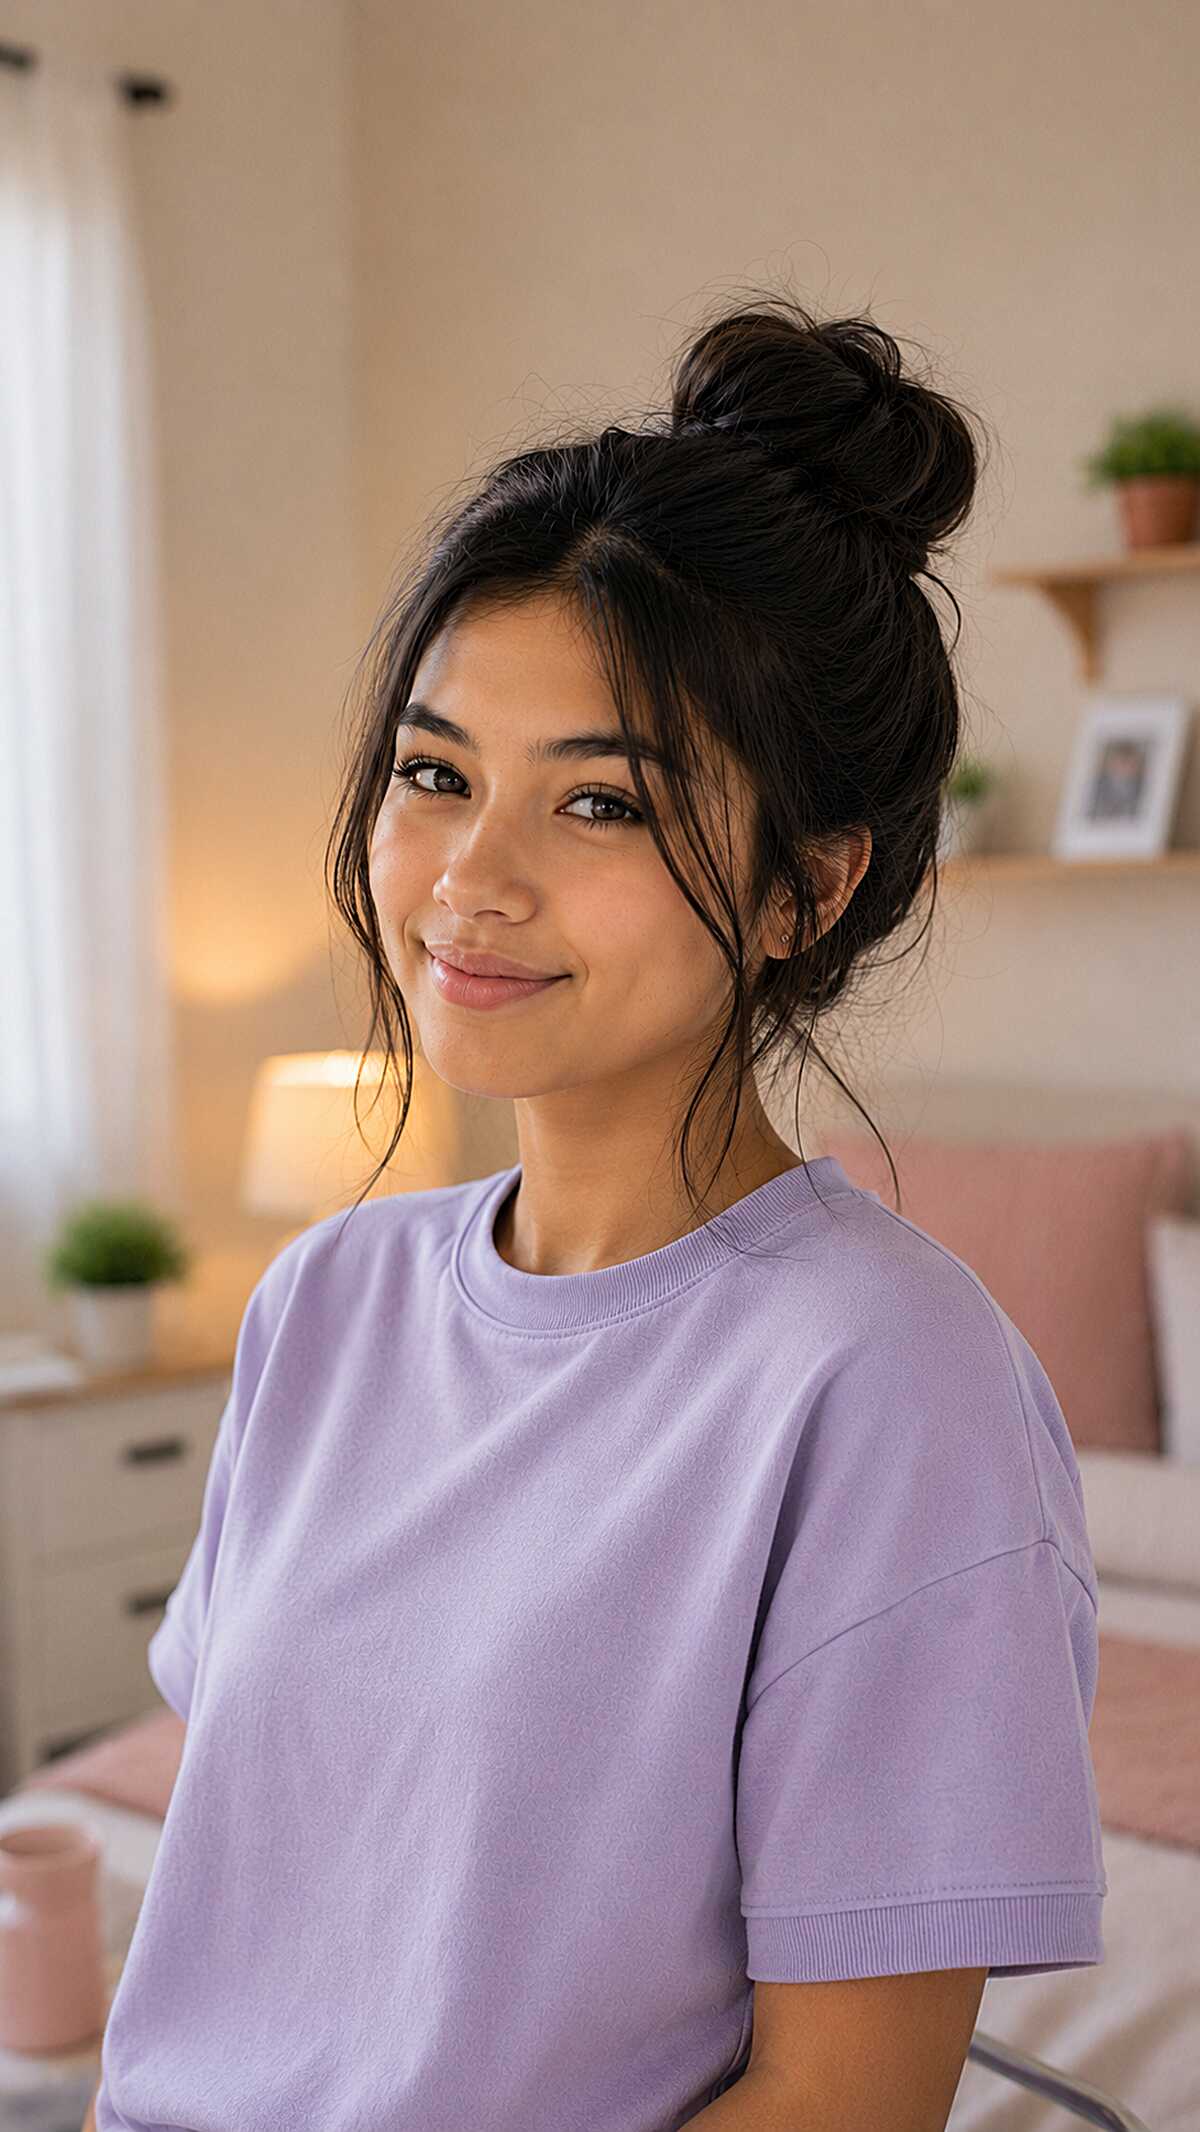
#17 Messy Top Knot With Curtain Wisps That Actually Look Slept In
Those face-framing pieces are doing all the work here, and they only look this good because her hair has enough natural texture and density to hold a loose tendril without going flat or stringy. If your hair is fine, it won’t look this way and it may look like you missed a section. The bun is actually high on the head and has been twisted once or twice and secured with one bobby pin, which suggests a medium to thick hair texture with some waves. Wispy hairs at the front are also varied in length, which is a critical component in aiding to the purpose of the work as a whole to be a look of being clear of is disheveled. Round or oval faces benefit the most from the height this placement gives. If you have a longer face, it may be more flattering to place the bun lower than to try to replicate this exact placement.
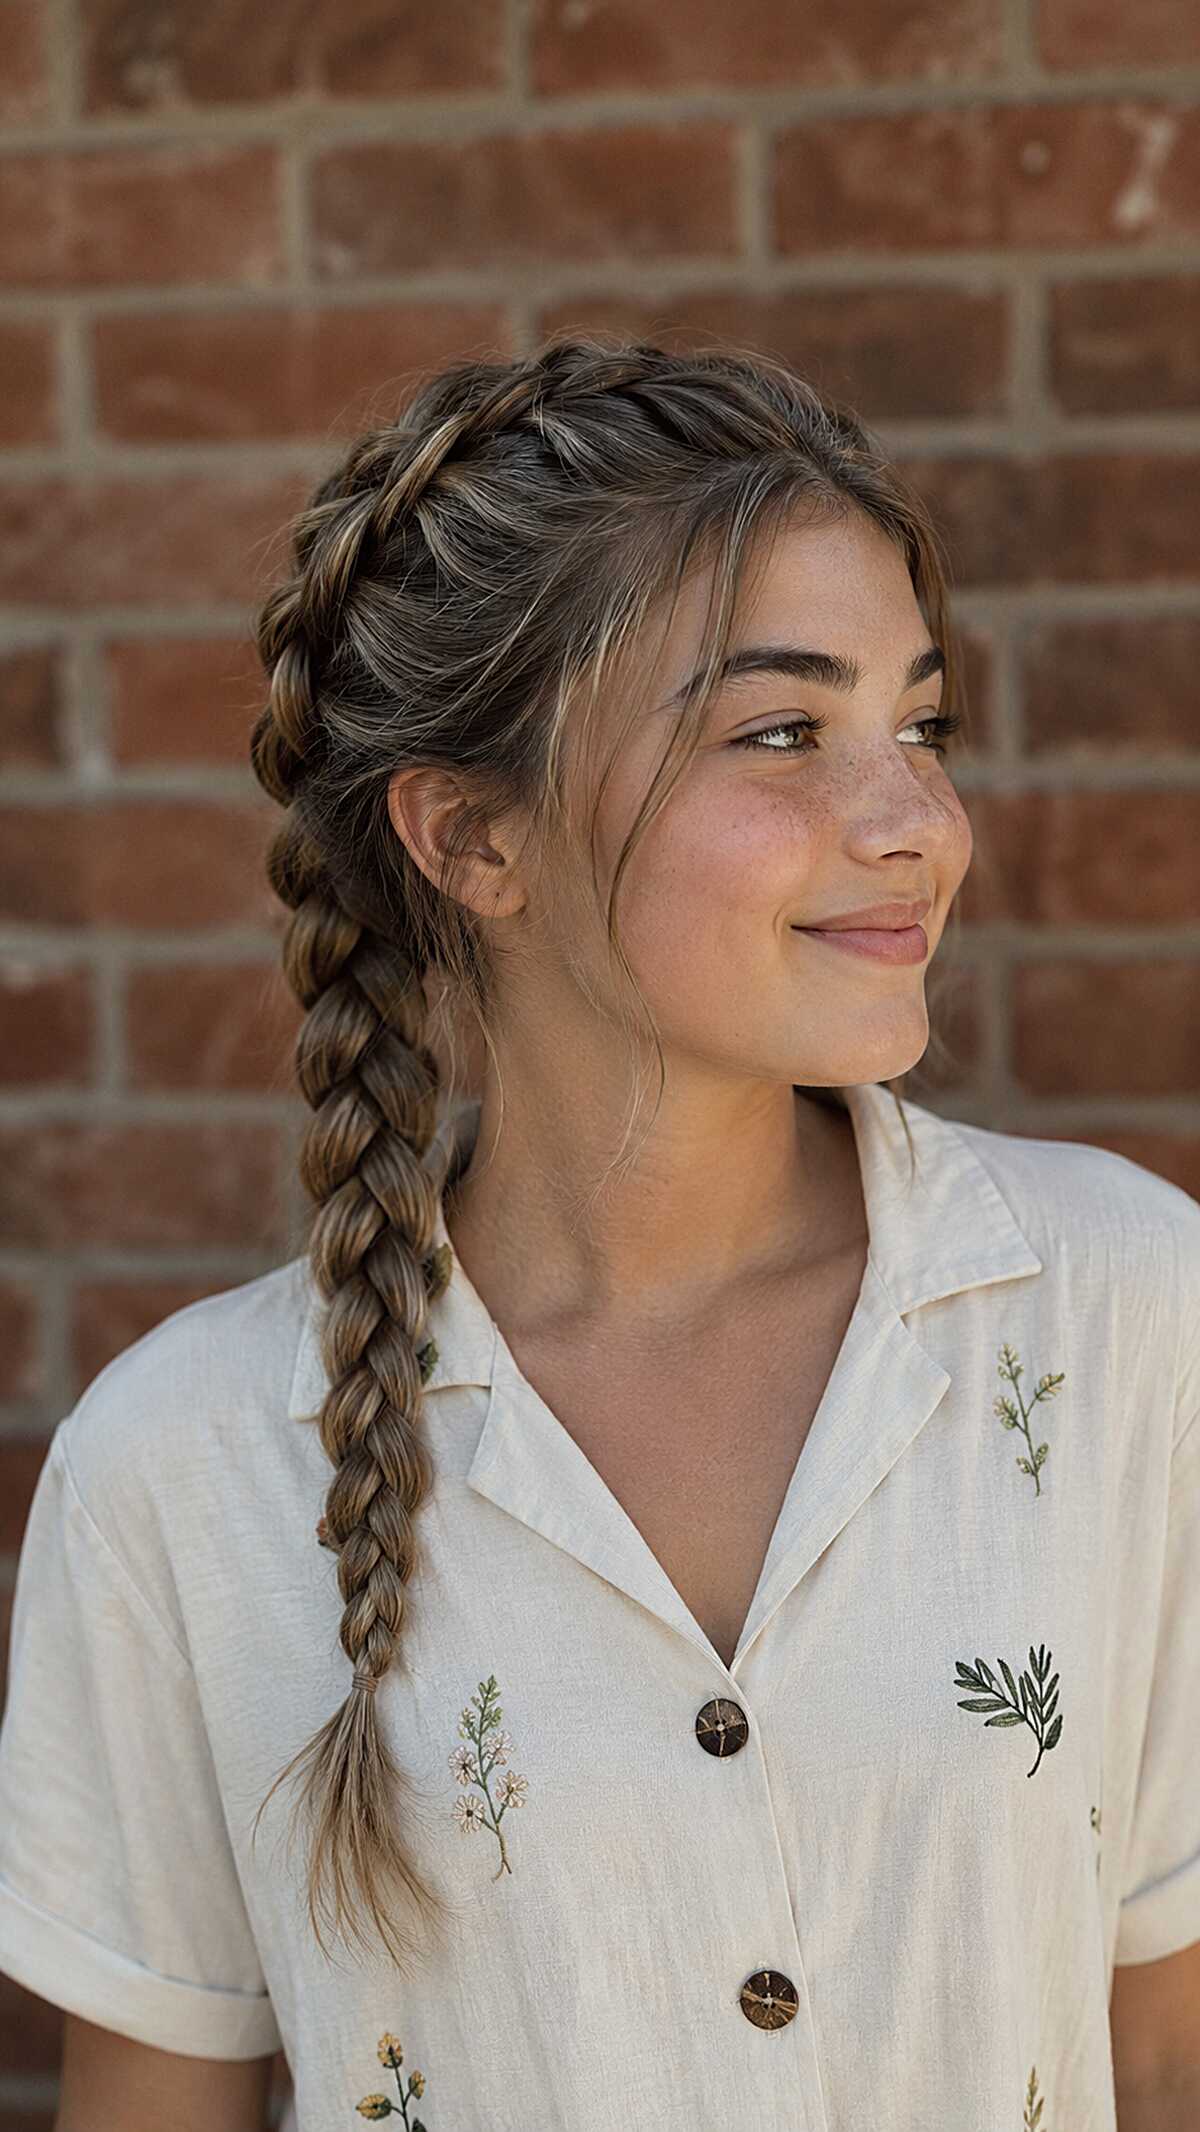
#18 Side French Braid With Loose Face-Framing Pieces
The first time you do French braid it’s not going to be five minutes. A French braid starts at the crown and you need to be able to feed it to one side – which is hard to get the tension right without it being flat against the scalp. What’s good to note is how loosely the braid is pancaked once it goes past the nape. That means the tighter section at the crown doesn’t have as much volume as the rest, and that contrast does a lot here. Hair needs to be medium thickness and at least collarbone length or else the braid will taper and end too early. Really fine hair will make scalp show through the front sections too much. The intentional pieces framing the face are great call for round or wider face shapes as they visually narrow the features without much effort. If your hair is newly washed and silky, this will probably come apart in less than an hour. Dirtier hair holds it in place better. After you get the hang of side French braiding, you really can get it done in about seven minutes, which is a reasonable amount of time for a school morning.
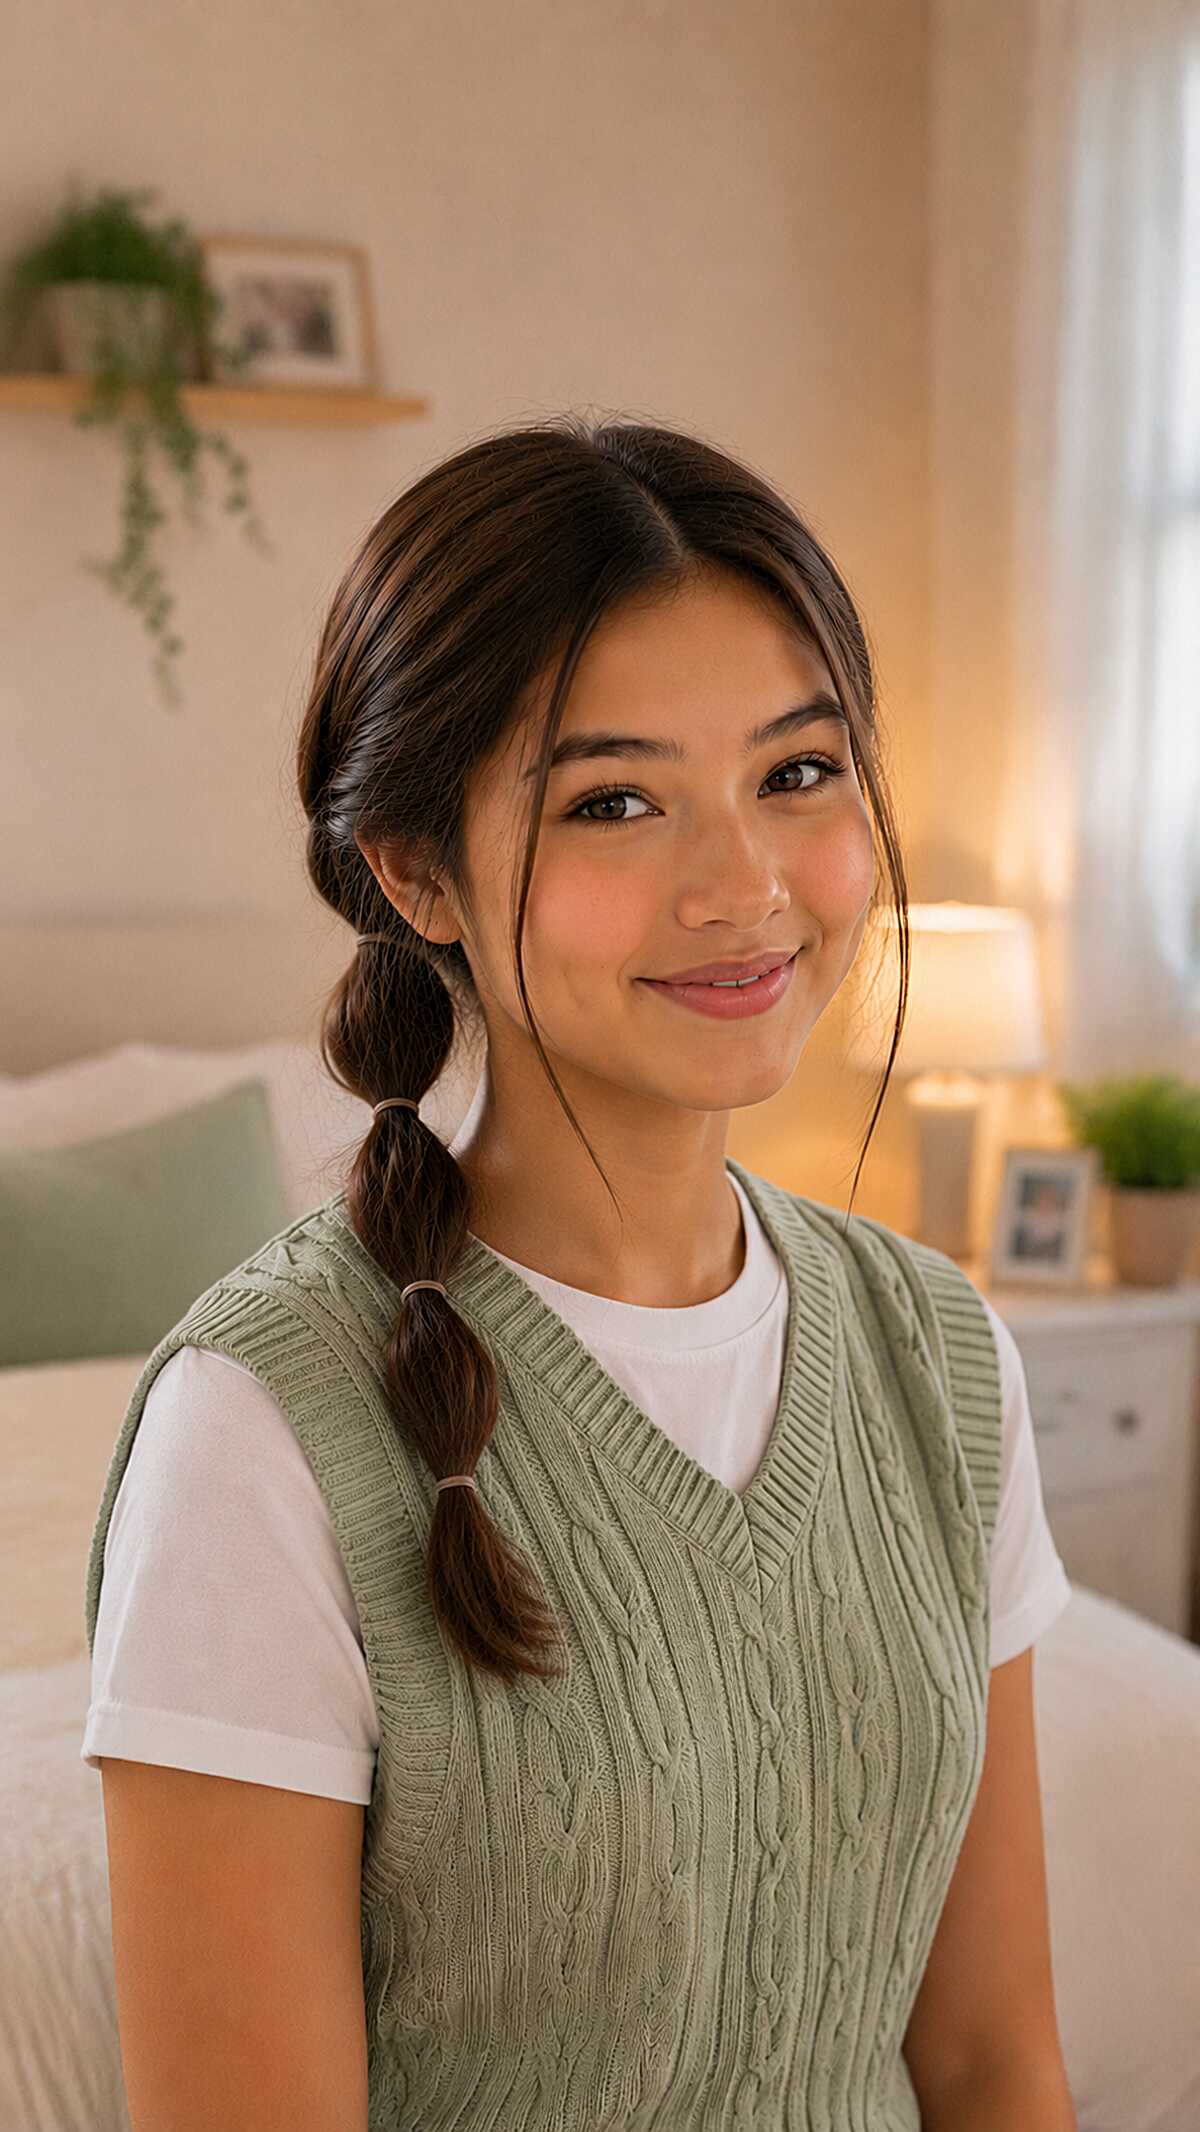
#19 Low Bubble Braid With One Loose Strand Doing All the Work
This look would be very boring without that one piece framing the face. The side braid is done using two small elastics, and the segments are created by making intervals in the ponytail instead of actually braiding it. No braiding skill required! This style is ideal for straight to slightly wavy hair. It must be medium density and mid back length or longer. The bubbles need to be full enough for you to be able to pull at them. If your hair is thin, this won’t be a styling problem you can fix, as the segments will look flat and stringy. This style works for every face shape as it is positioned low and is off to one side. This keeps the silhouette soft and adds no unwanted width to the sides.
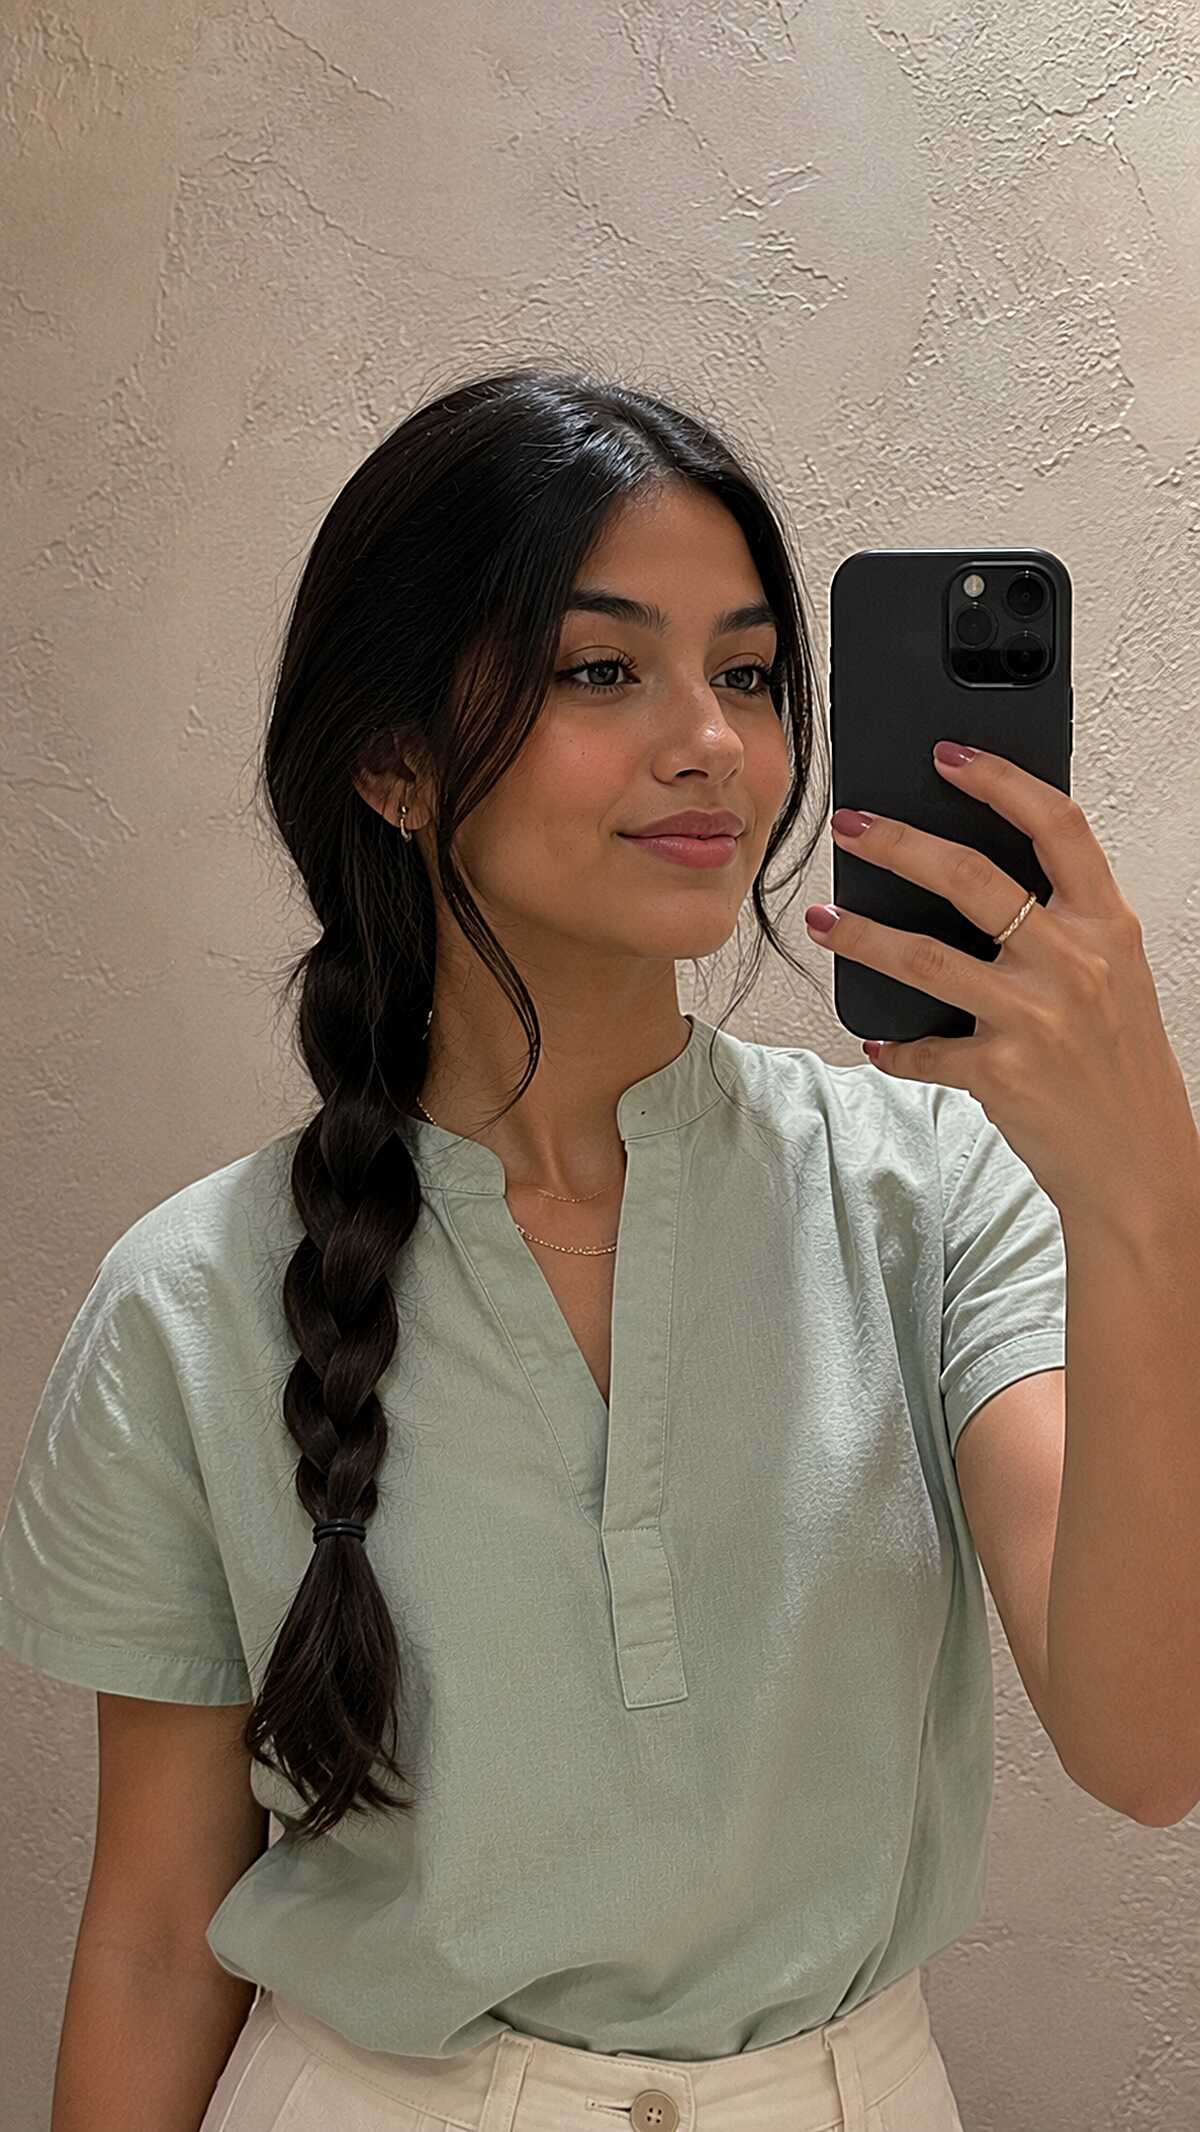
#20 Loose Three-Strand Braid Pulled to the Side Like You Meant It
The braid starts a good distance from the ears, which allows it to keep volume sitting forward over the shoulders rather than back where it may hang out of sight. Loose braids are best for mid thickness hair to keep the braid from falling flat. The braid is a simple three strand and the hair hits just past the collarbone. If you use a looser grip and separate each section of the braid, you enable the braid to look wider. Contrary to popular belief, fine hair can not maintain this shape and will appear very stringy quite quickly. The curled pieces at the front are face framing and are wrapped around a small barrel (probably just under an inch thick) and are separated into two strands instead of pulling one big piece to achieve the look of the curl as an intentional thing rather than just falling out. These work quite well for oval and heart shaped faces because the segmented pieces of hair appear to narrow the forehead, without closing in on the jaw. Make sure that if you decide to do this your hair is at least mid back length so that your braid doesn’t end up appearing too short and losing the whole point!
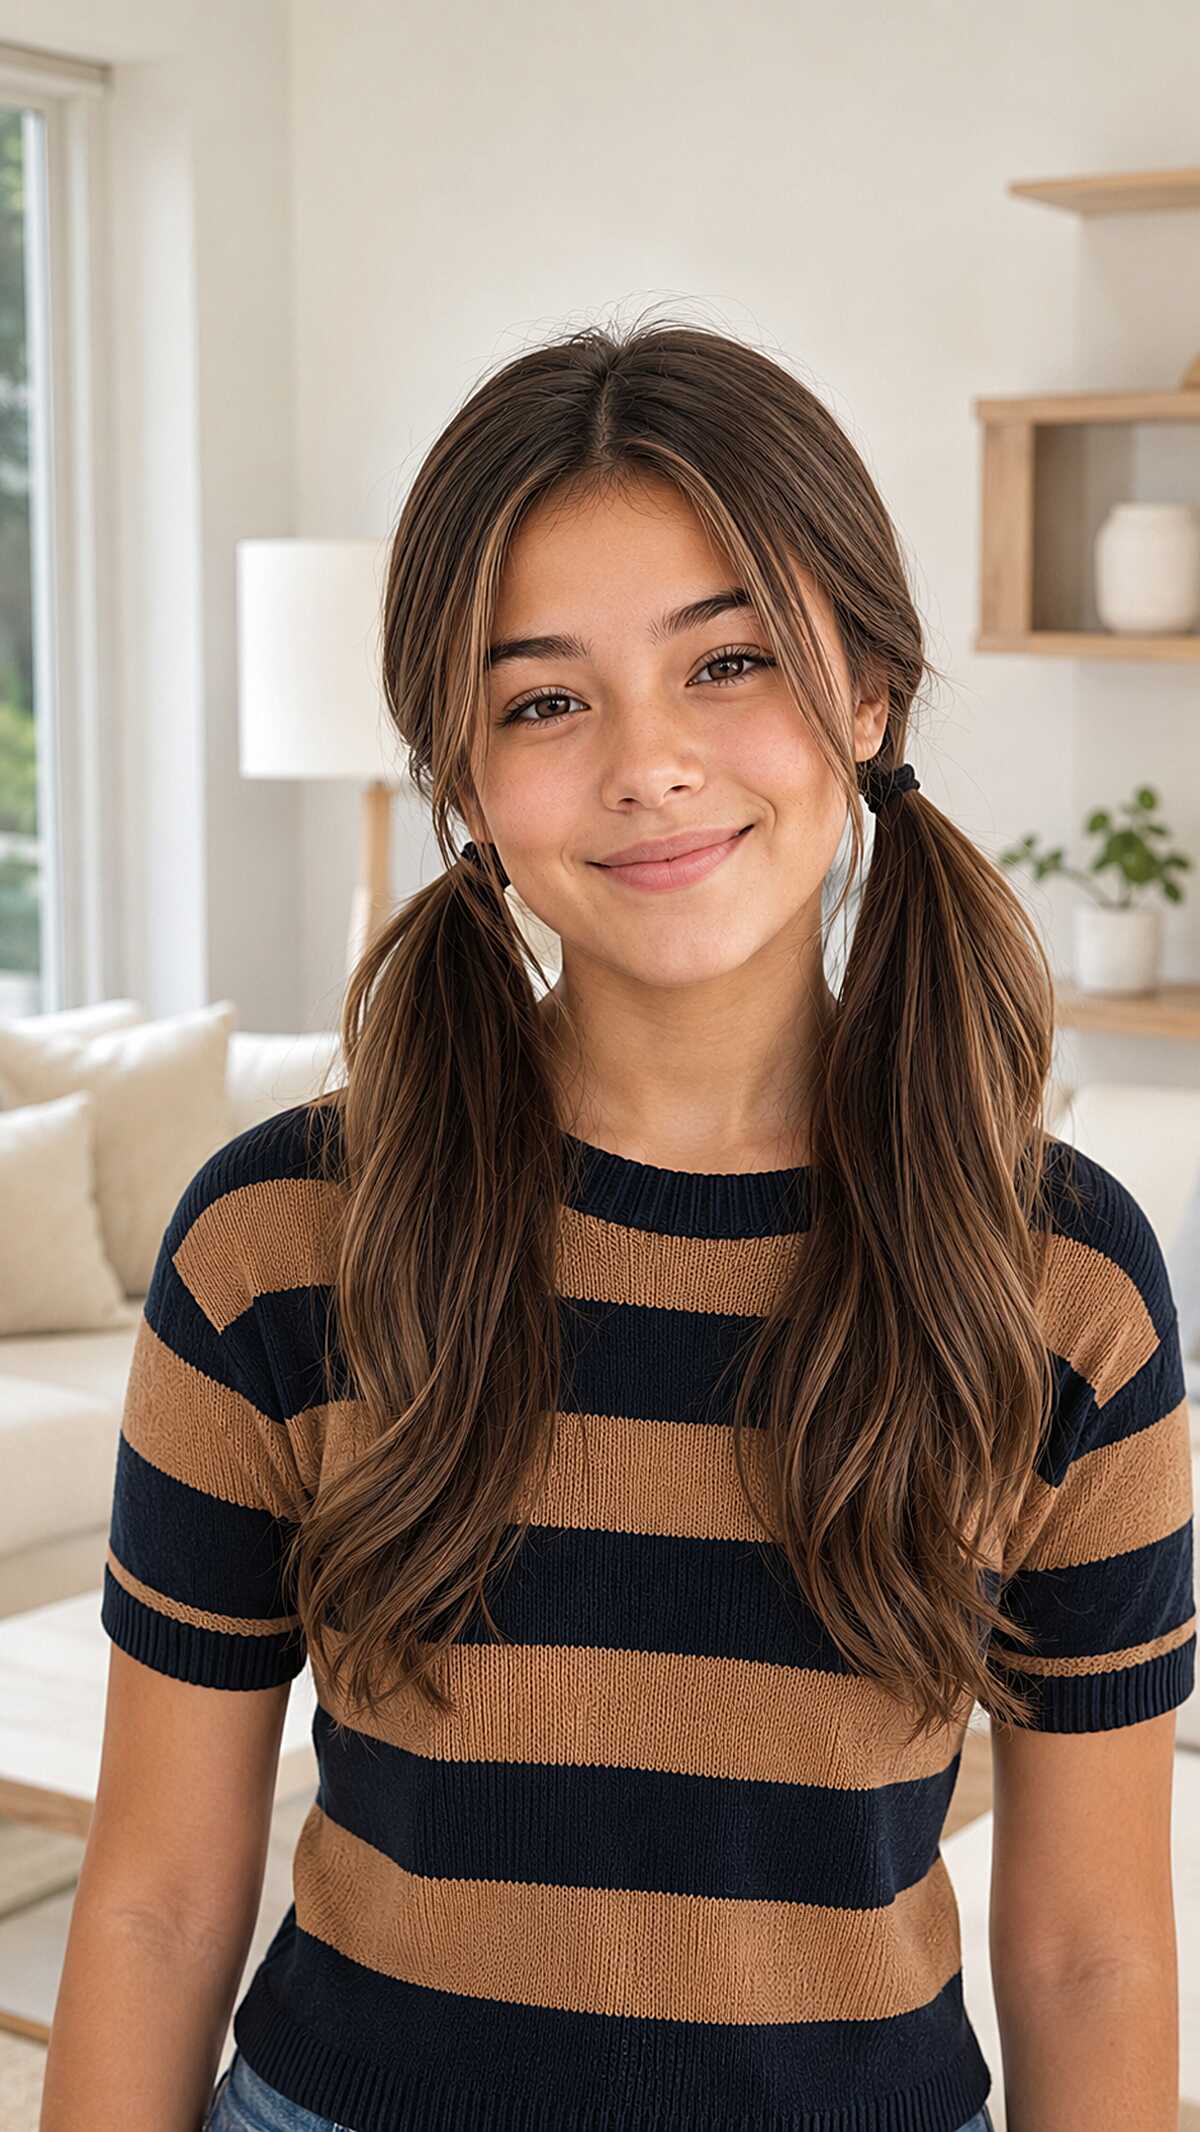
#21 Low Pigtails With Curtain Bangs That Took Maybe Ninety Seconds
The pigtails are placed low, almost close to the neck which is the only reason why this doesn’t look childish. Look at how much hair is left out, those curtain-framed pieces are the ones making it look intentional instead of lazy. Medium to thick hair with waves is perfect here because the tails need enough thickness to look full at that low placement. If your hair is thin you will only have two sad little strings. The bangs are cut with a middle part and point-cut ends so that they blend back as length without a visible line, and that’s what keeps this whole hairstyle from falling flat. This hairstyle works particularly well on round and oval faces because those face framing layers add length. One thing that nobody tells you though is that low pigtails loosen very quickly so by lunch you’ll be retying them.
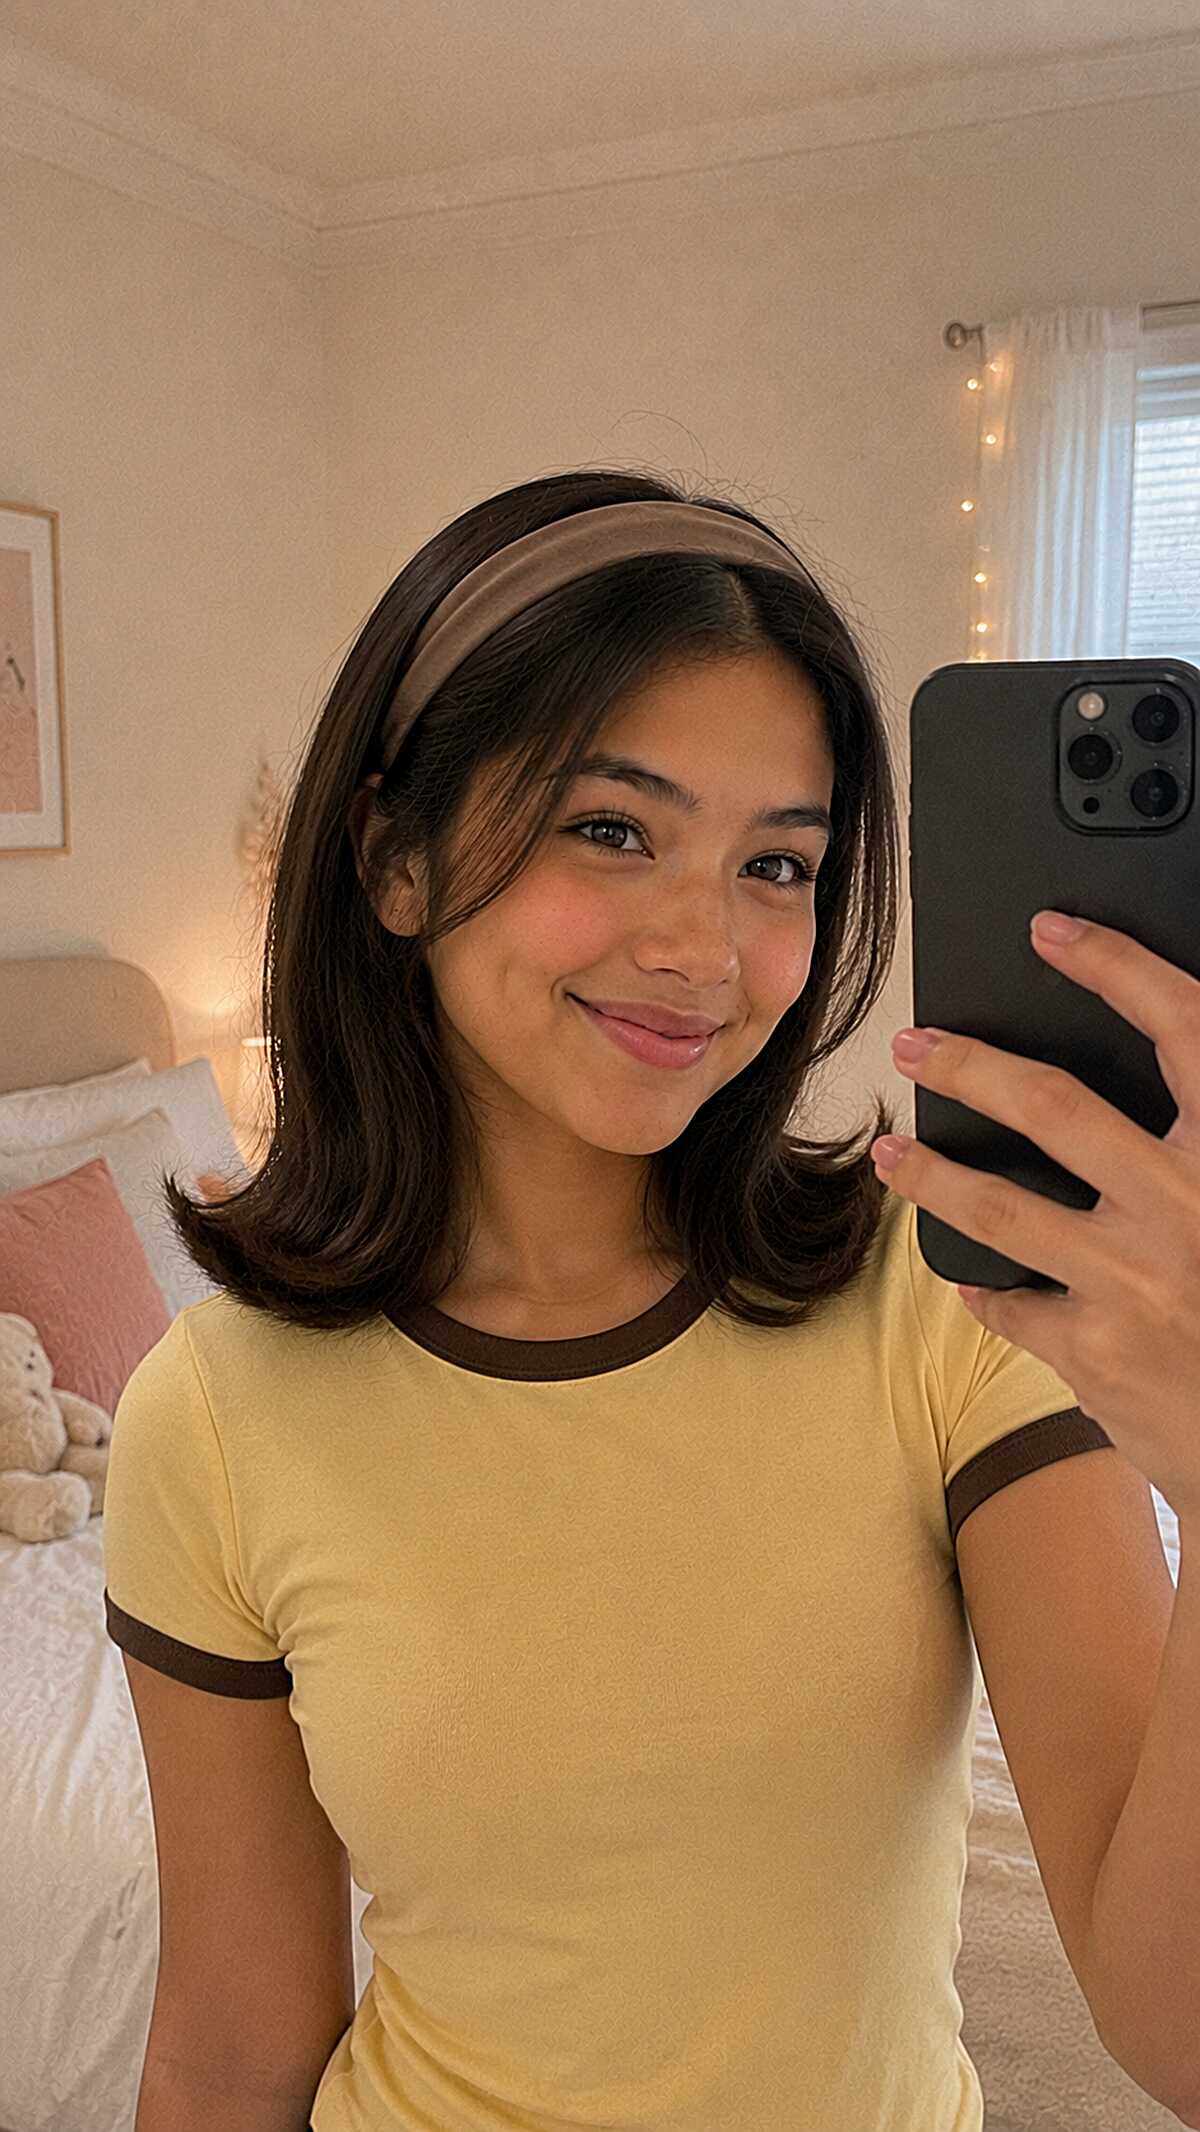
#22 Padded Headband Over a Shoulder-Length Flip That Does the Styling for You
It’s nice to see medium-length hair being styled! I can tell your hair is medium-density, straight to slightly wavy, and shoulder-length, and it looks great! I also appreciate the headband doing 80% of the work, as that’s the whole point of it. The headband pushes the front sections of hair so they frame the face on both sides, which is genuinely flattering on rounder and oval face shapes. I am really intrigued by how the ends of the headband flip outwards. There must be some internal layering starting around the chin to give enough movement to the hair so that a round brush isn’t needed every morning. This will not look the same on very fine hair, as fine hair goes flat under a headband and stays flat. Plus, those flipped ends won’t hold without some extra product or a curling iron which completely defeats the purpose! If your hair has enough weight and natural body to hold a slight bend from sleeping on it, or you scrunched it while it was damp, then this is a great zero-effort style.
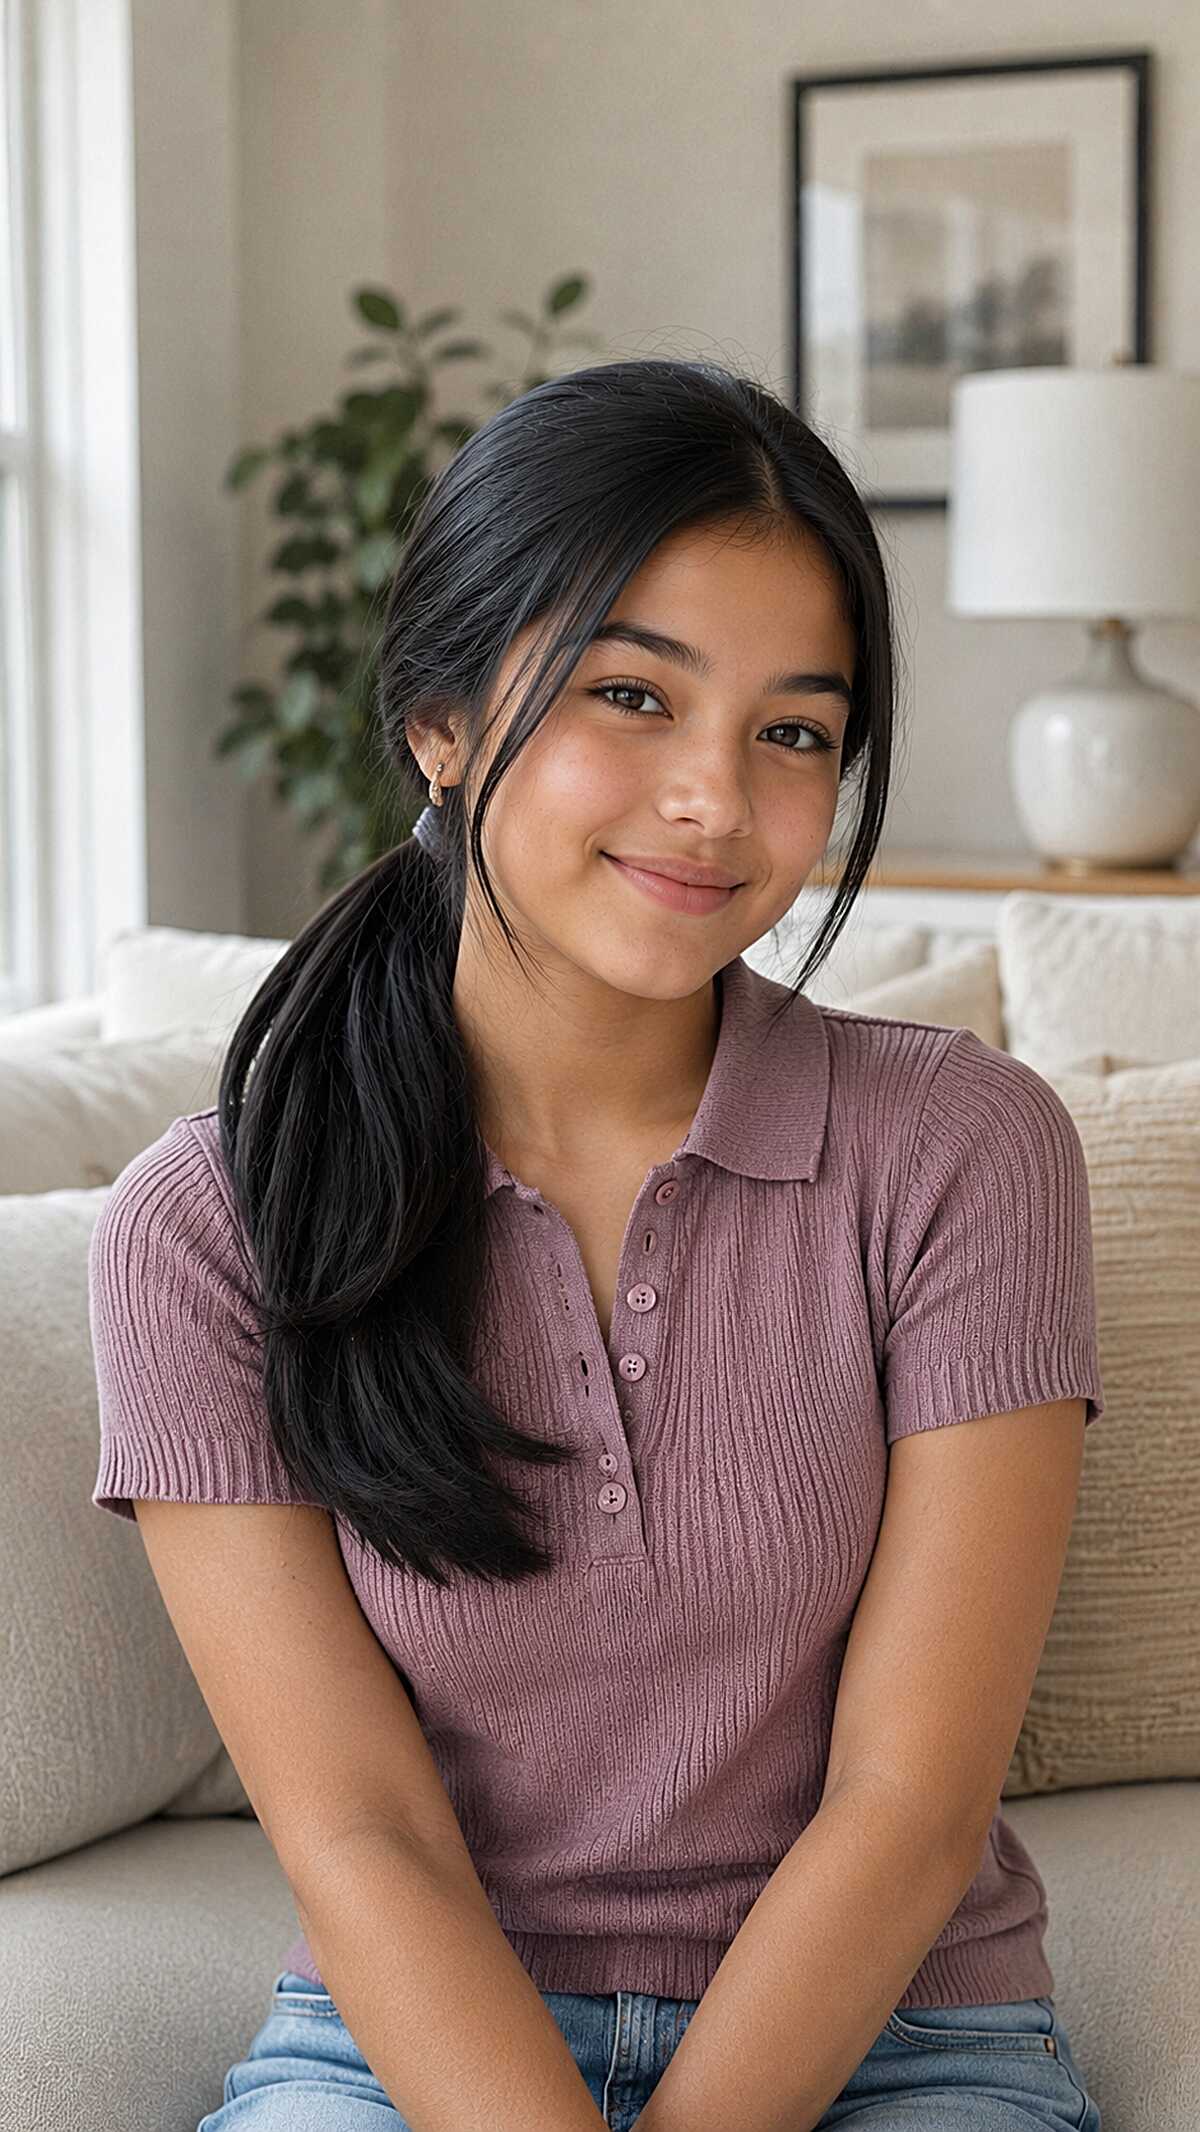
#23 Low Side Ponytail With One Piece Left Out on Purpose
That single strand of hair in front of the ear is very important in setting this style apart, as without it, this would be a simple side ponytail. This look works particularly well with thick, straight, and long hair, as the weight at the ponytail prevents the style from looking limp and accidental. However, fine hair will not be able to hold this shape and will fall flat against the neck. This will give off more of a “gave up” look rather than effortless. If the hair is not teased or volumized, the low nape placement of the hair, swept over the shoulder, means that the hair will look dense without any extra effort. If your hair is medium to thick and straight and reaches past your shoulders, this is a style that will take you less than a minute to achieve. Round and oval faces suit this hairstyle nicely as the side part helps to elongate the shape of the face while not concealing anything.
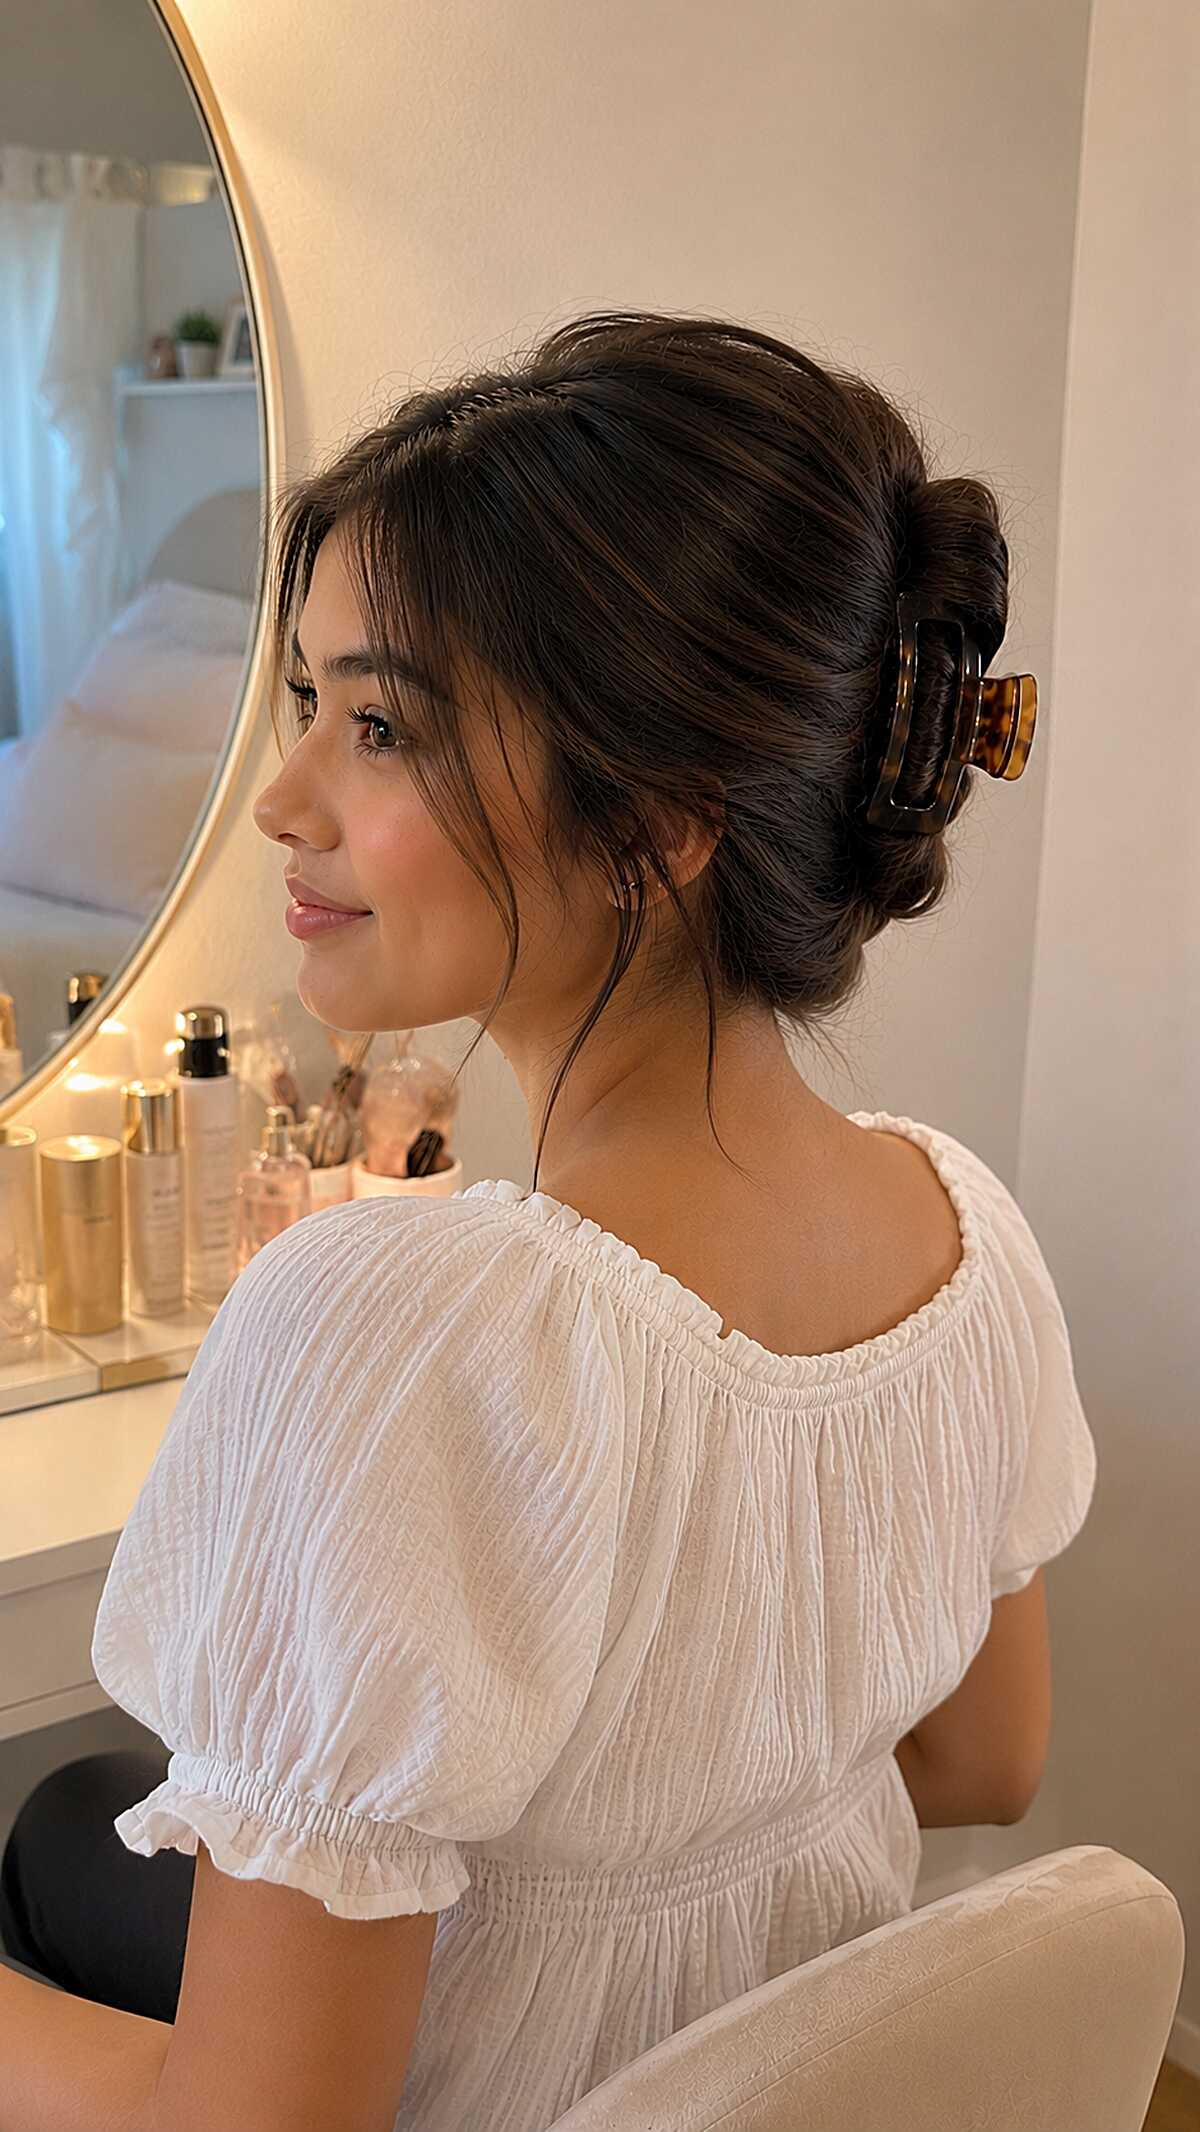
#24 Tortoiseshell Claw Clip Twist With Pieces That Fall Where They Want
The twist looks unstudied instead of like a tutorial screenshot because it sits unnaturally off-center to the right of the nape. For the twist to not collapse by second period, hair must be medium to long and dense enough to fill the clip. Hair that is too fine won’t be held back by a claw of this size and will slip out within the hour no matter how much texturizing spray is applied. You either need a smaller clip or a stronger grip. The face-framing pieces aren’t random; these are cut to rest at the jawline and enhance the chin’s structure or square face without obscuring it. One-tone dark brunette like this looks neat and tidy even as the style loosens, plus it showcases the natural wave pattern shaped through the crown. If you are already familiar with the motion, the whole thing takes about forty seconds. Gather, twist, and clip down. Lastly, bulk should be low and close to the head so it doesn’t stick out like a handle. This is the difference between looking like you put effort into it and looking like you’re holding your hair hostage.
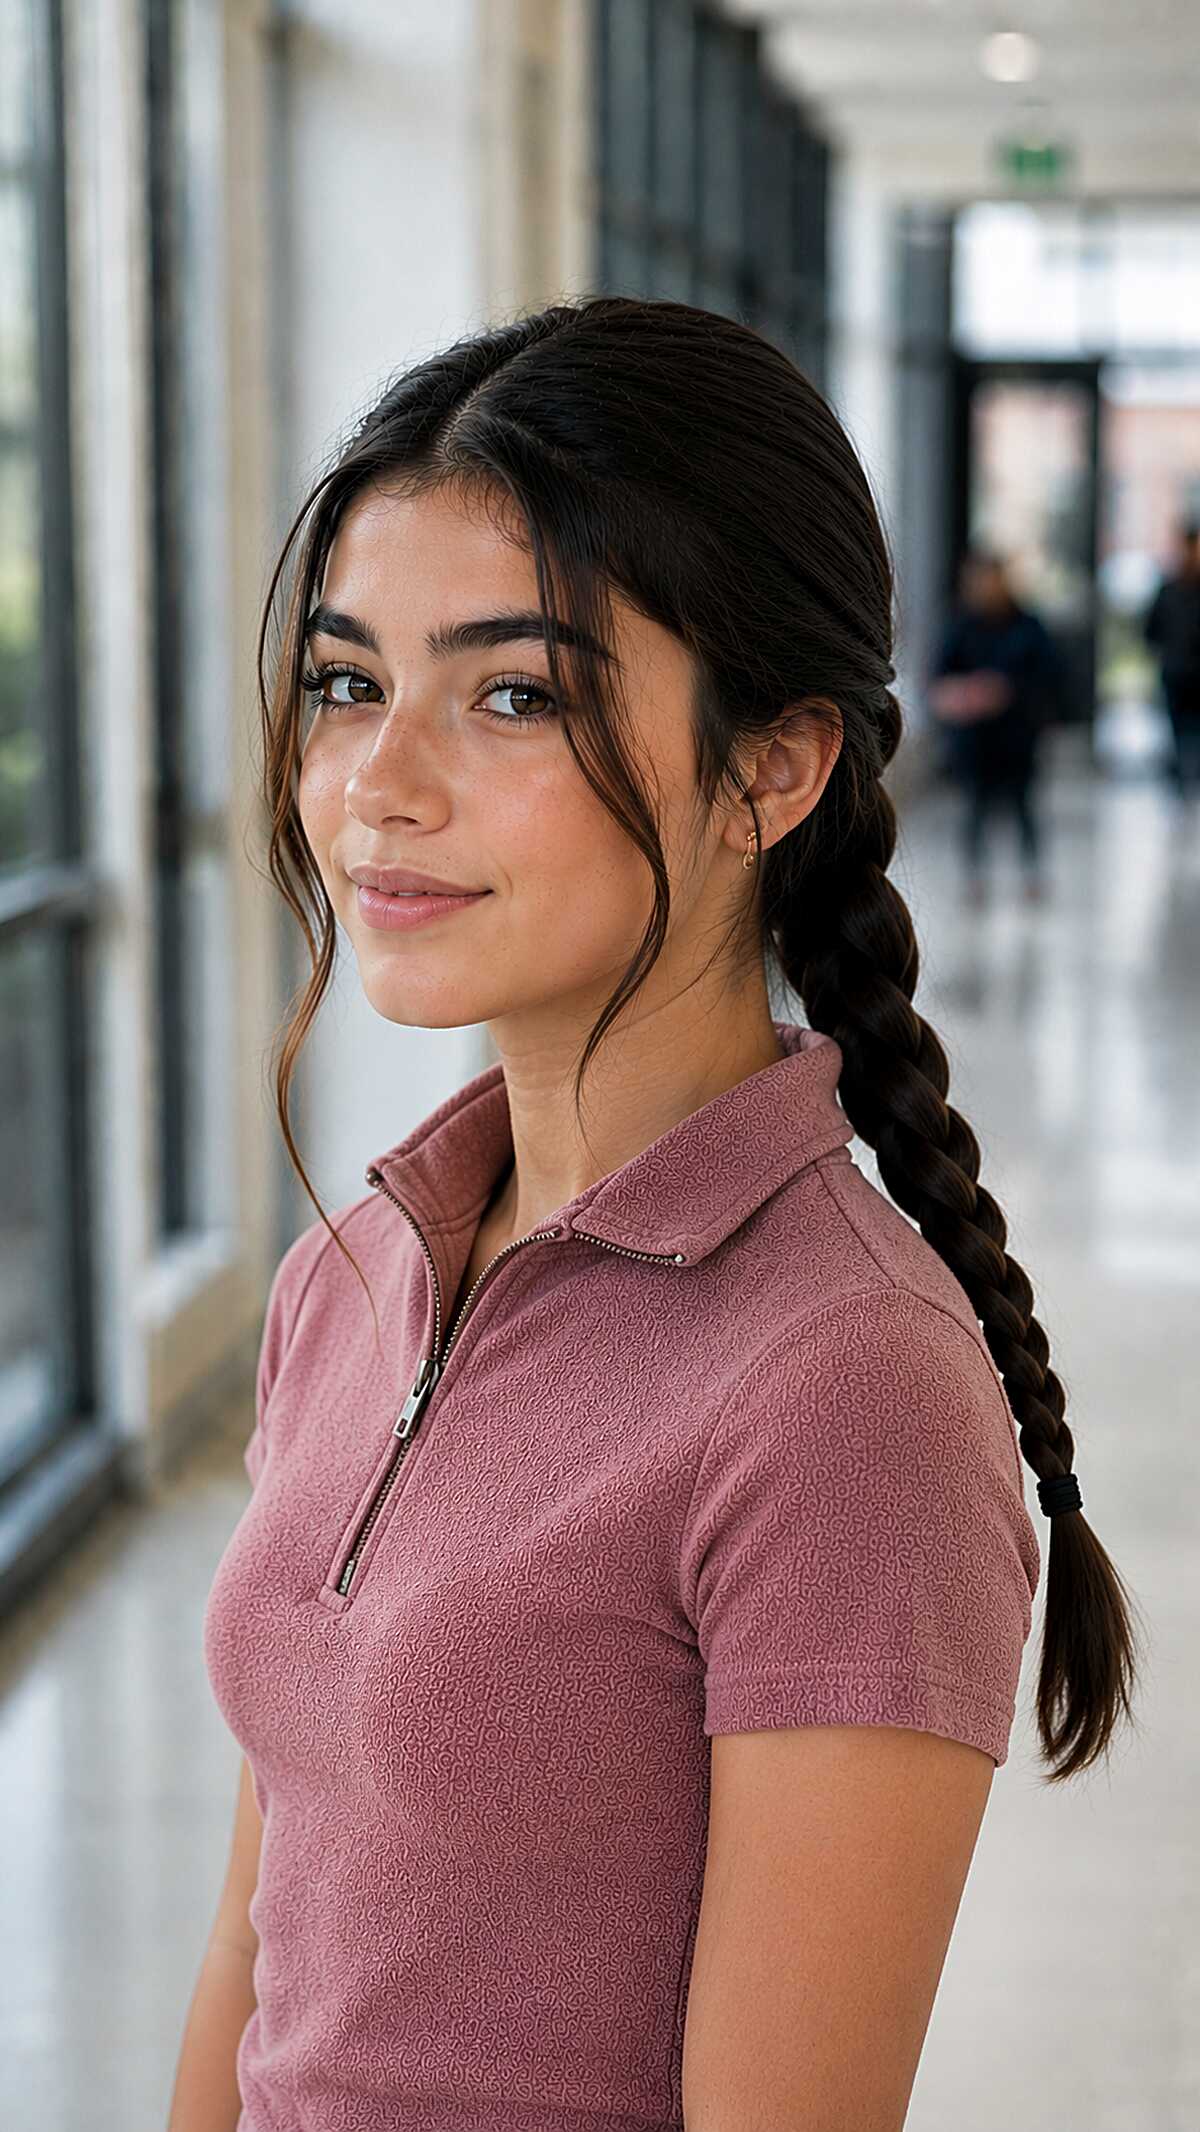
#25 Low Rope Twist Braid With Face-Framing Pieces That Earn Their Keep
Notice the way the rope braid twist goes. This is a two-strand rope braid (and not a three-strand) which is why it looks way more structured than it ought to for a before-coffee hairstyle. This will work on medium to long thick dark hair like this because the density keeps the twist from unraveling by second period. With fine hair, the twist will just lose its shape within the hour. The face-framing pieces here are doing real work softening what would otherwise be a hairstyle that pulls everything back way too flat against the head and they look intentional because they are cut right at the cheekbone. If your layers are shorter or longer than that it will look more like you just have flyaways instead of some nice framing. The nape low placement helps it not scream “I tried”. It won’t work if your hair is only shoulder length because you need enough length for the twist to read as a braid and not just a knotted ponytail.
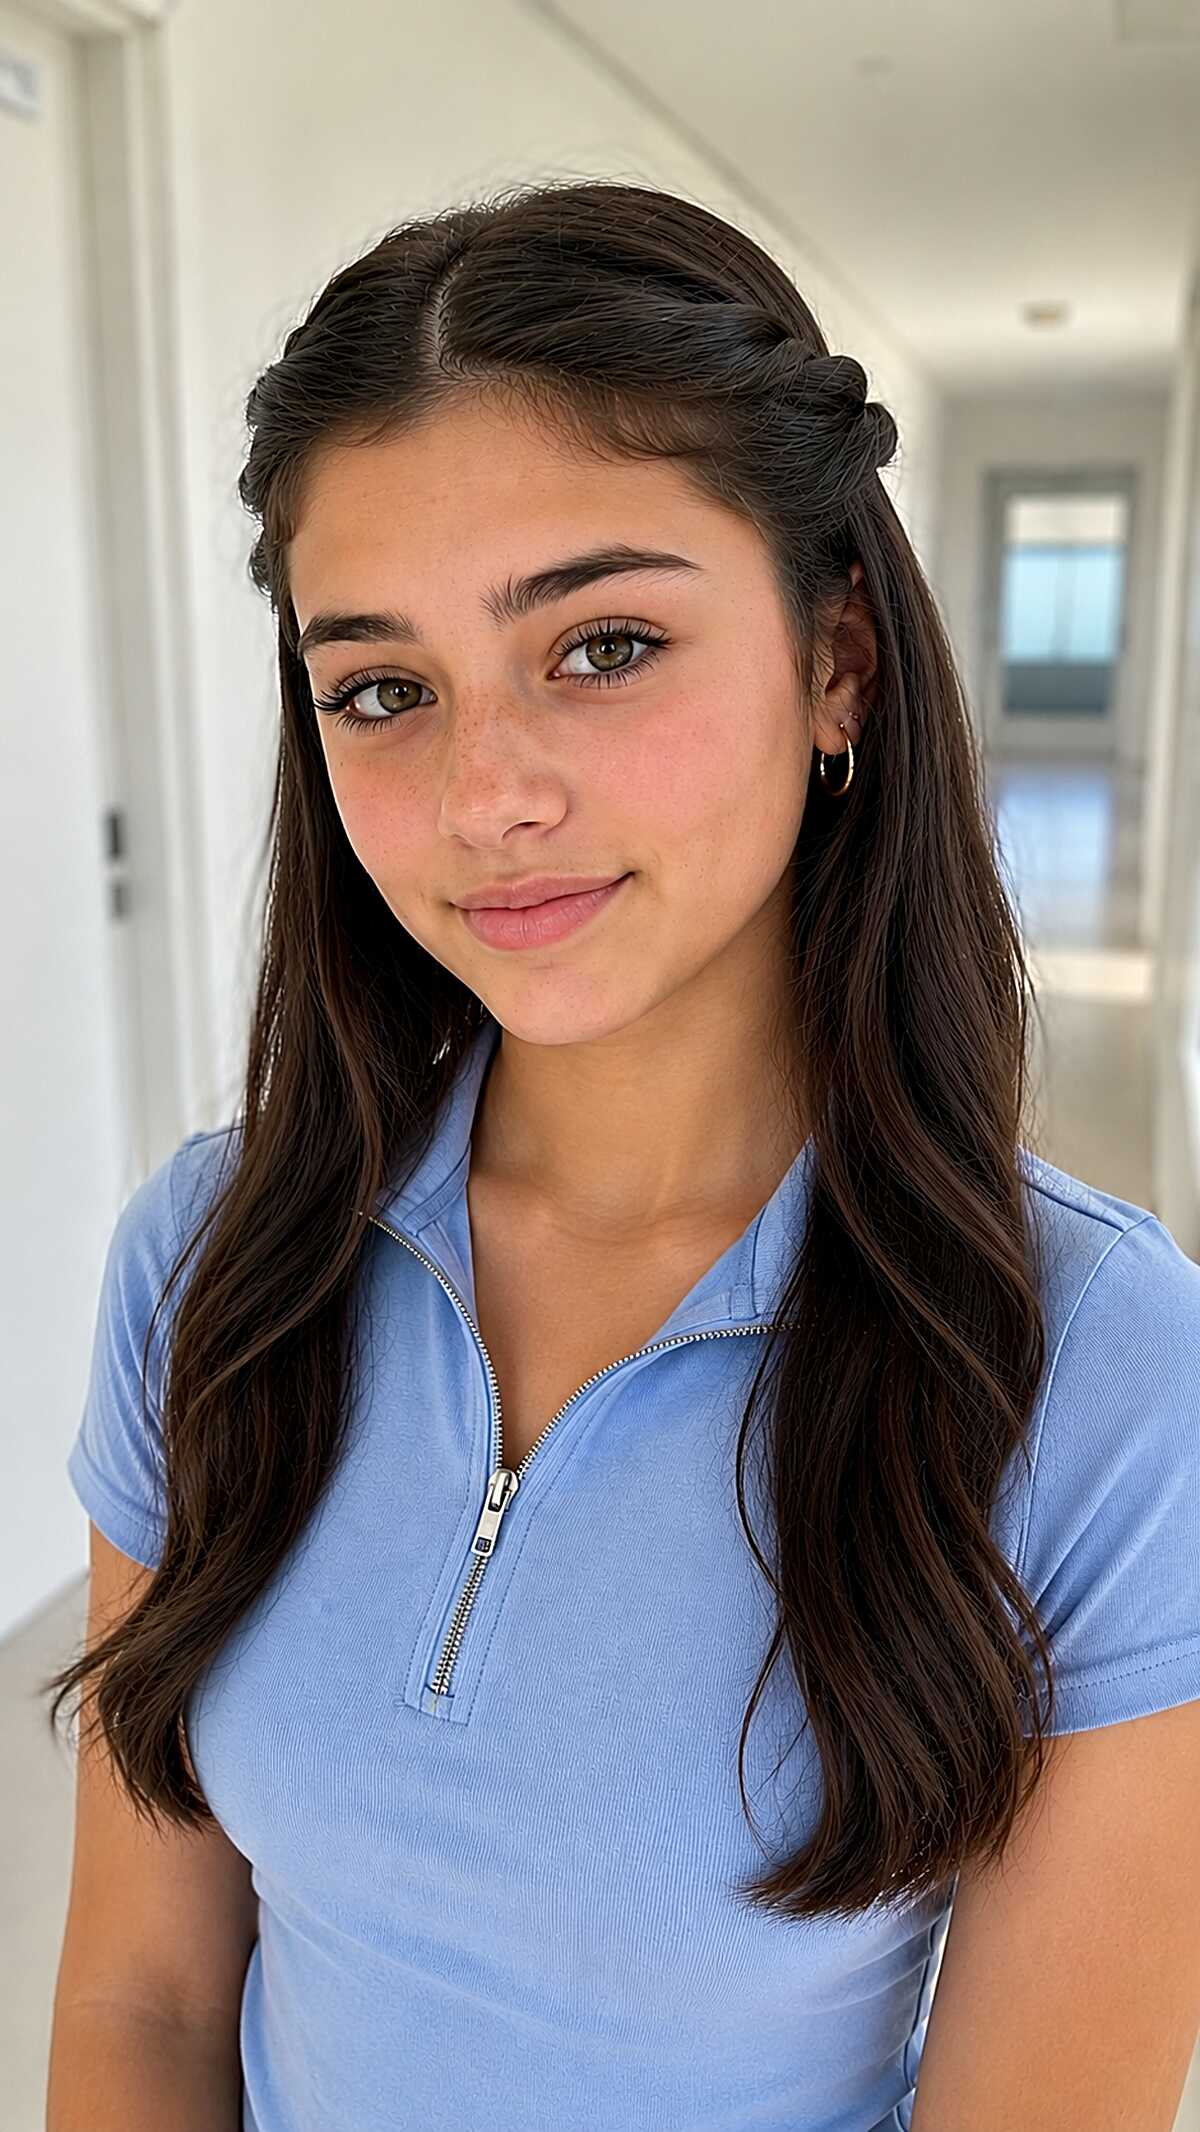
#26 Twisted Half-Up Pullback on Long Dark Waves
Notice how the twist is right at the crown, not further back like most people default to pin. That placement is doing real work lifting the face and keeping the front open without any framing face pieces falling forward. It’s two sections twisted toward each other and pinned flat which maybe takes 90 seconds once you get the right tension. Works beautifully on medium to thick hair with some wave or texture already in it. In fine hair, the twist will look sparse and expose it too much. This style genuinely suits rounder face shapes because of all the vertical lift that placement at the crown gives. On longer or narrower faces, it can elongate things further than you’d want. The natural brunette here has no color work just healthy single process dark hair catching the light at the wave bends. One thing worth knowing is if your hair is freshly washed and slippery the twist will unravel by second period.
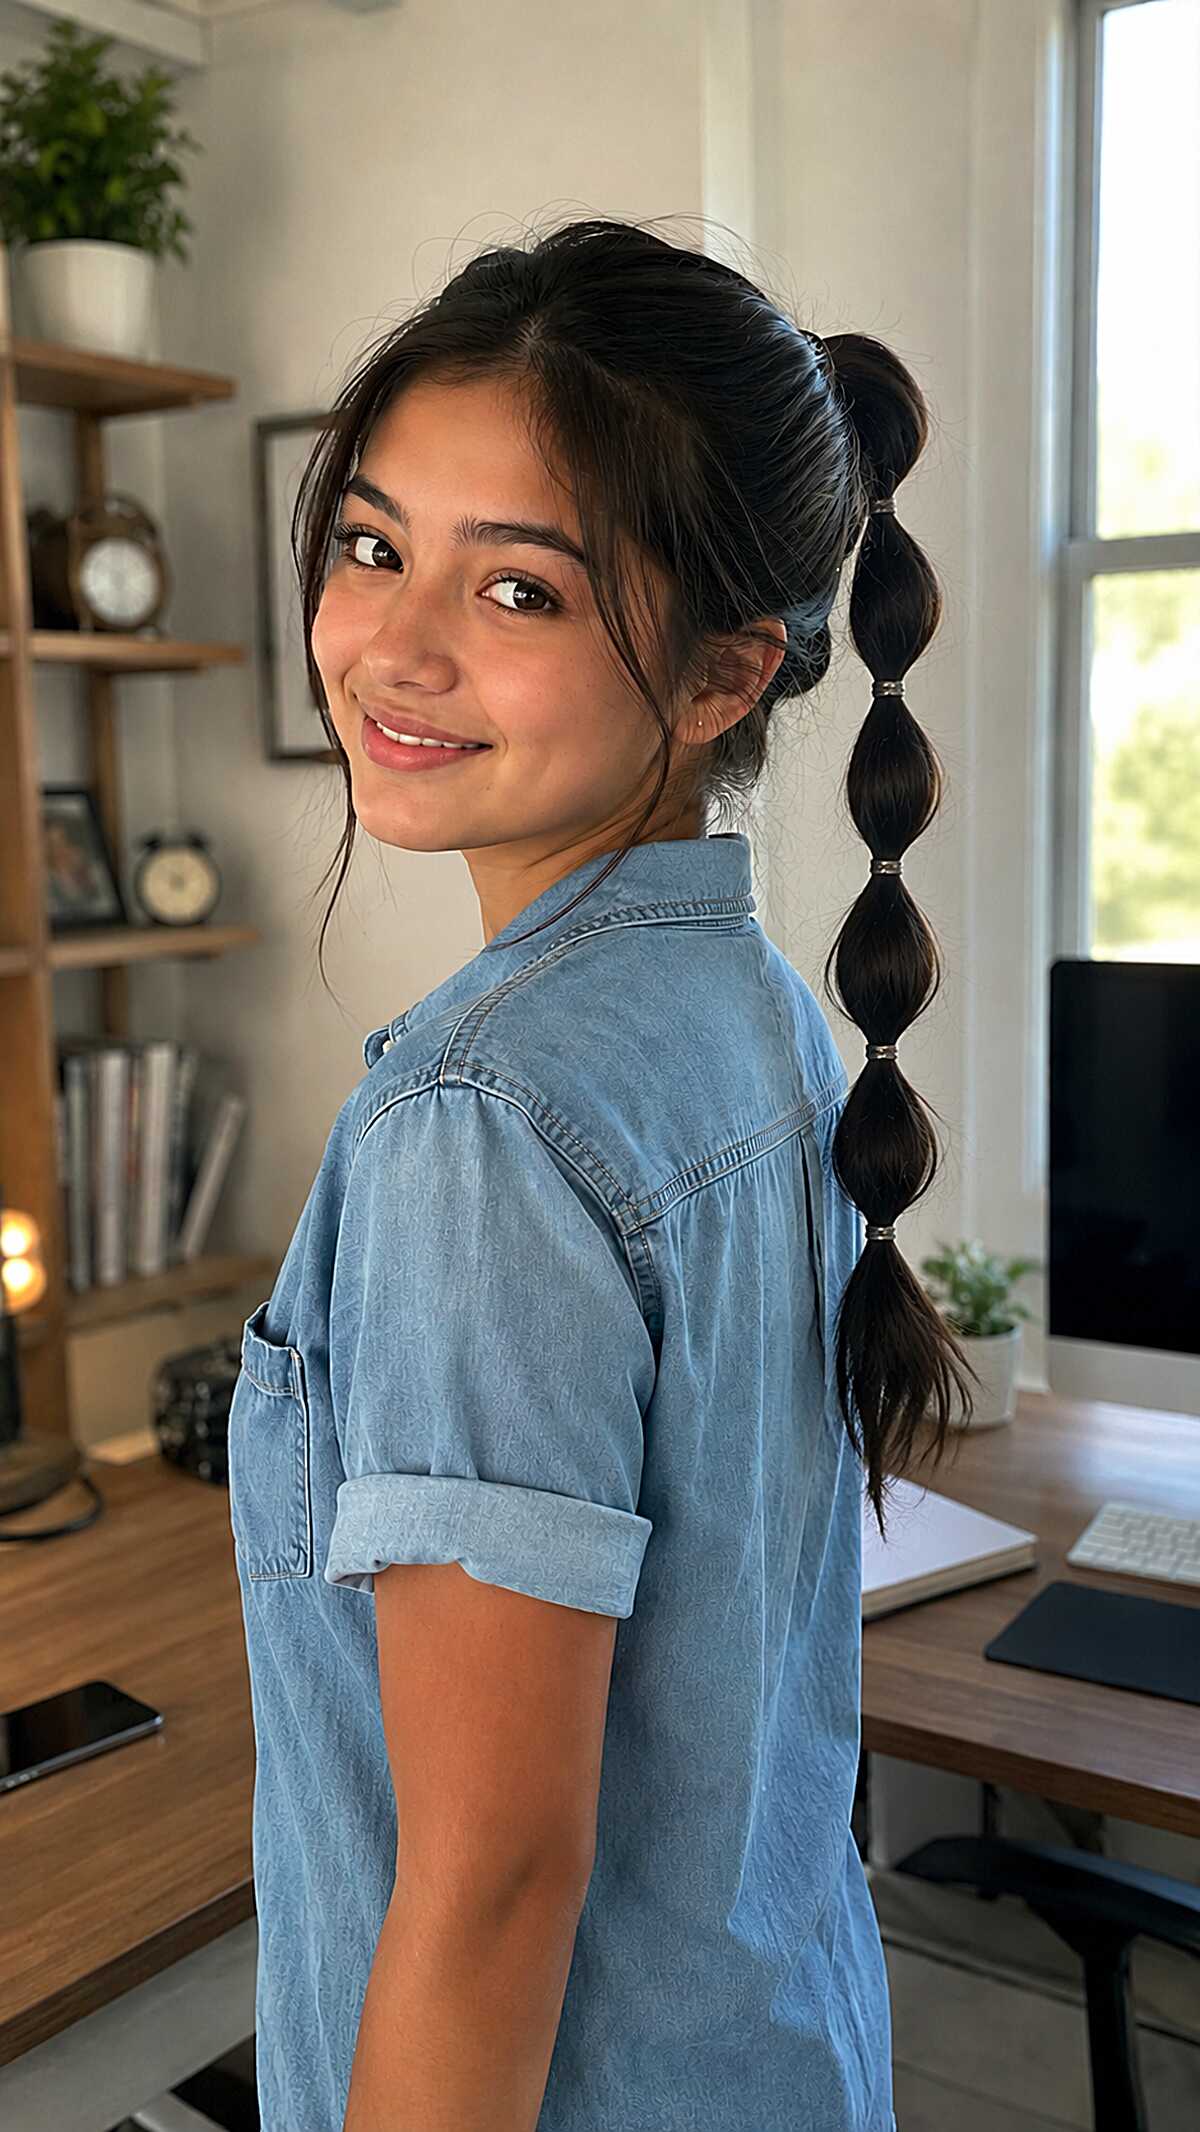
#27 Bubble Ponytail with Wispy Curtain Bangs on Long Dark Hair
You all need some length for this. Medium hair is sad bubble city + regret central. What makes this one different is the volume created by the bubbles. The volume comes from the sections being pulled apart. Instead of relying on your hair to be thick to provide volume, the trick is to pancake the bubble after securing it. This way even medium hair can look more dense. The soft curtain bangs make it look a lot more relaxed, which is important if you have a longer face or a more prominent forehead. Fine hair really struggles with this because the bubbles will deflate within an hour no matter how much you tease them. There is not much difference in using the clear elastics as the metallic ones because they provide better grip on straight dark hair, so the silicone ones will slide right off.
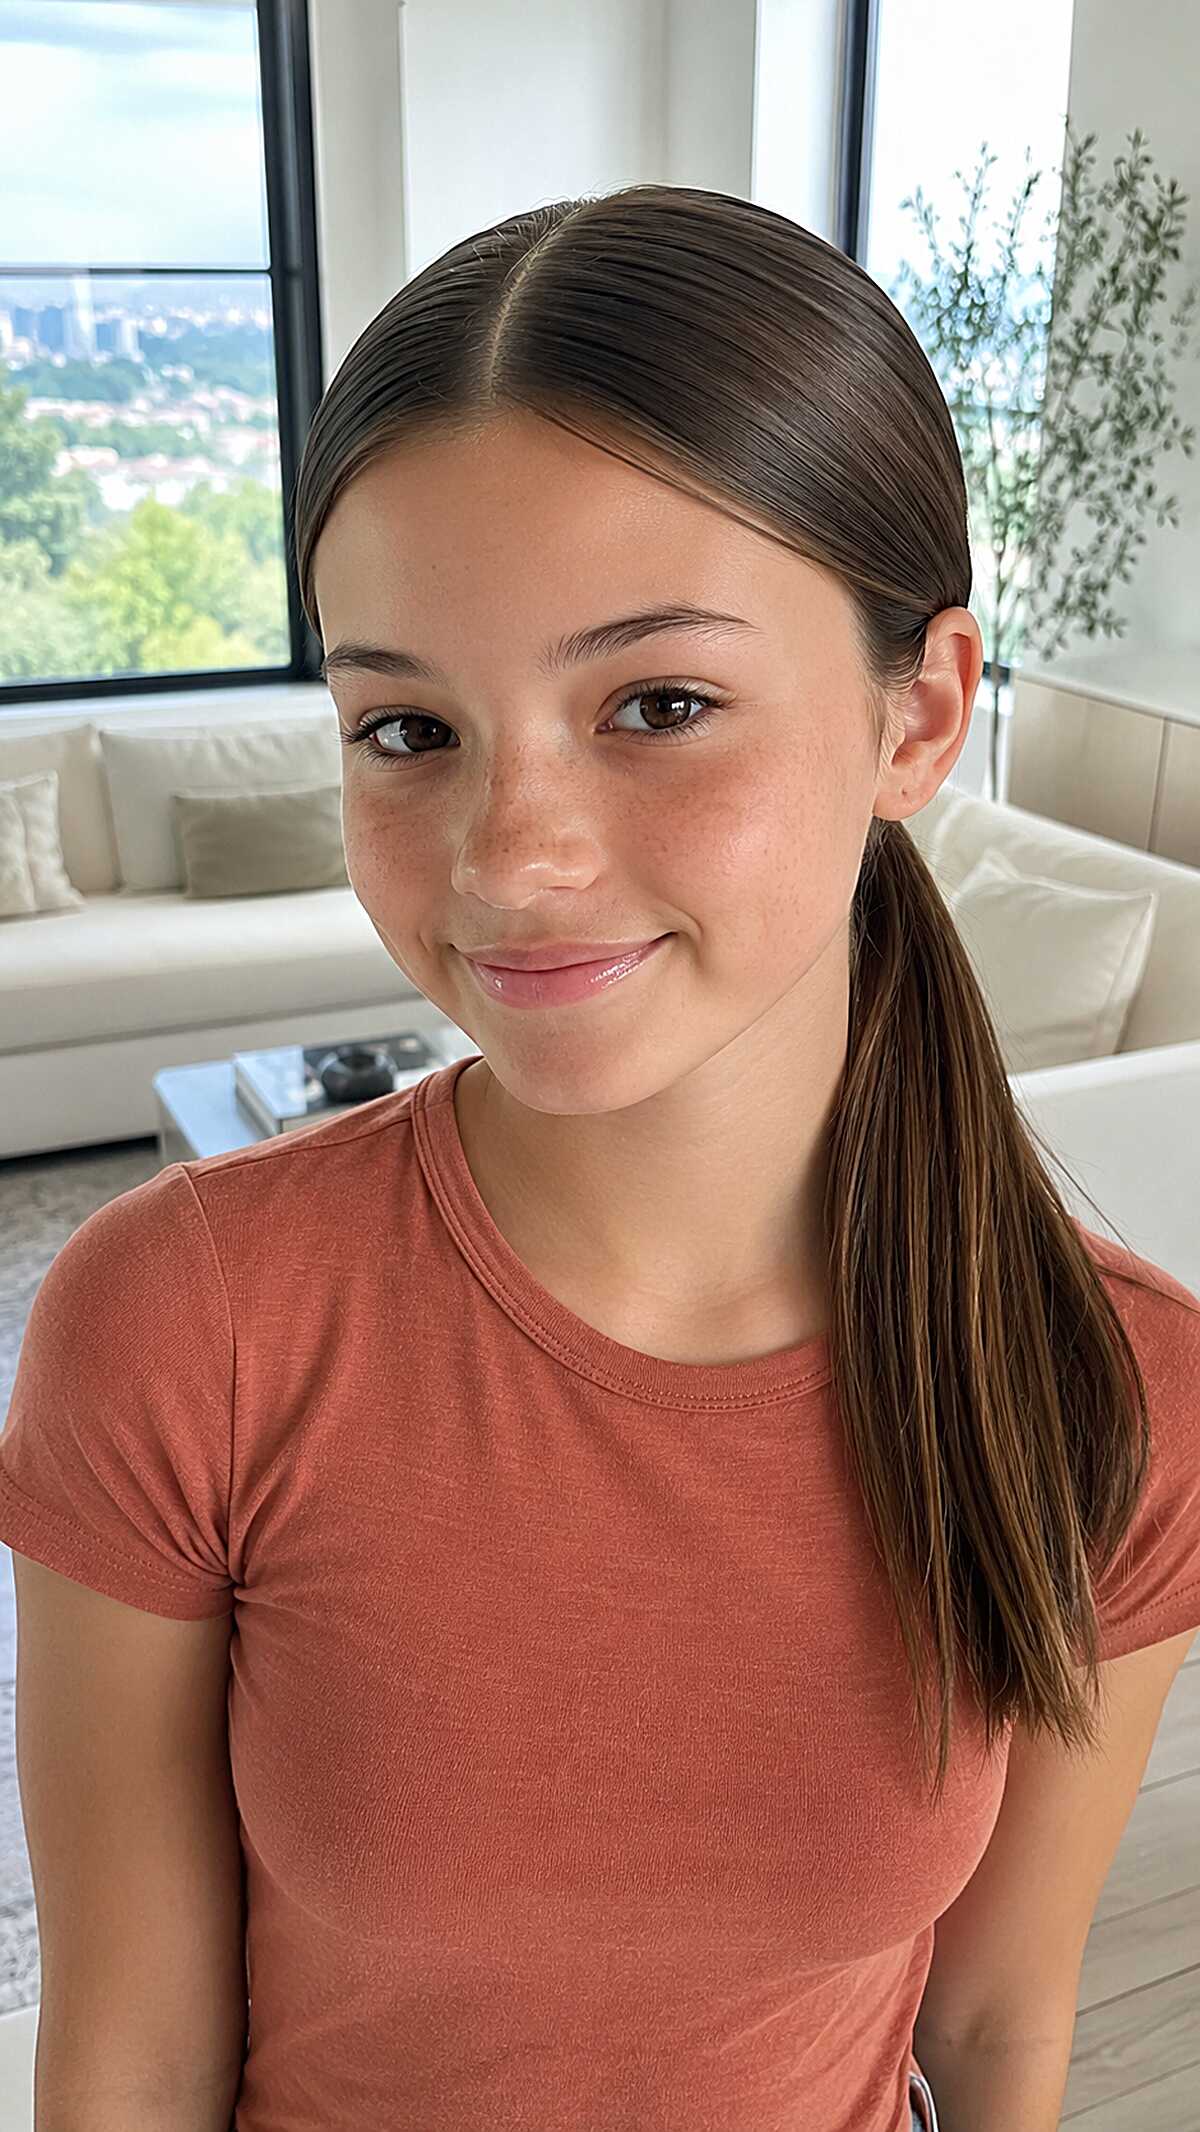
#28 Sleek Side Ponytail on Straight Medium-Density Brunette Hair
Notice where the part is pushed to one side, almost to the temple, which gives this a nice clean look to avoid looking like a low pony. It matters where the ponytail sits. For rounder face shapes, the deep side part adds a lot of asymmetry and vertical length to the face. The best kind of hair for this is straight and medium density and mid back length. That way, the hair will sink down to the head and won’t need a bunch of product to hold it down. If you have thick or wavy hair it will push against the rules for this look, which will just make the style take longer than it’s worth to get everything flattened. It also won’t hold if the hair is freshly washed and therefore slippery hair. The best part is the whole thing takes under two minutes on second day hair with one hair tie and you don’t even need a mirror.
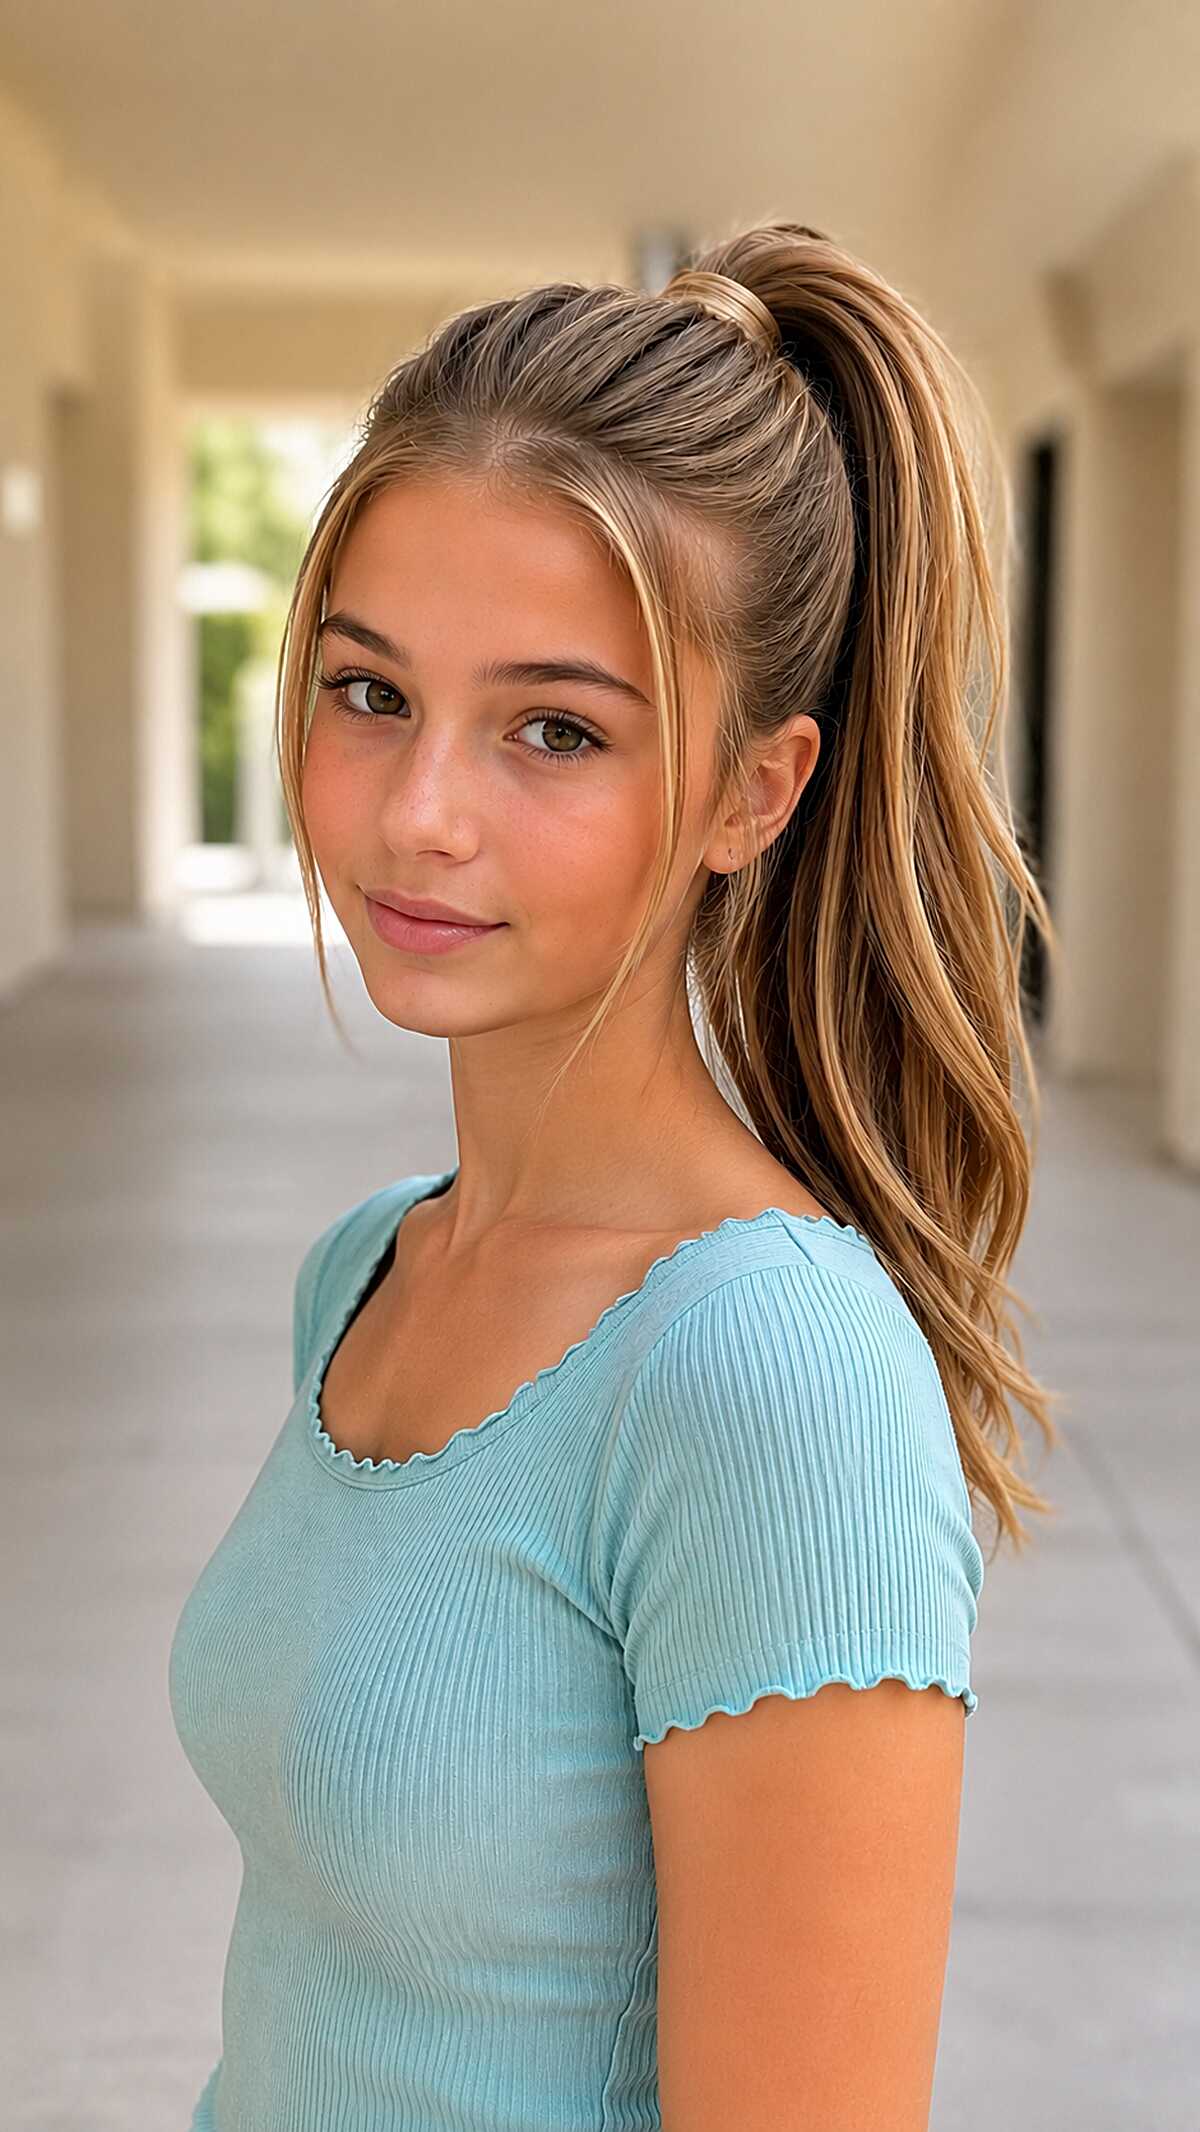
#29 Hair-Wrapped High Ponytail with a Single Curtain Piece on Bronde Straight Hair
The elastic wrapped around the bun is actually super important! Without it, this hairstyle is just a regular ponytail. But, with the wrap, it makes it look super intentional. Take a thin section of hair and wrap it around the base of the ponytail and tuck it underneath. You could pin it, or just let it sit there. You will also want to keep it from looking like you are trying too hard by only pulling one face framing piece free on the left side. This is best suited for medium to medium thick straight hair with some length. The bronde balayage will also help give depth and dimension to the hair which would be a single process color. If your hair is pretty thin and fine, then with a high ponytail this tight, it will expose your scalp at the temples and the ponytail will look super thin and that’s not a styling problem, that is a density issue. Oval and heart shaped faces tend to wear this style the best. Round faces are not as well suited to this look.
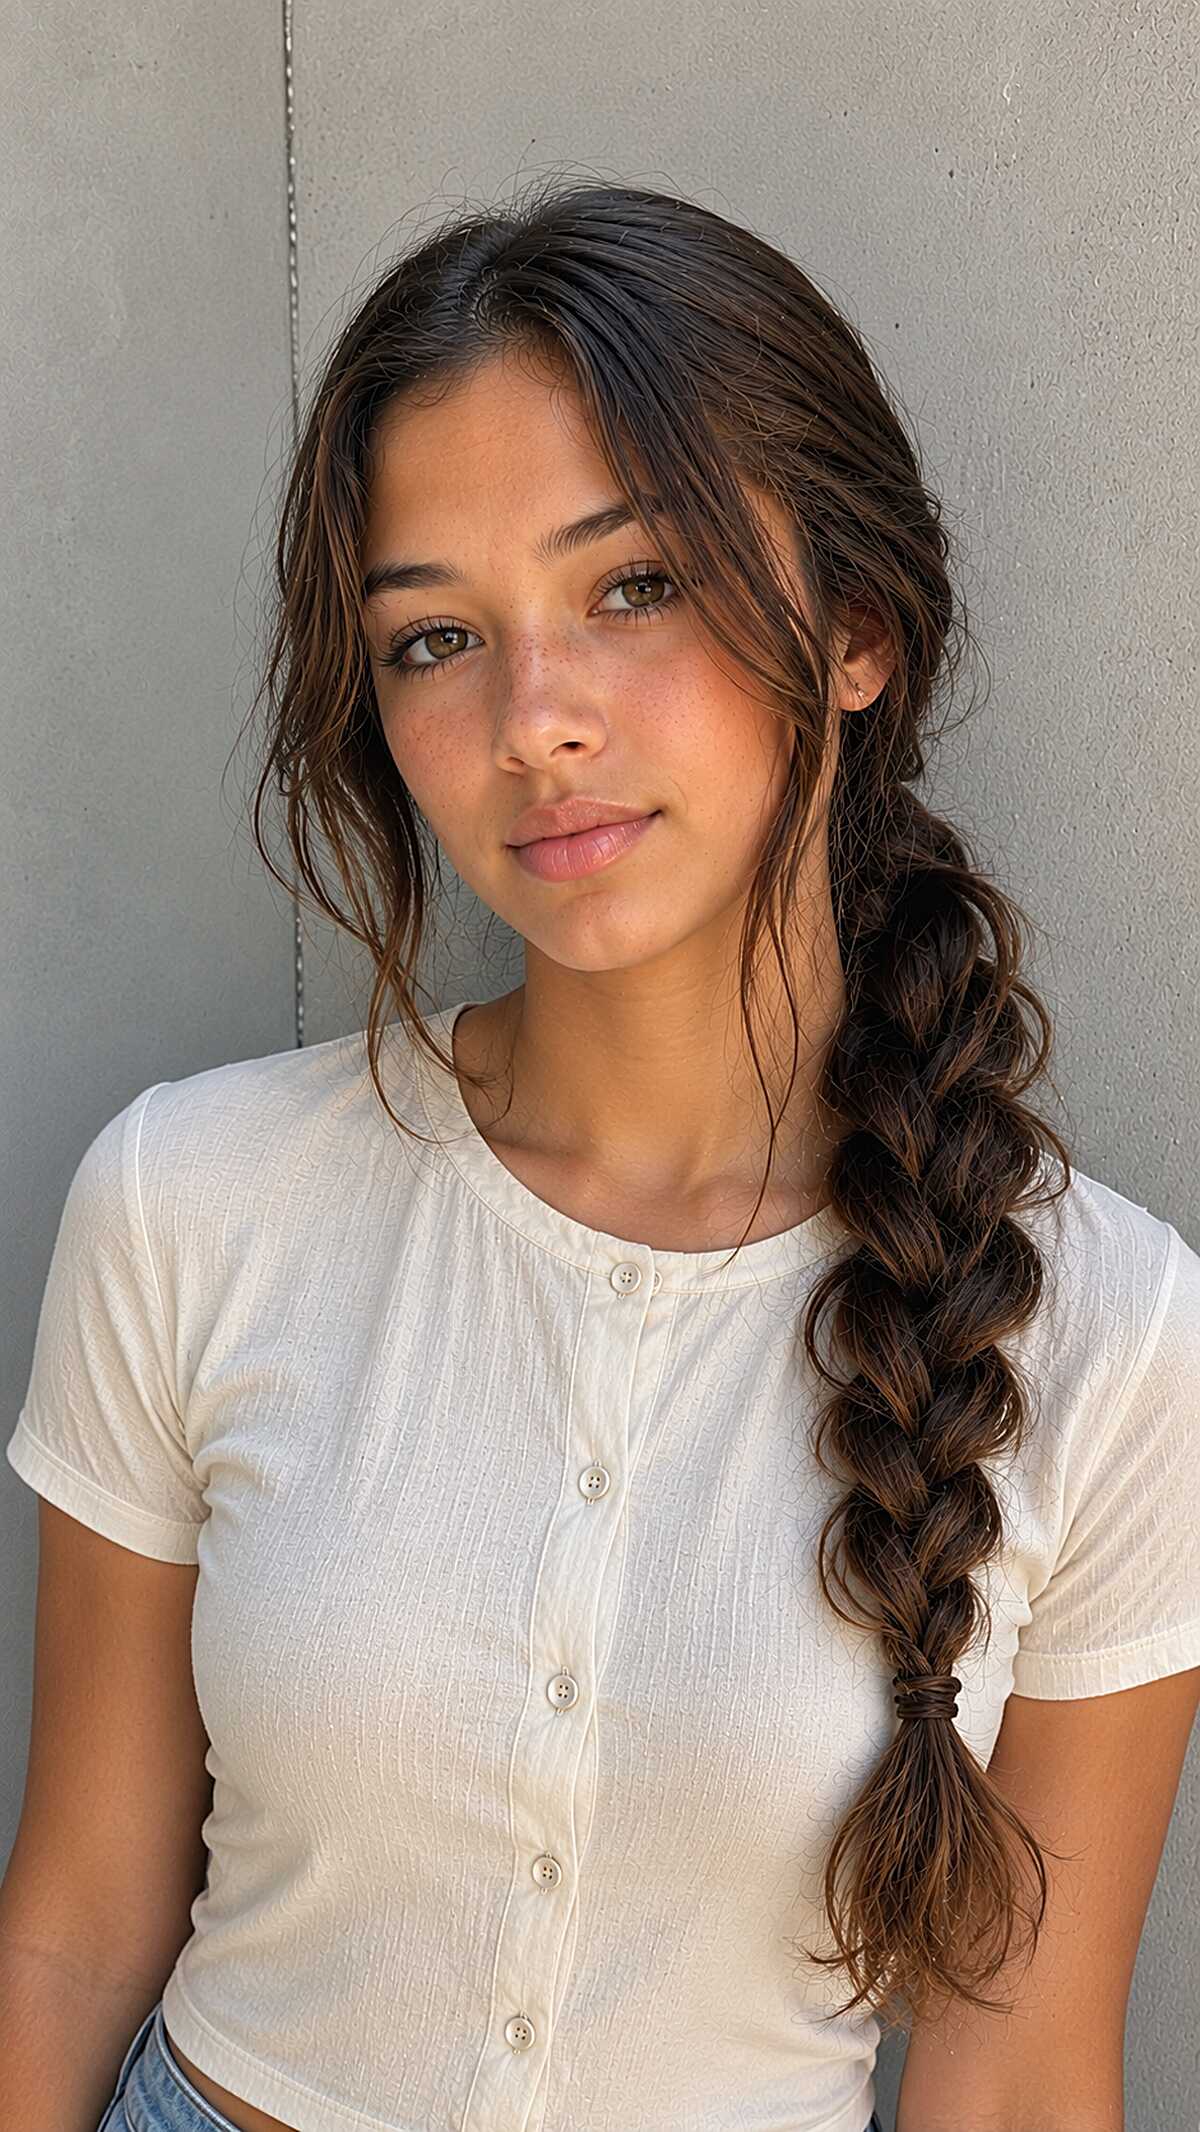
#30 Pulled-Apart Side Braid with Wavy Loose Pieces on Long Dark Hair
The braid is not braided tightly. It is a loose three-strand braid that has been pancaked out a lot. This creates a thick, rope-like appearance in her hair – this is a result of her hair’s moderate density. If your hair is thin, then it will not look this way and will look stringy. You will need hair of at least medium density and length past your collarbone for the braid to have any real weight to it. The face framing pieces have been pulled from around the temple and left wavy and do a lot to soften a wider forehead or stronger jawline without looking too fussy. This is also a way to combat the look of a round face, as all the looseness around the face is likely to add unwanted width. This braid is side sitting as well; meaning it was purposefully styled to sit over one shoulder, so your part will have to fall just right or the braid will pull unevenly at the crown.
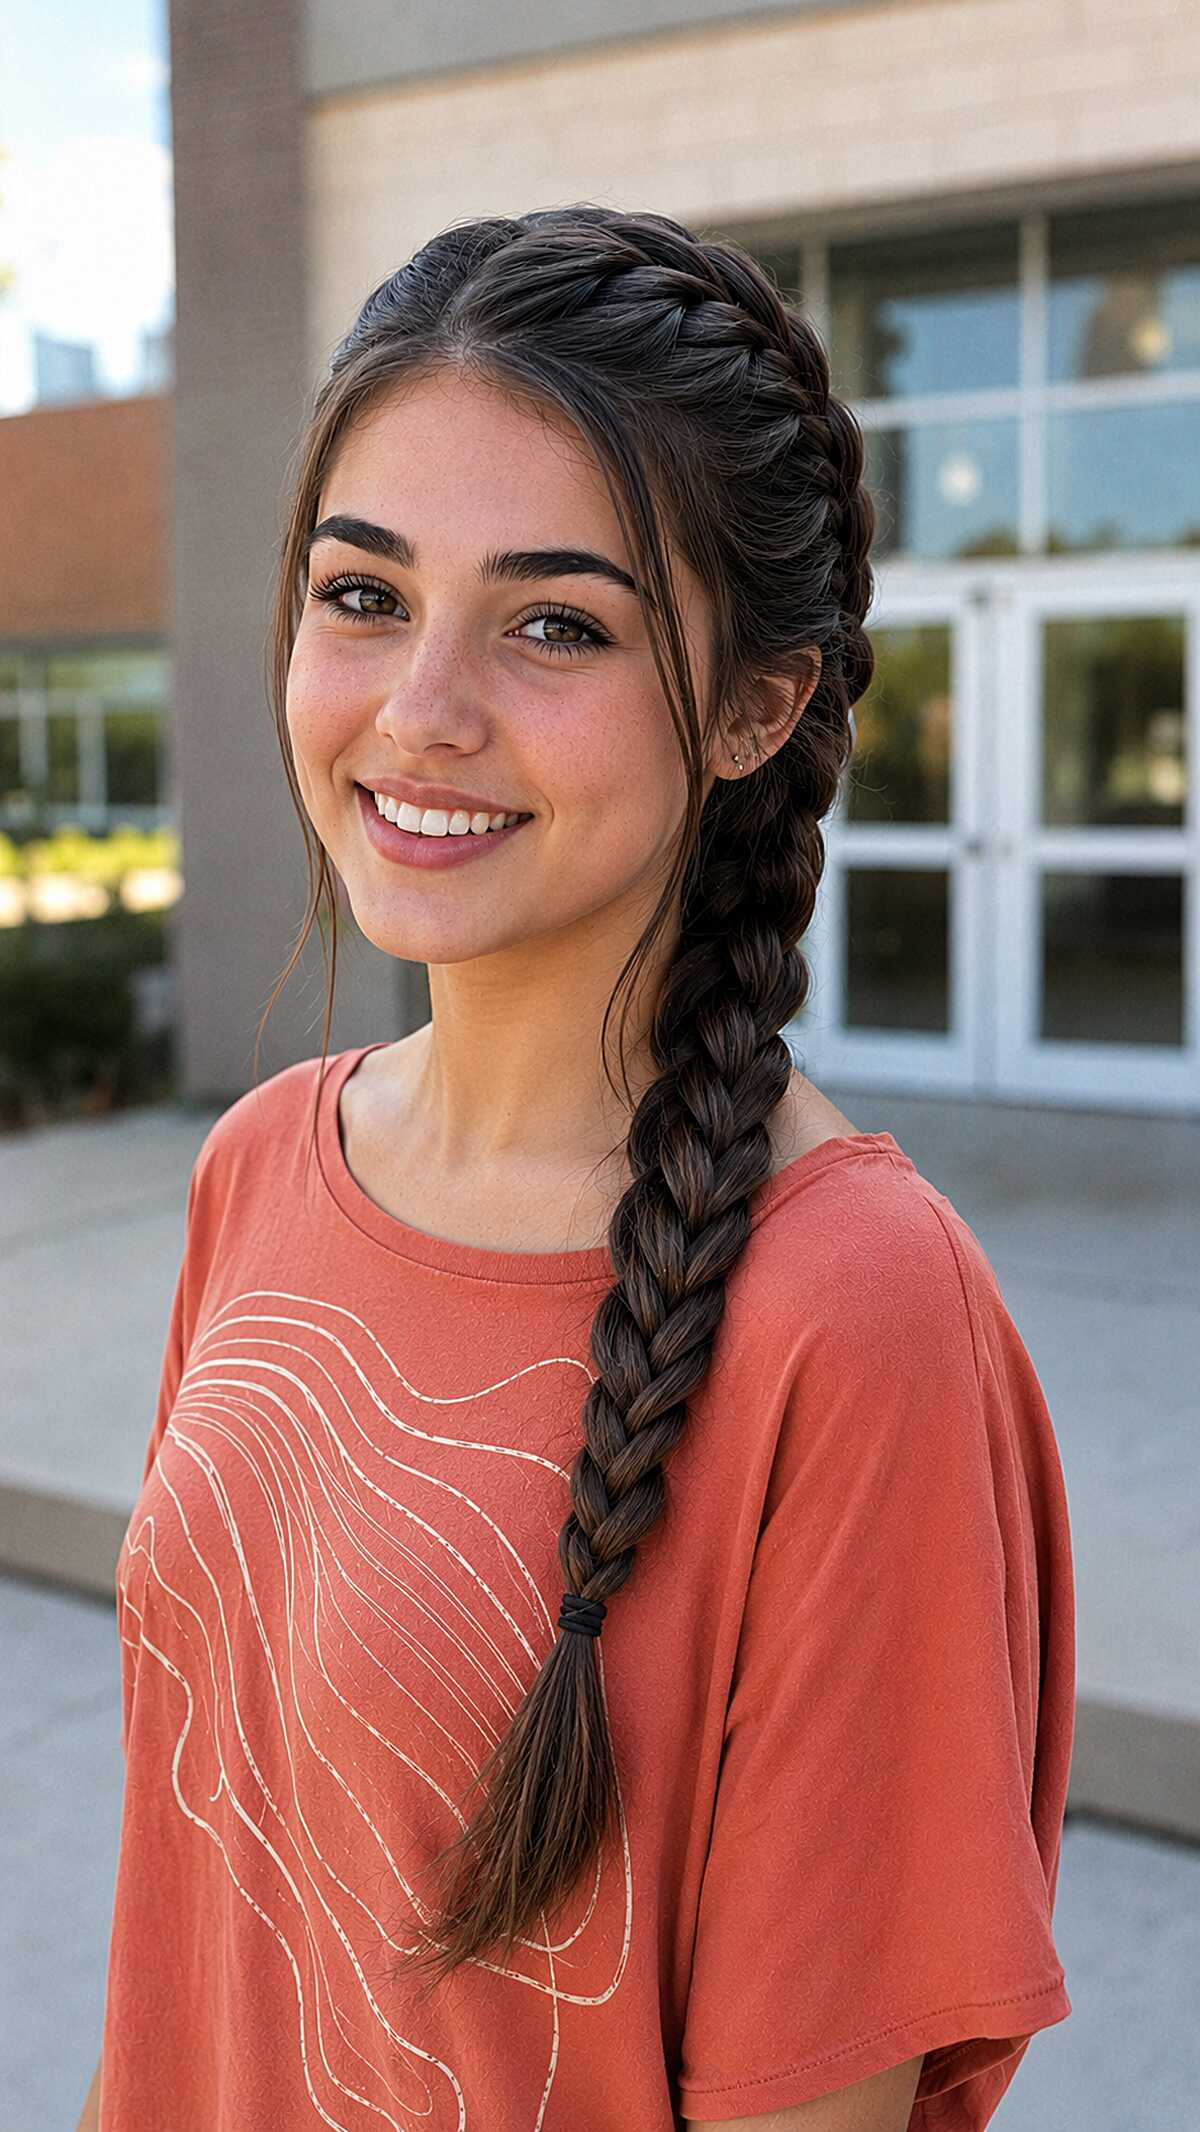
#31 Single French Braid Swept to One Side on Long Dark Hair
This won’t work on fine hair. The braid needs genuine density to hold that thick ropelike shape down the whole length and on thinner strands it just goes flat and stringy by second period. What’s worth noticing here is how the French braid starts at the high crown and crosses diagonally before falling over the shoulder which means the plaiting technique is angled from the start rather than straight back. That diagonal is the whole look. The few wispy pieces left out at the temple and ear keep it from feeling too pulled together and they are clearly intentional not just fallout. You need at least mid-back length for this to land right because shorter hair will poke out of the braid in stiff little spikes instead of tucking in cleanly. Ideal is medium to thick straight or wavy dark hair. This genuinely takes four minutes once you’ve practiced a few times so if you can French braid on yourself then it should be easy. Oval and heart-shaped faces suit this well since the side placement draws the eye down. Everything swept to one side like this can make round faces feel wider.
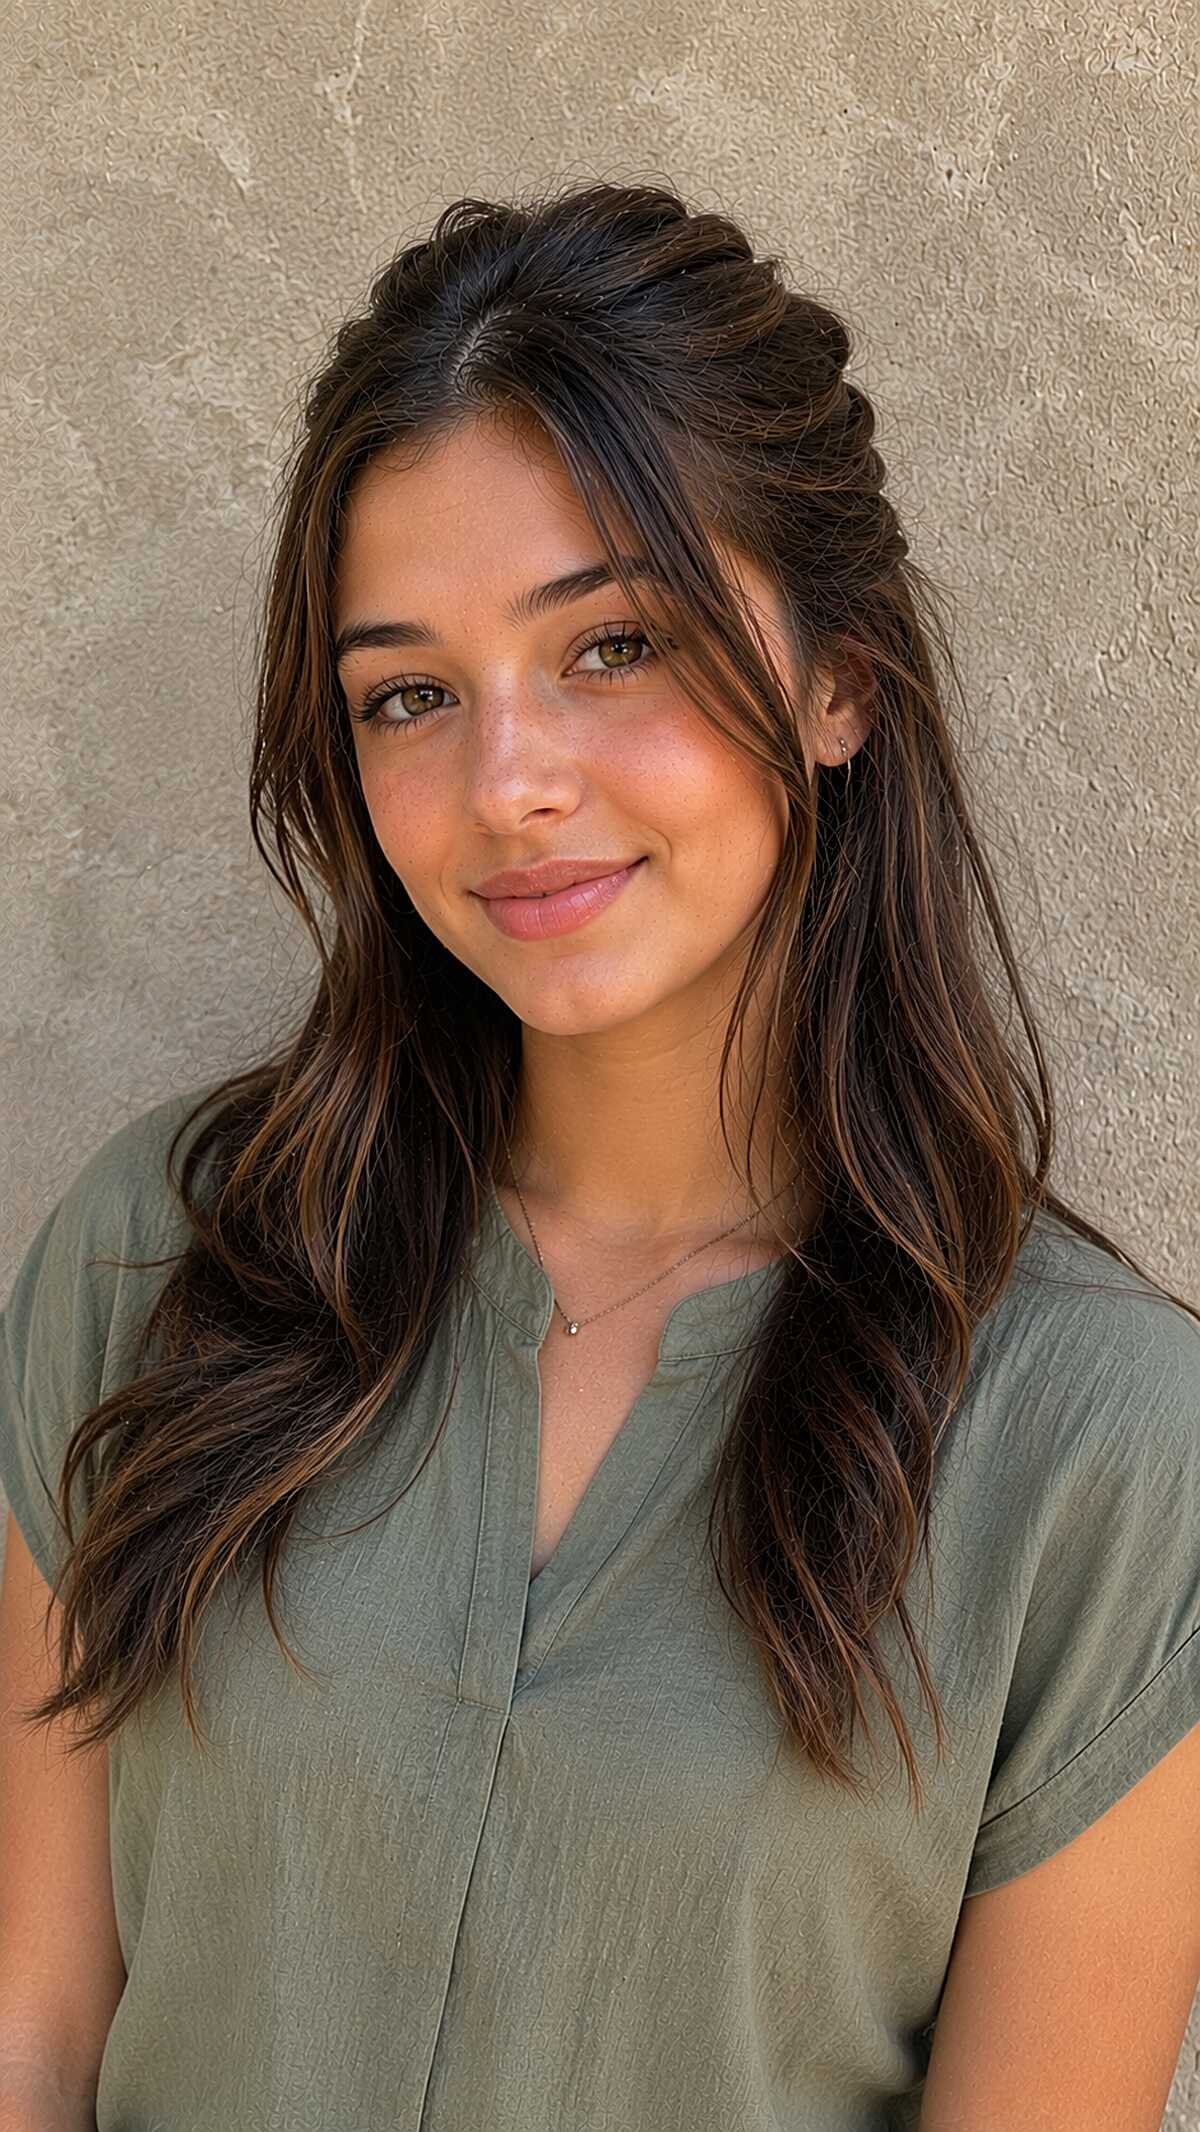
#32 Fishtail Crown Pullback on Long Brunette Waves
The trick to the look of the fishtail braid is how it lays flat against the crown of the head. This effect only works if you pancake every single stitch of the braid as you go along – if you wait until the end to do this, the effect won’t happen. This is a style intended for medium to thick hair only. With fine hair, the braid will quickly reveal the scalp underneath it (no amount of texture spray will fix that). The long curtain bangs that frame her face are doing a lot to soften her angular jawline and keep the overall look from being too polished for a school morning. The natural wave in her hair adds enough body to the loose hair so it doesn’t go flat against the pulled back section. If your hair is super straight, expect a major gap between the braid and the rest of your hair.
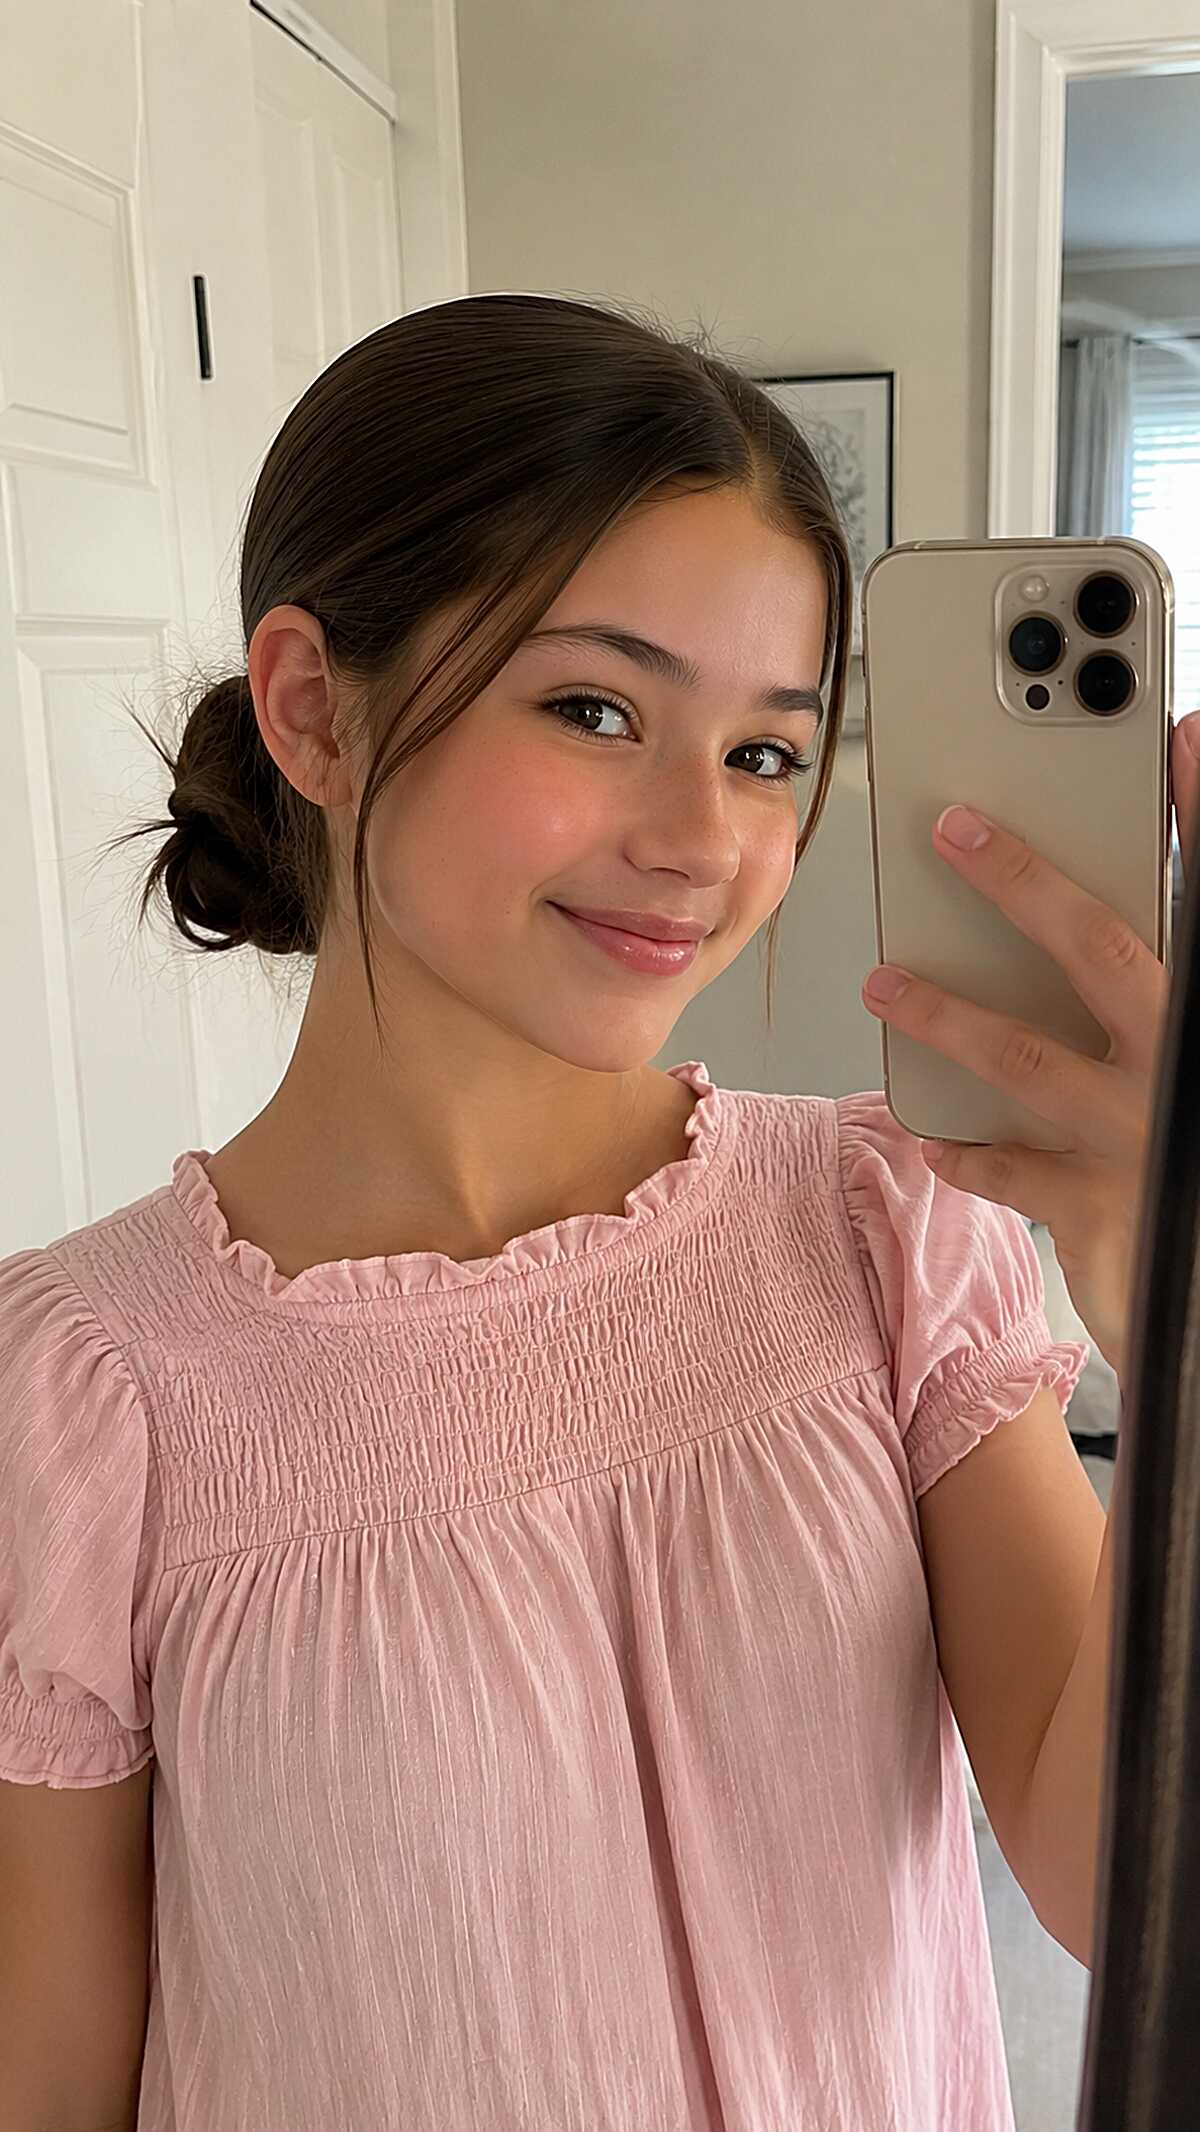
#33 Tiny Low Bun with a Single Loose Tendril on Dark Straight Hair
That bun is very small. I would estimate that the hair is medium density at most, and probably shoulder length or just past it when worn down. What makes this good is the one face framing piece that is pulled to the side and intended to not fall loose, and the center part that is pulled back smooth and not overly slicked. If your hair is thick or long, this bun will sit differently and lose that compact neat shape completely. People with oval and heart shapes will look good with this since the pulled back sides don’t widen anything. On round faces this won’t be good because the tightness is not flattering without the volume at the top. The technique here is a simple twist and tuck at the nape with one elastic and a couple bobby pins. It will probably unravel by lunch if your hair has a wave or any texture and you skip a smoothing cream.
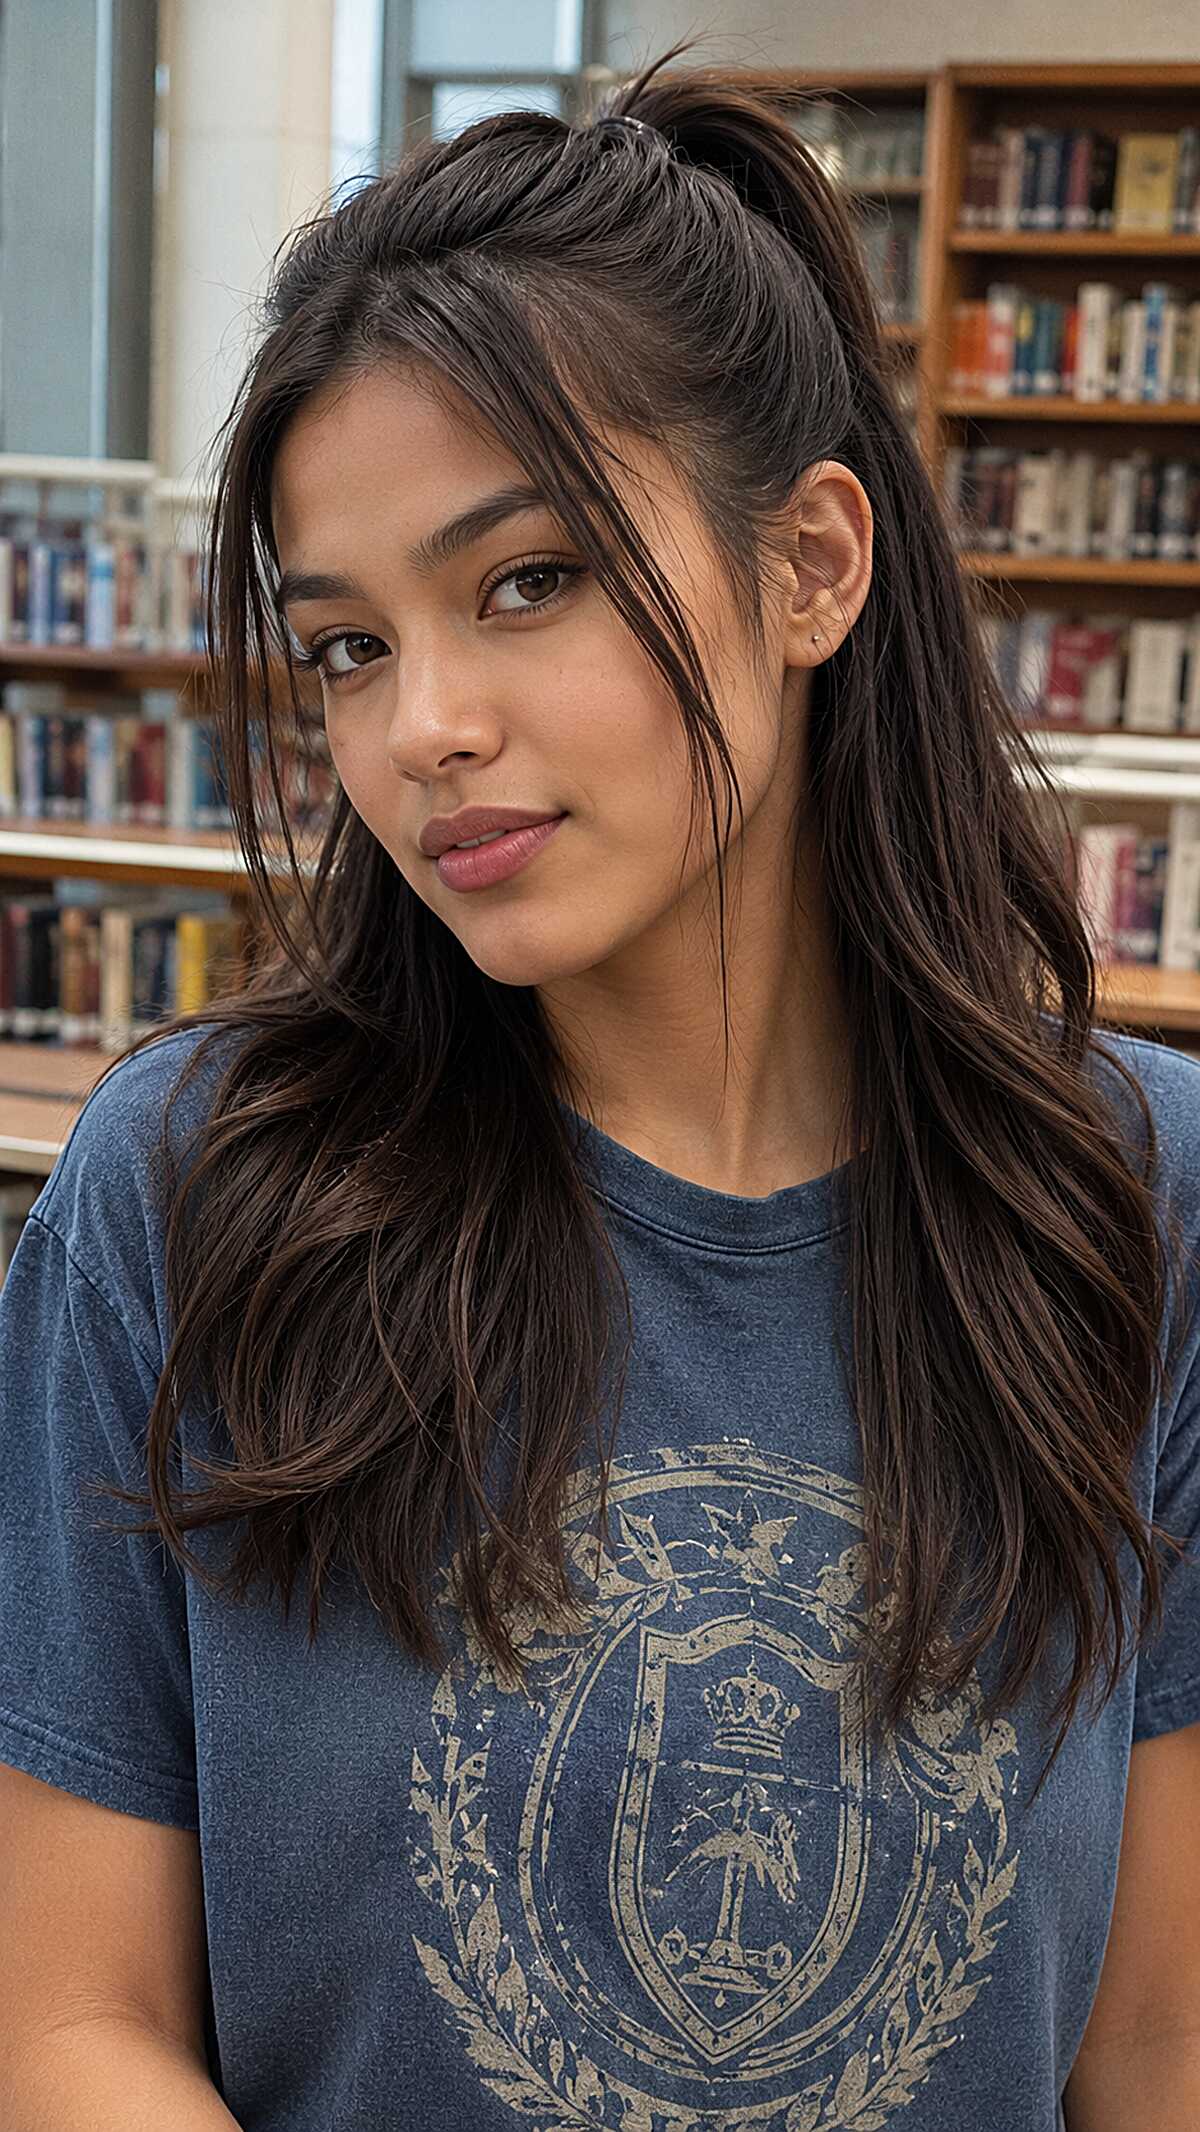
#34 Half-Up Ponytail with Wispy Curtain Layers on Long Dark Hair
The pieces in the front are different lengths. The shorter piece by the temple and the longer one by the jaw makes it so this look doesn’t resemble every other half-up ponytail. The layering on the sides of the face was point cut, so those pieces have movement without looking blunt or heavy. This style is better on medium to thick hair with some natural wave, because fine hair will just go flat by the second period. Oval and heart face shapes get the most out of those face-framing pieces. If you have a wider jaw, longer pieces that sit right at chin level will only draw attention to that area. The ponytail is gathered loosely at the crown, not pulled tight. So, you need enough hair for it to look thick from behind. It takes about two minutes.
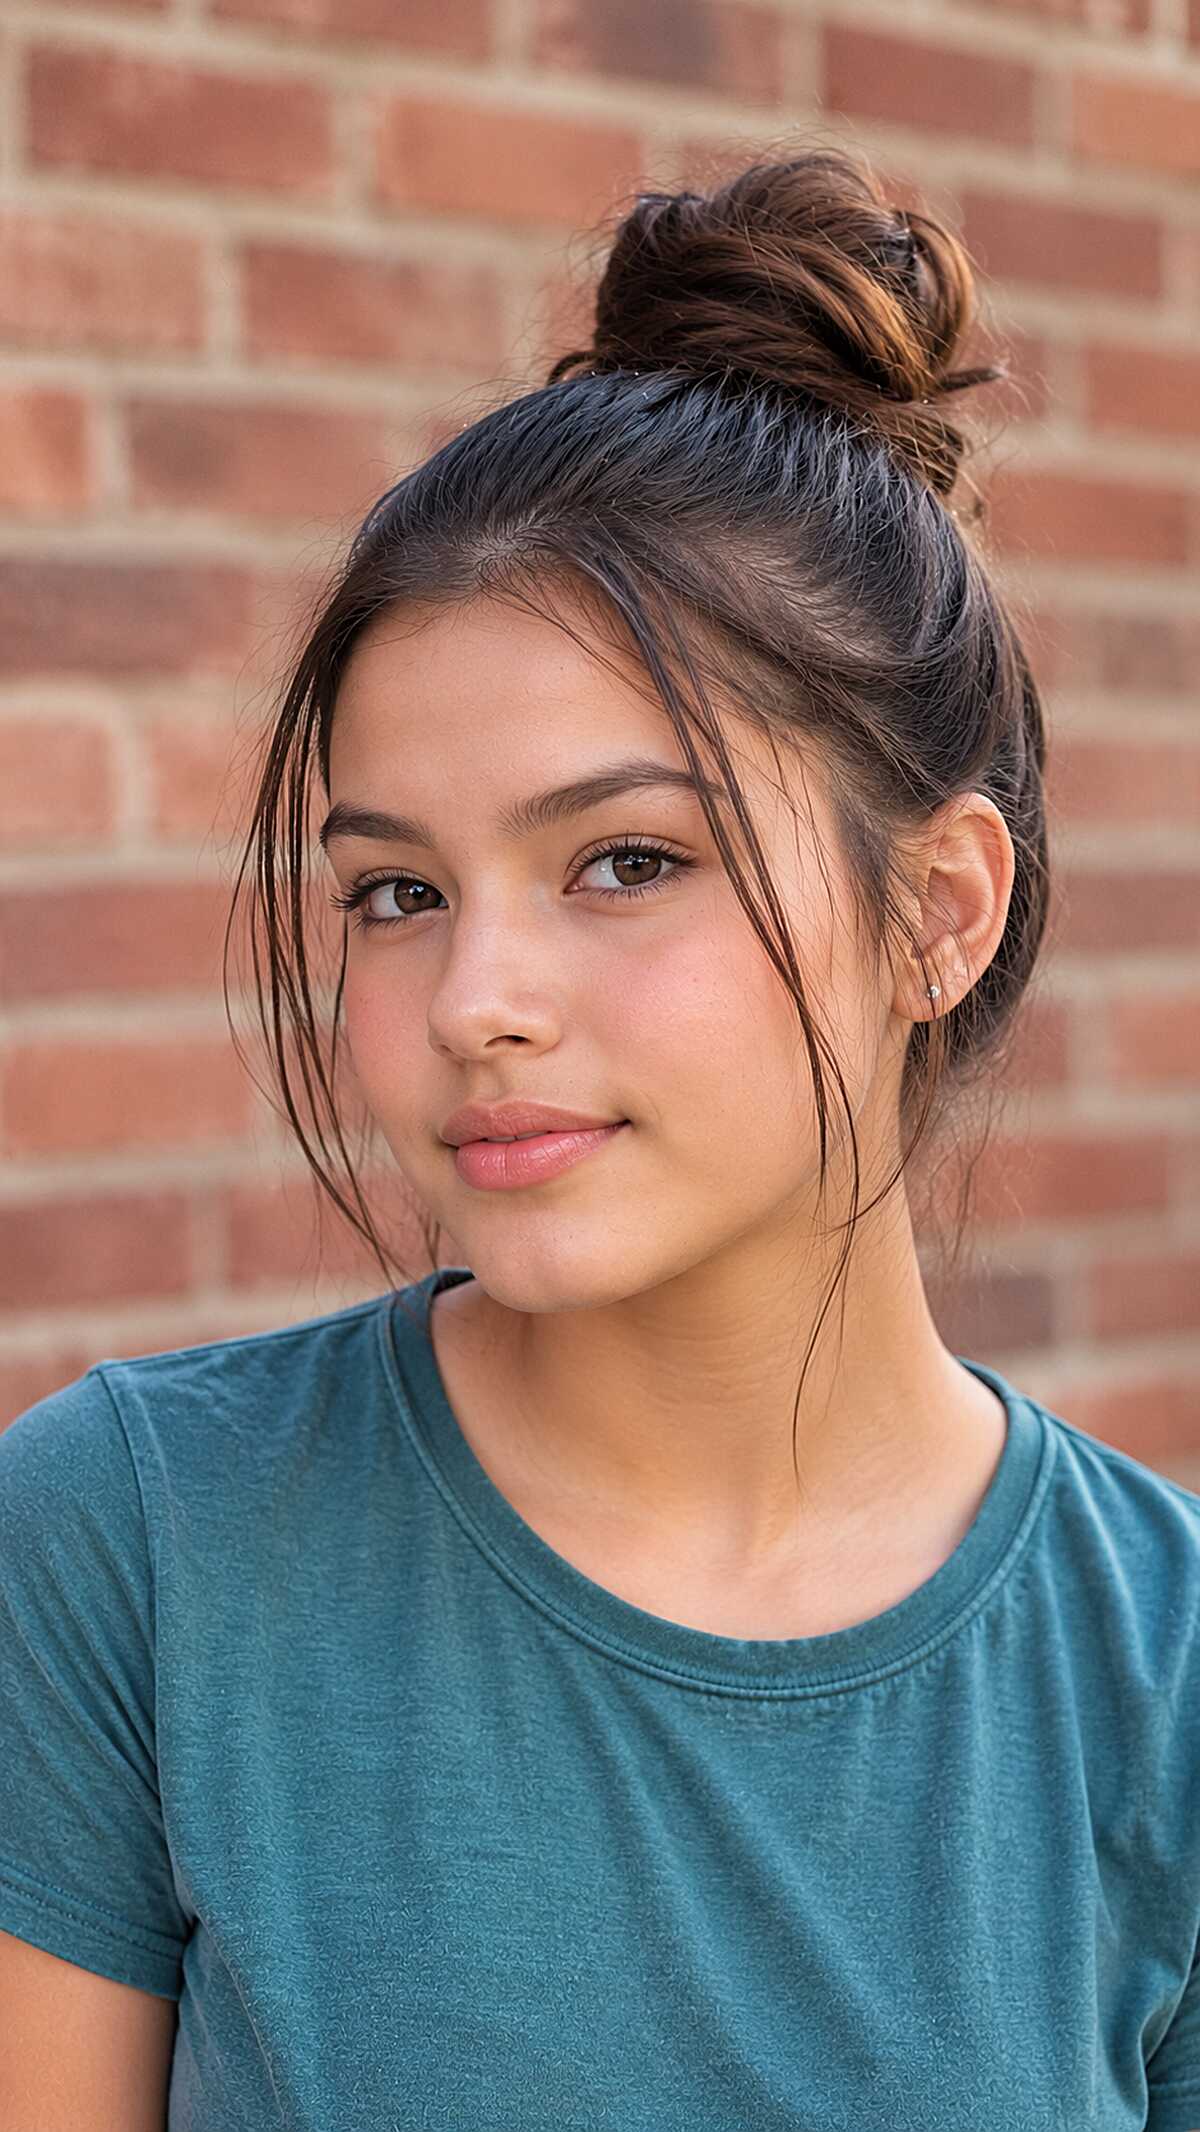
#35 Quick Top Knot with Wispy Front Pieces on Dark Straight Hair
In this case, the pieces left out in front are doing all the work here, and they’re purposefully left looking thin, almost stringy, which is what keeps this from looking like a rushed gym bun. That’s intentional. It takes a decent amount of hair on the medium to long side to be able to create a knot that can hold its shape without a ton of bobby pins, and hair that is straight to a bit wavy makes the front pieces fall just right instead of frizzing out at weird angles. On rounder faces, those long pieces narrow the whole look nicely. If your hair is fine or layered short around the face, those wispy pieces won’t sit like this and the bun will be flat and sad. This is, as mentioned, a genuinely 90 second style, no heat, and no product required if your hair cooperates.
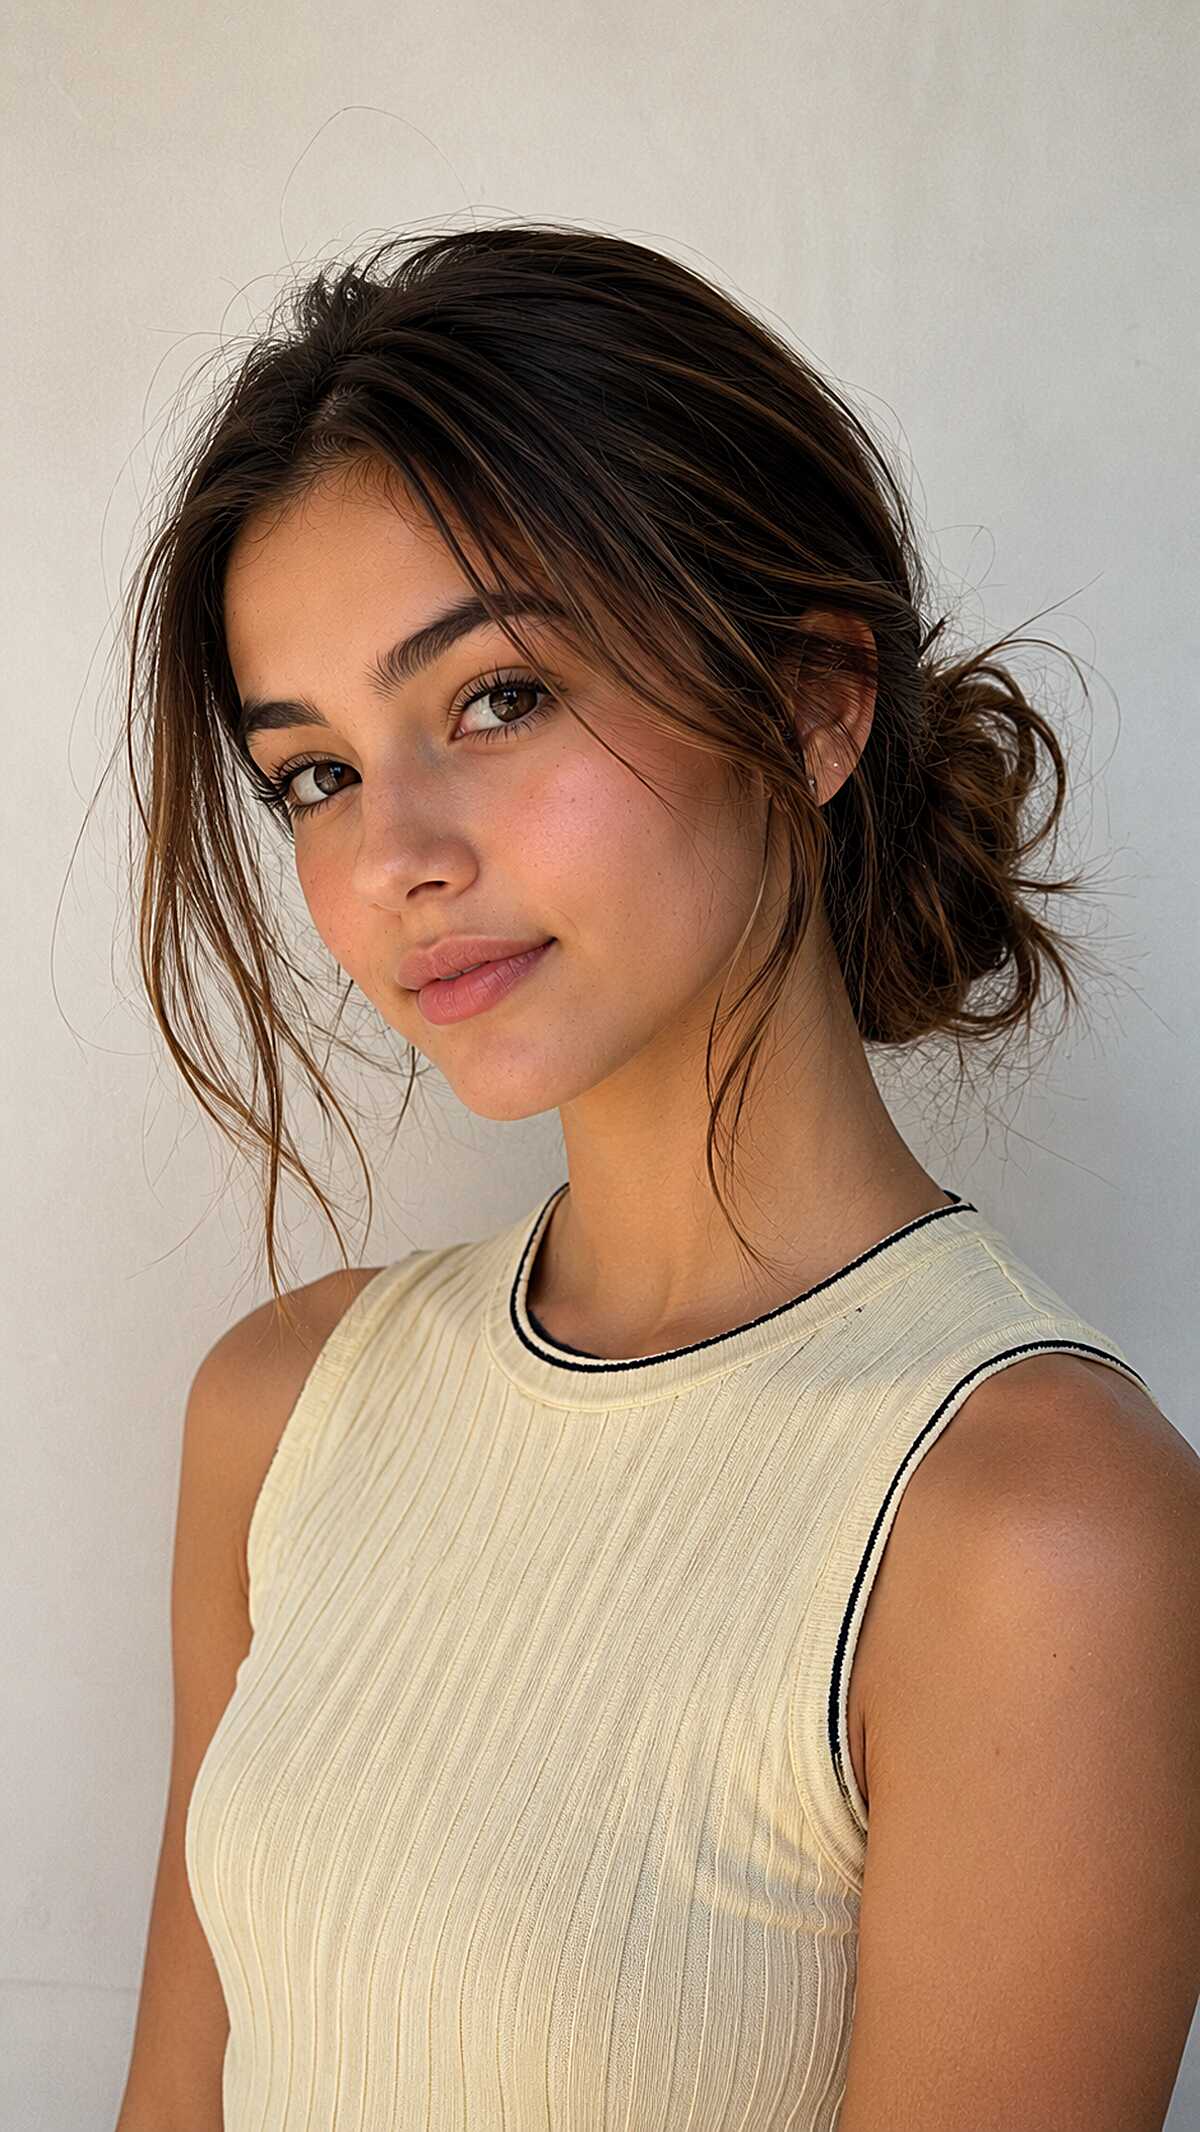
#36 Undone Low Bun with Curtain-Parted Face Framing on Medium Brunette Hair
Your bun might be falling off (and that’s the point). With the right amount of face framing layers, not just curtain bangs, but longer pieces coming down from the nape of the neck and the temples, it creates a nice soft frame all the way around. If your hair is medium in density and around mid-back length, you’re able to do this quick style in under two minutes with only an elastic band. For thick or fine hair, the proportions may feel off and not the same. Thick hair can sometimes cause the bun to feel extra bulky at the back of the neck, while fine hair doesn’t tend to have the right wispy airiness that you’re looking for unless you use a lot of product and do some curling which adds time to your style. The goal is to have uneven pieces, some that fall to the jawline and others to the collarbone, so that it creates that loose, thrown together look, instead of looking like you just accidentally had some hair fall out of a ponytail. Oval and heart face shapes really benefit the most from this look because of the way it frames the face. Rounder faces may want to pass on this look altogether. The warm brunette base has some subtle caramel highlights in the front pieces which really catch the light due to the balayage, and is a lot more interesting than a single process color.
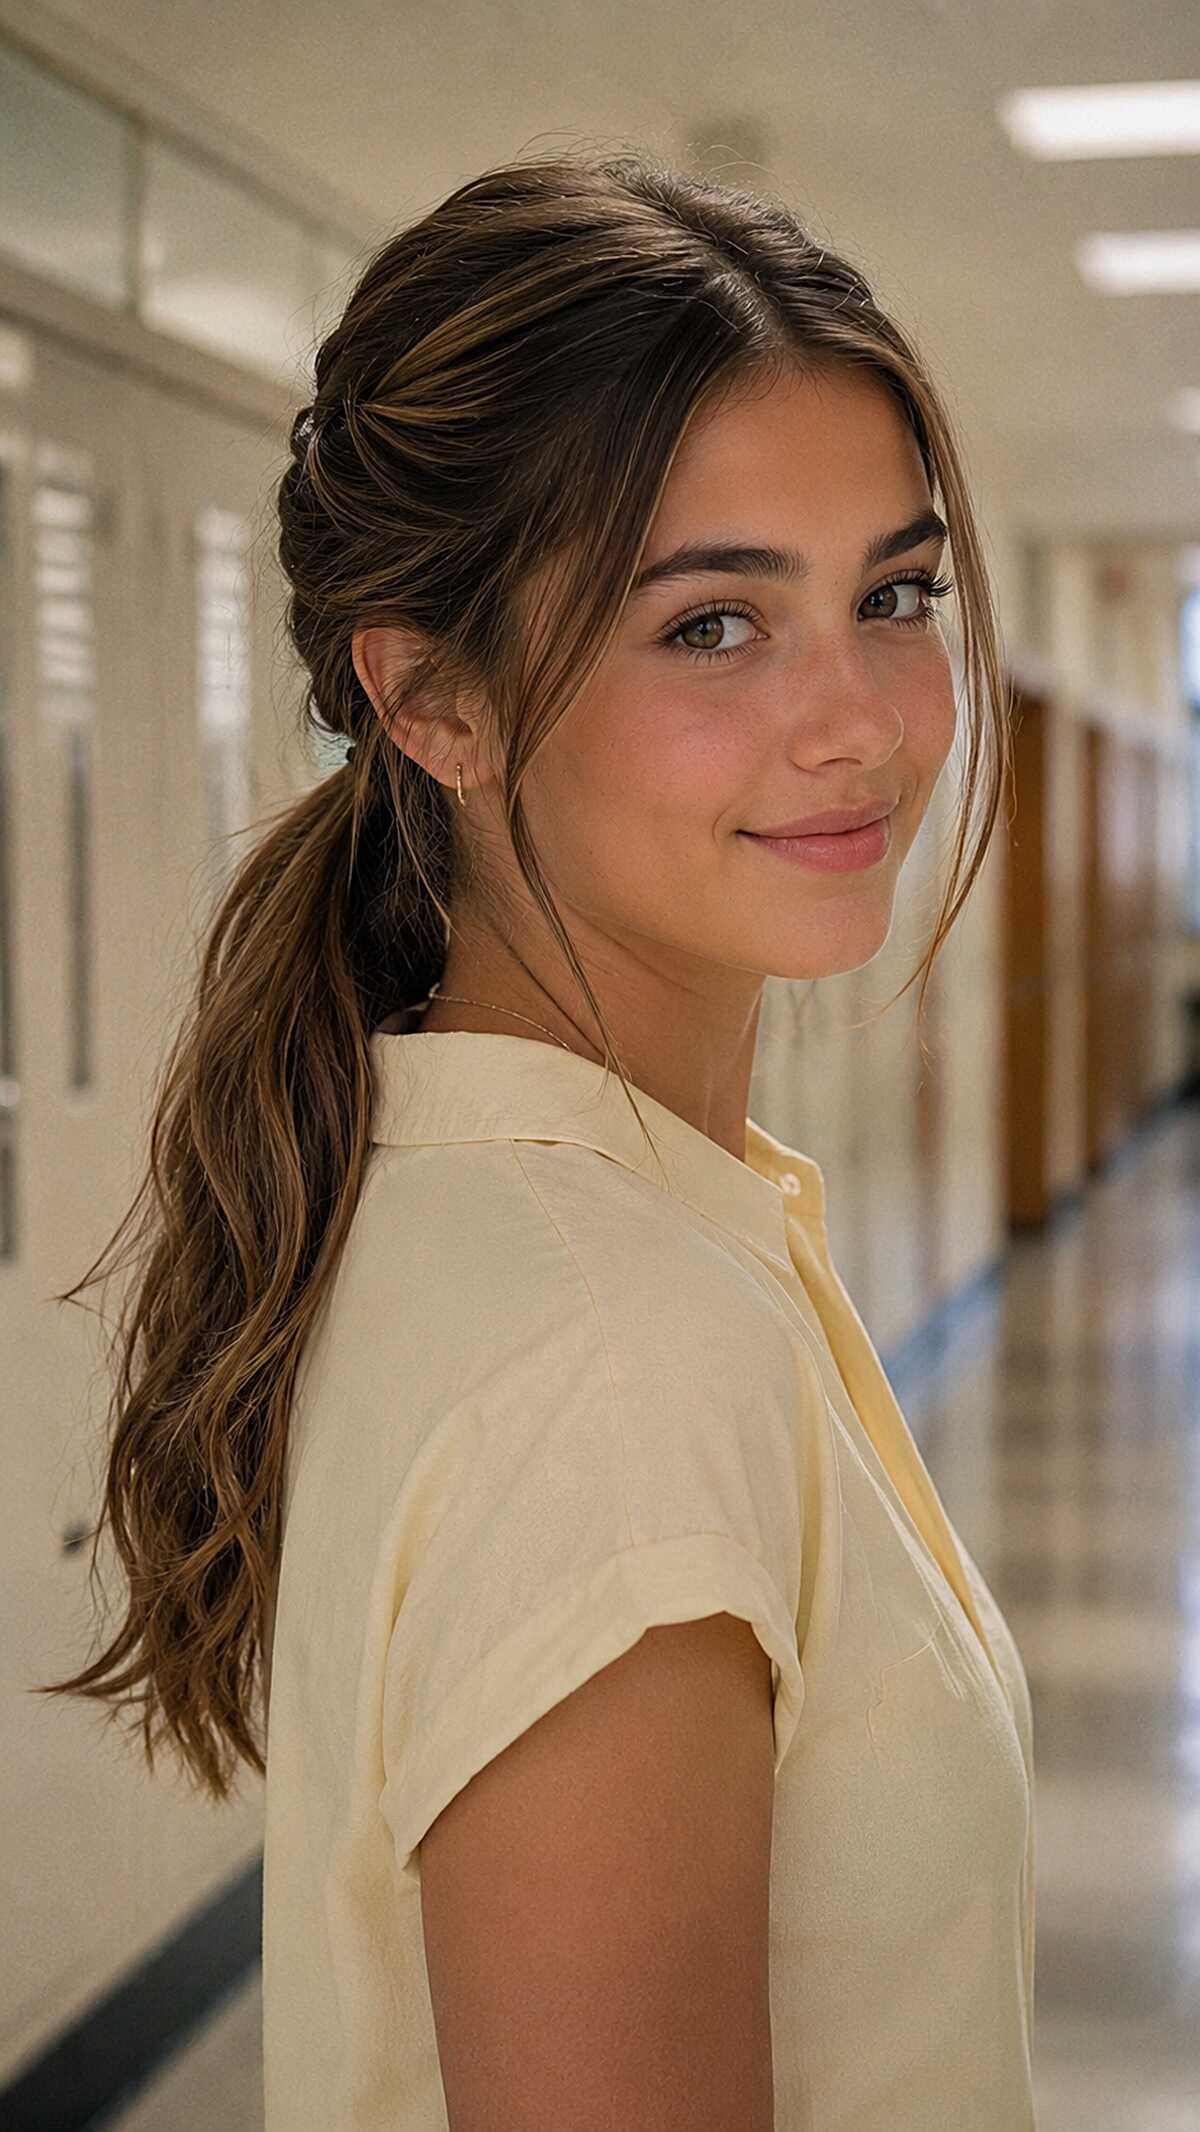
#37 Twisted Low Pony with Loose Front Strands on Medium Brunette Hair
The intricate work at the crown will do all the lifting, and most will miss the fact that it is just two sections wrapped around each other and secured at the nape. That’s it. When it comes to medium density, slightly wavy hair, the twist holds the texture incredibly well. This is quite an achievement considering how simple the twist is. Each side gets one face framing piece, and this is purposefully kept thin, nearly wispy, creating a nice softness to oval and longer face shapes. For this style to sit flat at the back, you will find this sits best on fine hair. Coarse or thick hair will sit flatter and create less of an intentional twist, and actually bulk up in a way that looks a bit more messy.
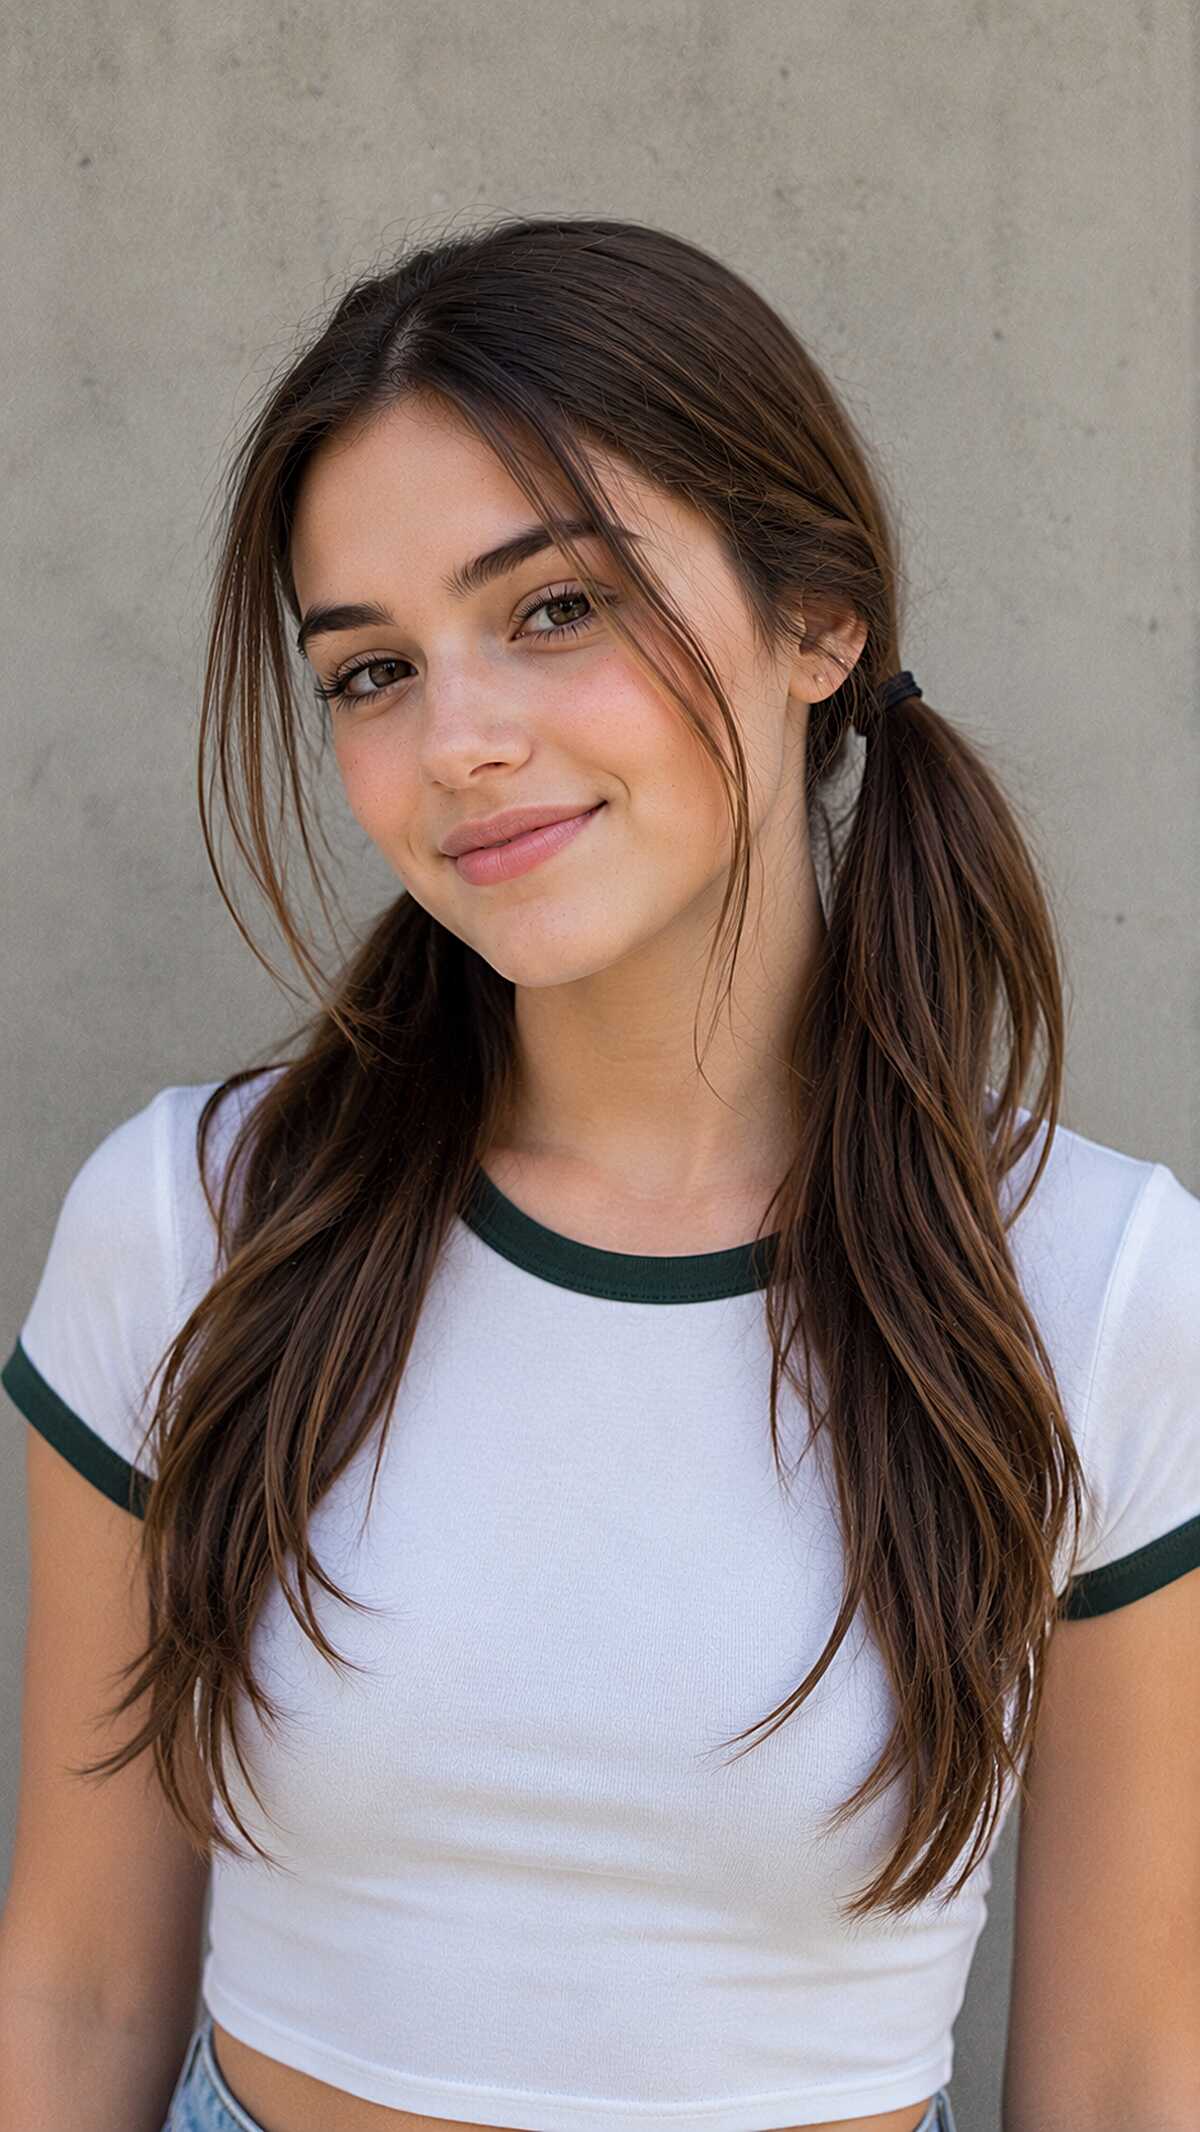
#38 Side-Swept Low Pigtails with Long Face-Framing Pieces
Take notice of the hairs left in front. This is doing all the work here, softening a round face shape and making a basic low pigtail look intentional instead of rushed. The pigtails sit just behind the ears and are secured with small thin elastics that almost disappear into the medium-density, brunette hair. This style needs to be longer than collarbone length in order to look right. Additionally, with fine hair, those front pieces will separate and look straggly within an hour. If you have thick hair that is straight and lacks texture, then the whole style will lose the looseness you are seeing here which is mainly due to some natural waves in the mid-lengths of the hair.
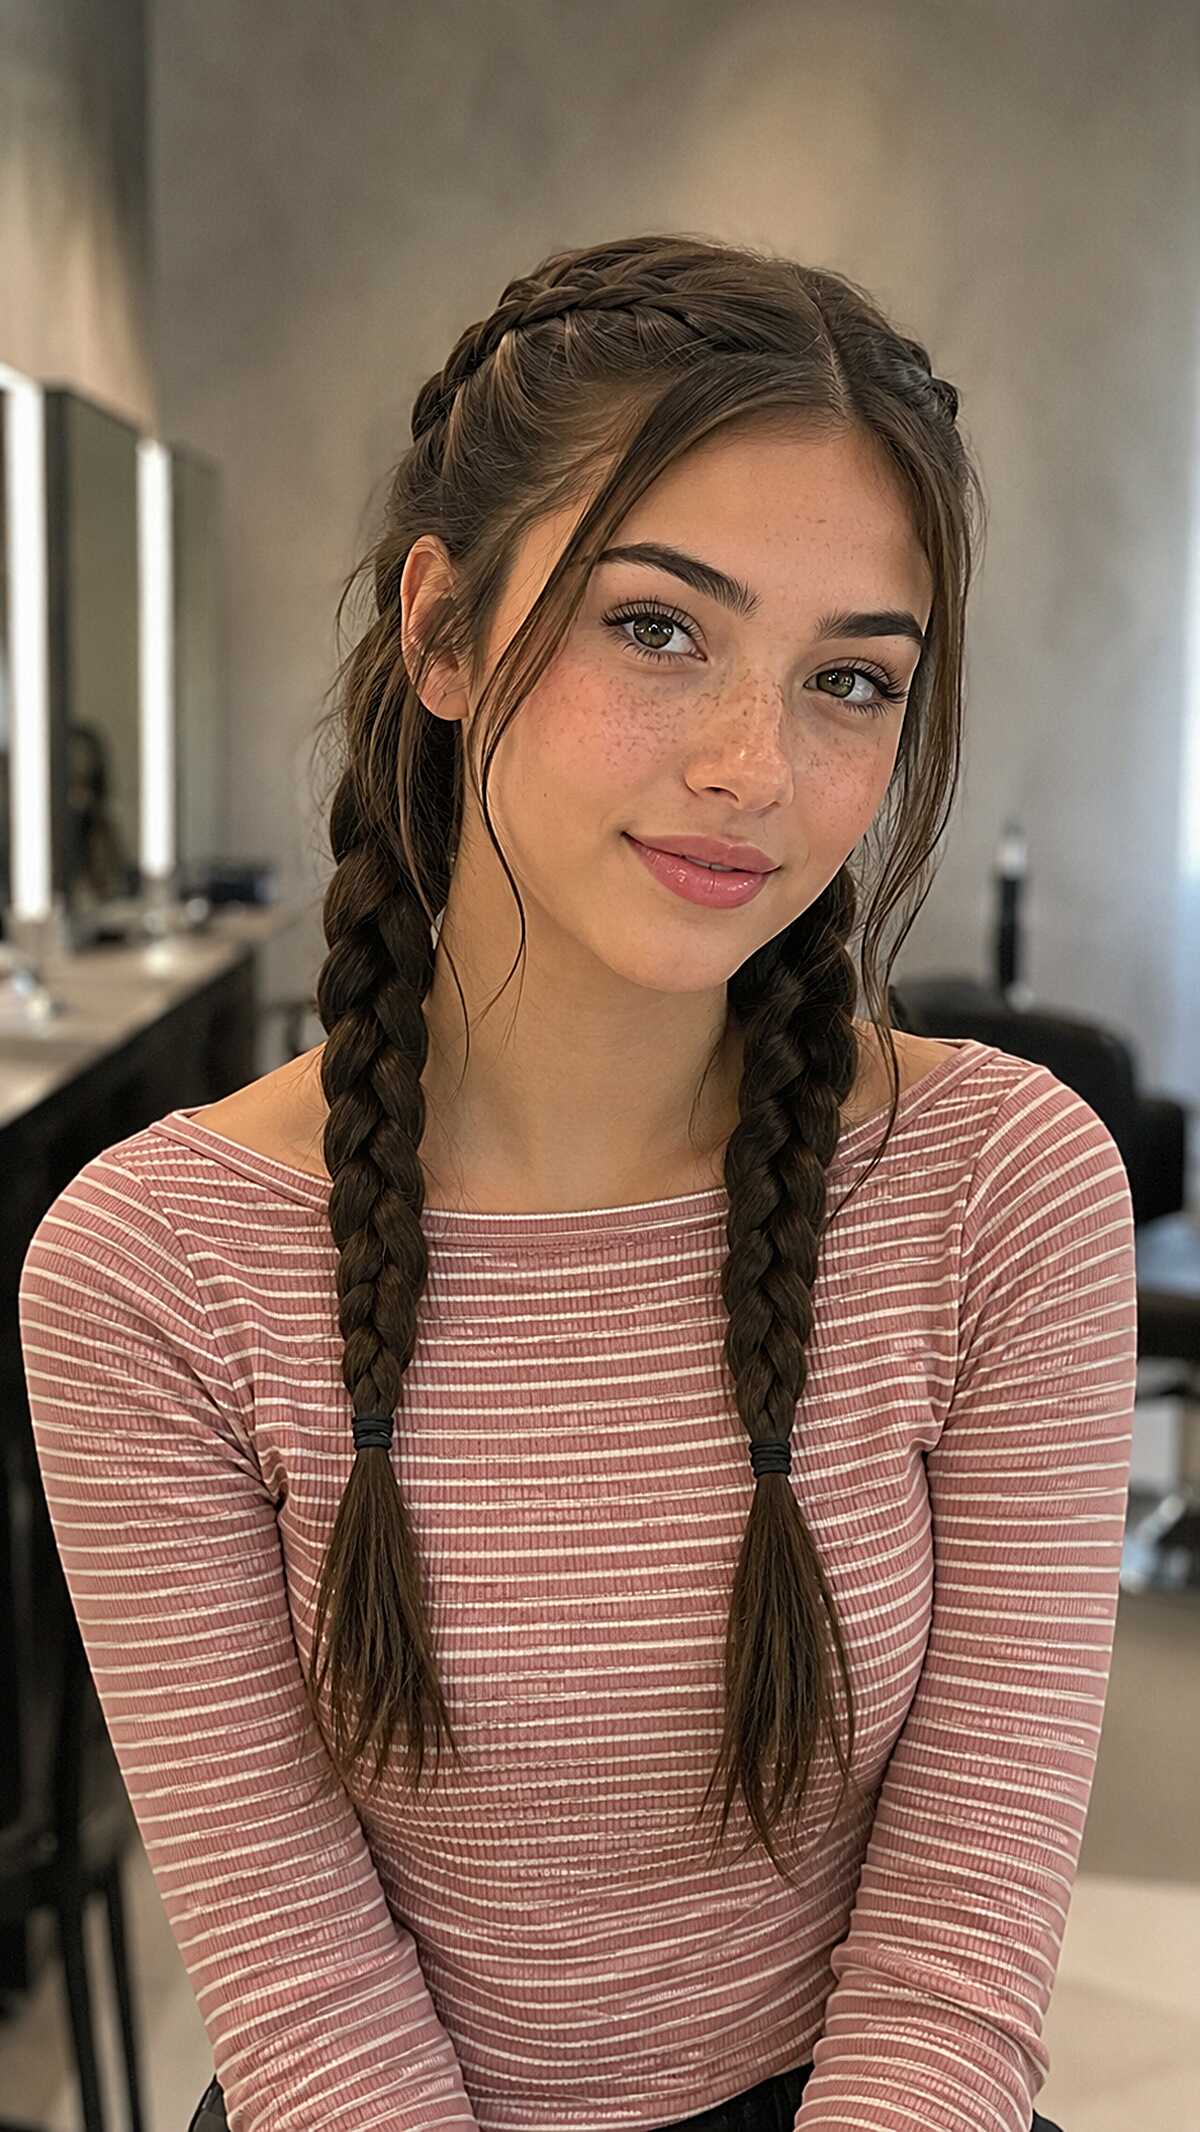
#39 Dutch Braided Pigtails with Soft Pulled Tendrils on Long Dark Hair
The beginning of the braids are Dutch, meaning they sit on top rather than underneath the braid, creating that raised ridge look. You will want medium to thick density for the braids because with fine hair, the scalp will show and the braid will look stringy by lunch. The small face framing pieces are intentional and aren’t just random flyaways. They are taken from the front section. This looks most flattering on oval and heart shaped faces since they close off the forehead without hiding it. The overall look will be ruined if your lose face framing pieces are taken from the front section before the braiding starts. If your hair is above the collarbone, the look will not work. The ends will be too light and the braids will stick out instead of just hanging.
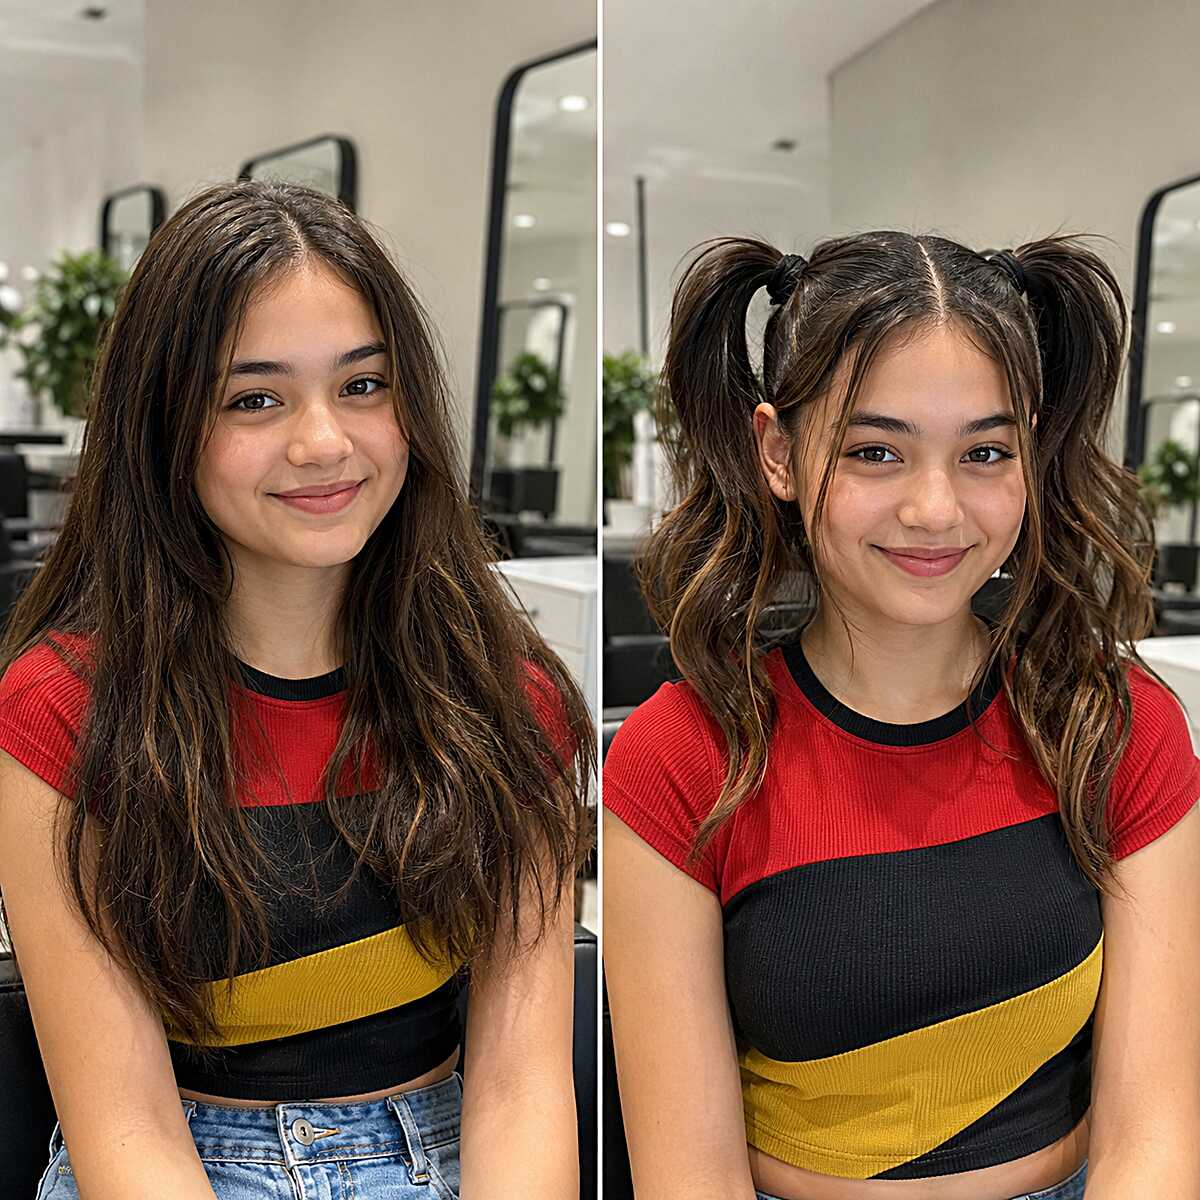
#40 Messy High Pigtails with Curtain Pieces on Long Wavy Hair
The left picture shows why this works. It features a lot of medium density, wavy hair with some subtle warm highlights throughout the midshaft, and pulling it into two high ponytails instantly shows off the dimension that was hiding when it was all down. Face framing pieces are not random. They are cut to fall at the cheekbone, and that’s what makes it look intentional and not just messy. Fine, silky hair will not hold like this without some serious grip from elastics that create dent marks. It needs a bit more texture and some natural wave to look full not stringy at the ends. Oval and heart face shapes get the most from those dropped front pieces because they soften width at the forehead without covering it completely. In two minutes and with three elastics, you’re done.
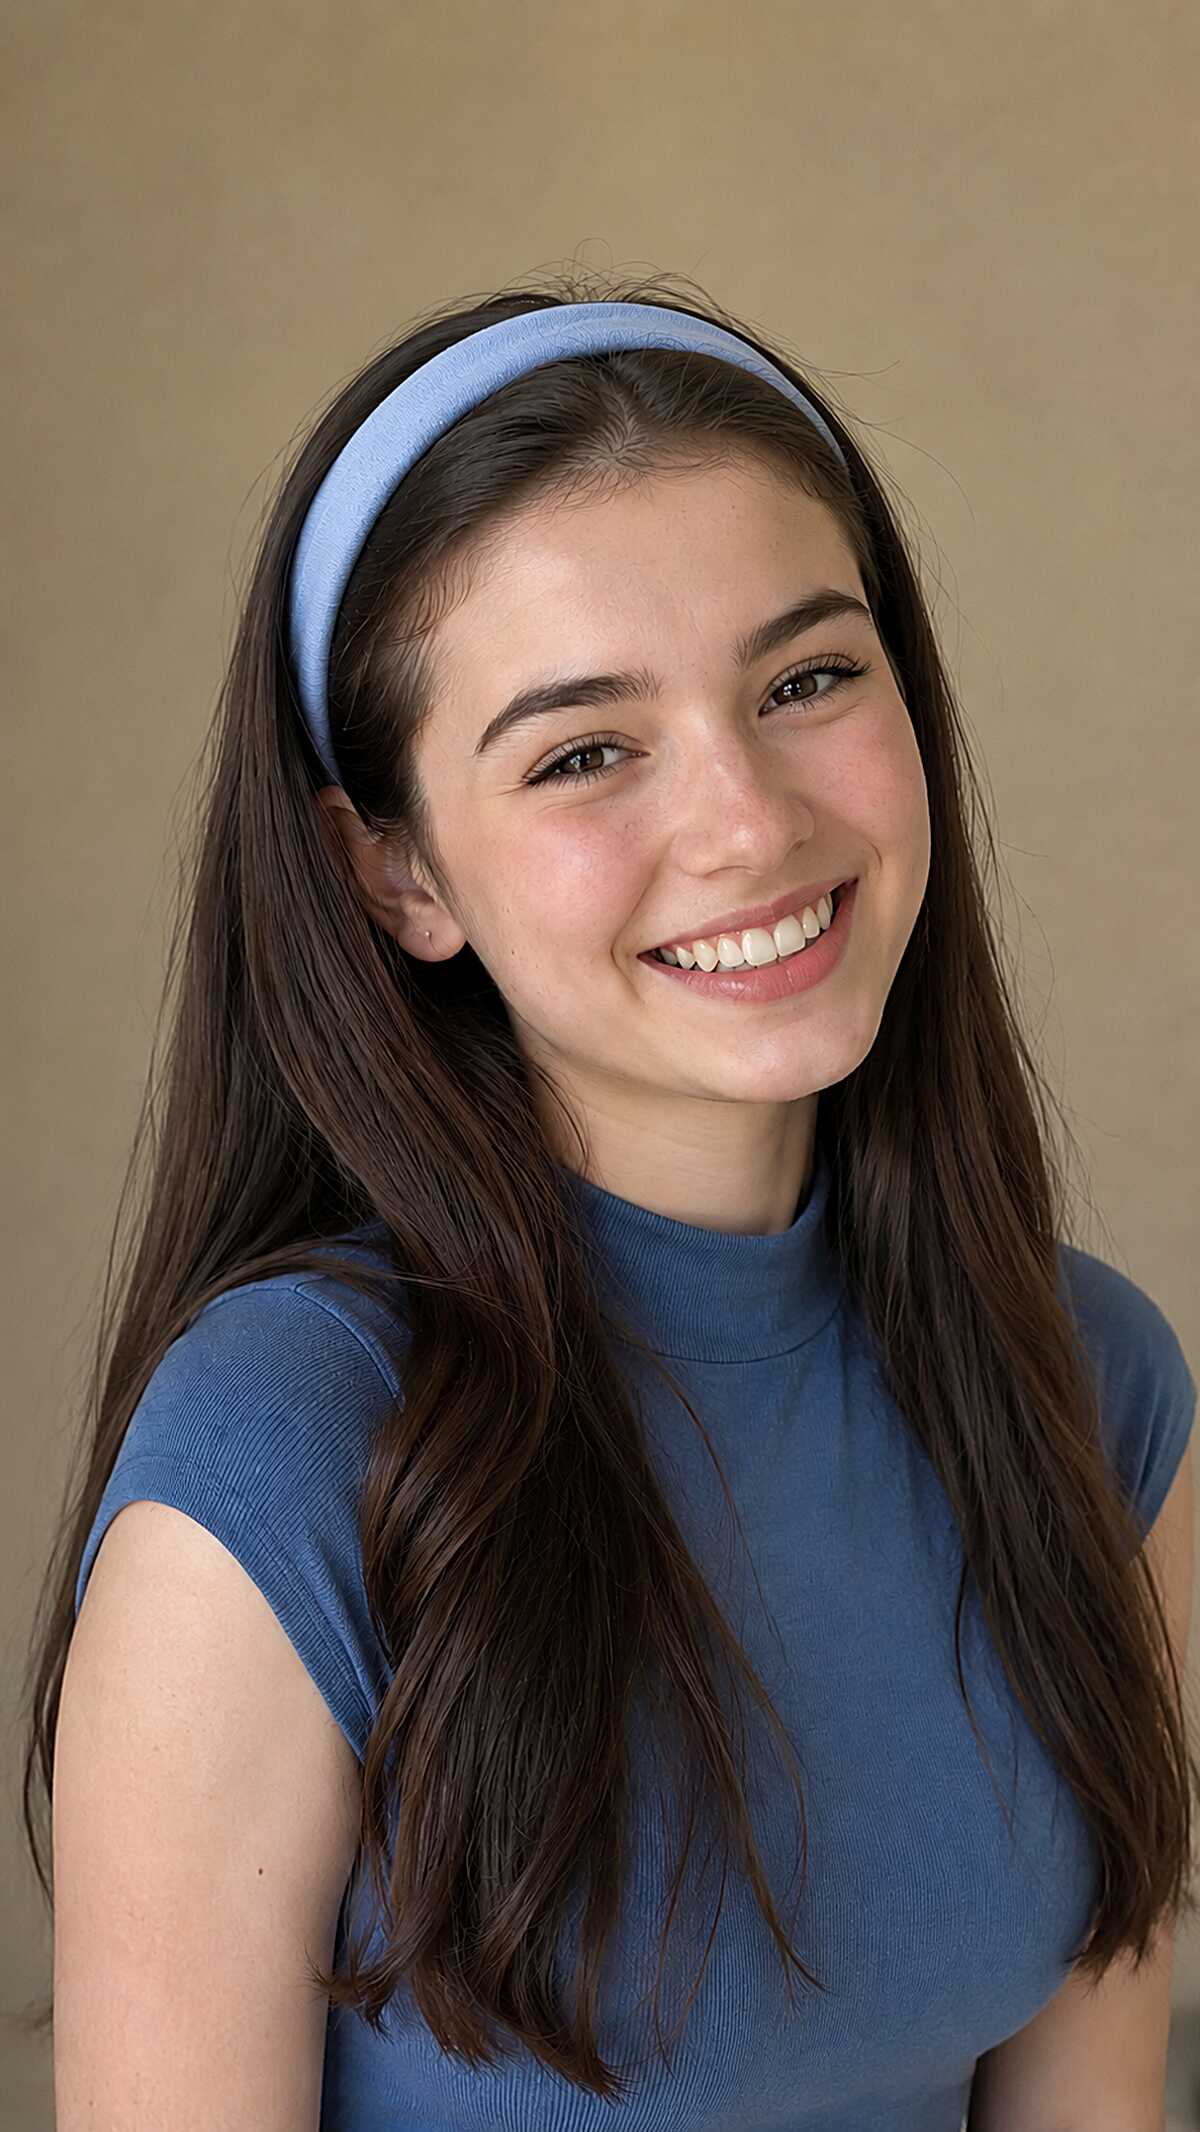
#41 Padded Headband Pushback on Long Brunette Hair
Unfortunately, 88 percent of the effort in this hairstyle is from the headband. However, this headband trick is great for keeping your hair out of your eyes during practice. The headband sits about two inches off the front of your hairline which gives just enough lift at the crown of your head, so your hair doesn’t sit flat. This headband trick is perfect for people with medium or thick hair straight, slightly wavy hair, or even one length cuts. However, it is not ideal for people with fine hair as the band is not going to hold fine hair. One more thing is that if you have at round face, just remember to put some hair in front of your ears and more at the sides of the headband to make the face look less wide. It great that the headband also holds the hair in such a way that it looks like hair underneath was styled with a curl or waves, and some product is needed when you restyled it. This hairdo is totally manageable to do for practice.
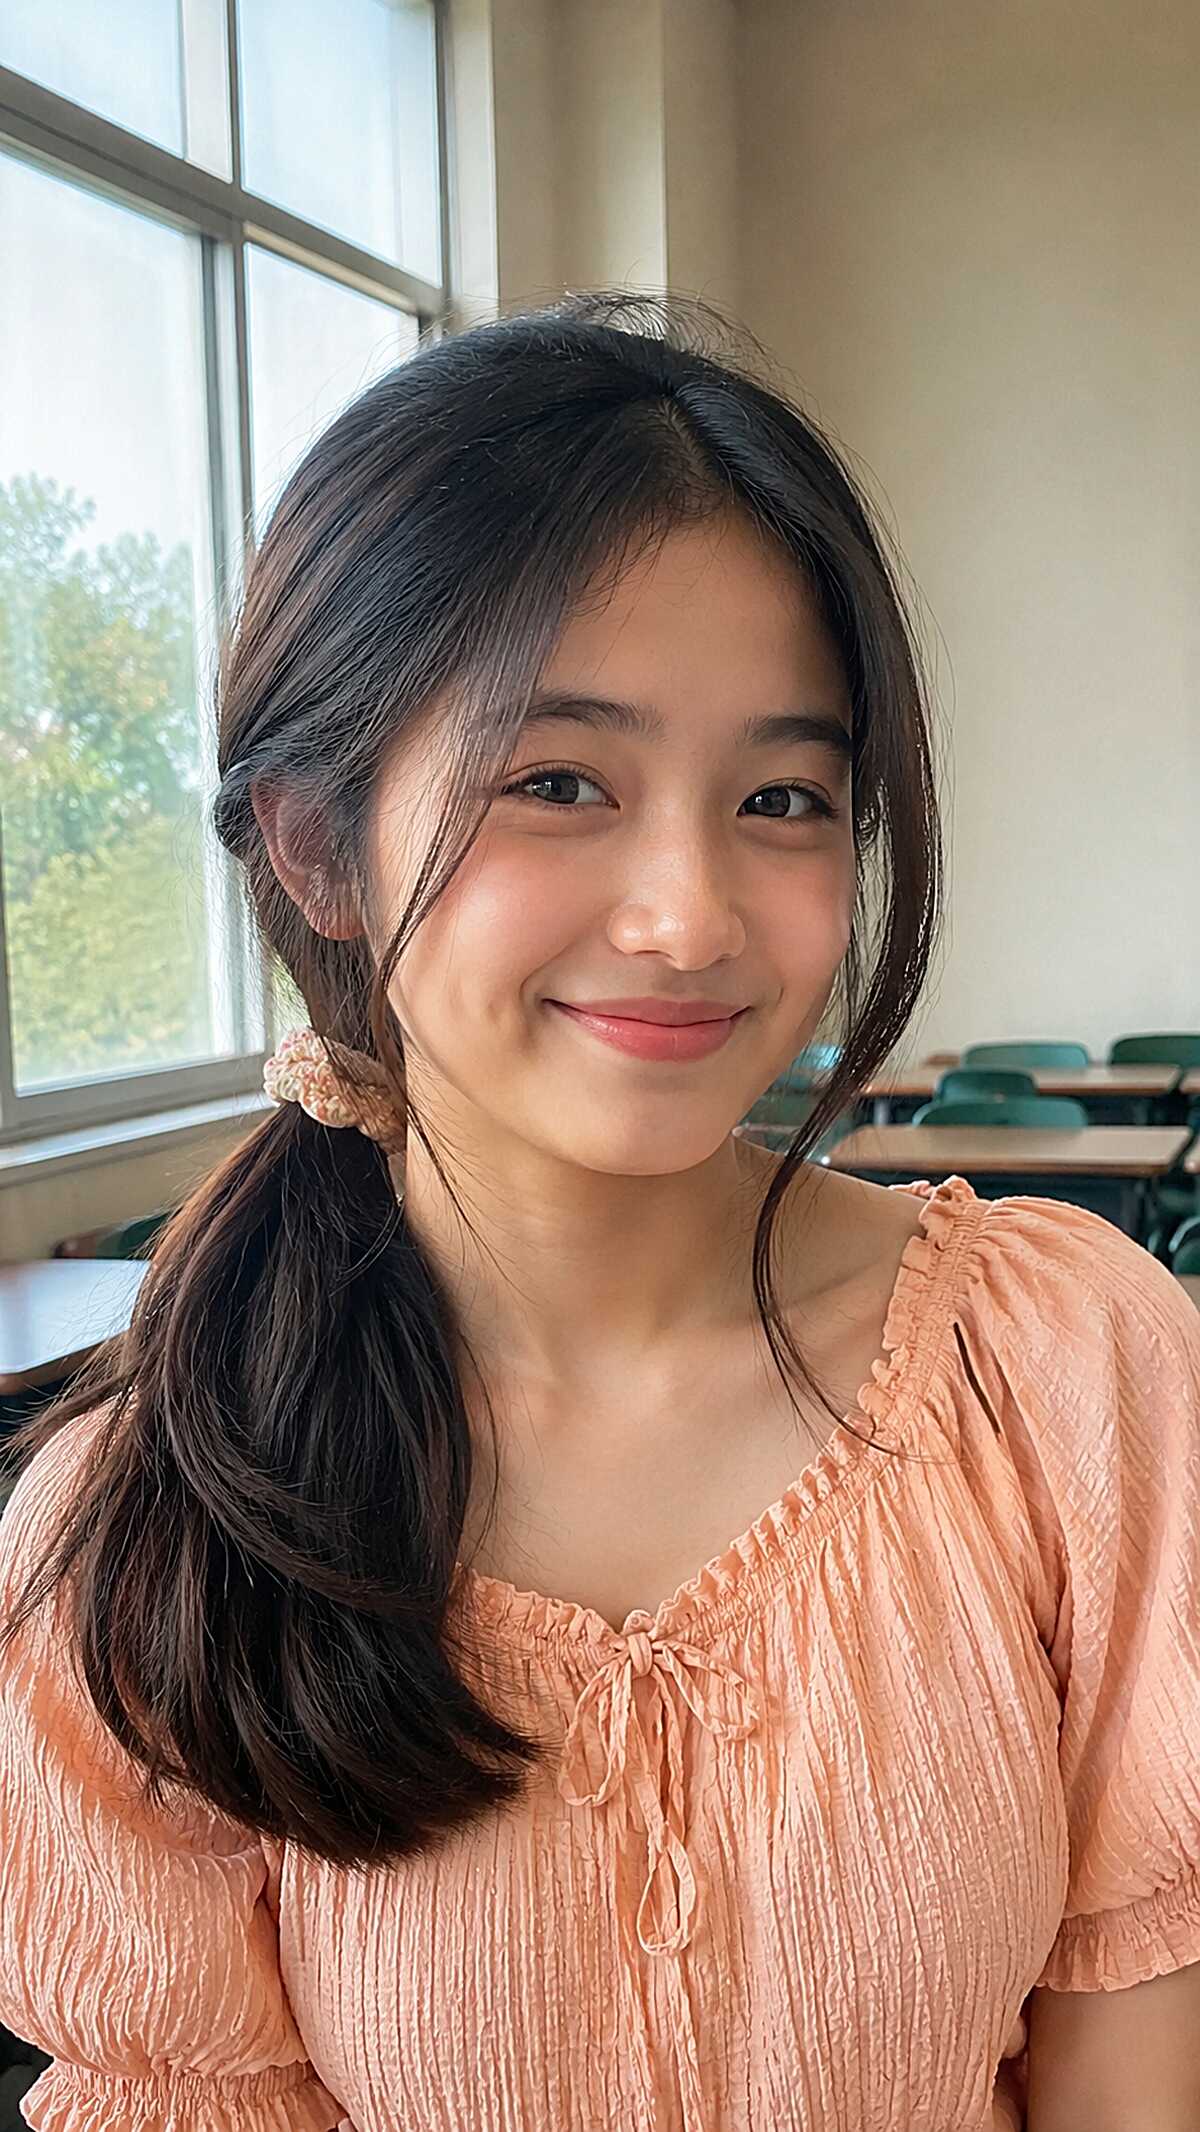
#42 Side-Swept Low Ponytail with Crochet Scrunchie on Dark Straight Hair
That crochet scrunchie has quite a few elements that enhance the look of this style without being distracting – the low side ponytail and added texture for visual interest. The deliberately long face framing strands that extend below the chin on both sides are great for wider/rounder face shapes as they provide a narrowing effect. This hair appears medium density and straight with an approximate length of mid back. If your hair is thick or coarse, that soft drape at the tail won’t happen naturally. It’ll pouf. The placement sits right at the nape behind one ear, and what’s easy to miss is how the part is slightly off-center, which lets one curtain piece fall heavier than the other for asymmetry that feels unforced. Two minutes, tops.
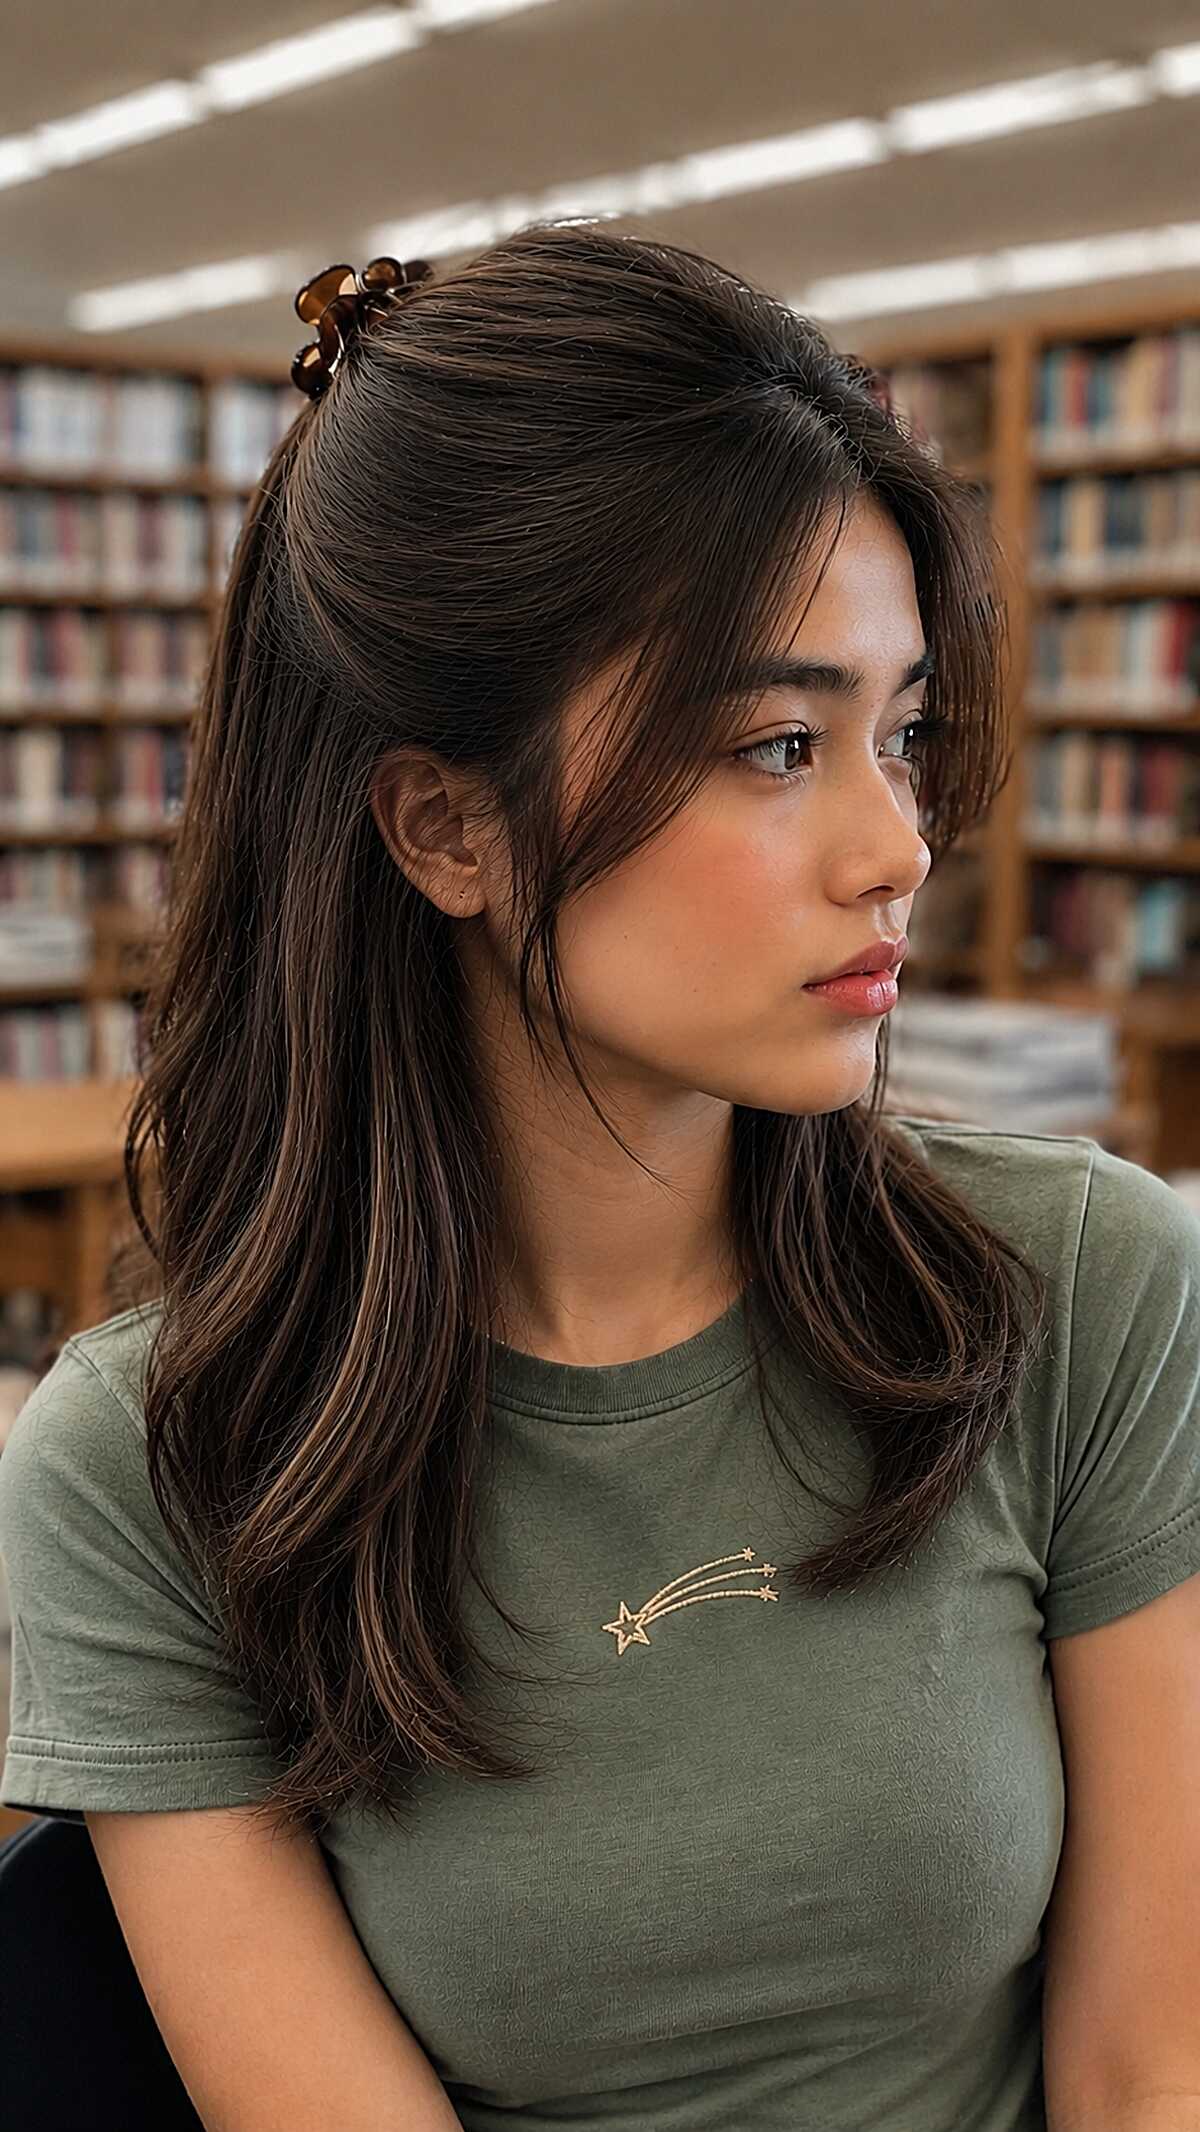
#43 Half-Up Claw Clip with Face-Framing Layers on Dark Hair
The clip isn’t doing much here; the layers are doing all the work. Those framing layers were probably point cut to taper softly around the cheek and jaw area so they fall like that instead of looking like random pieces. Without those layers, this half-up style just looks like you snagged some pieces and clipped them back. Ideally, this works on medium density straight-to-wavy hair that is around mid-length. Fine hair will slide out of that small tortoiseshell claw clip in less than an hour. If you have thick hair, a larger clip will be needed which changes the proportions of the whole look. It’s also very noticeable how little hair is actually pulled up; just the crown section. This gives a lot of volume below so it doesn’t look flat at the sides.
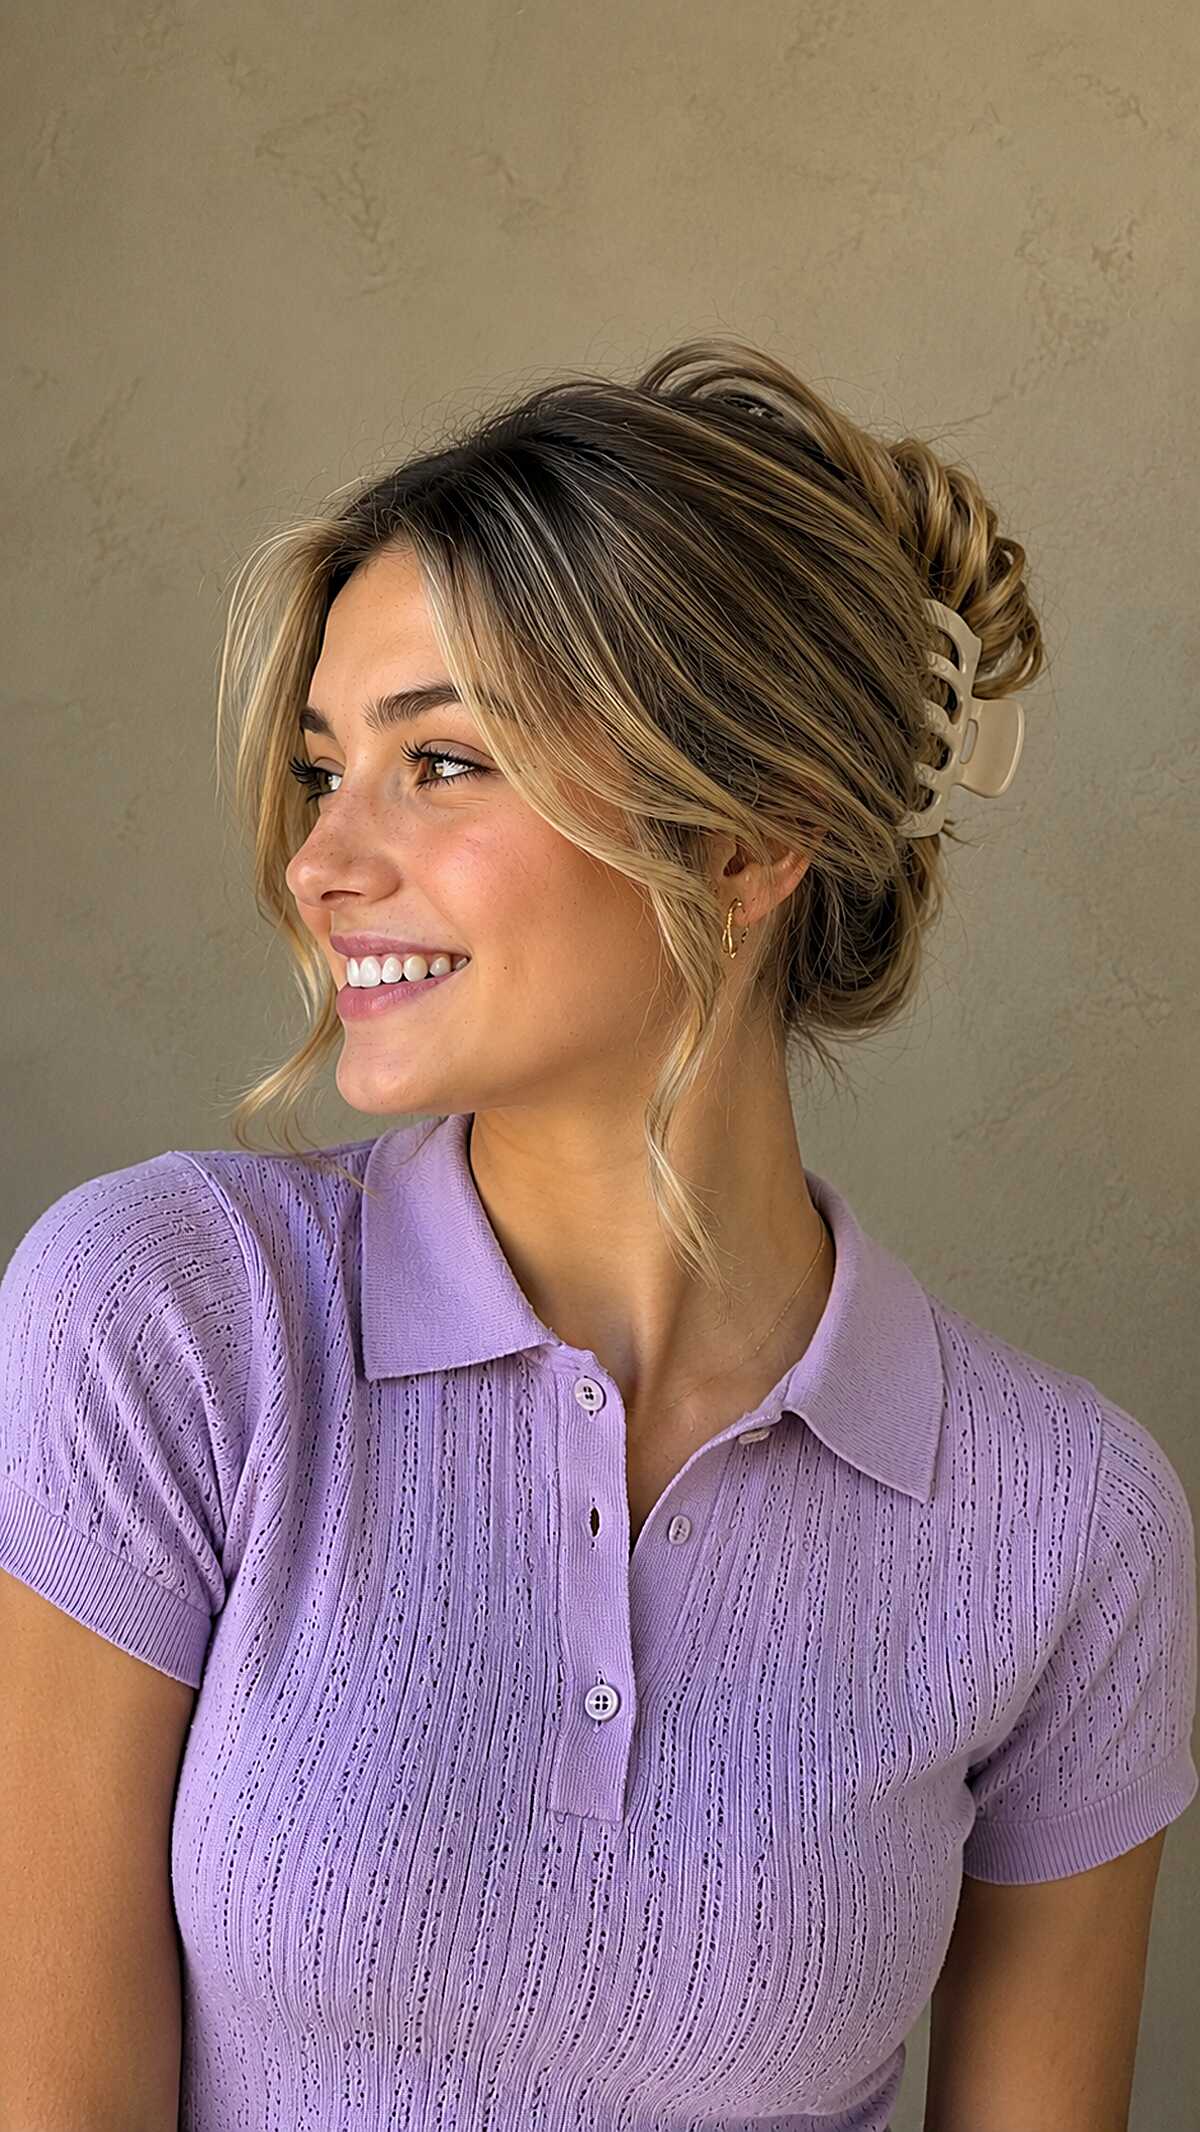
#44 Loose Claw Clip Twist with Blonde Money Pieces
The clip is easy to put in, and the twist is just as easy to do. The piece framing her face is the most important element, as it is the only all the pieces look this good, especially with the money piece. The money piece looks good as it is foiled heavily and she was able to pull it to the front. This looks to be just medium-density hair, most likely no longer than collar bone length, with the ends twisted loosely about 2 minutes ago. The twist is not meant to be perfect. If you have fine hair, this will not keep its shape for very long, as it will all fall into place and slide down. This will all be saved because the proportions will look off if you use a smaller clip. If your hair is medium to thick, or has a wave or some texture, then this is perfect for you, along with the face framing layers. Round and oval face shapes gain from those curtain layers breaking up the forehead, while longer face shapes may find the volume at the crown adds length you don’t want. Notice how the pieces at her neck are left out too, keeping things relaxed instead of scraped back.
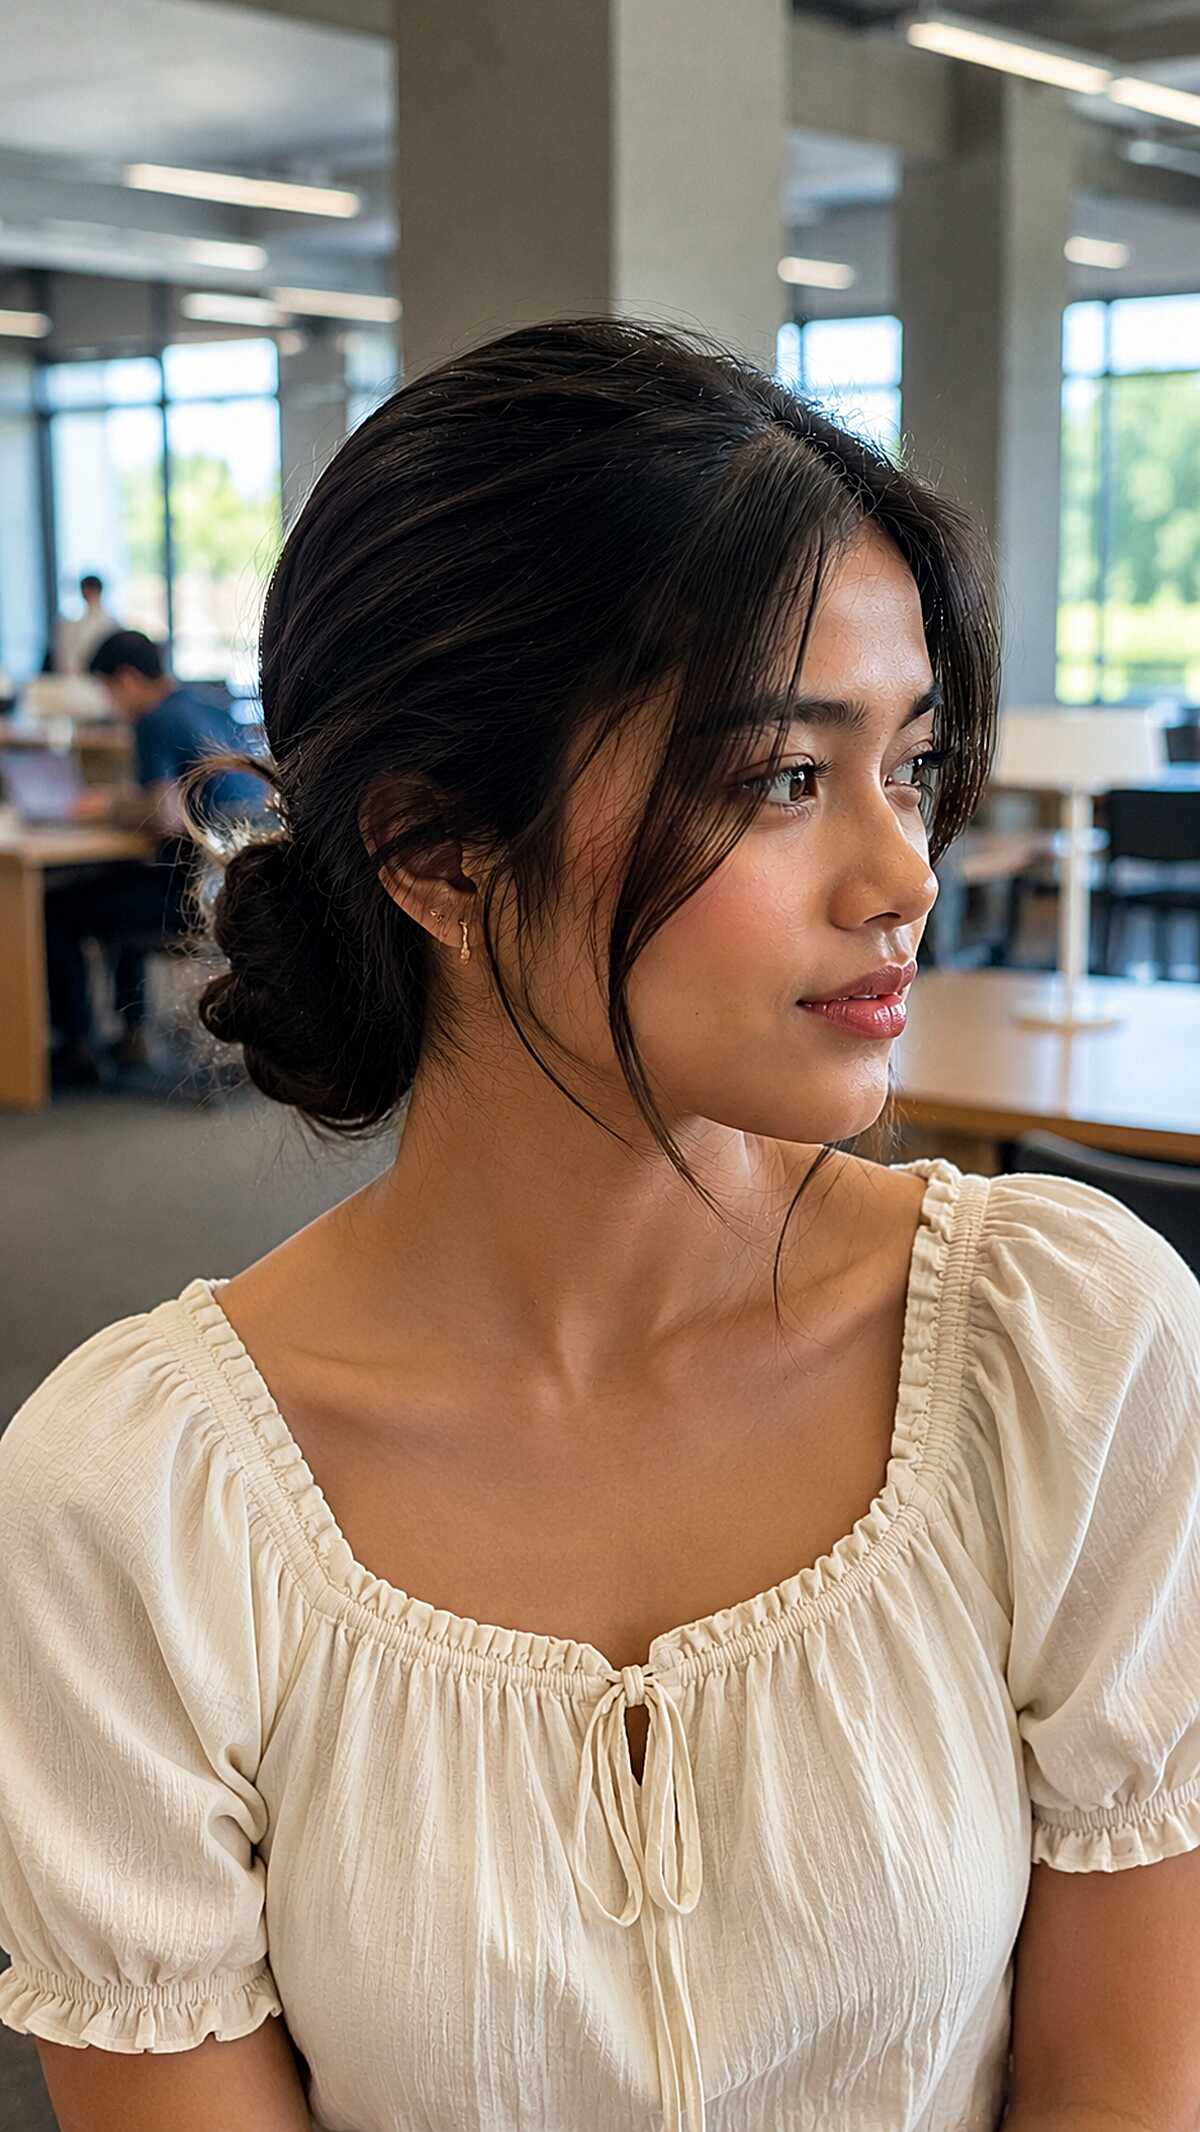
#45 Twisted Low Bun with Loose Tendrils on Dark Medium-Length Hair
You can observe that the tendrils lack symmetry. One side has a long piece dropping past the jaw, whereas the other is shorter and sits near the cheekbone. This unevenness shows that this design does not look like an afterthought. This design is a simple twist and pin bun that sits right at the nape of the neck. This is constructed on medium length/medium density straight hair which has enough natural texture to hold the bun without any visible bobby pins and is not freshly washed. You will not achieve this design on freshly washed silky hair. You want second day hair to achieve the right amount of grip or you can use a light texturizing spray as opposed to the whole bun sliding apart before third period. Round and oval faces shape softening look most beneficial from the front pieces, but if your face is already narrow, the curtain effect can look longer than desired. The bun itself is small and compact, which is suitable for this hair length and density, whilst anyone with thick or longer hair should expect something a lot bulkier at the back.
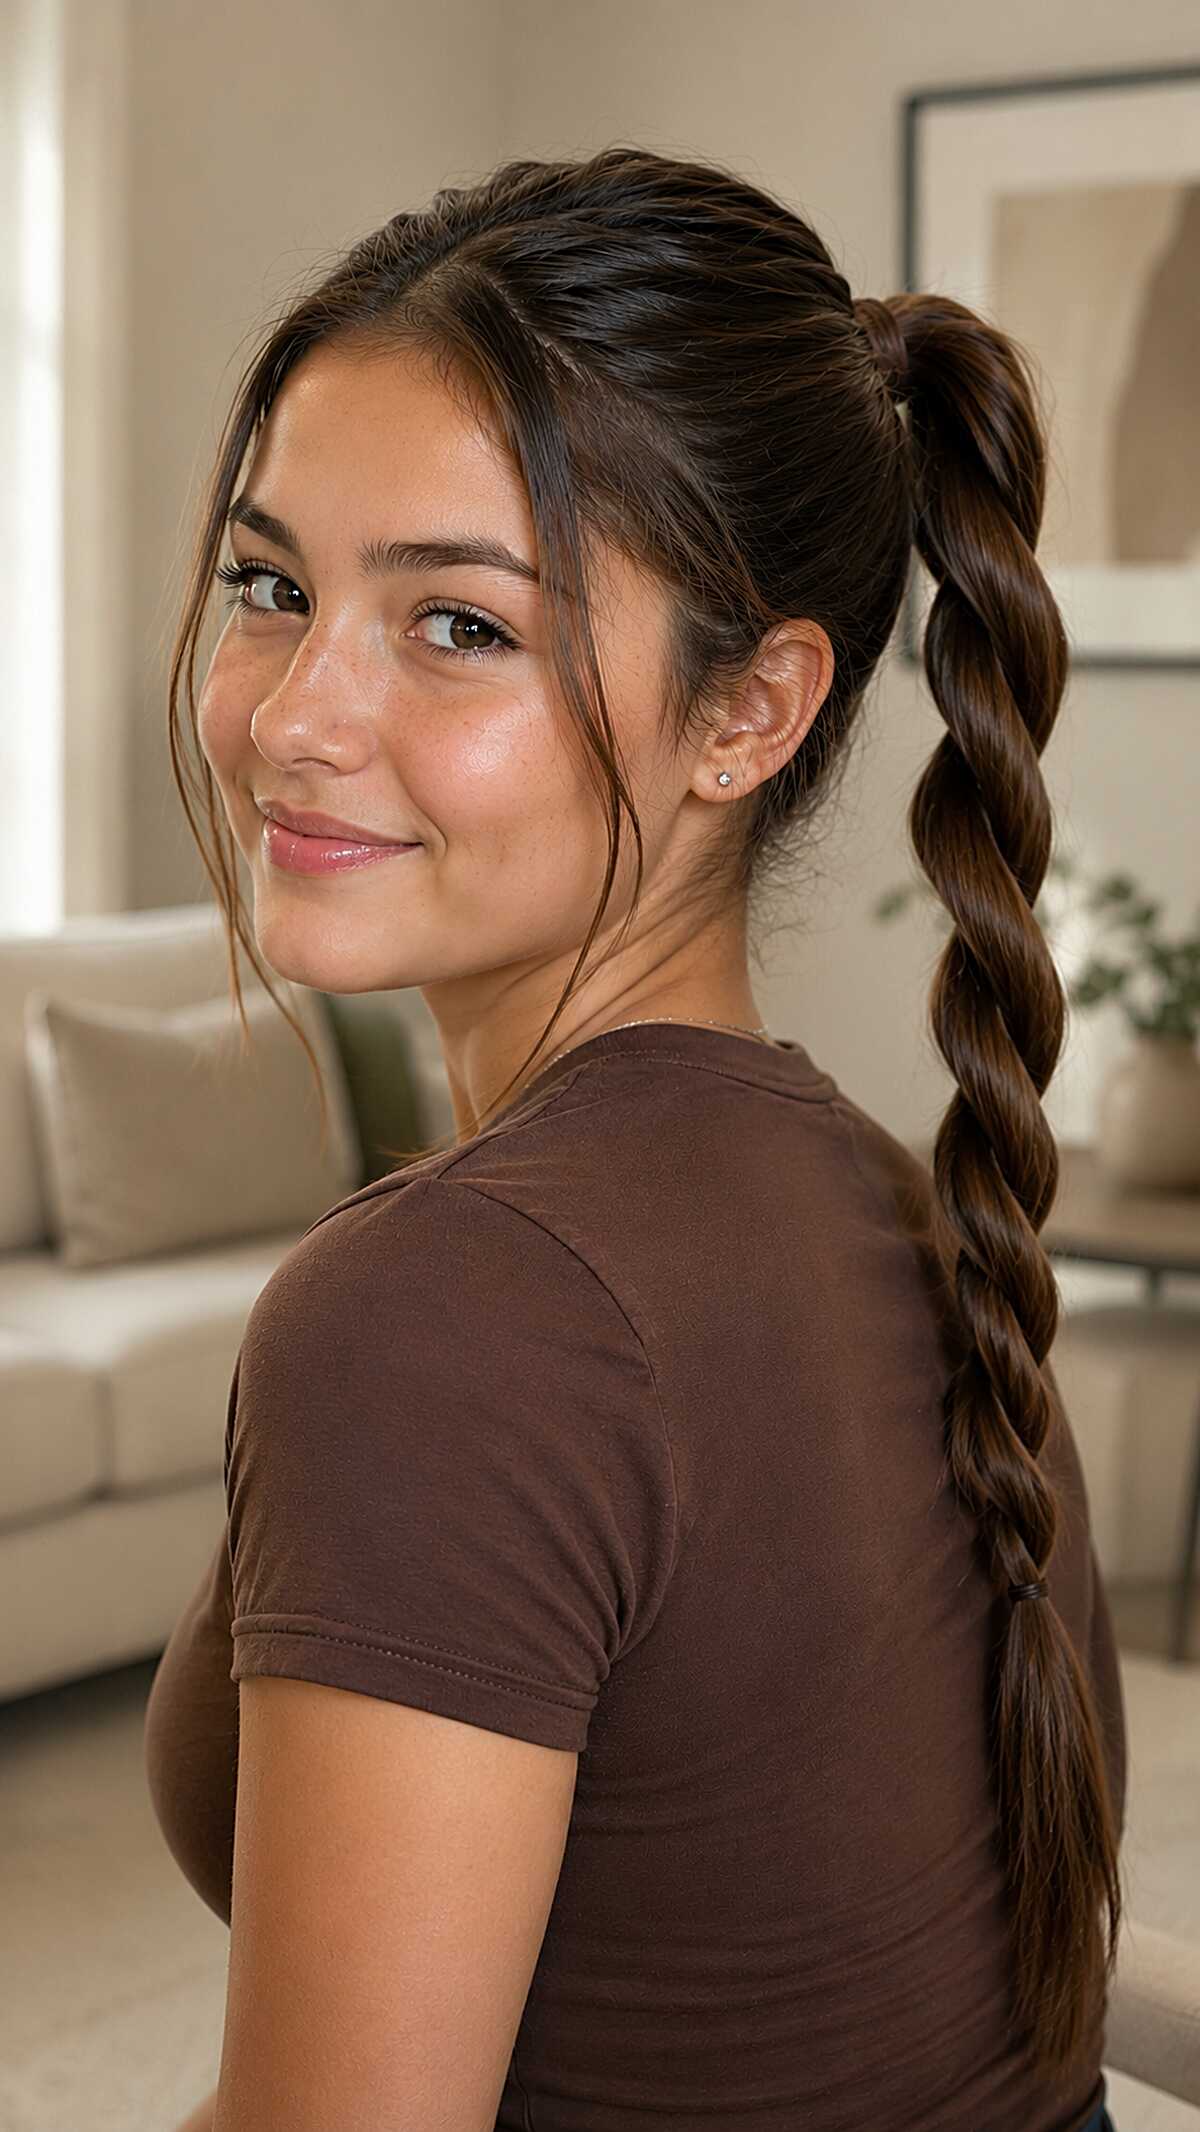
#46 High Rope Twist Ponytail on Thick Dark Hair
The structure of a 2 strand rope twist relies on density to keep its shape and keep that rounded, almost braided look all the way down. Starting the twist at the elastic instead of a few inches down like some people do, is a really smart way to keep the ponytail from looking limp at the top. The intentional wispies left out at the temples and behind the ears are doing work softening the pull across the hairline, so the style reads relaxed instead of severe. To achieve this length of twist, you need to have hair past your mid back and of medium to thick density to grip each other when wound. Oval and heart shape face types suit the high placement well as it elongates the face without exposing too much of the forehead. One thing to note is how tightly the base is gathered, which can cause tension headaches by lunch if your scalp is sensitive.
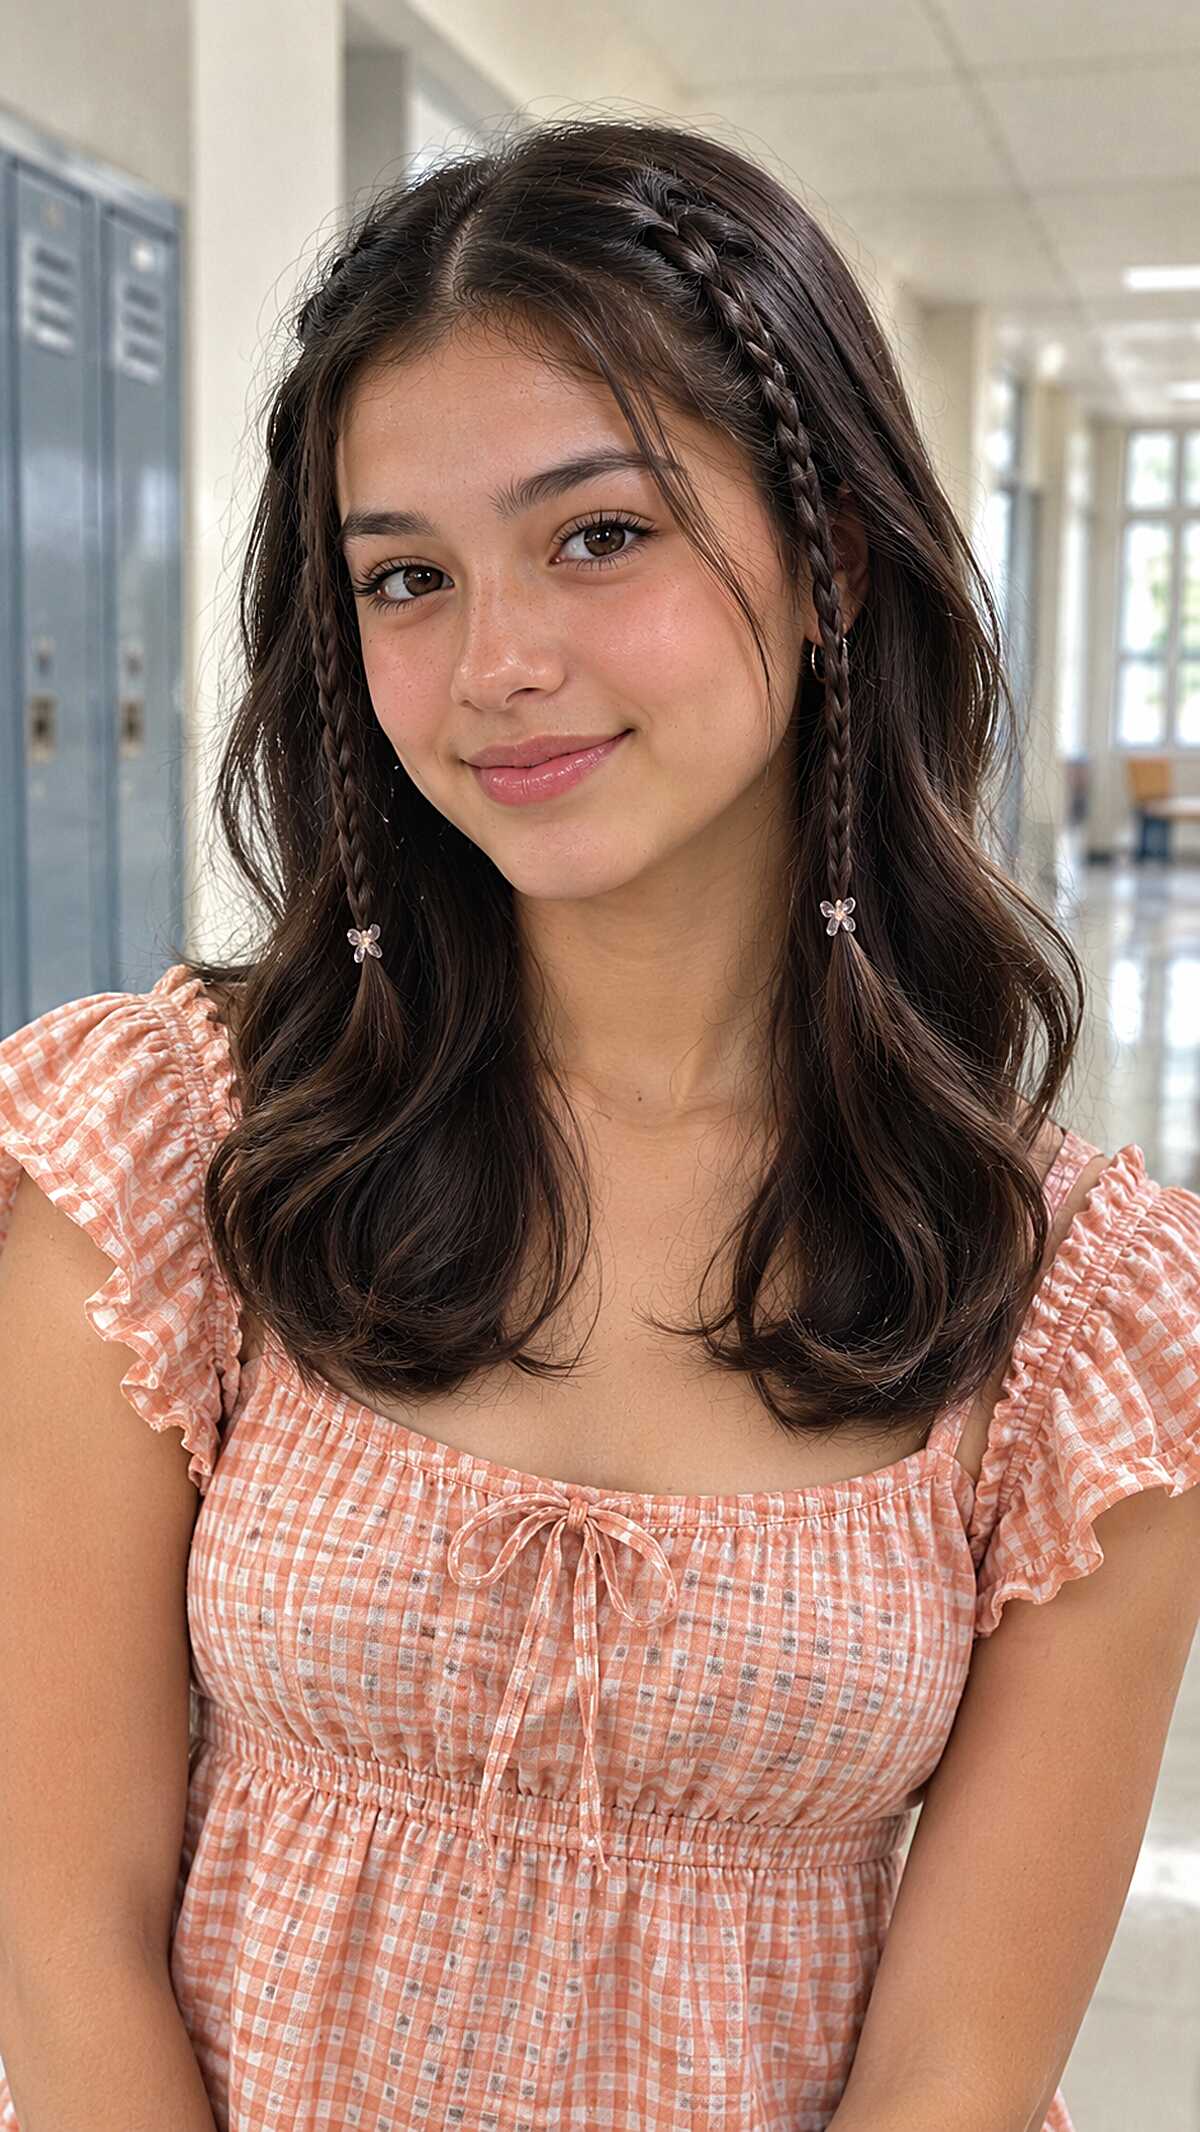
#47 Accent Braids with Flower Clips on Loose Waves
Two thin braids start from the hairline and are left out with the rest of the hair. The small flower clips at the ends are doing more work than you’d think. These clips are basically the only thing keeping the braids from coming undone in an hour if the wearer is slippery or has freshly washed hair. This style works on medium to thick textures with a wave or natural shoulder length or longer. On fine straight hair, the braids will look stringy and flat against your head. Notice that the braids are at parting line which frames the face, and also keeps everything pulled back, so it looks intentional instead of half-finished. If your fingers know a basic braid, this takes about three minutes. If you have PE and wind, this will not look cute and survive the whole day.
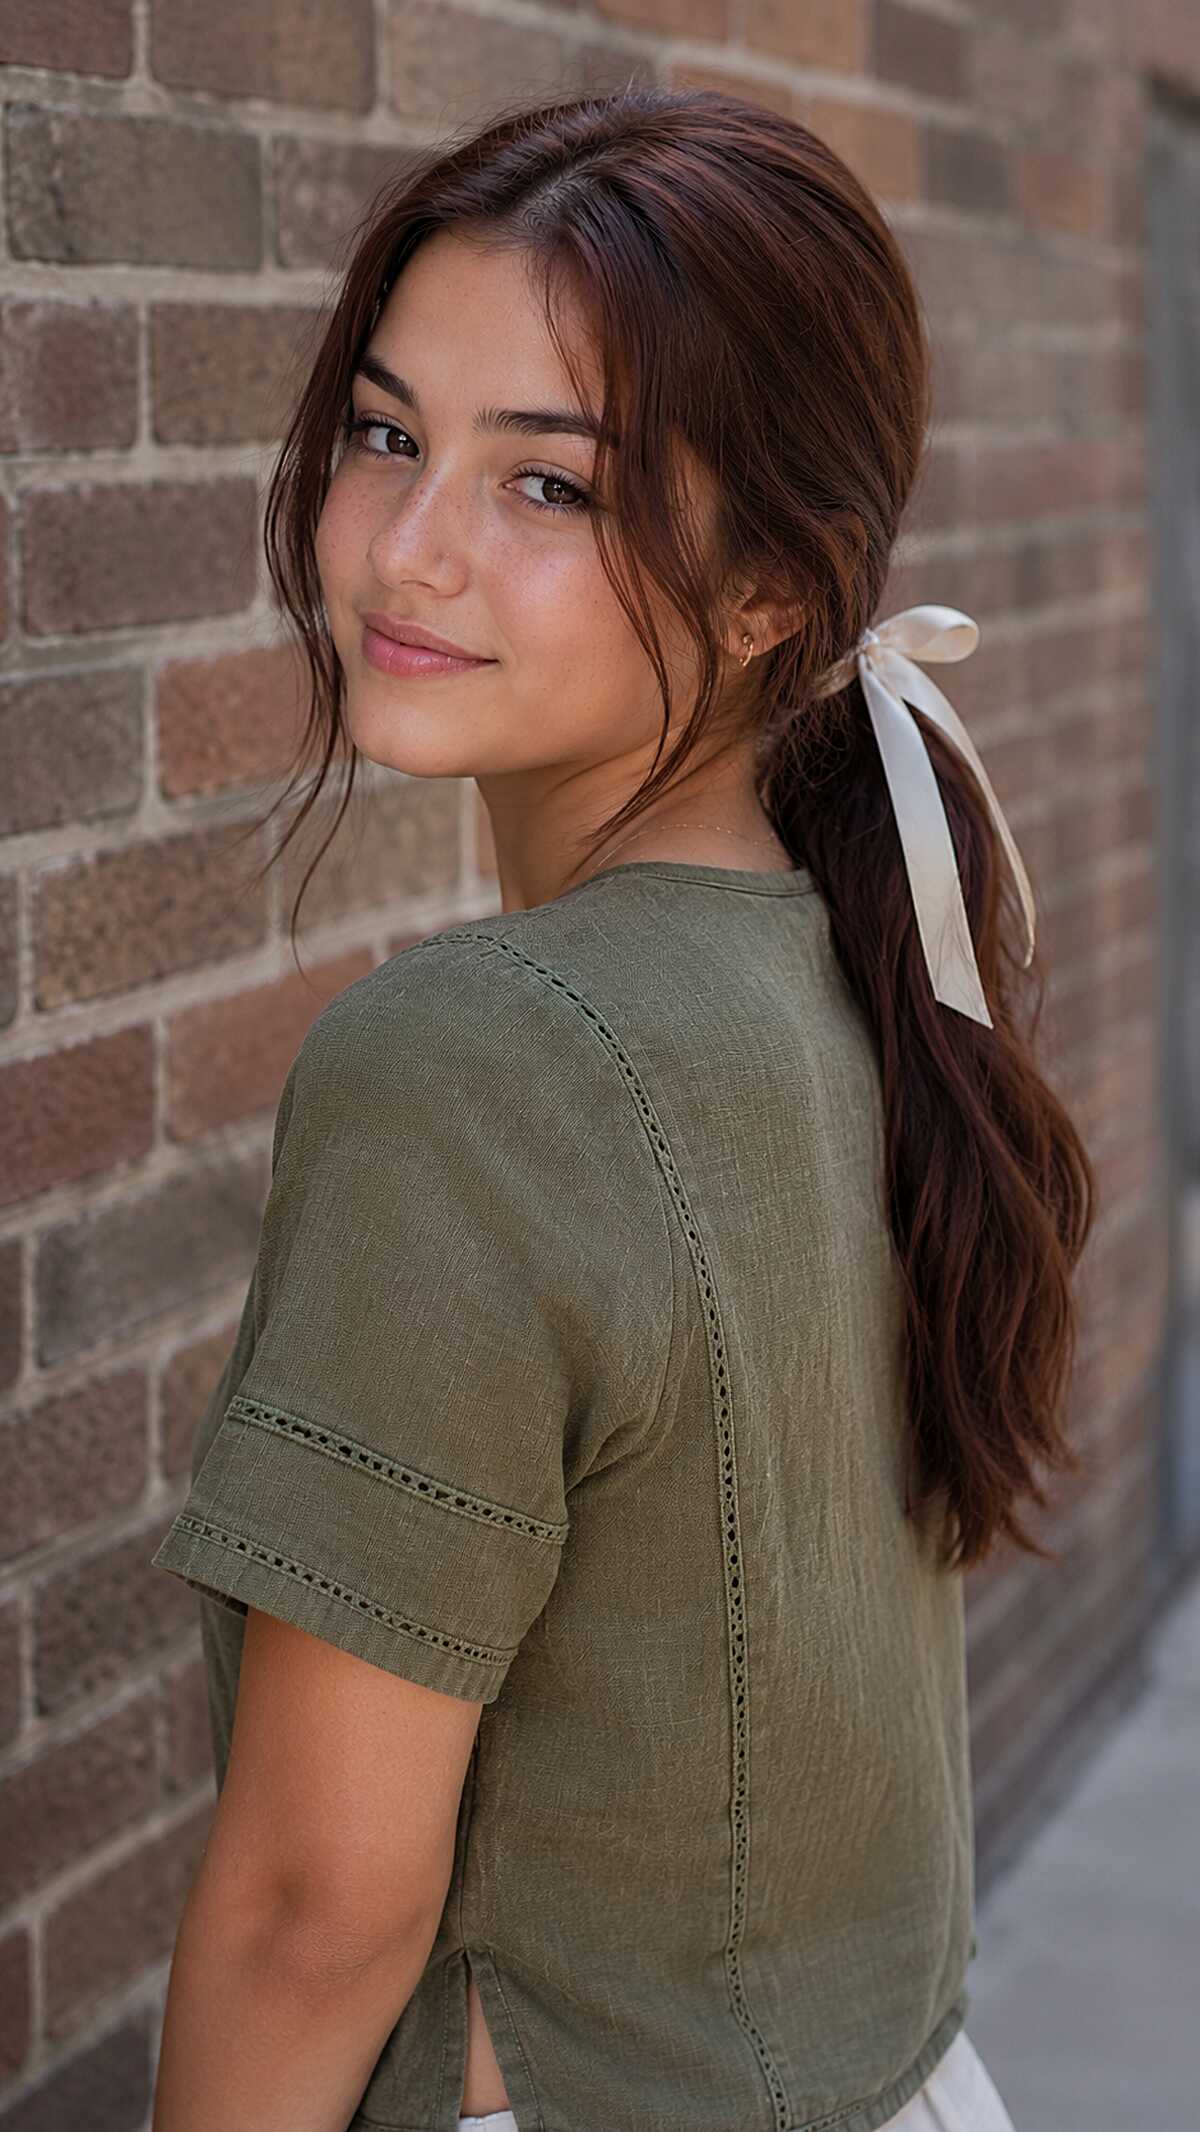
#48 Ribbon-Tied Low Ponytail with Loose Front Pieces
Clearly, the ribbon is the main focus here, but notice how it’s tied at the nape, rather than the mid-band, which helps the look avoid appearing too costume-y. The model’s hair is medium-density, mid-back length, and lightly wavy. The face-framing sections (which were not just let out) are pulled forward purposefully. There is a lot of thought behind that loose section around the temples, which elevates the look from just being casual. If you have very fine, or slippery-straight, hair, the front pieces may not hold so much as a slip, and you’ll just look like your ponytail was a disaster. The style works well for oval and heart-shaped faces, as the extra framing soft curtain and framing leaves the space beneath the chin unfilled. The warm, light auburn shade reflects light which brightens the overall style. Honestly, this style is so simple, it only takes around 90 seconds to do.
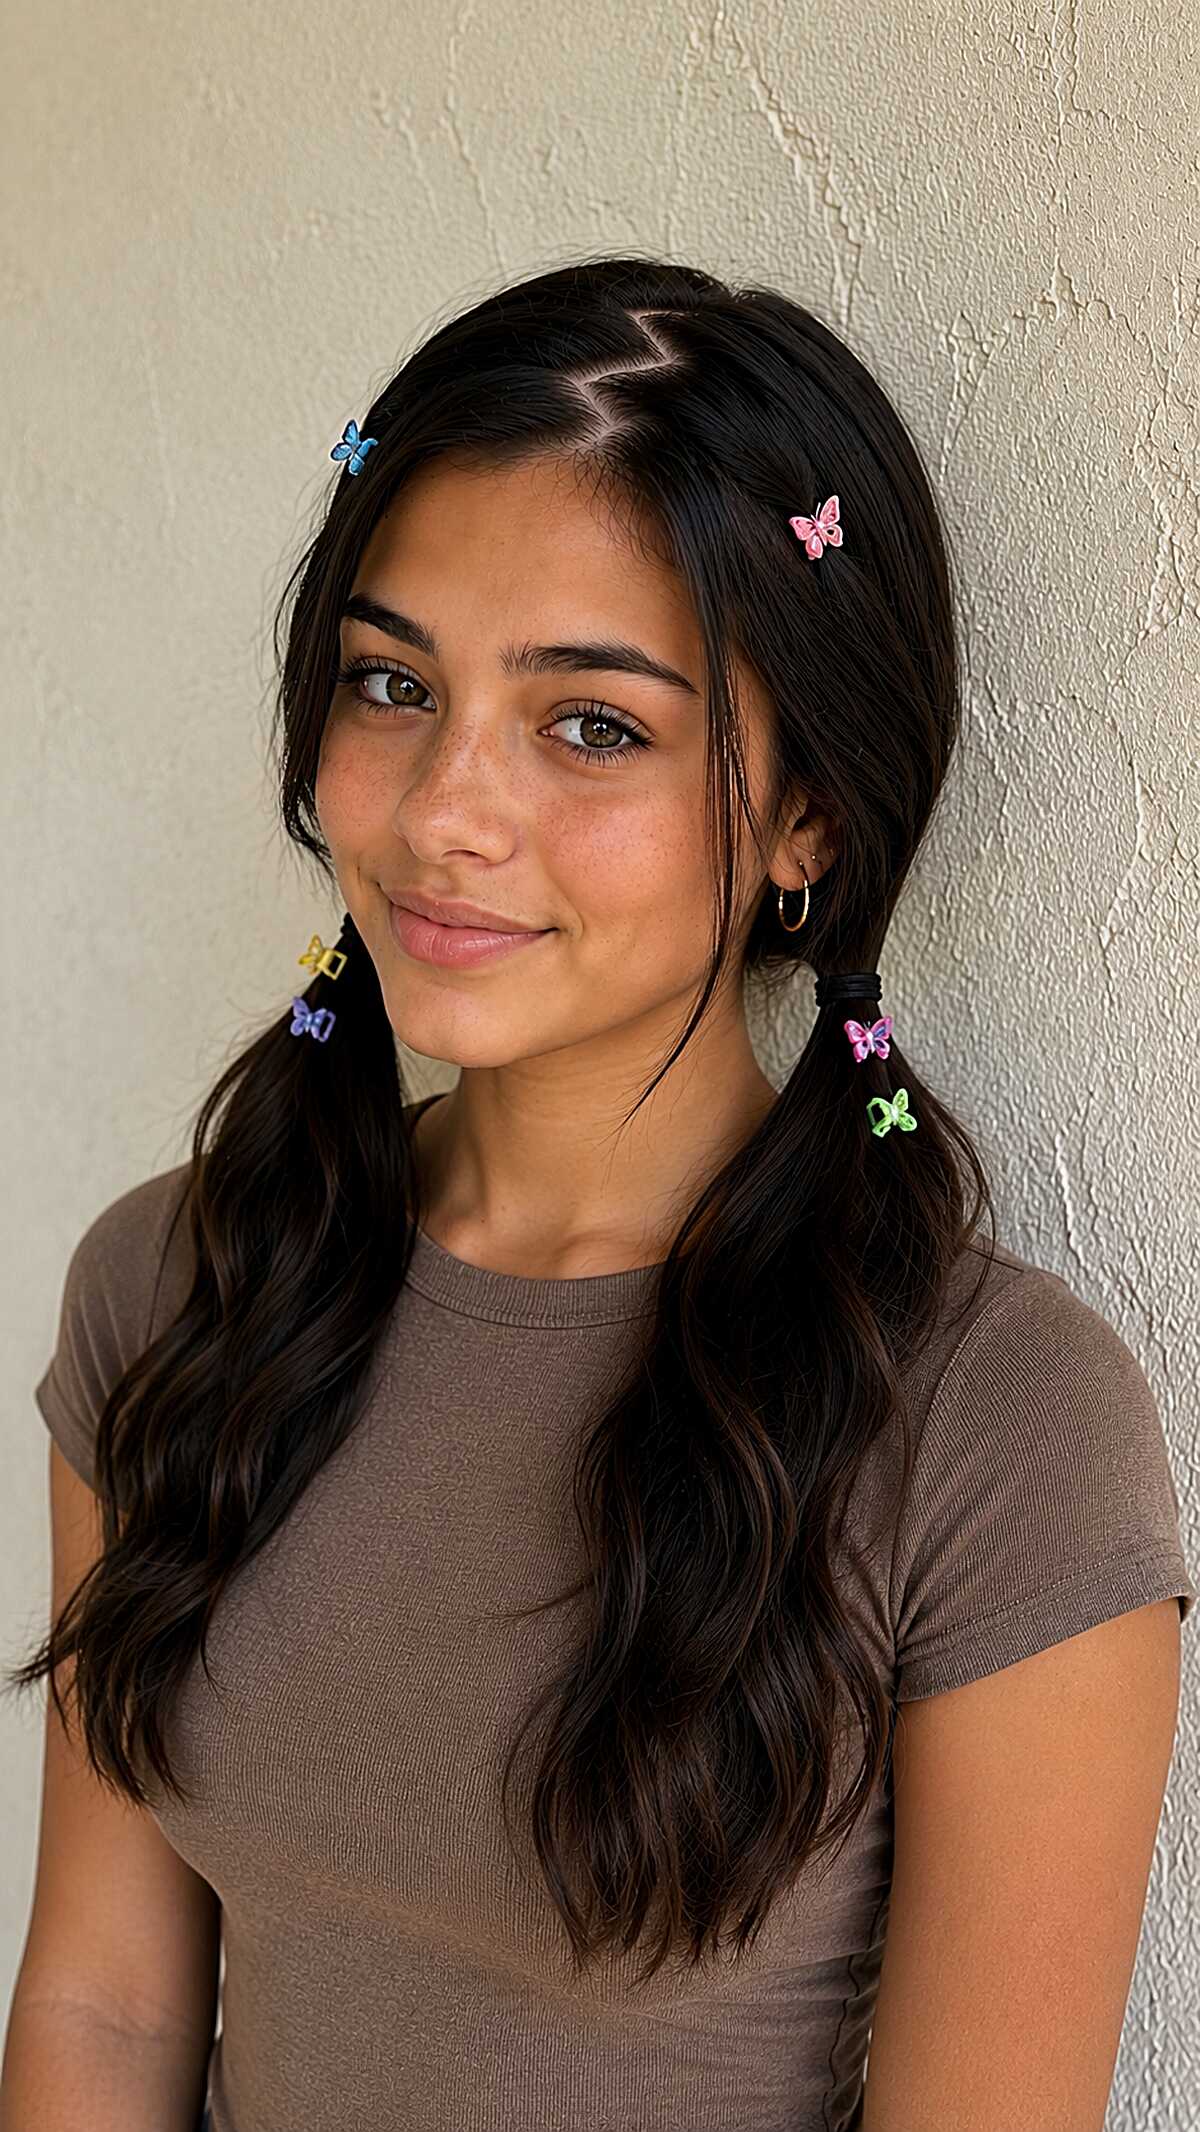
#49 Low Pigtails with Scattered Butterfly Clips
The looks revolves around those butterfly clips, and that’s totally fine! The rest of the hairstyle is a simple center part with two low pigtails that are secured with small black elastics (this will take a max of a minute and a half!). The pigtails look more intentional because of the uneven butterfly clip distribution- some clips are close to the part, some clips are near the ends, some clips are in the middle. A lot of hair means this looks intentional, but with fine hair, the pigtails will look flat, and because there aren’t enough clips, they will slide out. The messy look works best on hair that is wavy or textured and is at least mid back length. If the hair is straight, the tails end up just sticking out and not hanging with a curve. Finally, to keep the look from feeling too pulled back, the face framing pieces of hair are pulled free from the clips. This suits a rounder or wider face shape.
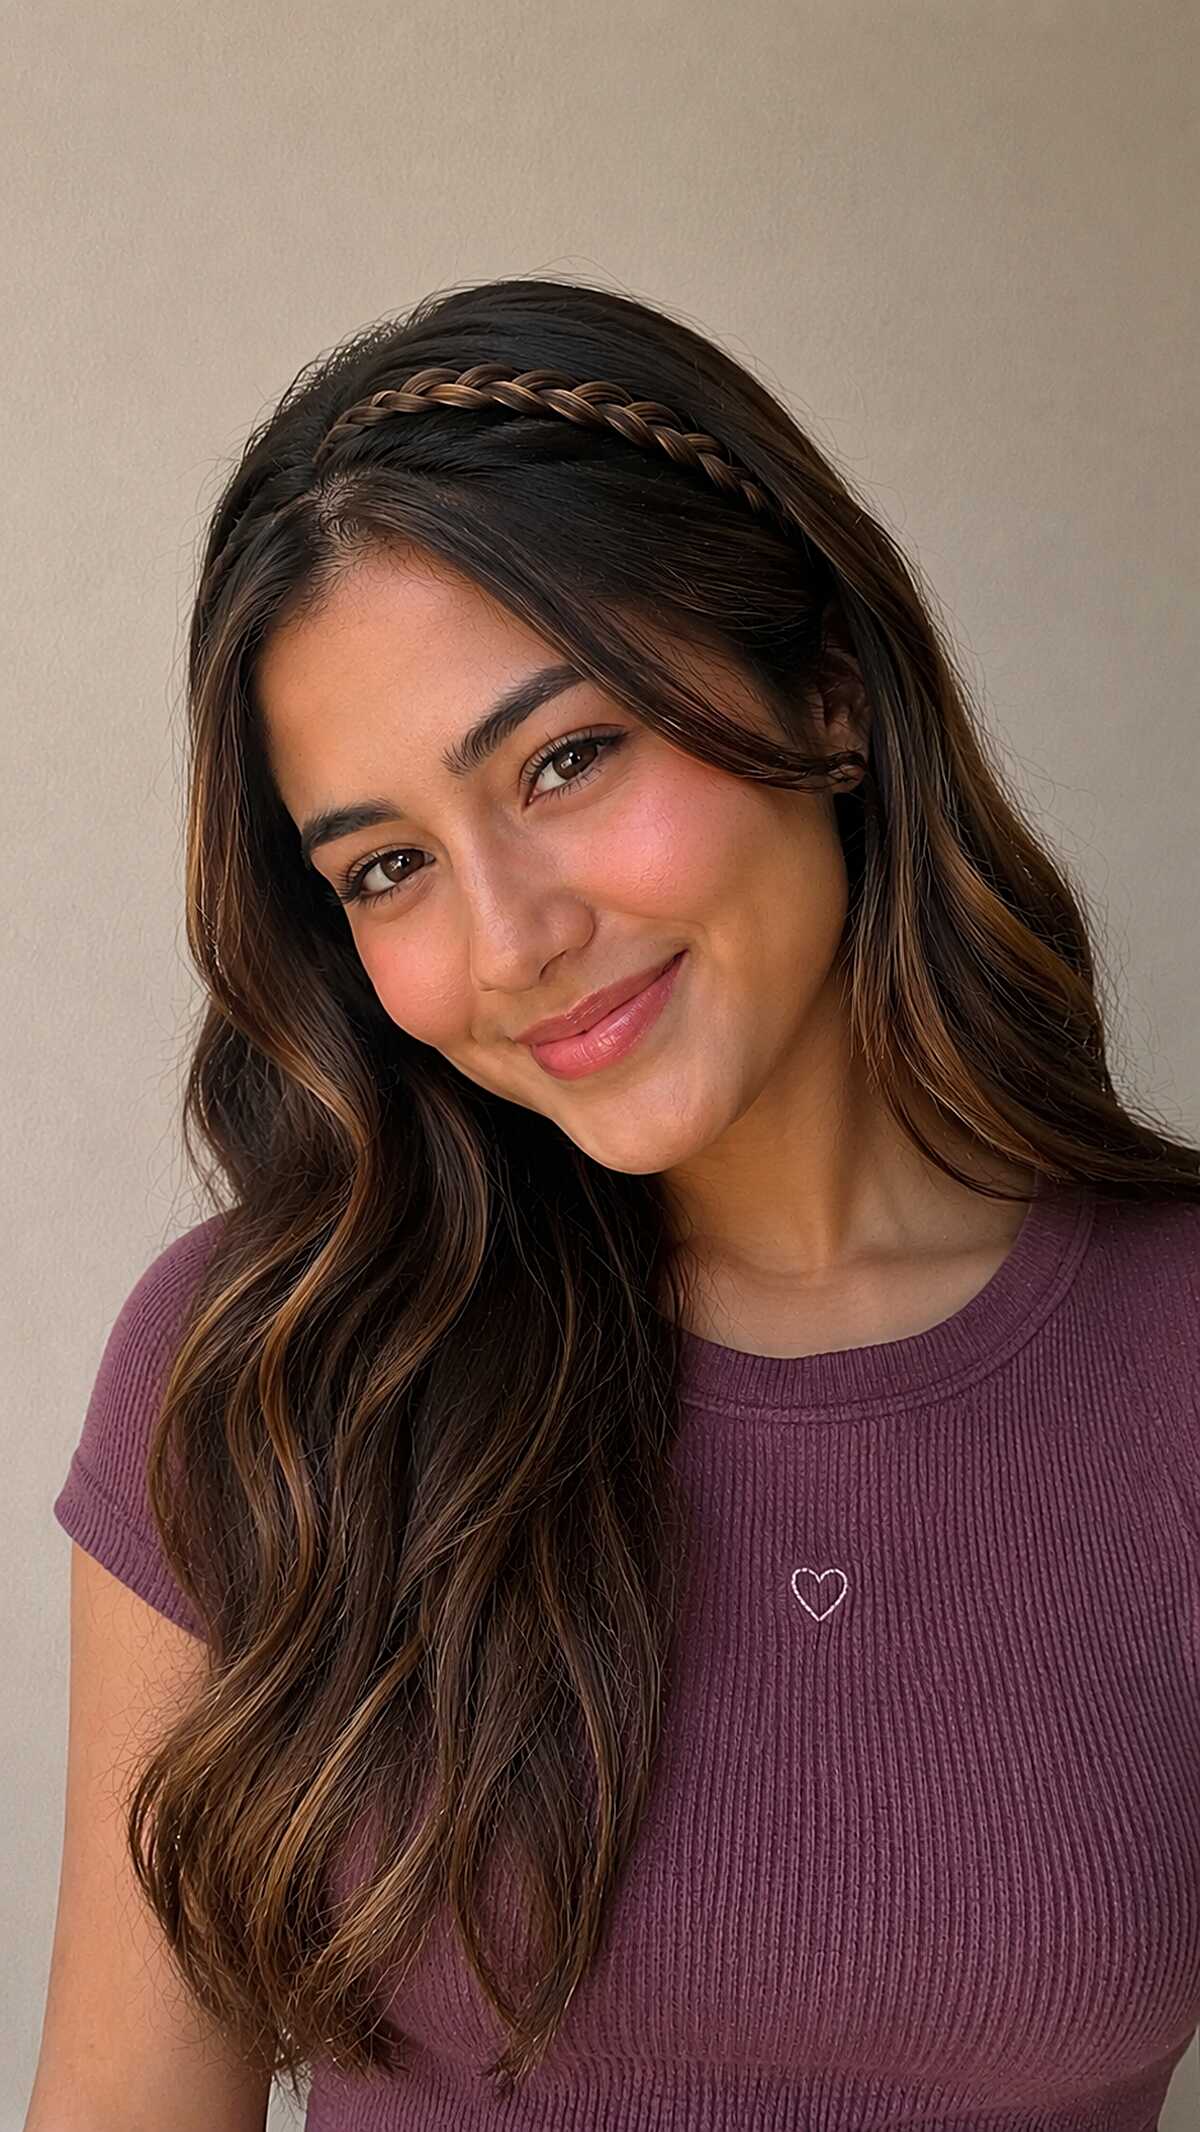
#50 Thin Braided Crown on Loose Brunette Waves
All that braid does is create a bit of visual interest, and that’s exactly why it’s effective. It’s just a simple three-strand braid, pulled from one side, and then wrapped around the front like a headband and pinned behind the opposite ear. All the rest of the hair is worn down, with soft, mid-chest length hair that has some gentle waves. If your hair is fine, or slippery straight, that braid simply will not hold without multiple pins (and a prayer). This is a pretty solid medium-to-thick hair style. What really stood out to me is the way the warm caramel strands interwoven with the brunette base of the braid made it look really dimensional, almost like a two ton ribbon on the head. Without that color variation, the braid visually flattens and almost looks like an afterthought. It works on every face shape honestly, since nothing gets pulled tight or is changing the frame around the face.
Enter your email and get this picture and description straight to your inbox, and you'll also get new hair ideas ❤️
🔒 We don't spam or sell emails. See our Privacy Policy.