The alarm that was supposed to go off at 6:30 went off at 7:12, and now you are standing in front of a mirror with wet hair and a toothbrush hanging out of your mouth. You also have four minutes to do something that looks like you did not just roll out of a dryer. I witness this panic every week and what surprises me the most is how many people think that there are only two options to choose from. Spend thirty minutes making something cute, or do a simple ponytail that will slide down to your neck by lunch. There is a huge middle ground that people do not talk about which is in between messiness and just a little bit of organization.
What I have learned throughout the years is that the clients who I see return from school and tell me which hair styles survived an entire day of carrying backpacks, going to gym, and leaning to write during 5th period. The styles that last the most are never the ones that look the most polished when leaving the house. When a style looks overly polished at 7:00AM, it will look bad at 2:00PM because there is only down to go from there. Styles that look undone from the start only get better over time and that is the secret that no one tells you about because it is so easy to do.
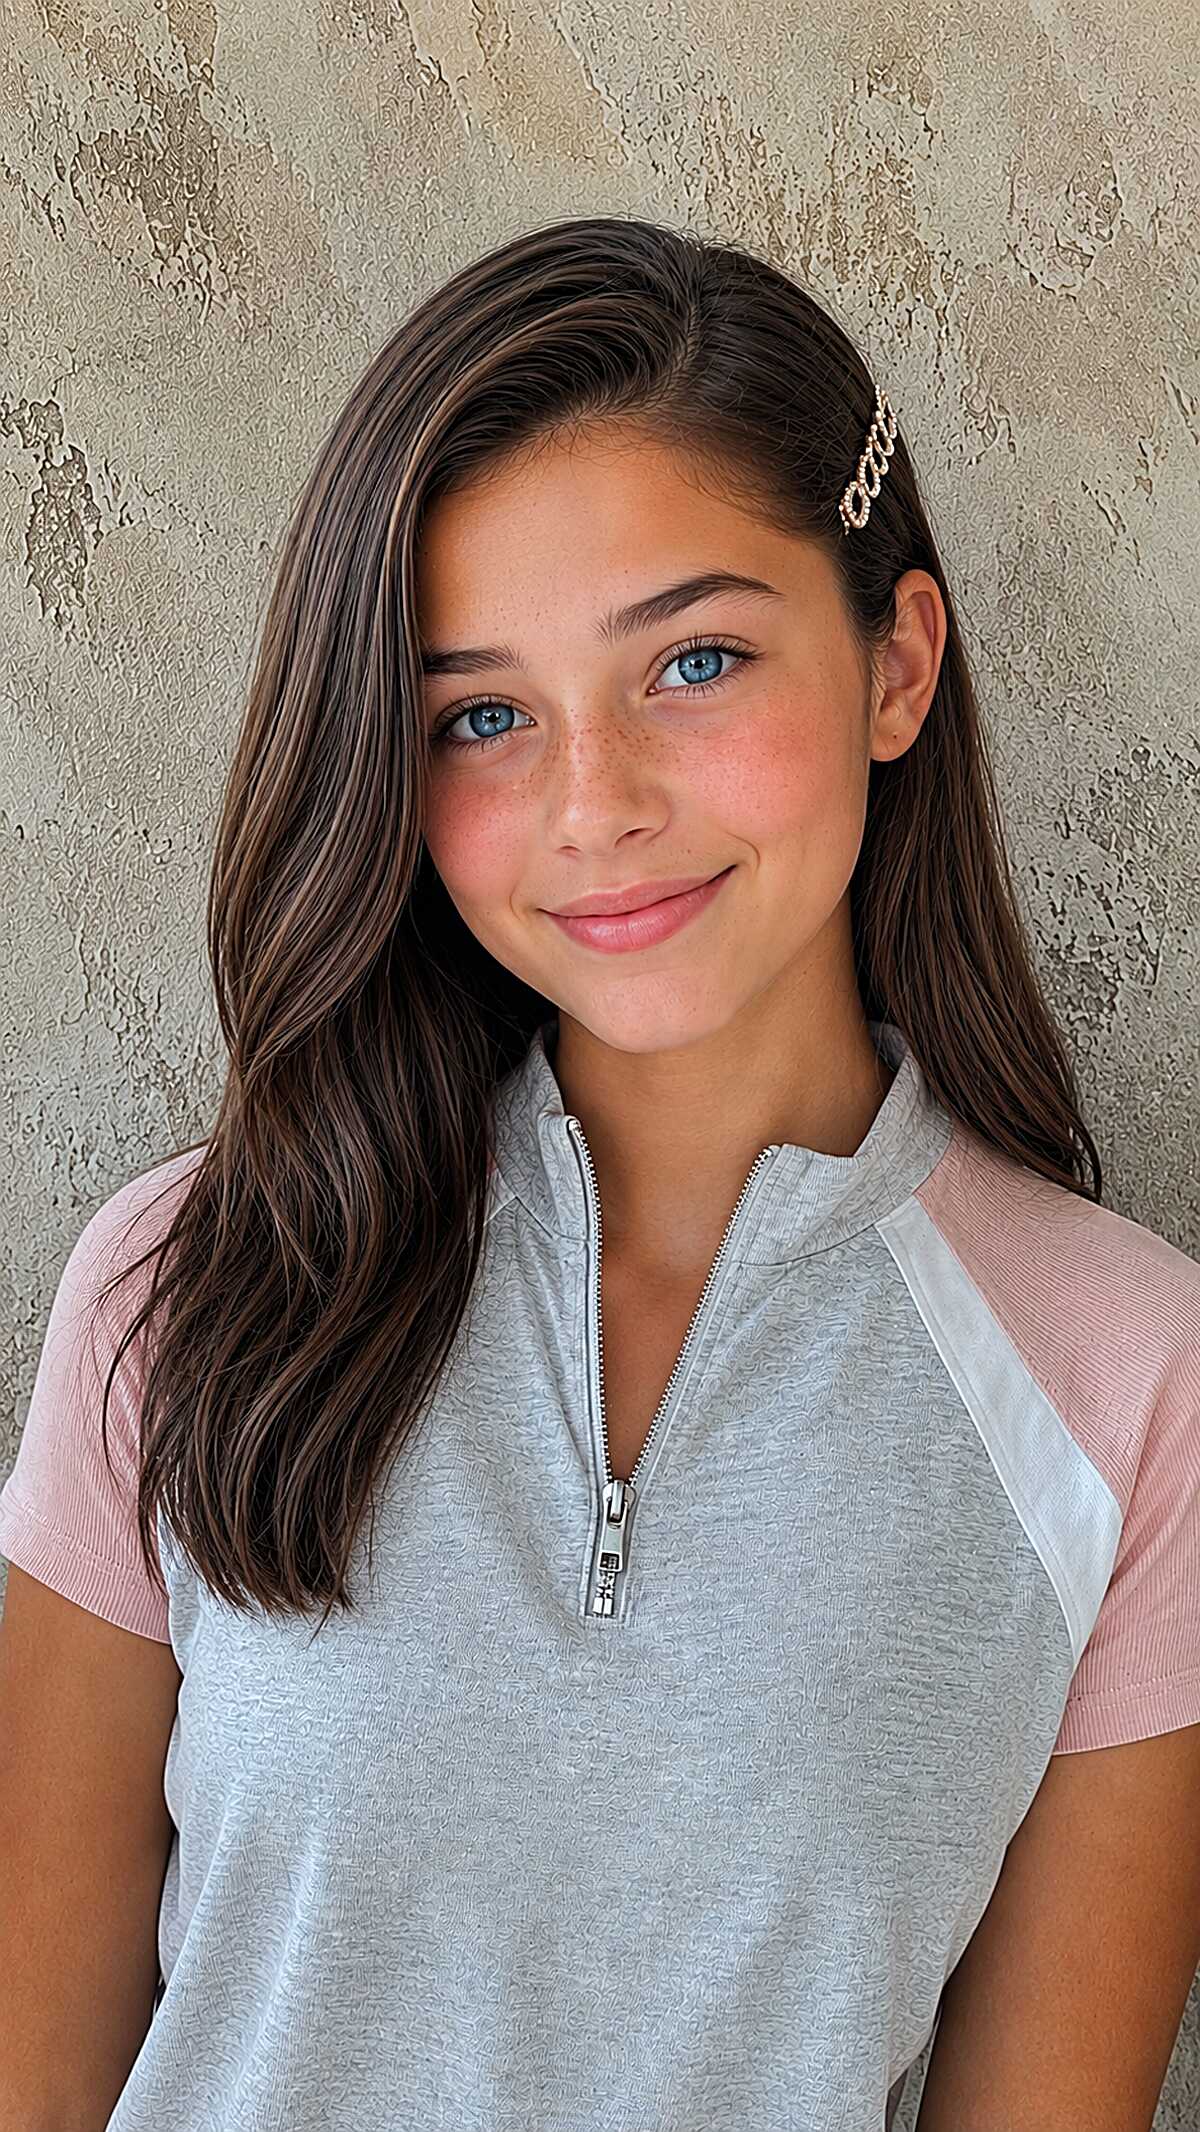

#1: One Decorative Clip on a Deep Side Part
The clip does all the work, and that’s the whole idea. Just a single gold barrette holding back the heavier side of a deep side part on medium-density straight to wavy brunette hair that reaches just past the collarbone. What stands out to me so much is the placement of the part. It’s definitely far enough over to create genuine asymmetry, which is what prevents it from looking like you just forgot to do anything to your hair. If you have thick hair on top, this really won’t stay. The single clip will just slide out within an hour. This style literally takes ten seconds and works best on hair that has a natural slight wave or bend, to give some movement to the loose side instead of hanging super flat.
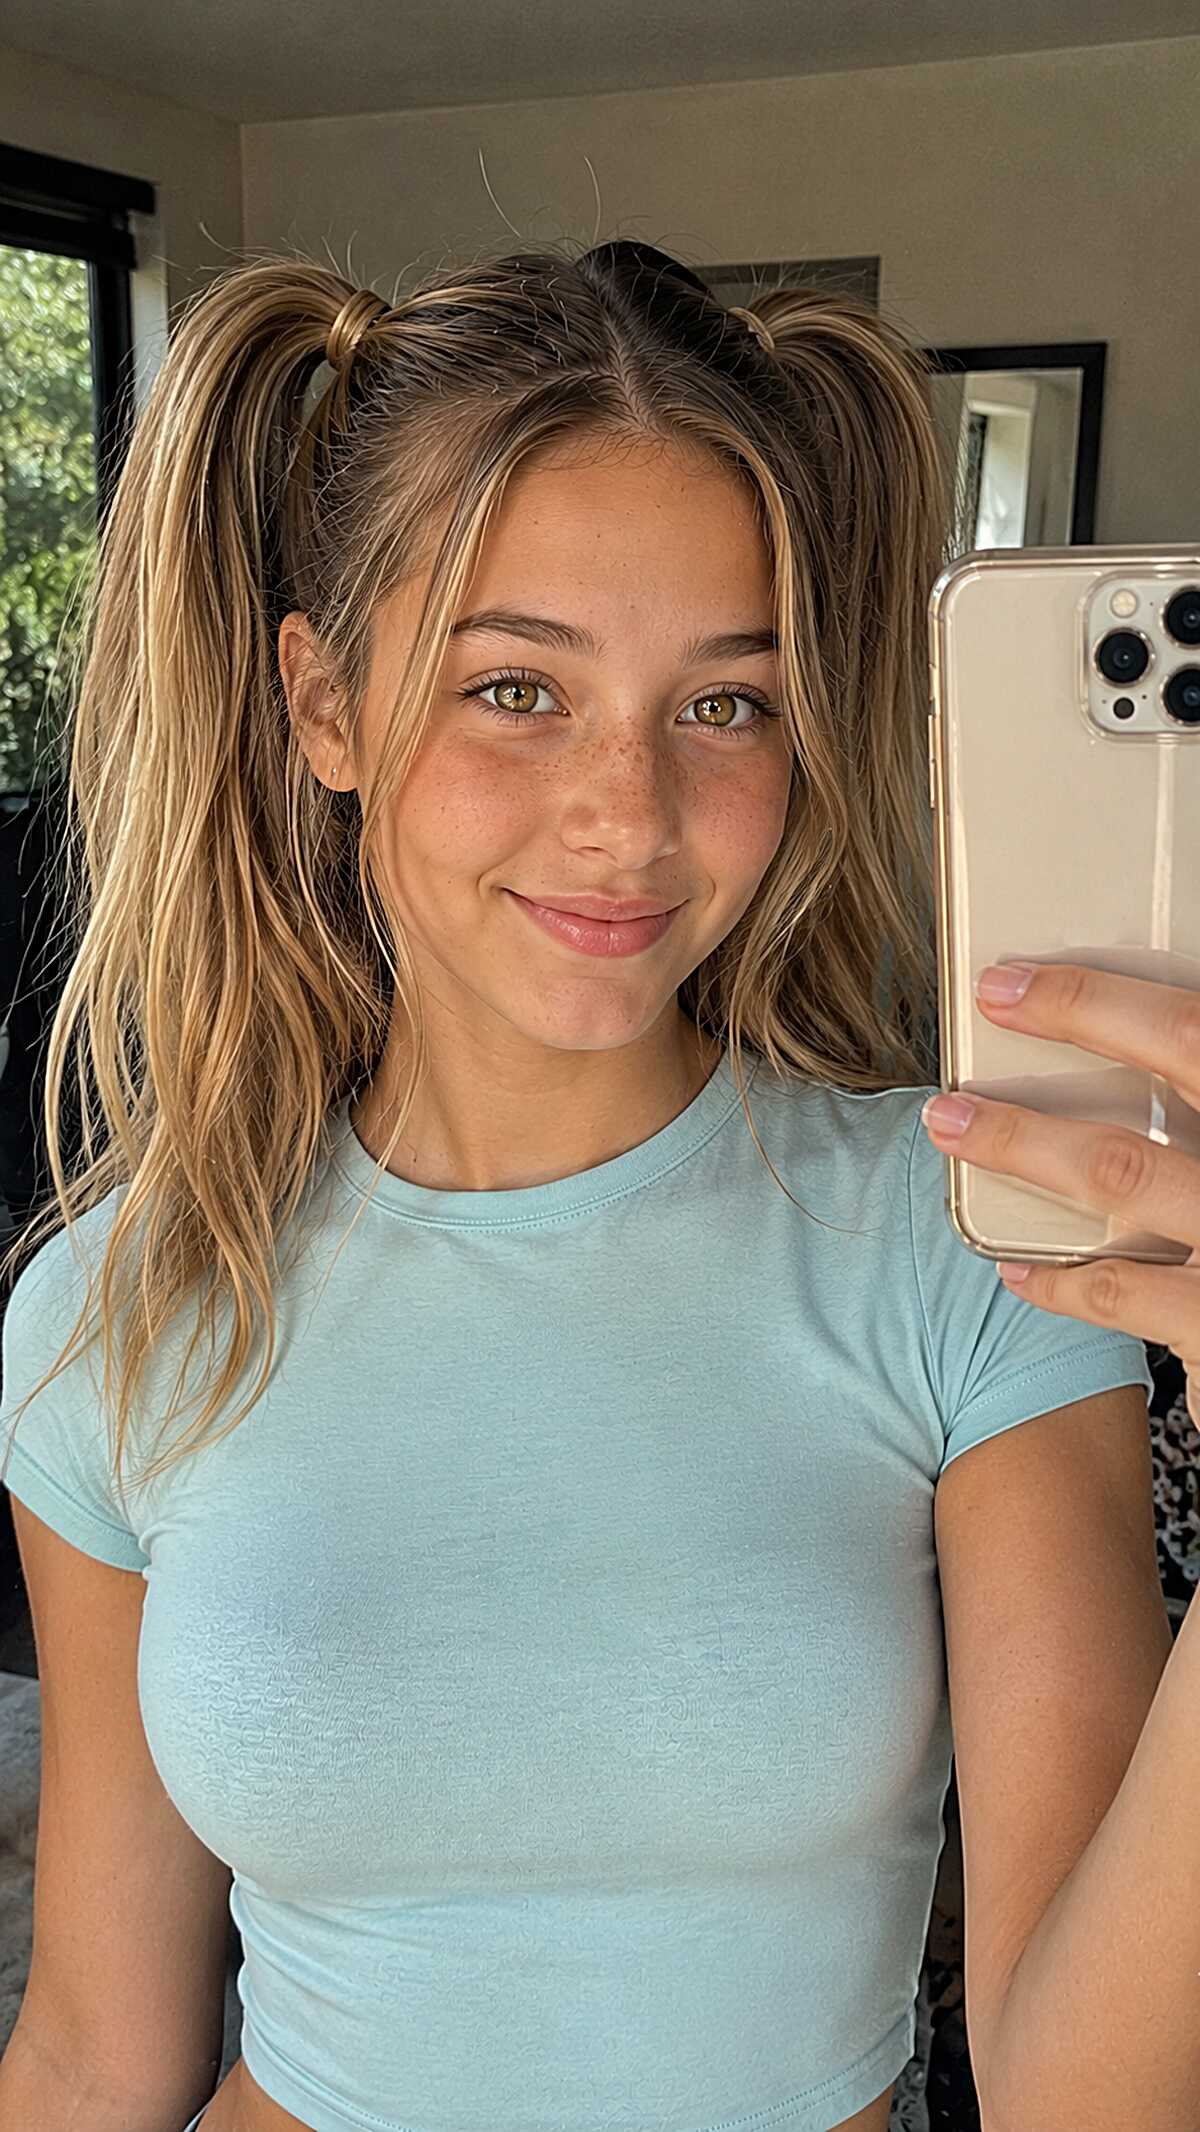
#2 Half-Up Pigtails with Sun-Kissed Highlights and Loose Pieces
The left pigtail is higher than the right, but that’s the point! If both pigtails are even, it looks more like a costume. These pigtails look casual and thrown together. This hairstyle is for medium density hair, probably mid back length, and has a balayage with blonde colors framing the face which is nice. If your hair is fine or straight, these half-up ponytails will look flat and sparse. The hairstyle relies on enough natural waves and volume to fill out the pigtails, and also so that the front parts don’t look like they’re just hanging there. This takes about 90 seconds, two hair ties, and that’s it. It also looks good because the face framing pieces aren’t just pulled out randomly. The pieces are thin tun enough to be able to move, so it looks more intentional instead of just pieces falling out.
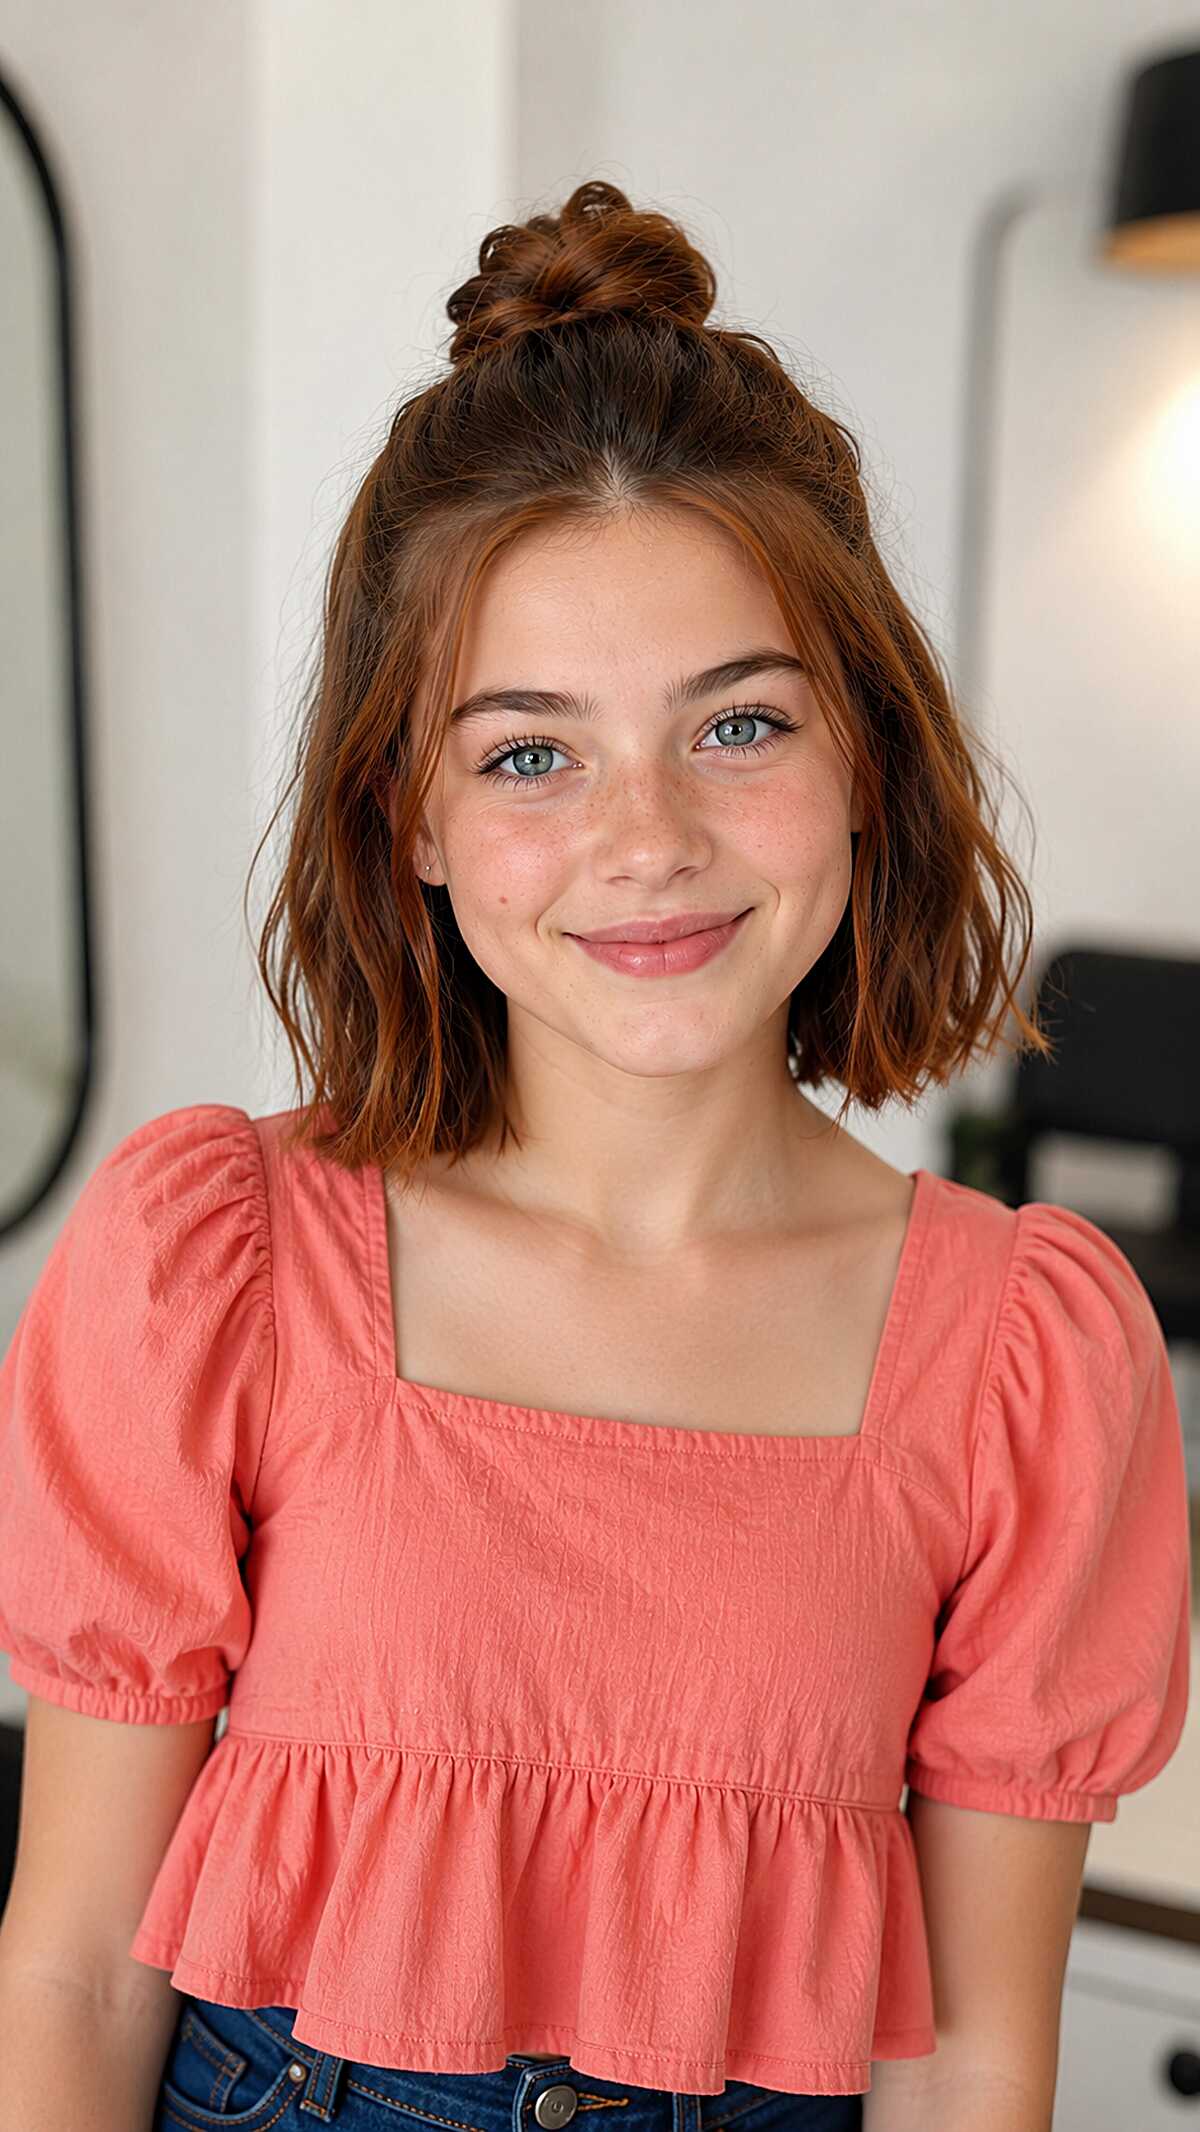
#3 Half-Up Mini Bun on a Chin-Length Textured Cut with Warm Auburn Tone
That bun is tiny!! It looks like its hardly holding on!! It’s meant to look that way, though, because for chin length bobs there’s also only so much hair to gather, and trying to force a full bun will pull at the nape and cause you to get a headache before 2nd period. It works because she’s only taken the top third of her hair, twisted it loosely, and let everything below the ears hang free, and the natural waves do the rest. The color looks like warm auburn copper glaze over a natural base medium brown that reflects the light beautifully and it stops the hair from looking flat. This is medium density and slightly wavy texture which makes the bun look great. It’s also worth noting that if your hair is thick and straight, the remaining pieces will just curtain hang instead of curving around the jawline like hers do. Oval and heart shapes get more of this because the top volume and jaw-length framing is just a great balance. For the round faces the pieces that drop can actually widen the face. It looks effortless, but a part of it is the front pieces being uneven and unequal on both sides which can be tough to pull off if you are trying too hard to get it.
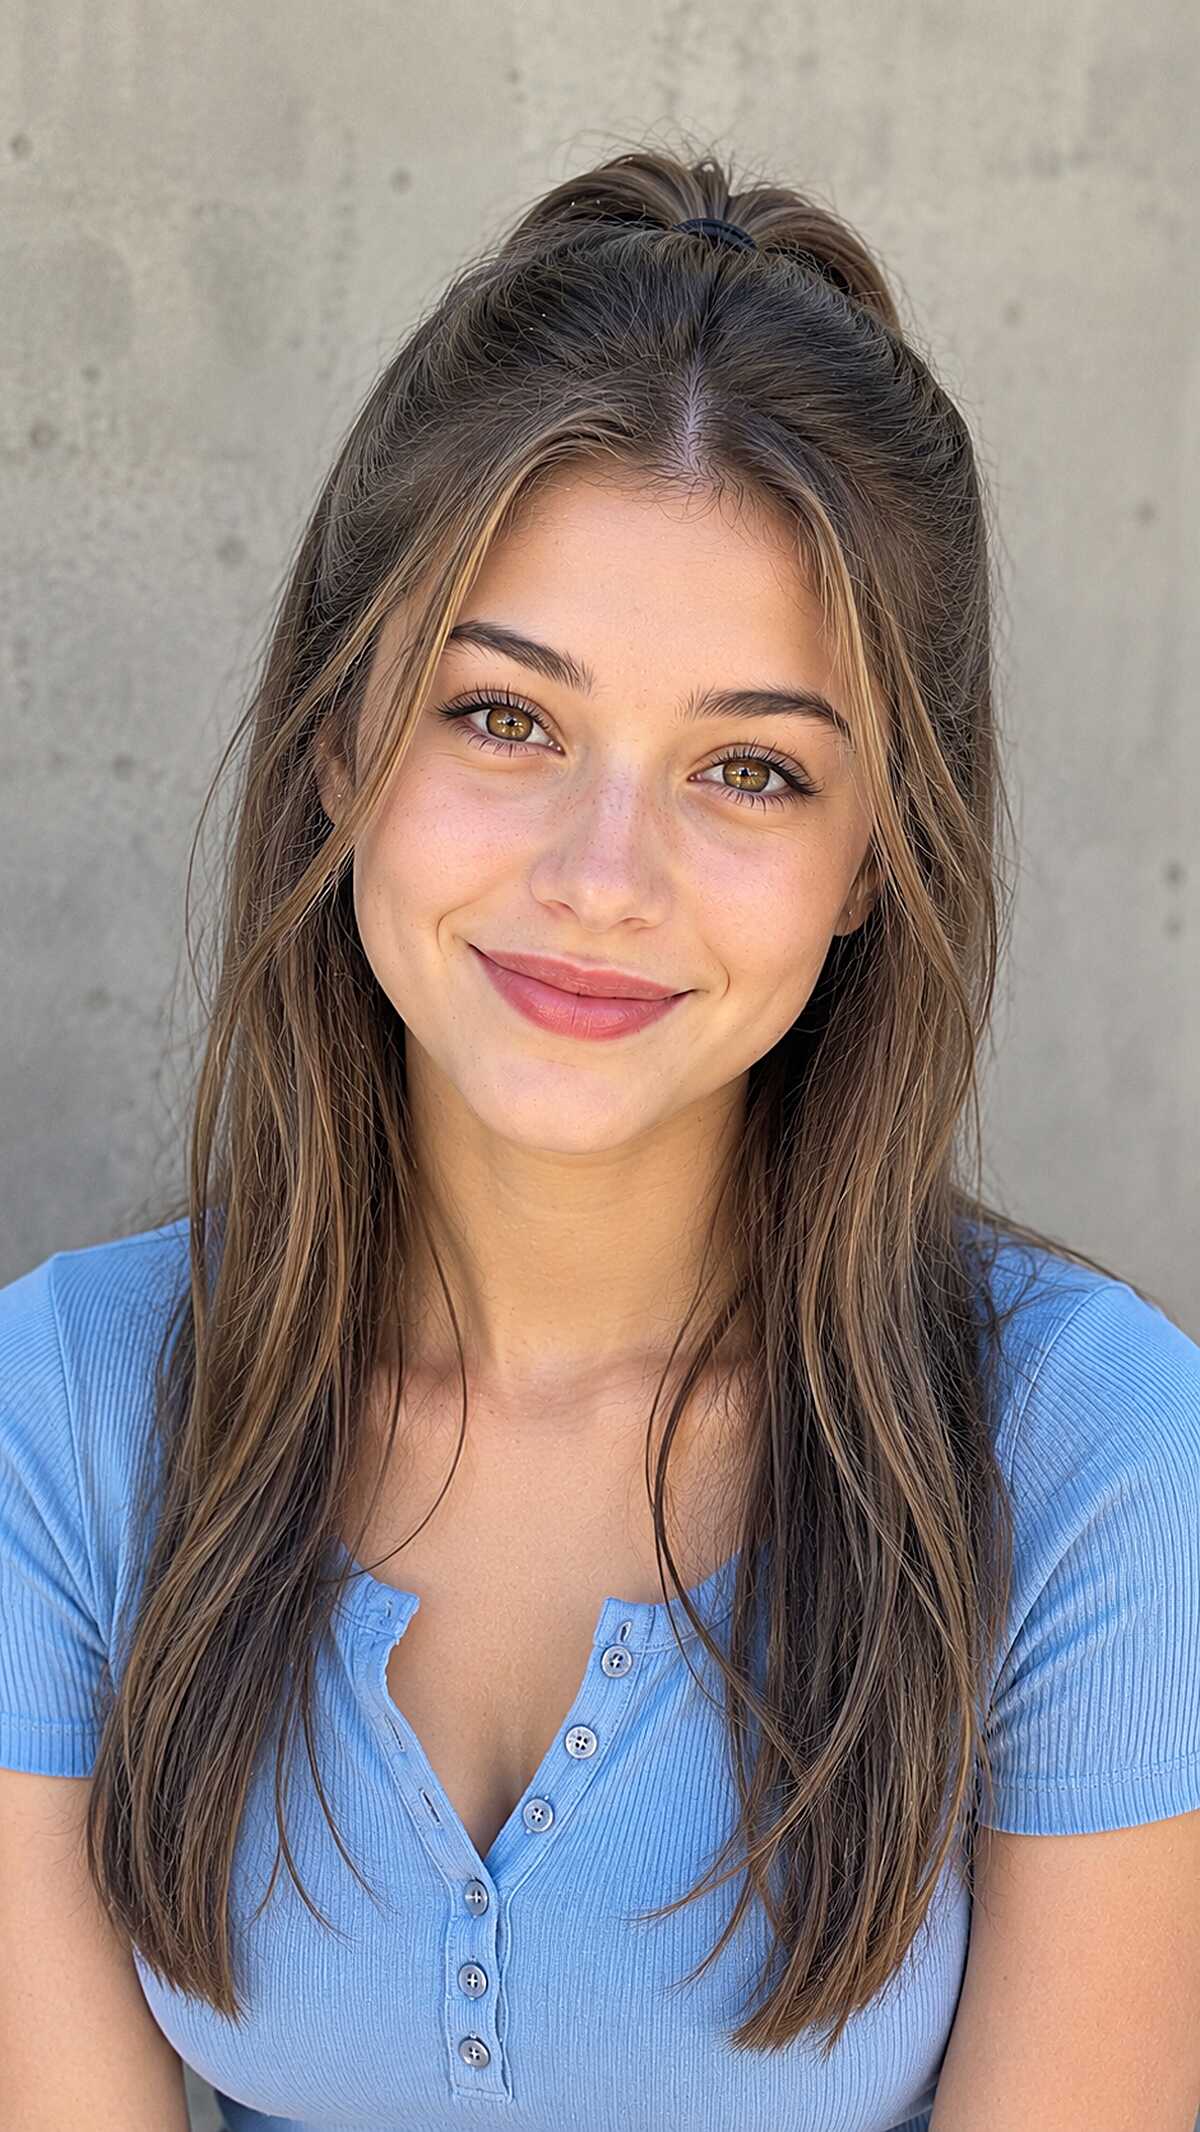
#4 Half-Up Bump with Long Layers and Subtle Honey Highlights
The crown volume does all the trick here, and it only works because the hair is of medium density to hold that bump without backcombing. You can see the elastic sitting far back, almost at the crown rather than at the usual half-up midpoint, that is what gives that lifted shape instead of a flat pull. Fine hair is going to collapse within the hour. On both sides, the face-framing pieces are left long and loose with some hand-painted honey highlights right where the light hits them, a natural looking subtle balayage that is more aligned with the trend than styled. For oval and heart-shaped faces this works really well because the longer front sections cut closer to the cheekbones. Round faces will lose all definition under this much loose hair at jaw level.
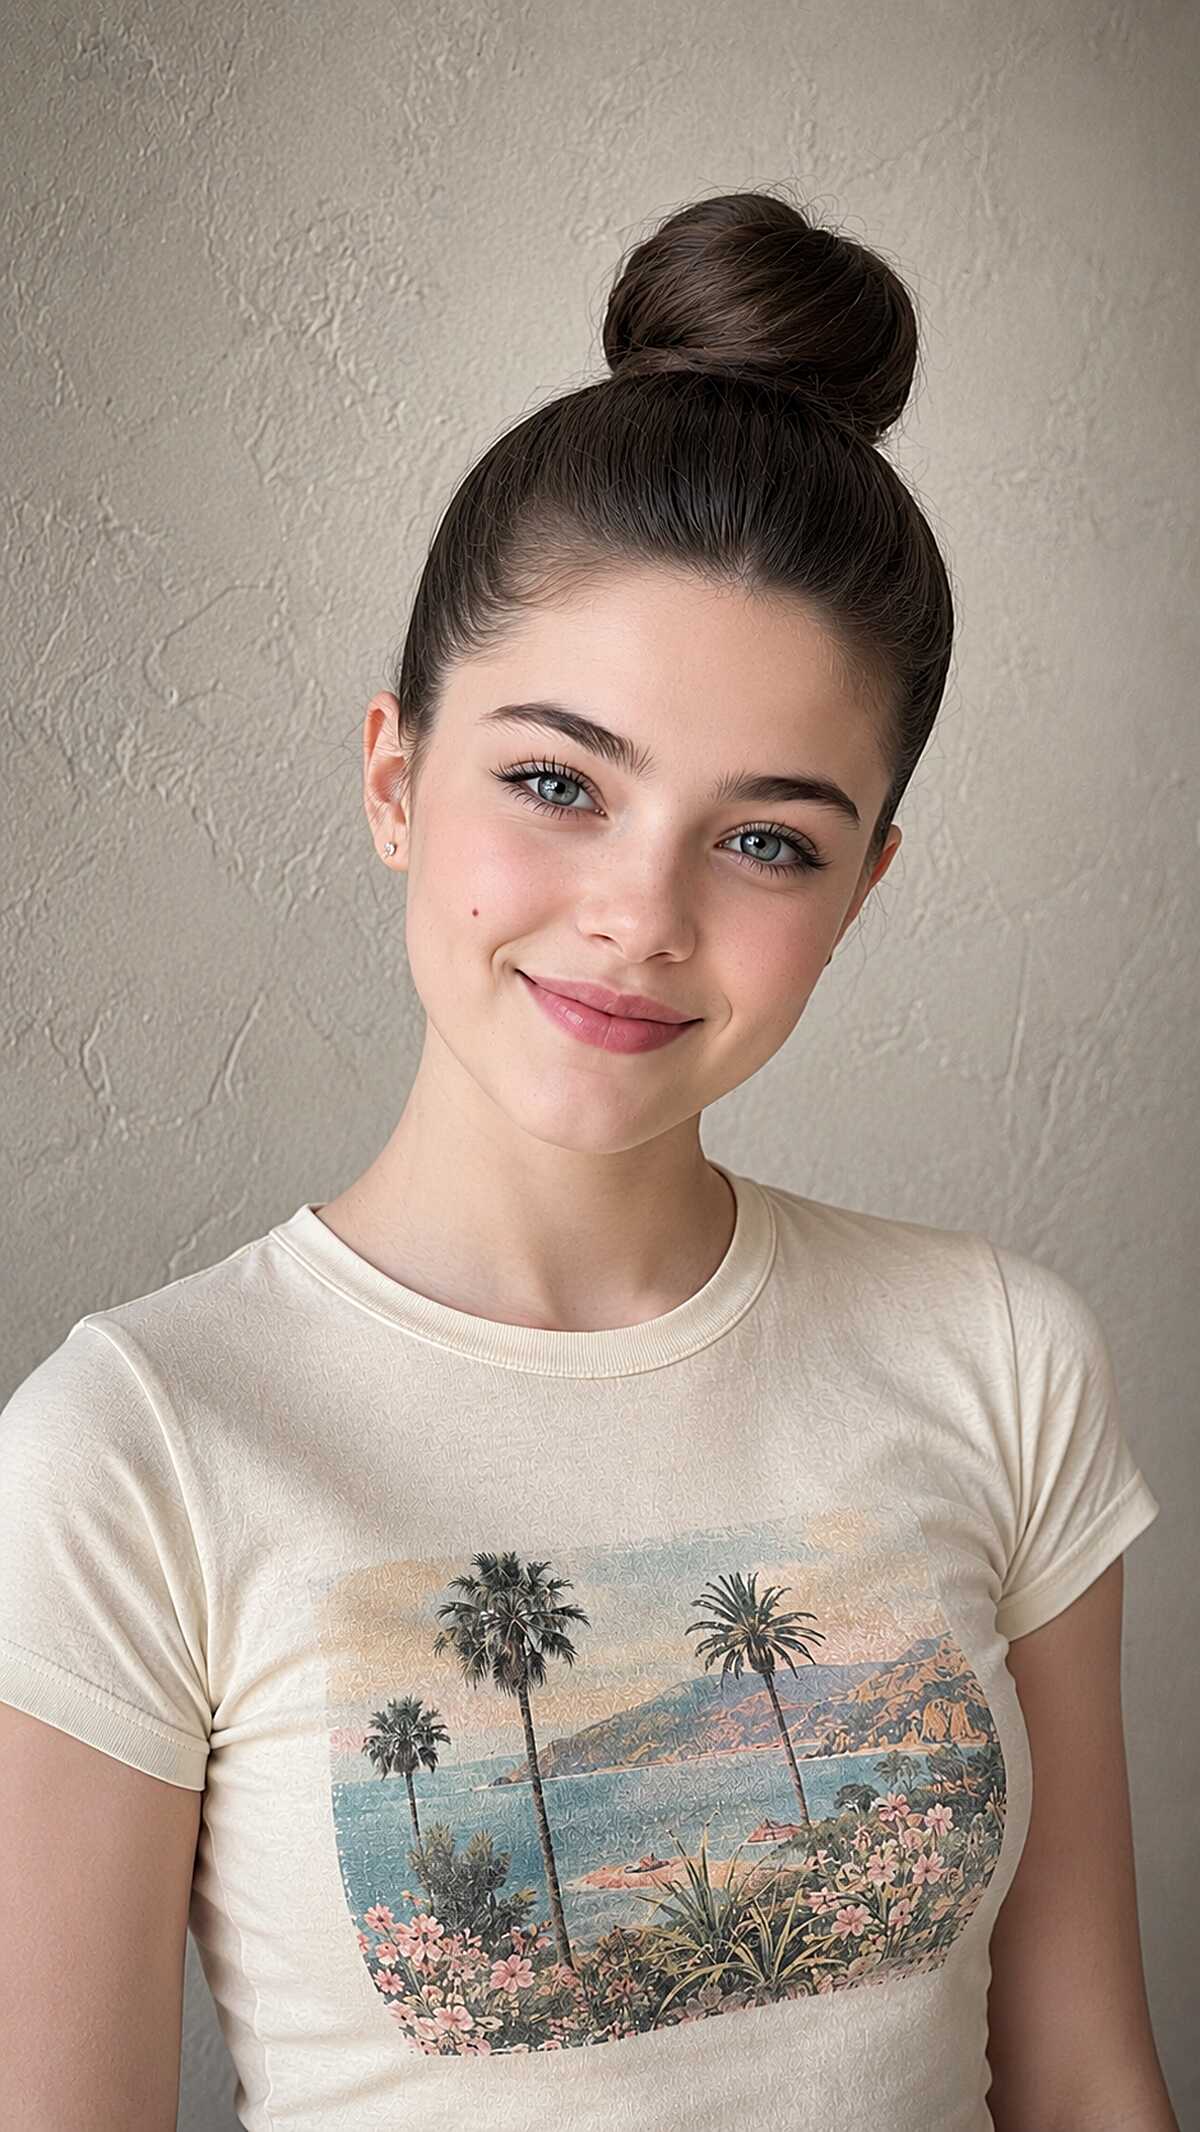
#5 Slicked-Back High Bun with Zero Face-Framing on Dark Brunette Hair
No loose pieces at all around the face is worth noting, as nearly every other quick style features something out, but this one does not. Up smooth from the hairline, all features are exposed. For those with a round face or wide forehead, this won’t be a softer option. It works best for oval or heart shaped faces as they typically have the best proportion for all of that openness. The bun looks to be medium density hair at about mid back length when down because it’s compact and wrapped only once around itself and secured. Hair that is fine will struggle to maintain this shape without a donut or significant product. Excessively thick hair will make the bun too top heavy and large. If you have the right texture and grip from second day hair, this style will take about a minute, but it will fall apart quickly on freshly washed hair and it will be a struggle to maintain on silken strands.
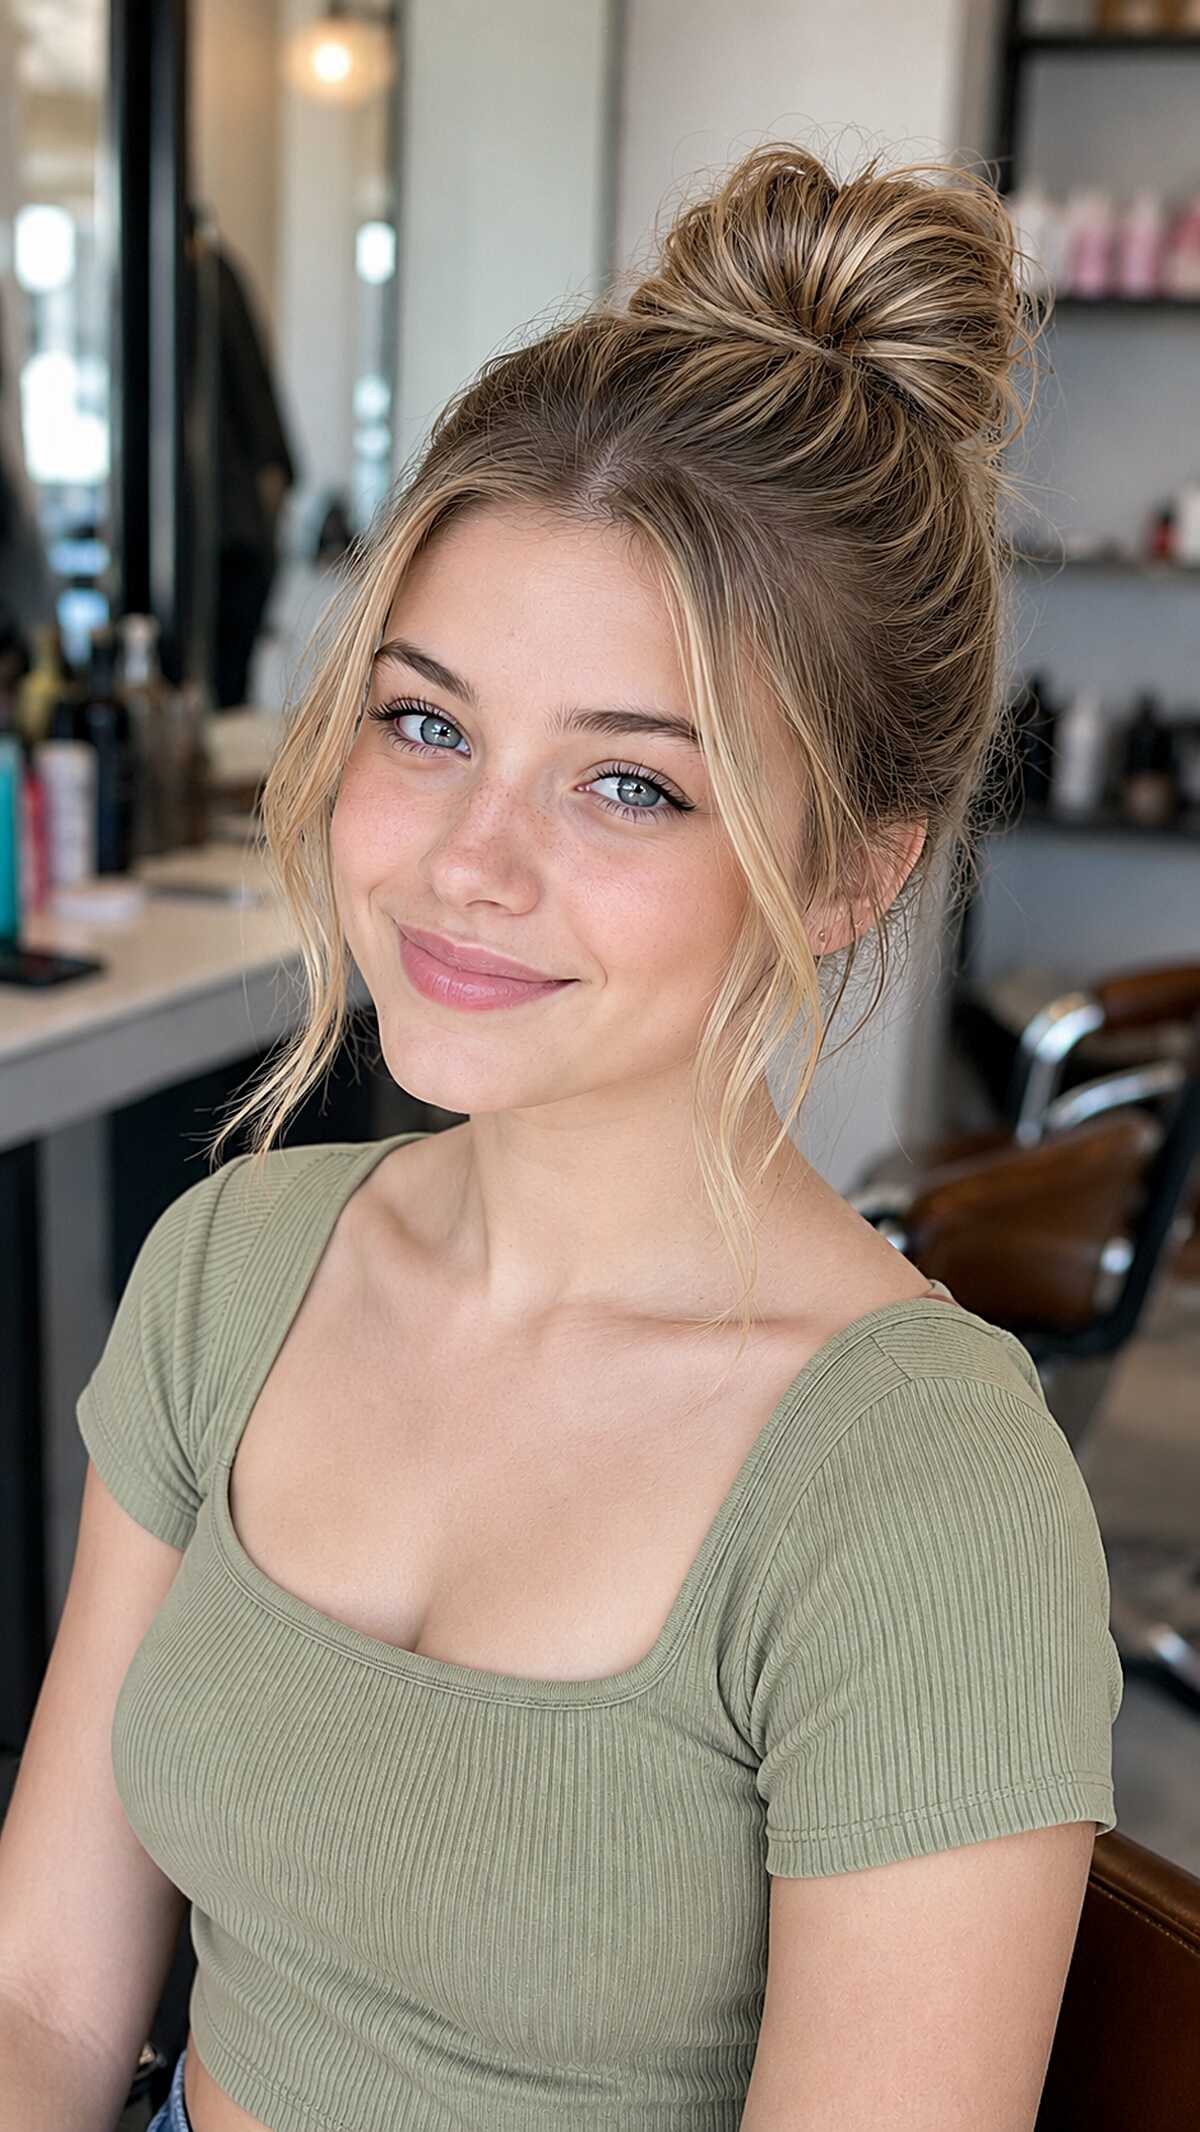
#6 Wrapped Top Knot with Blonde Money Pieces Left Loose
This hairstyle appears intentional because of the money pieces- the face-framing blonde sections. Without these pieces, this hairstyle is just a bun. The best part is that it takes around 40 seconds to create. You can see that the pieces at the temples are longer than the ear pieces. This indicates that there is layering under the top pieces, so these strands weren’t pulled at random. As for the hair type, this works best on hair that is medium density, straight to slightly wavy and at least shoulder length. Fine hair will not hold the knot shape and will appear wispy and flat at the top. A high top knot can widen the face, especially for those with a rounder face. This hairstyle is very flattering for oval and longer face shapes. The balayage paired with this hairstyle looks really good because she has a natural dark root. The hand-painted blonde is only at the front which means the bun looks darker and more grounded while the face-framing pieces are light.
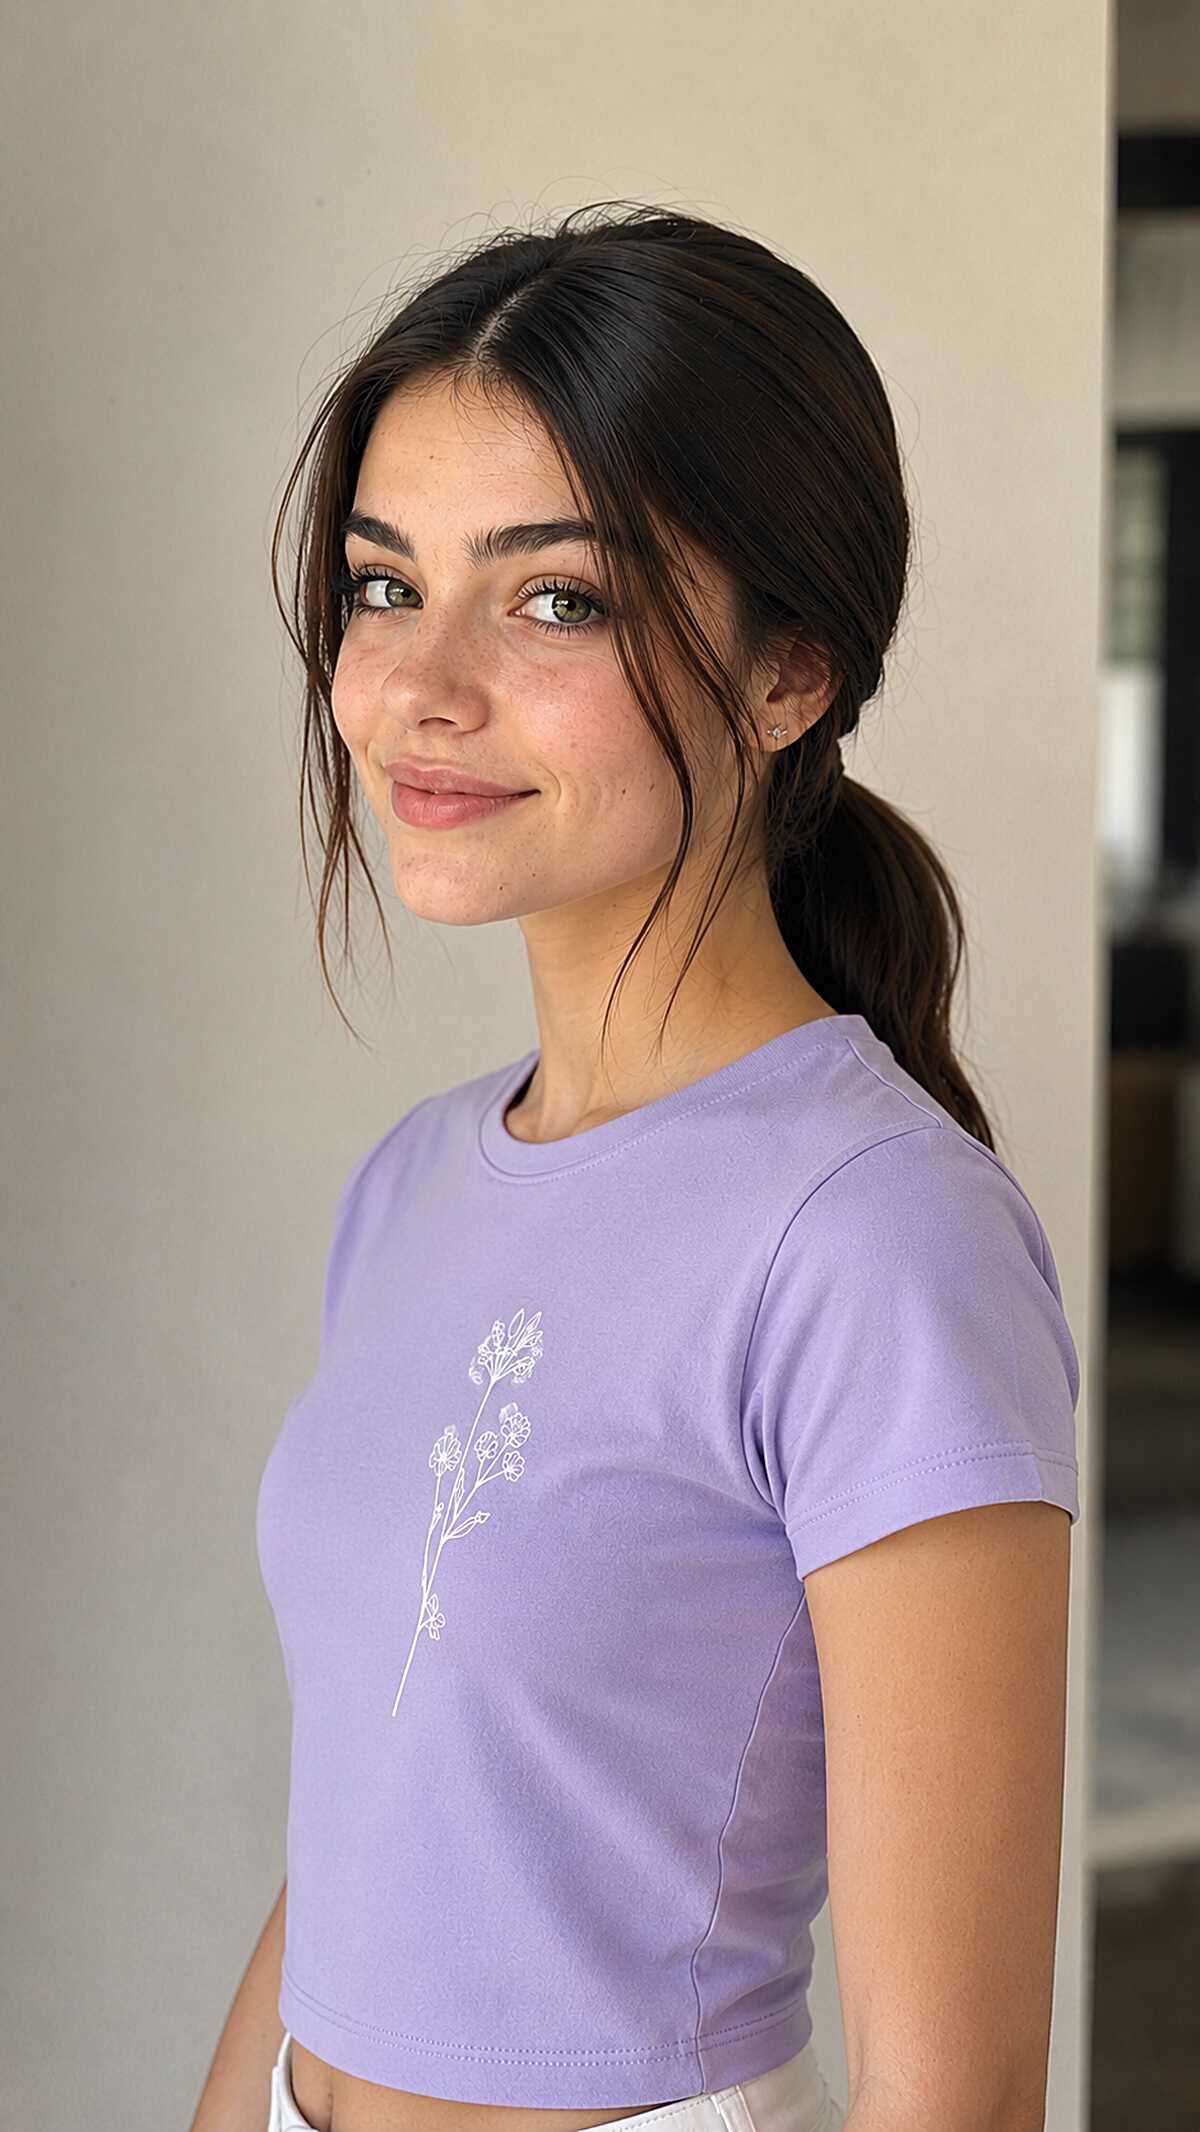
#7 Casual Low Ponytail with Wispy Front Pieces on Dark Brunette Hair
Let’s break the look down by starting with the shorter pieces added around the hairline. They help achieve that pull through as these are purposefully left out of the ponytail and vary in the length and the side of the head they fall at. Their purpose is to create that little bit of asymmetry detail so it doesn’t look as if you’ve put no effort into the style. This technique is best suited for medium, thick hair that’s straight or wavy, and long enough to sit at mid length and beyond. If you have fine hair, you can consider it exposed elastic at the base of your hair which can look sparse. This look is best suited for hair that is oval and heart shaped as the face tendrils won’t narrow anything further. If your face is round, those wispy pieces won’t do you any favors. The ponytail sits extremely low at the nape so this also adds to the effortless look and it is held loosely with a hair tie. It is the sort of style that looks totally effortless rather than undone. It will take no more than thirty seconds to create this look and requires no product or tools.
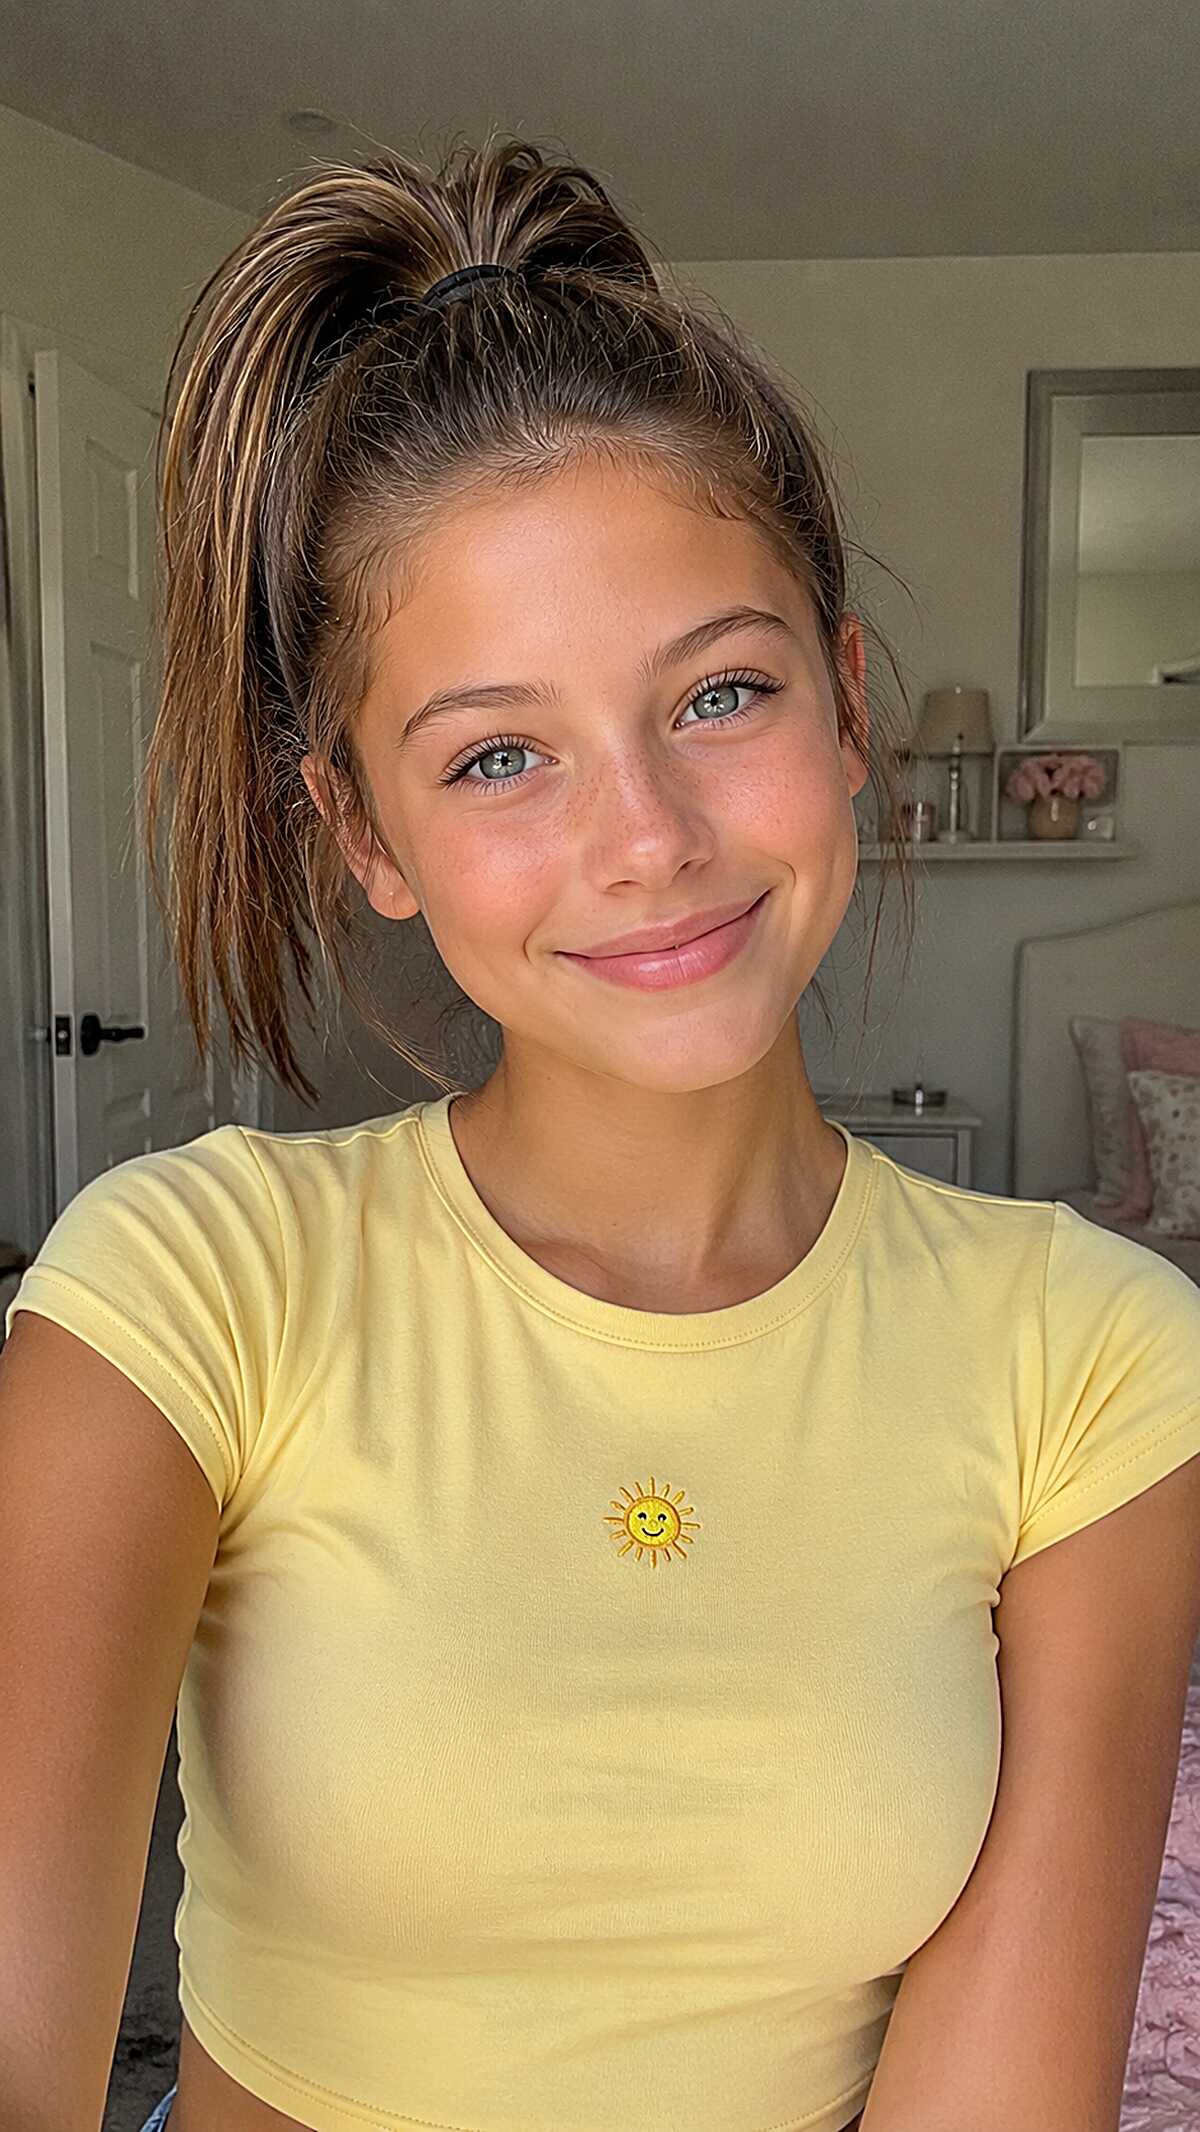
#8 High Ponytail with Dropped Pieces on Medium Brunette Hair
The pieces left out around the face are doing most of the styling here and it’s not by chance. They’re taken from the temple section and cut to sit right at the jawline, which means it frames the face without any cutting, curling, or styling needed. This styling will work on medium density straight to slightly wavy hair. The hair also needs to be heavy enough to lay down and not be slippery enough to hold a high pony without sliding. If your hair is too thick, the ponytail will end up sitting lower and those face framing pieces won’t look very good because they will clump together. The ponytail is placed right on the crown of the head with a thin elastic. The ponytail is short enough to sit above the elastic so it will fan out instead of hang down. That fan look comes from shoulder length hair or slightly shorter. If your hair is longer, it will create a different shape. The part looks undone and that is part of the effortlessness of the look. You just gather and go.
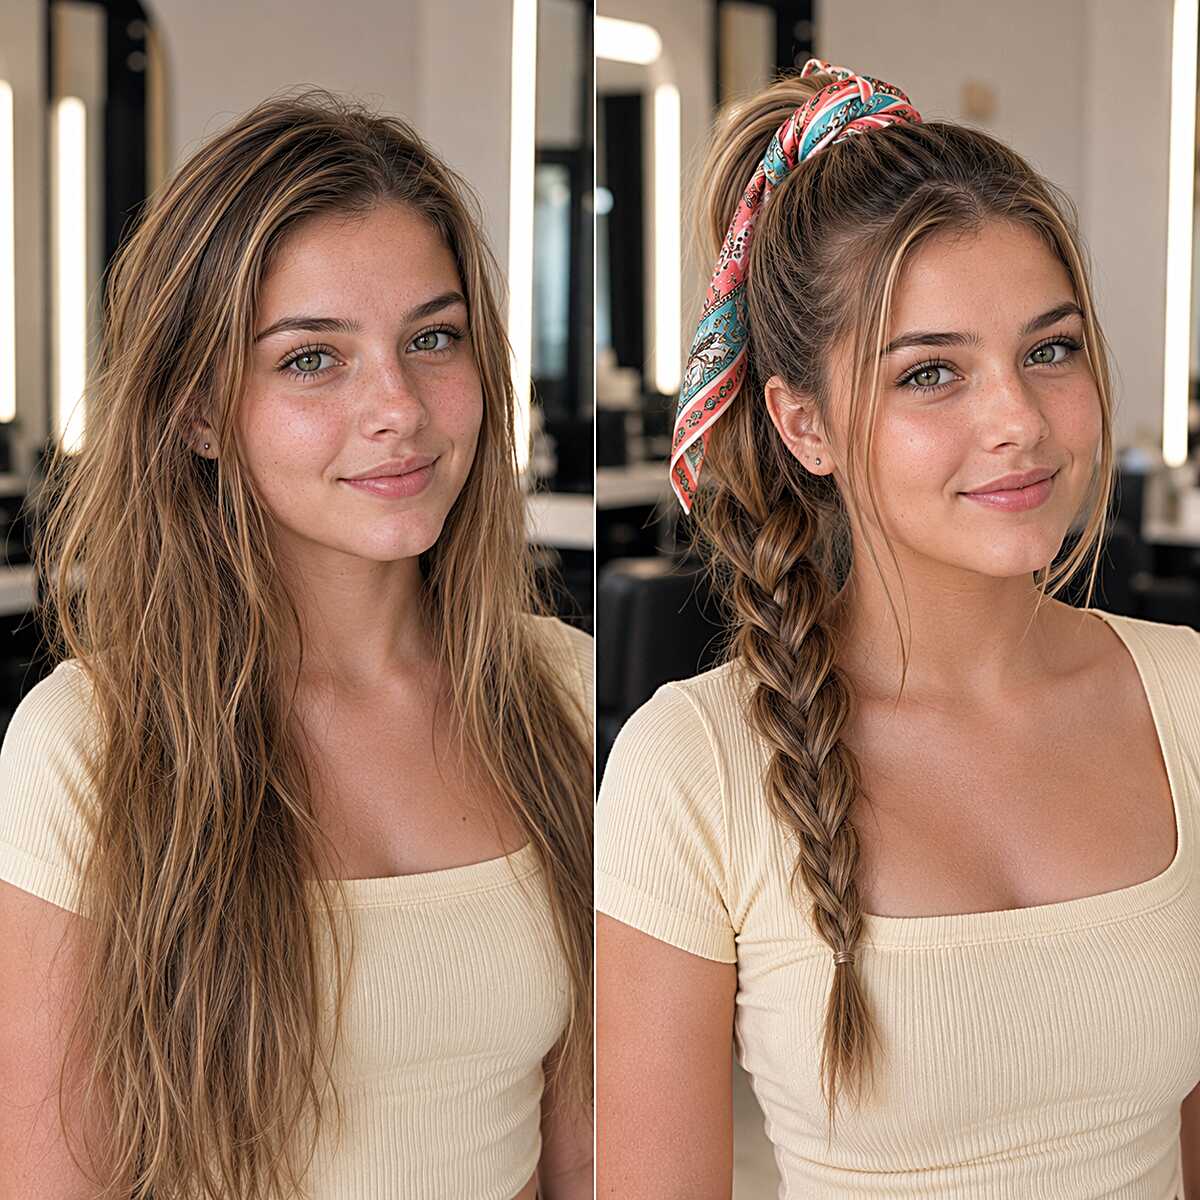
#9 Scarf-Wrapped High Ponytail Pulled into a Loose Fishtail on Bronde Layers
“`
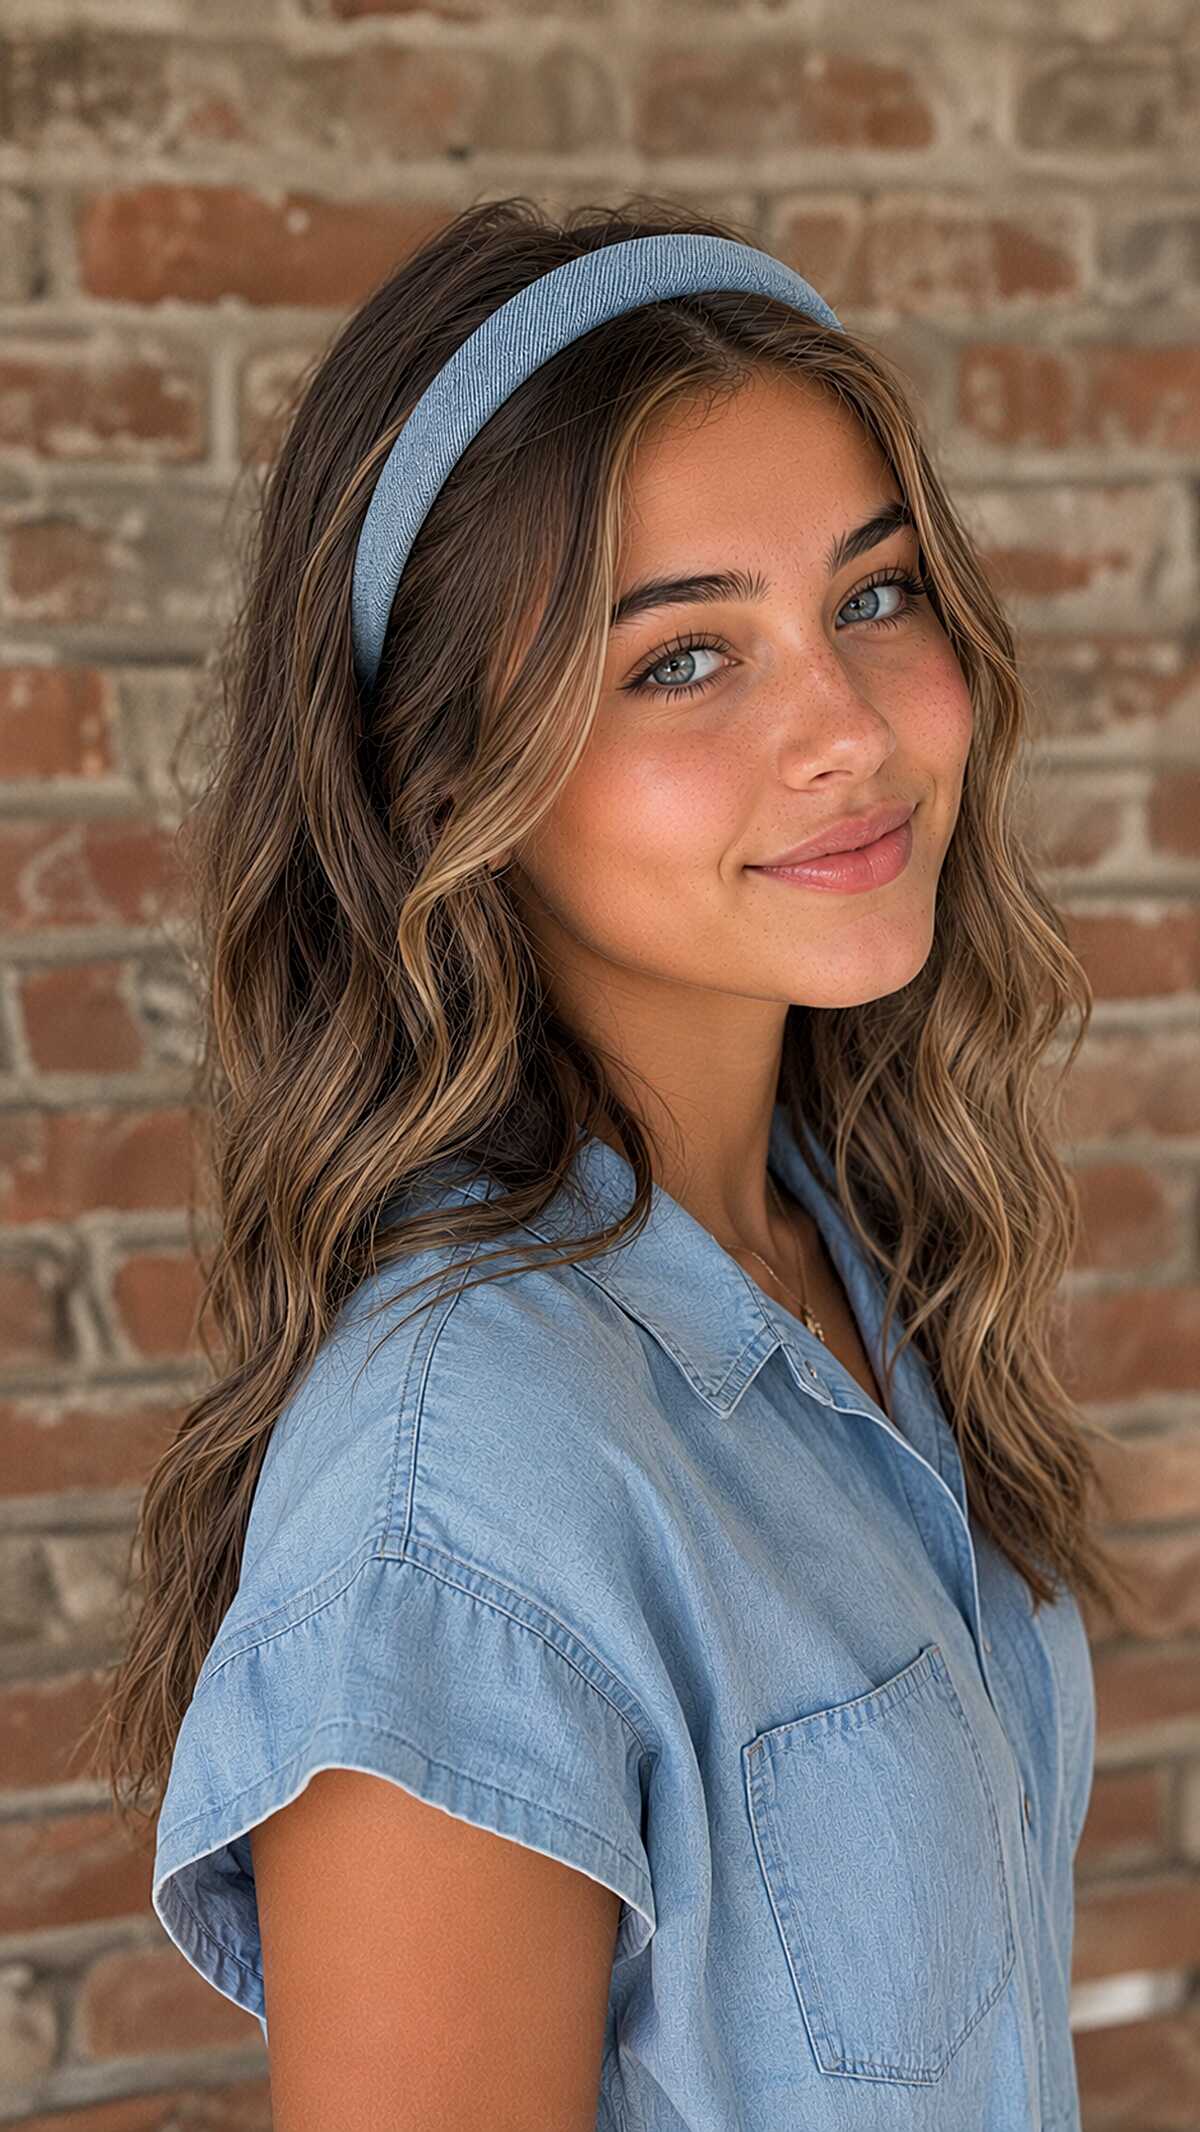
#10 Fabric Headband Pushing Back Loose Waves on Sun-Kissed Brunette
There is a lot of effort going into this look and that’s the intention. This is mid-length hair, mid density, and has been hand-painted with some caramel highlights bias to the face, left loose with a wave to add texture, so it doesn’t look straight and flat. You can see that the hair is pulled back only at the back crown and temples, then everything else is let down, and that subtle positioning is what prevents this look from reading as an afterthought. On finer hair, a headband of this type will slide back and won’t stay in place throughout the day. This style requires enough texture for the fabric to grip it. This look is most suited for oval and heart-shaped faces as the volume at the sides doesn’t add more height, but keeps the height at the sides.
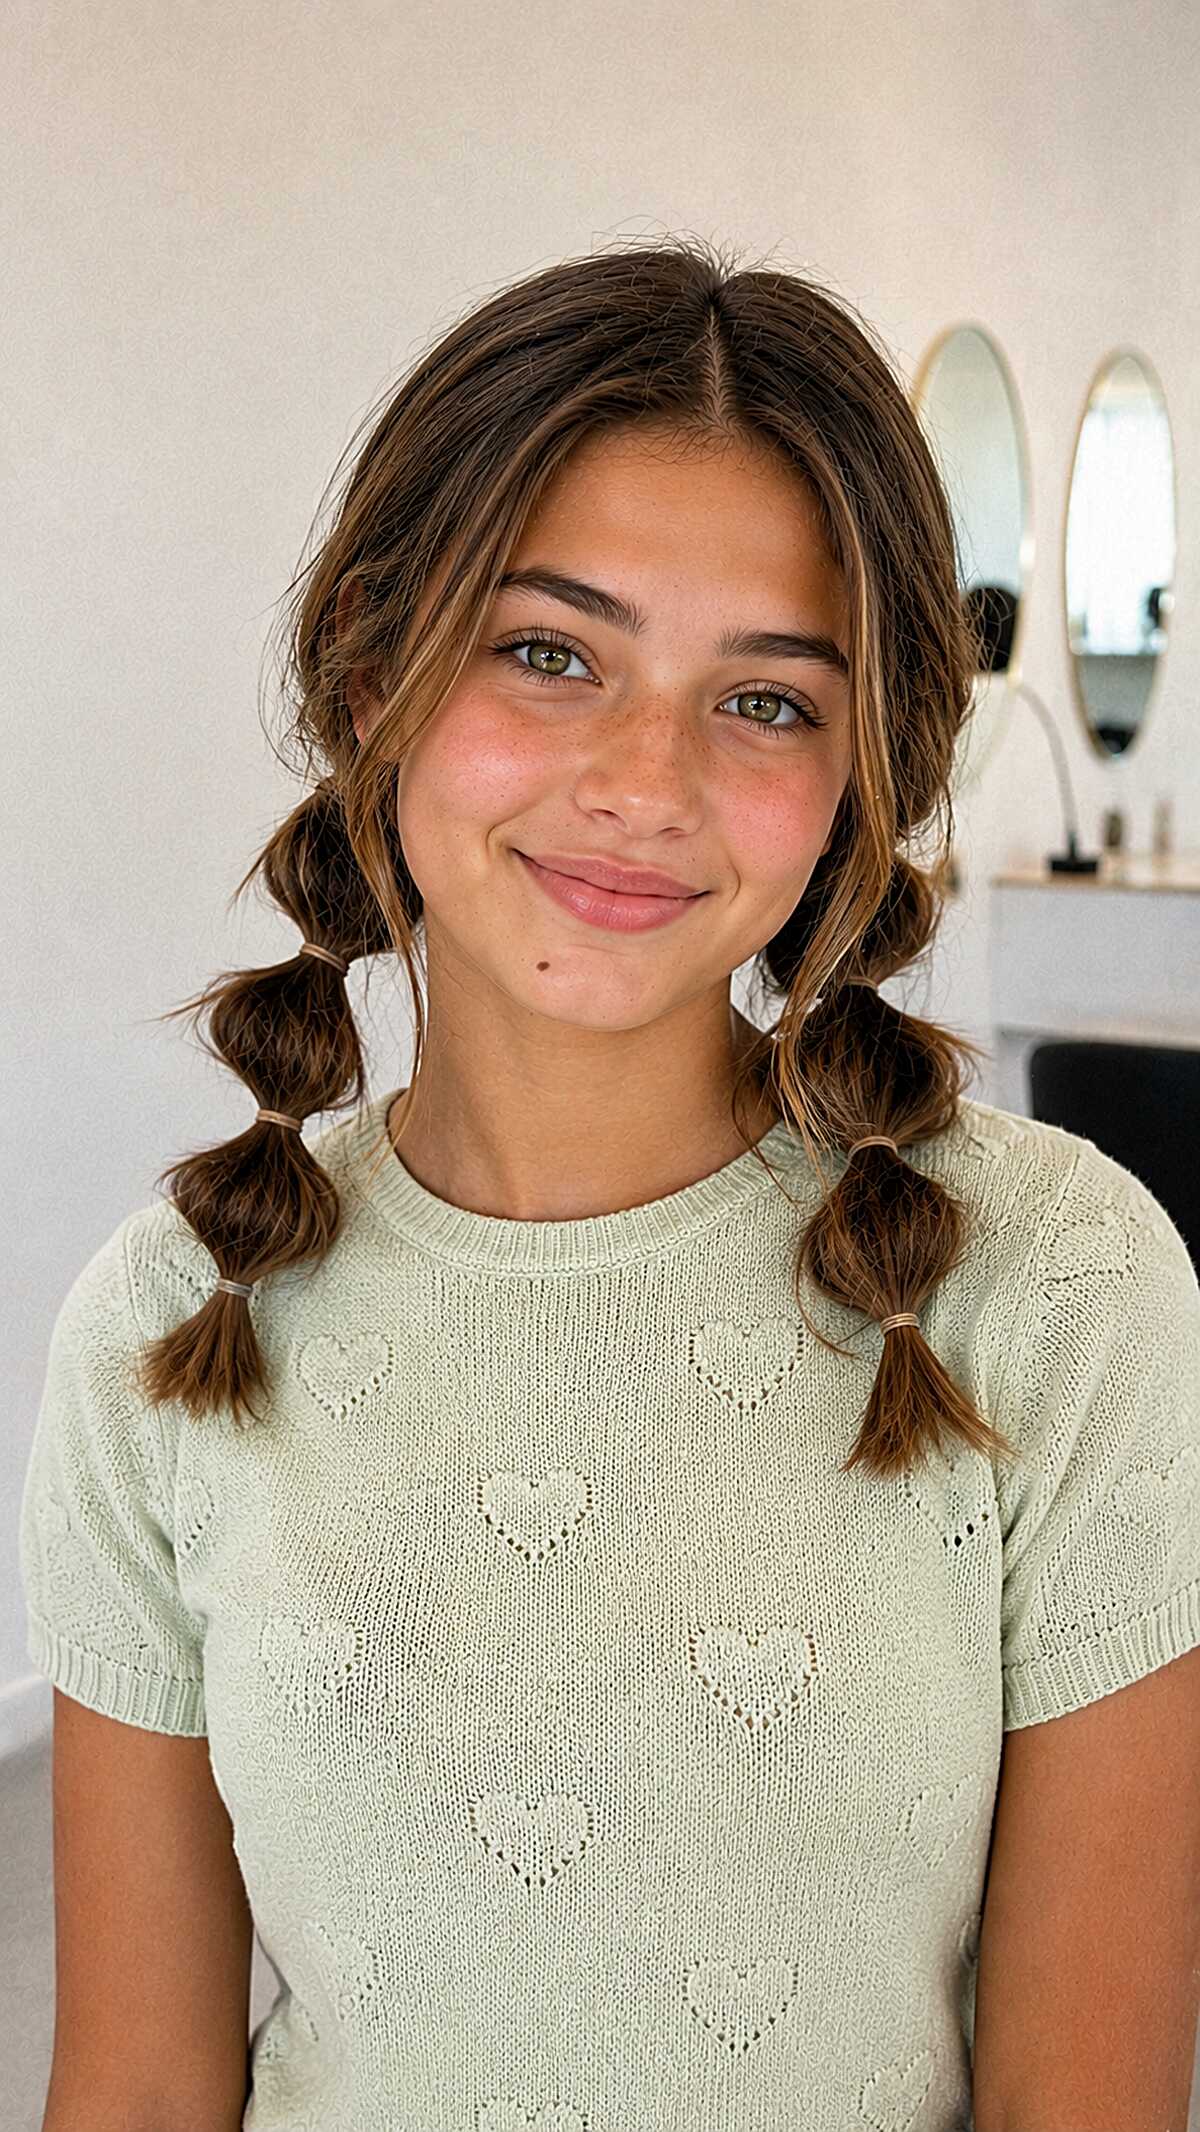
#11 Short Bubble Pigtails with Loose Front Pieces on Wavy Brunette Hair
The bubbles in this video each consist of just one segment, and that’s what makes this an actual three-minute style rather than a fifteen-minute one that’s trying to pass off as quick. For this style, your hair should be medium-density wavy hair that is around shoulder length and loosely parted down the middle with a few face framing pieces pulled out on each side. The subtle warm highlights that run through the front pieces of a brunette base help keep the look from reading flat since they catch the light. This style will not work on thick or heavy hair because the bubbles will lose their rounded shape and will just look like tied off sections. The best range is fine to medium hair. If your hair is very straight, the texture won’t fill out the bubble the way you want it to, and you’ll end up with something deflated.
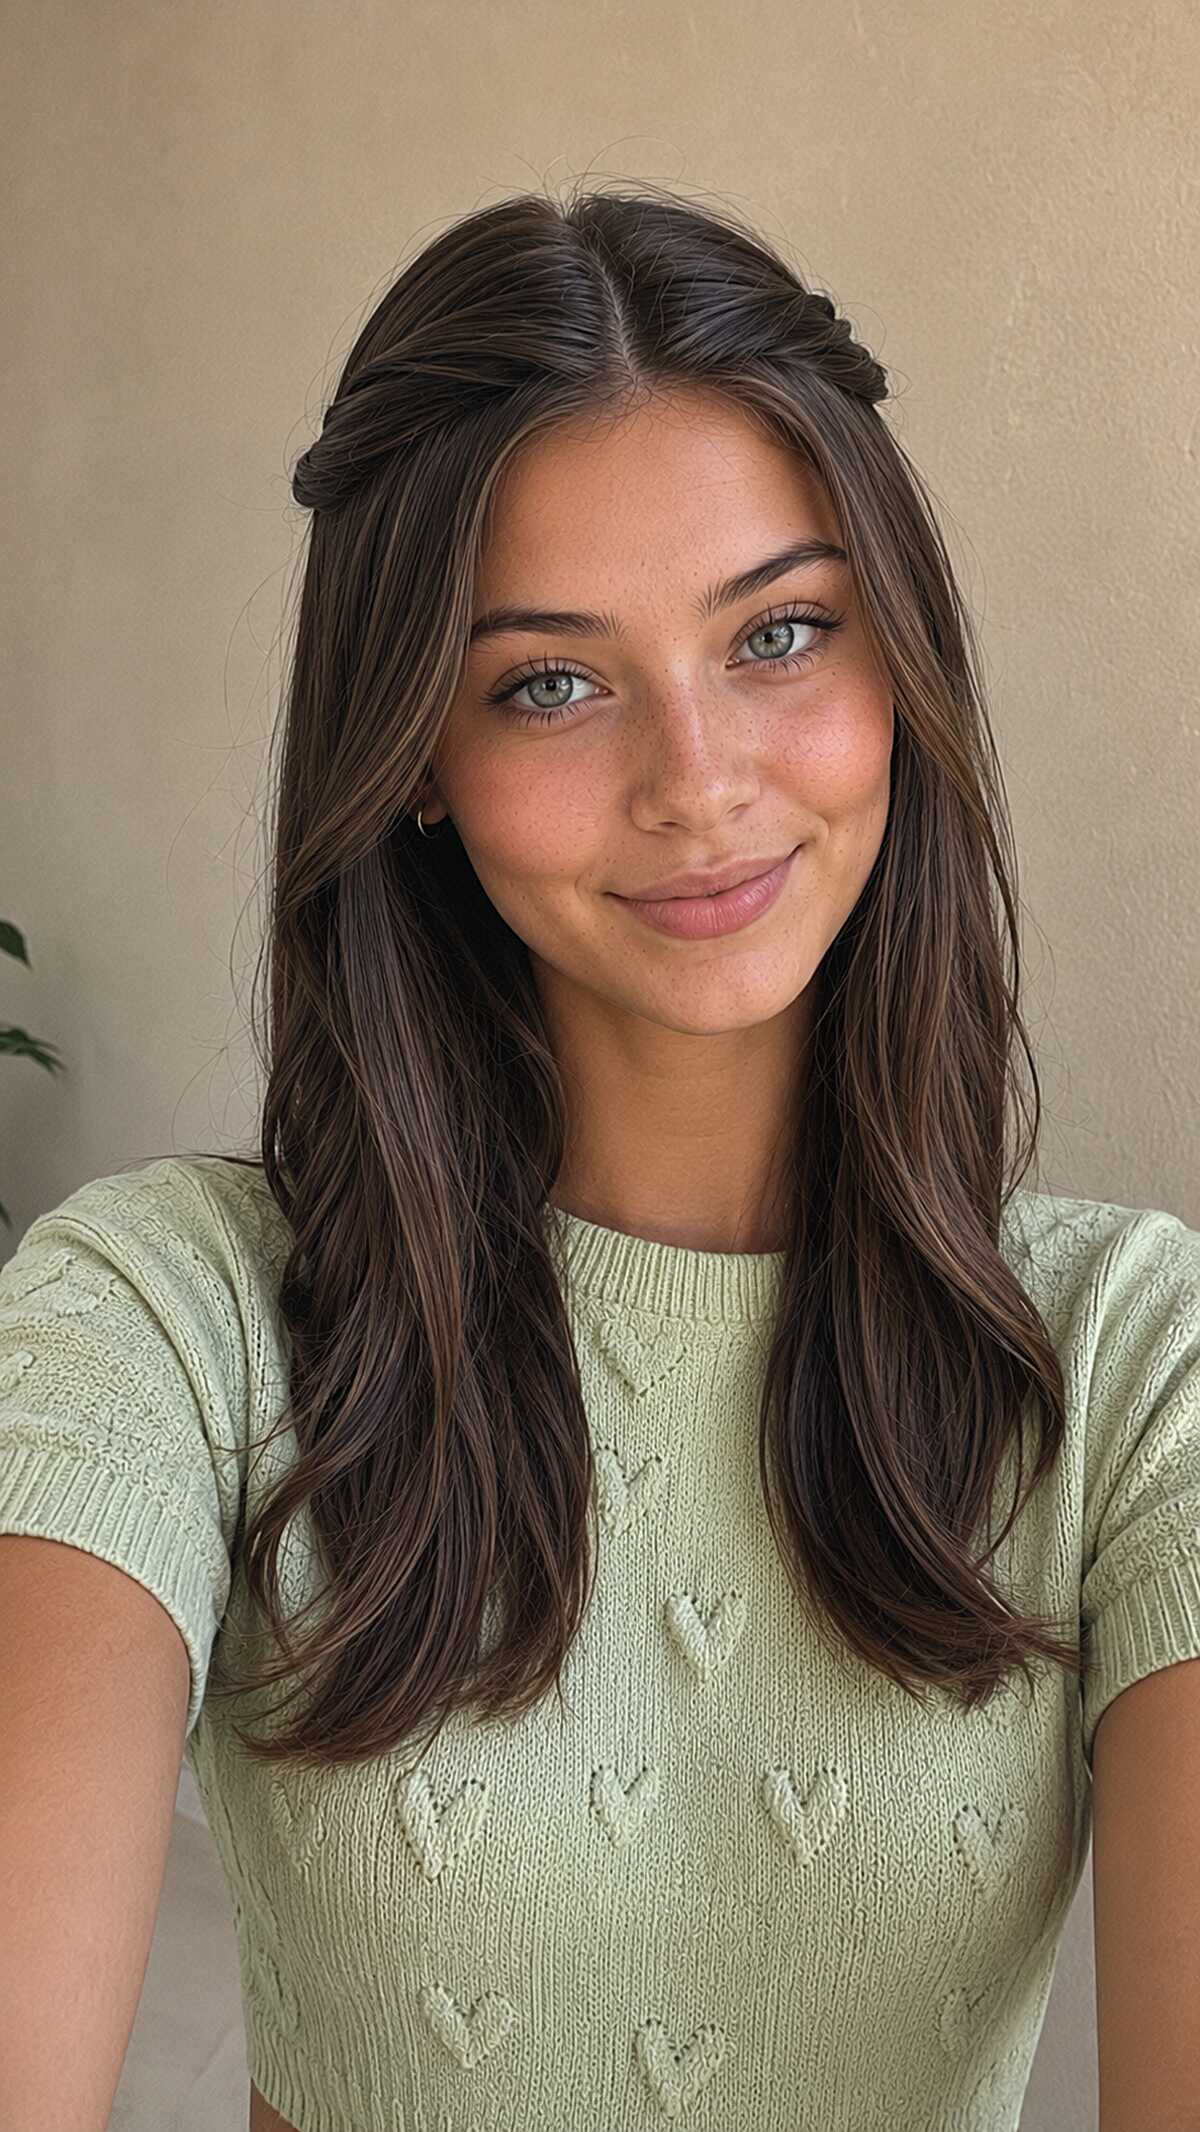
#12 Small Twist Pinned at the Crown on Long Brunette Layers
The reason this look is so easy to achieve is because there is so little hair involved in the actual twist. We are talking about a tiny section from each side, about 2 inches wide. That get’s rolled back once, pinned, and placed flat right behind the crown. The remainder of the hair is all left down. If your hair is on the finer side or doesn’t have much density, the twist won’t look as big and won’t hold the shape as well. This is best on medium or thicker hair that is beyond collarbone length since you need enough weight below to keep the style from looking top-heavy. The length also helps so that the side face-framing layers of her hair can do the job of keeping the silhouette soft, which also helps keep the twist from pulling everything flat against her head. It takes literally no time to do, no product or mirror is actually necessary. This looks like it was thrown together in 30 seconds and will struggle big time if it has to survive a windy walk to class.
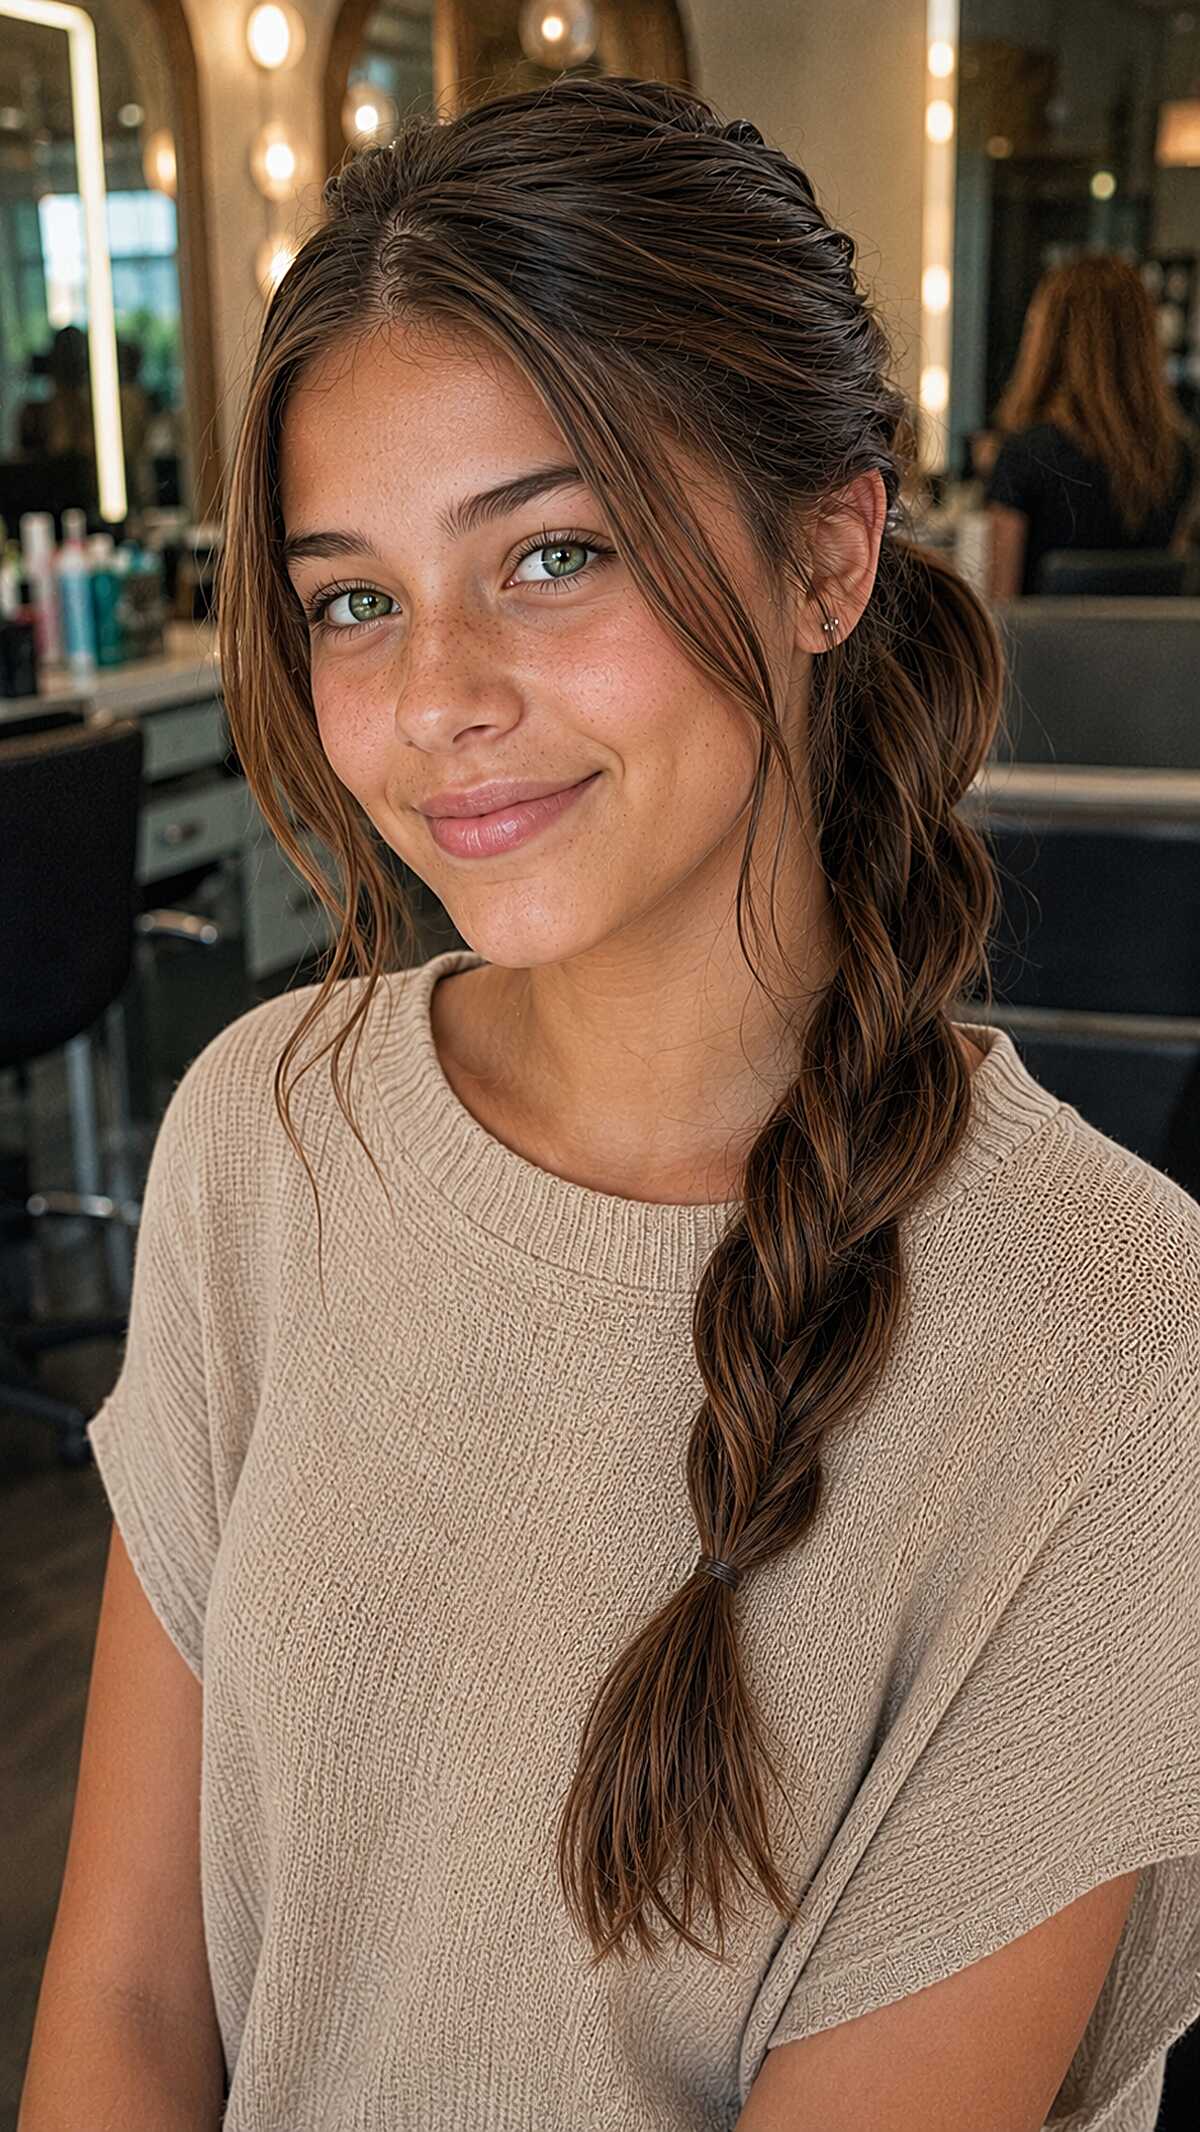
#13 Twisted Side Braid with Soft Curtain Pieces on Brunette Hair
What you’re seeing here isn’t a traditional three-strand braid, but rather an organic two-strand twist. This is secured at the bottom, which is what gives it that slightly undone appearance instead of a polished plait. It’s quite the speedy technique! The framing pieces of the face are what really do the most to construct this whole style, as they are cut to cheekbone level, and pulled forward purposefully (and not just let to fall down). On wider or round face shapes those pieces narrow everything down, and also prevent the whole look from being too exposed and high. The style tends to work best on medium density hair because it gives just the right amount of bulk in the twist without appearing to be a rope. If your hair is too thick this will triple in size and lose that relaxed aesthetic entirely. The warm, natural brunette hair color here has no highlights and that consistent tone causes the twist to read as one homogeneous shape instead of a variegated mess. I wouldn’t recommend this for freshly washed, silky hair unless you have texturizing spray.
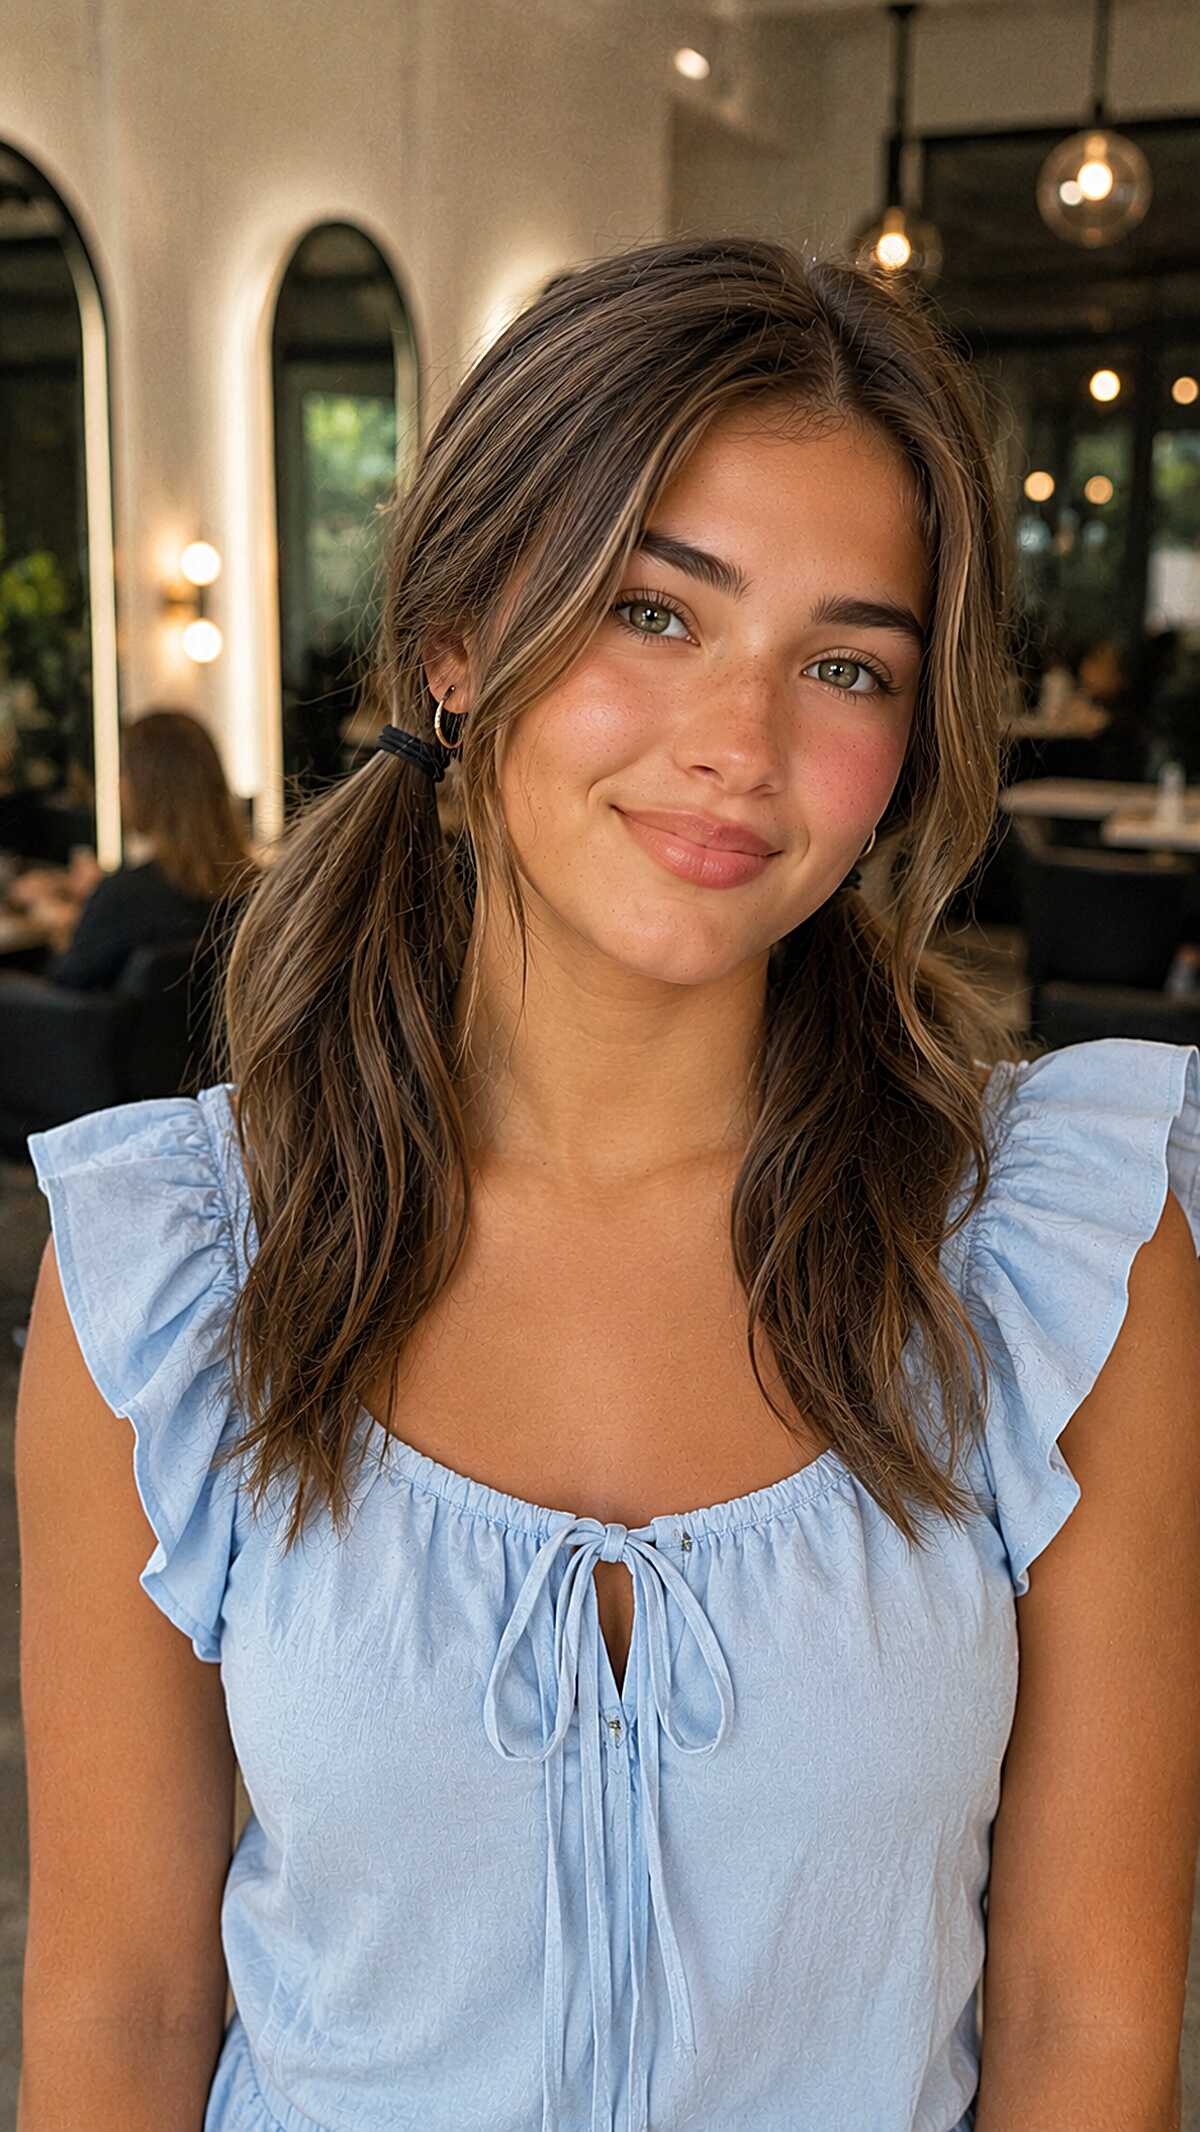
#14 Low Pony with Curtain Bangs Doing All the Work
Take a moment to notice how much hair is actually left out — that’s the whole trick. The ponytail itself is barely holding anything. Just a small black elastic is used to gather the back section low at the nape, while a long curtain cut layers frame the entire face and fall past the collarbone. This only reads as intentional on medium to thick wavy hair with enough density that the front pieces don’t look stringy. Fine hair will expose too much scalp at the part and the “effortless” look just ends up looking incomplete. The balayage here is pretty subtle, with a few hand-painted pieces that are caramel through a natural brunette base that catch light without screaming highlight. Oval and heart faces get the most out of those cheekbone-grazing layers. If your hair is straight this will fall flat against your head and lose all the texture that makes it work.
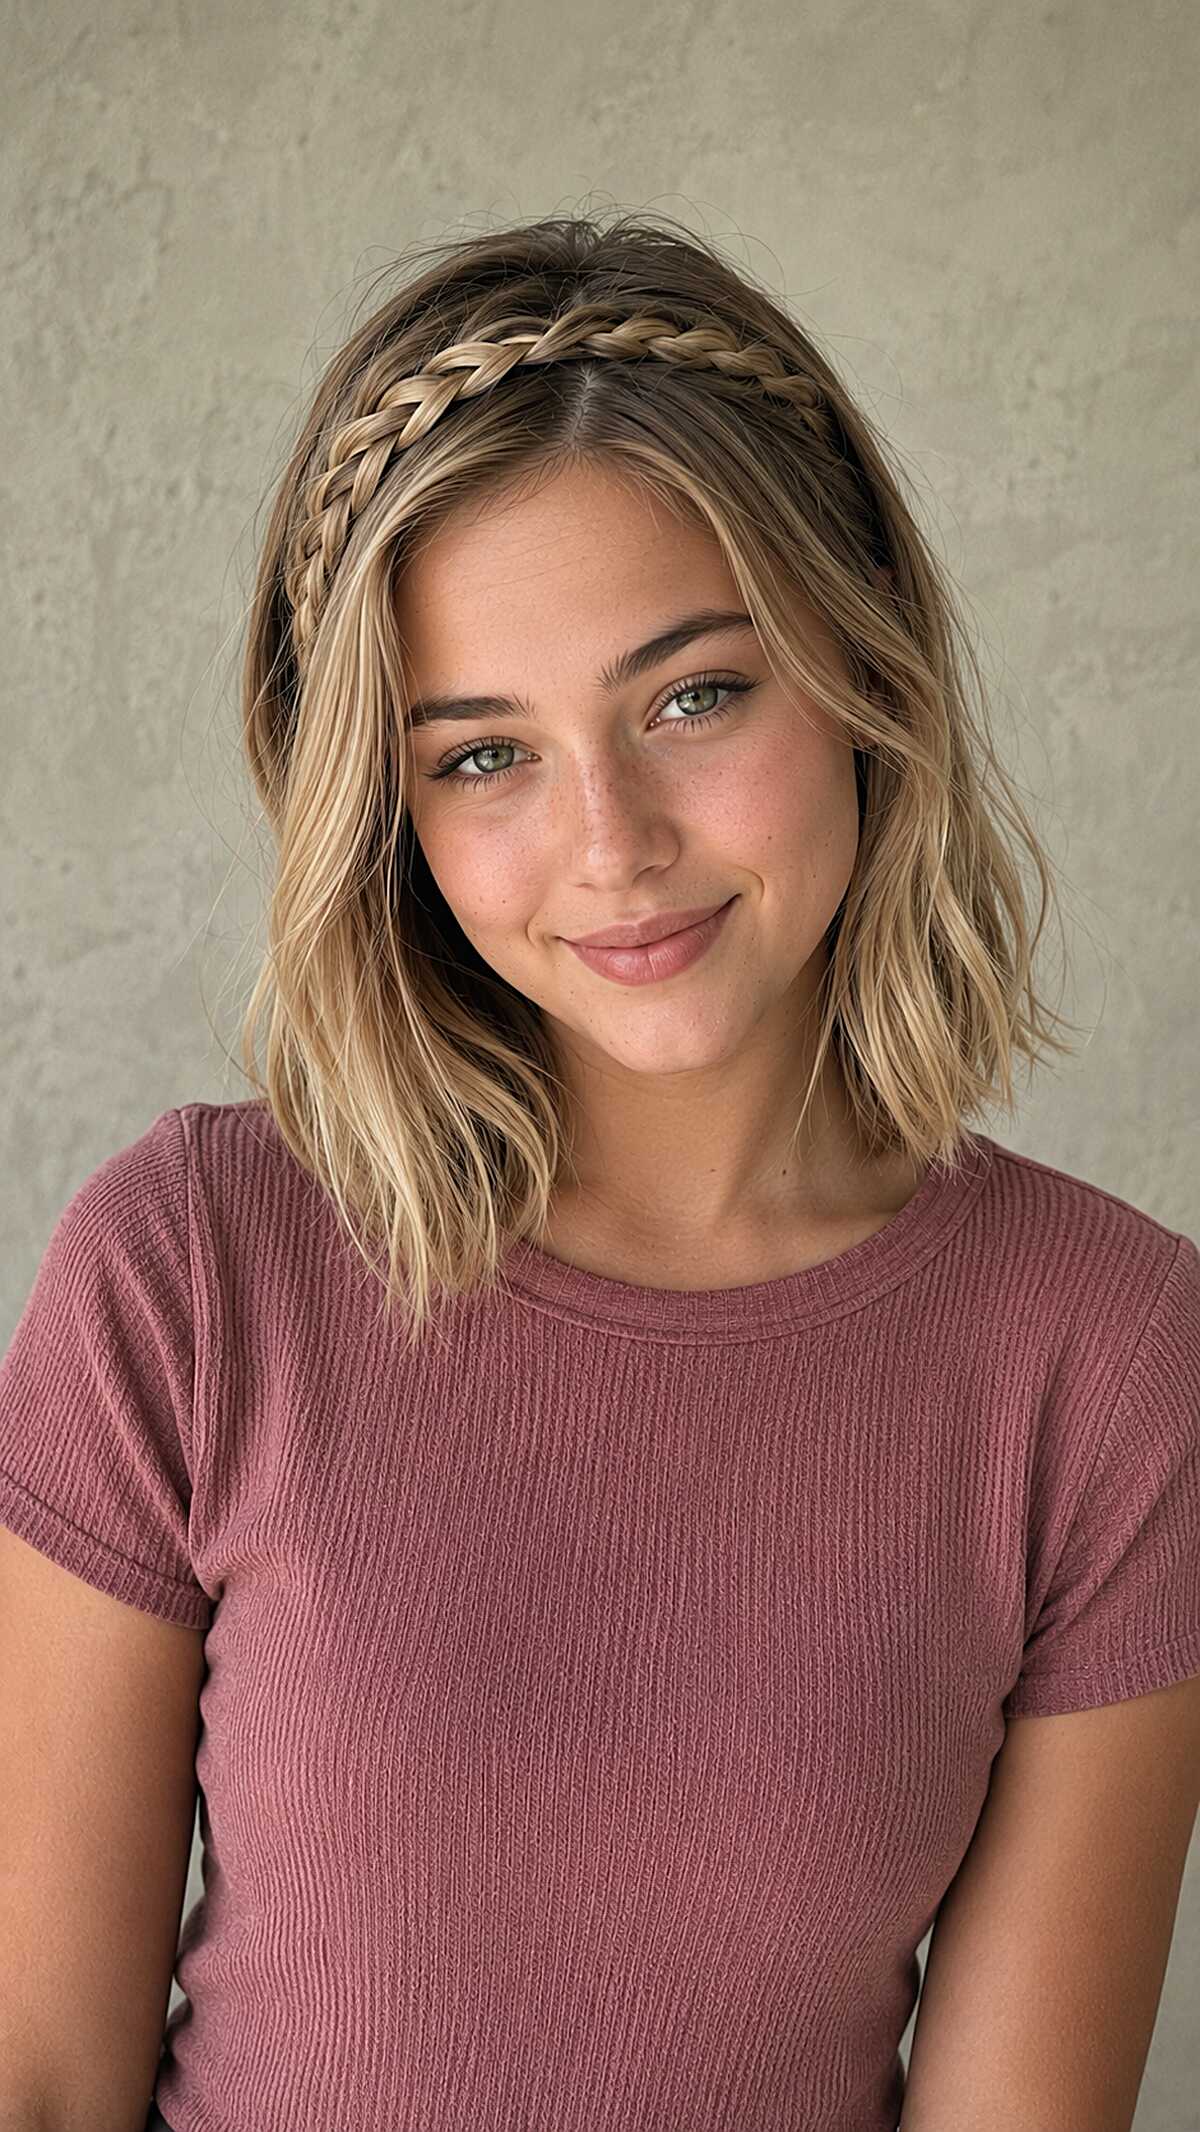
#15 Crown Braid on a Textured Bob with Warm Blonde Ends
The braid is only pulling hair from a small section of each side, which is why the rest of the hair still has enough volume to look full underneath. It’s a good idea for medium to fine density. If you have thick, heavy hair at shoulder length, the bulk will sit on top of the braid and it will lose the clean headband look. This look is best on a collarbone length bob or lob and will need some waves already in it. The waves will keep the loose pieces from going flat before second period. The blonde is a balayage with darker roots. This contrast is what makes the braid read as detail instead of one solid color. On round face shapes, the center part and braid sitting across the forehead can widen the face. It won’t suit everyone equally. The whole thing will take about three minutes if you can do a basic three strand braid.
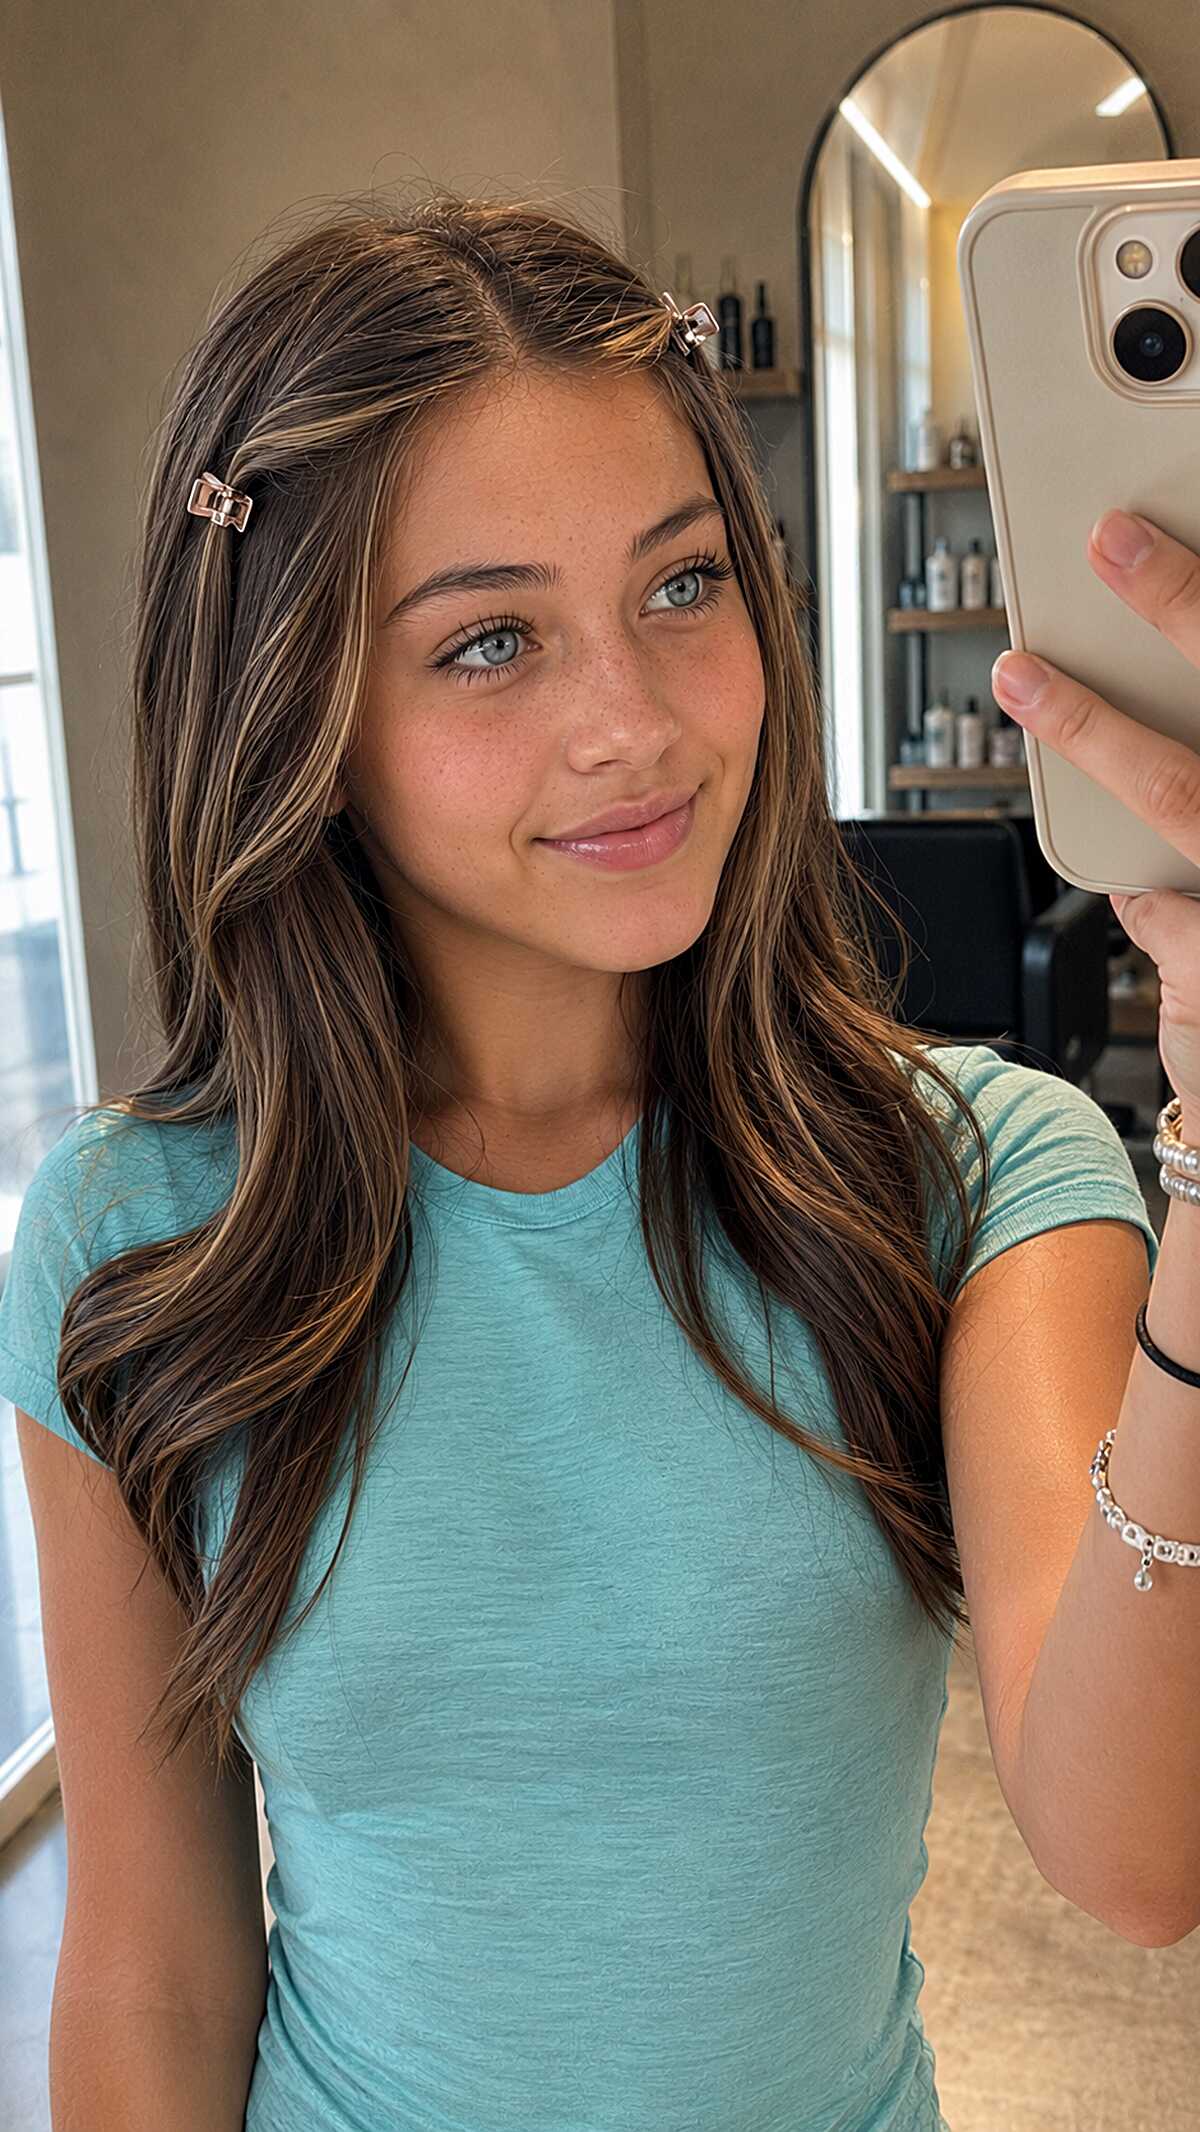
#16 Two Small Clips Holding Back the Front on Long Brunette Waves
Those are small metal clips, not decorative ones, and that is what makes this work. They are doing the job of a half-up without any twisting or tying. They are just pinning both front sections away from the face at the part line. The base here is medium-density brunette hair with fine caramel ribbons woven through, likely hand-painted foils, woven around the face. Long layers, natural wave. This is really a ten-second style. It won’t hold on slippery straight hair. The clips will slide right out if your texture has zero grip, and no repositioning can fix that. But on hair that is wavy or slightly textured with enough density to hold the clips, this is one of the more truly quick styles you can achieve.
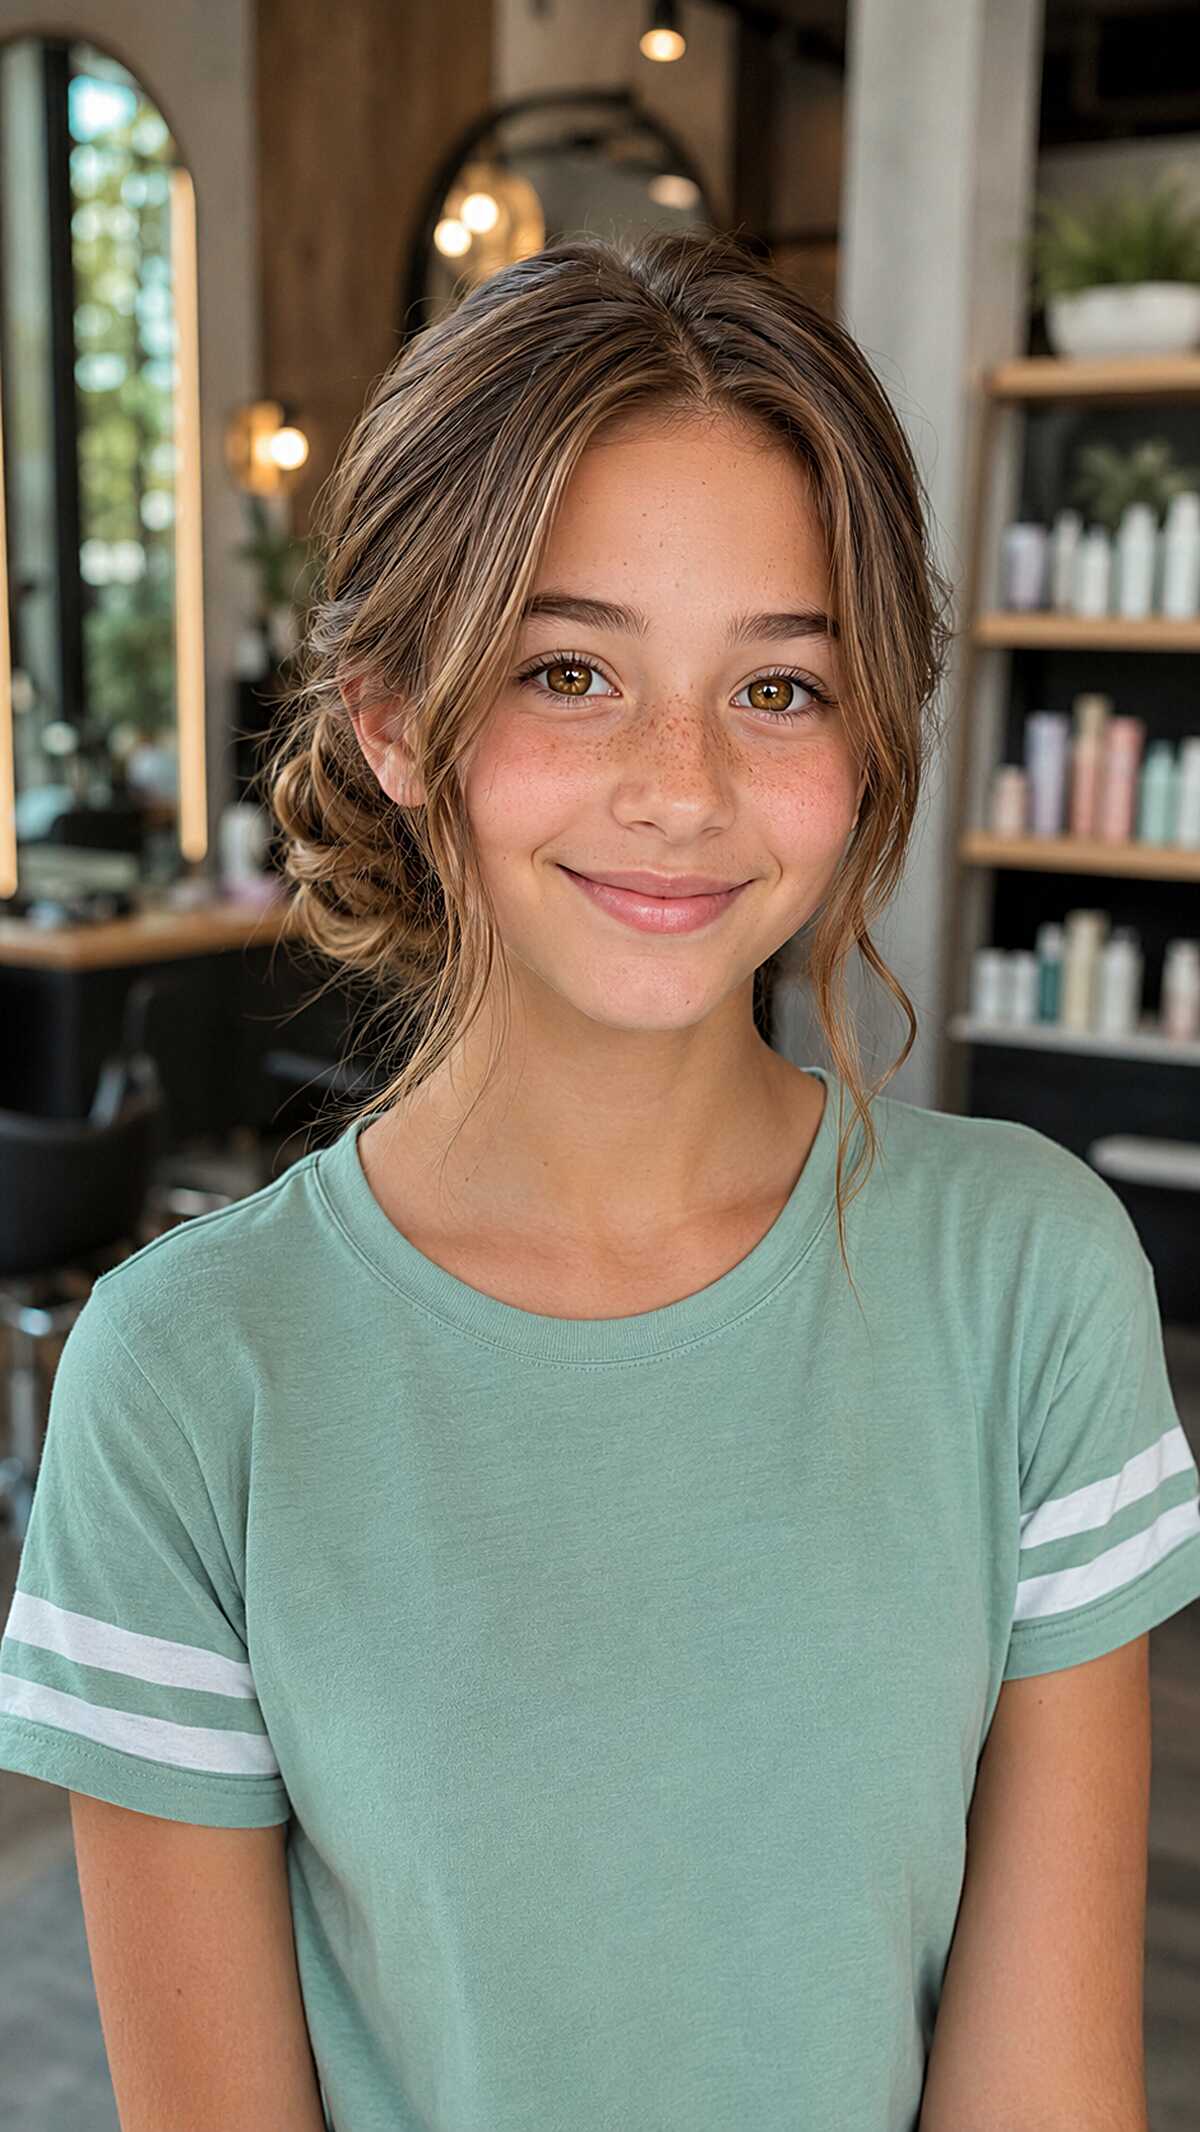
#17 Messy Low Bun with Loose Waves Left Out
Look closely at the hair pieces that are not included, they are not random. They are taken from the front at varying lengths, which is what prevents a messy look. This is a low gathered bun on medium density, wavy hair, loosely twisted and pinned without much tension. It works fast. With straight and fine hair, the pieces framing the face will just hang flat and limp, and the bun will not have any volume without backcombing or texture spray, which completely defeats hte purpose of “quick”. This style works best with wavy or naturally textured hair, preferably medium to thick. The bun is placed asymmetrically which means it will be slightly tucked to one side, and that off-center position is an advantage on round face shapes. If your hair is shorter than shoulder-length, skip it because there simply won’t be enough hair to twist into anything that stays put.
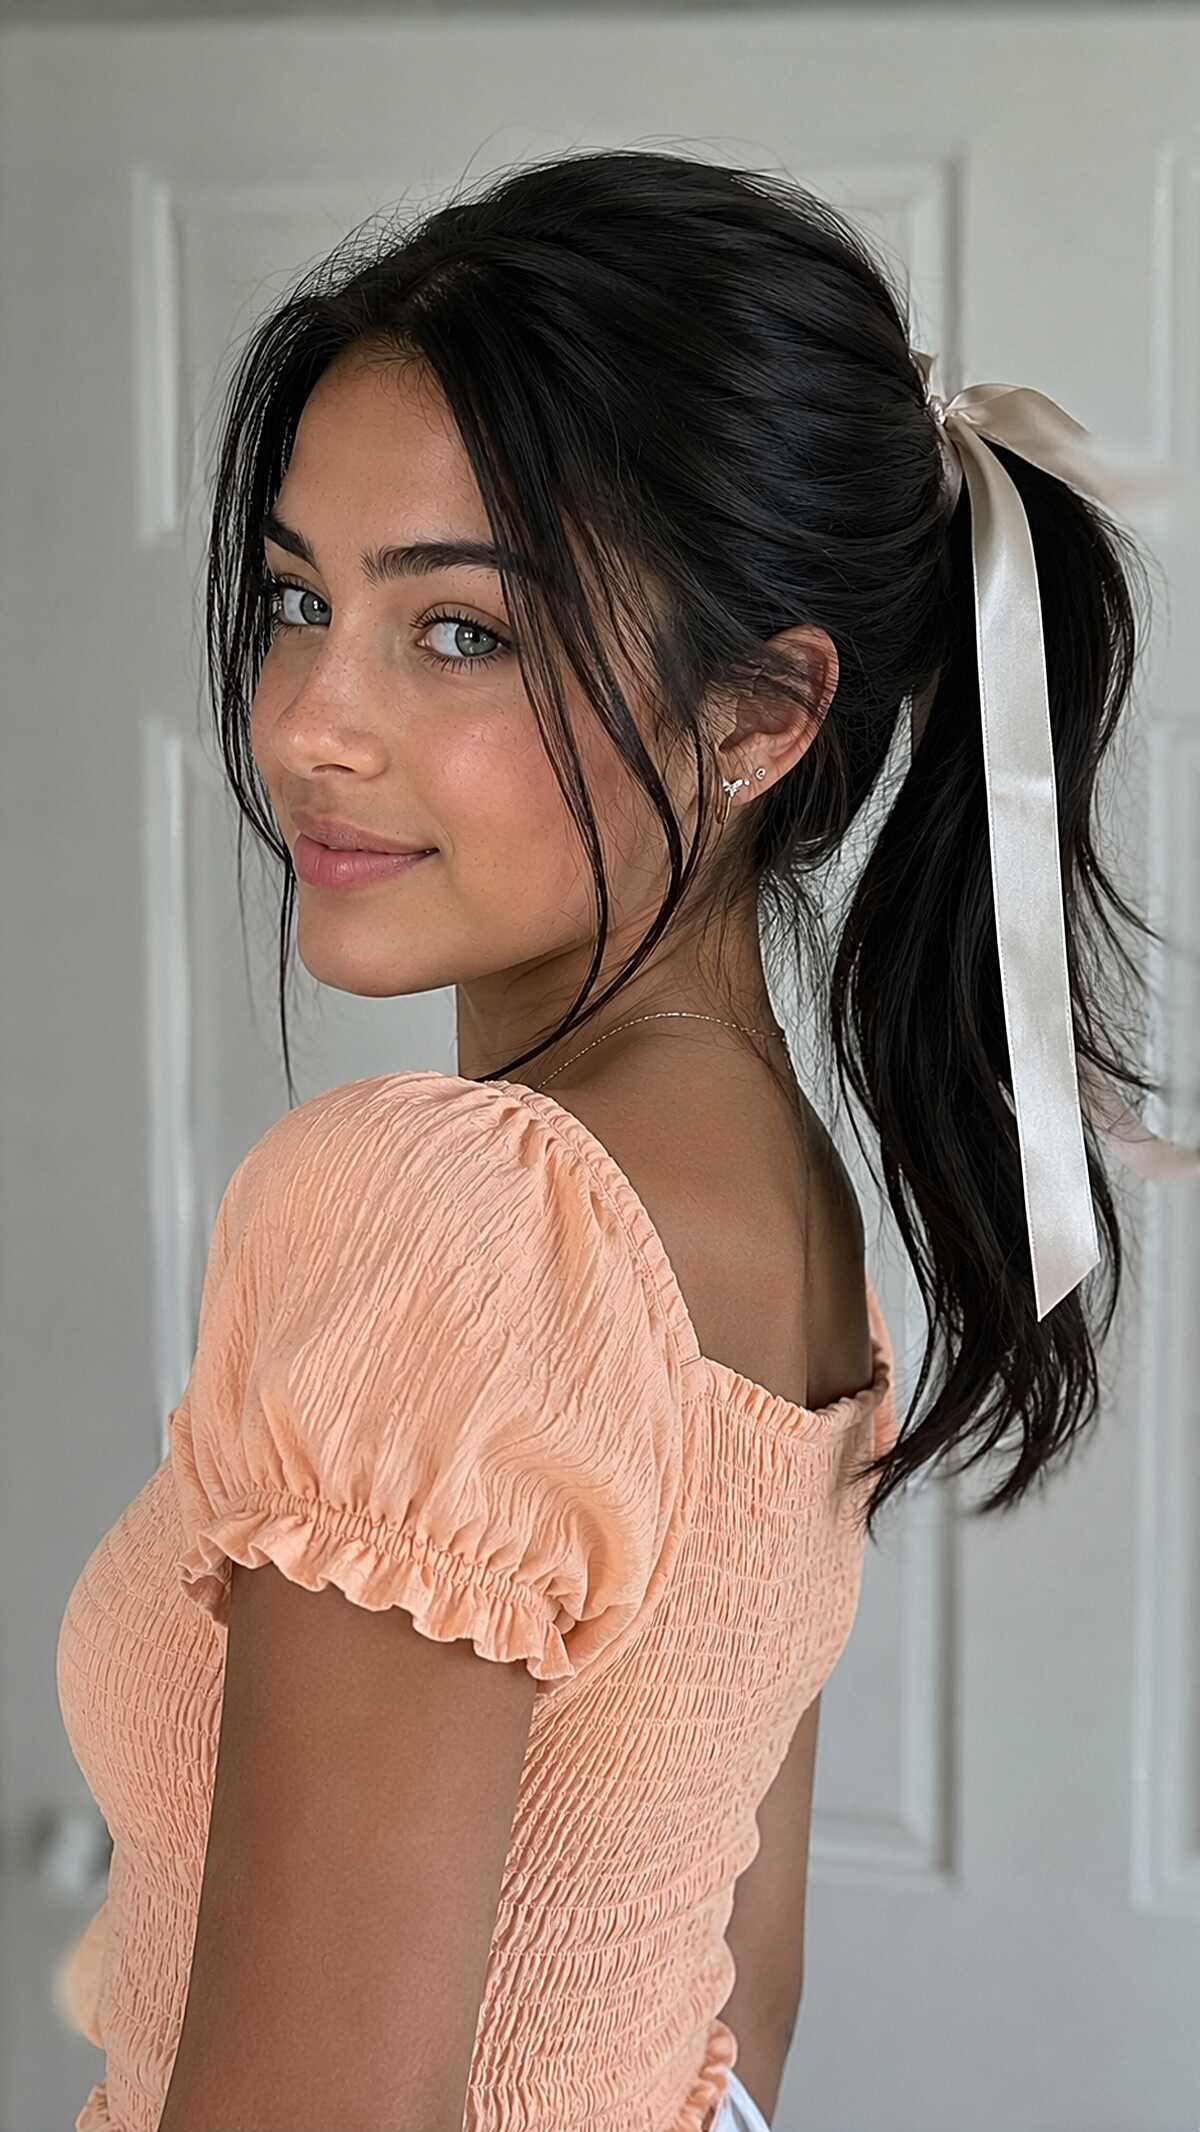
#18 Low Ponytail with Satin Ribbon and Face-Framing Pieces
The spool is definitely the most important part of the ribbon, but look at how the ponytail is sort of undone? It’s loosely gathered at the nape, has a little texture, and a couple of pieces intentionally pulled free around the temples and ears. That looseness helps prevent it from looking like a gym afterthought. Ideally, this would be done in under two minutes on hair that is at least past the shoulders and of medium density or thickness. For oval and heart-shaped faces, the strands that sit in front of the ears help soften the look of the forehead (no bangs required). Unfortunately, fine hair might not be able to pull this off as the ponytail may look too thin and the ribbon may be too much. If you have smooth hair, a satin ribbon may also slip down, and in that case, you should tie it over the elastic instead.
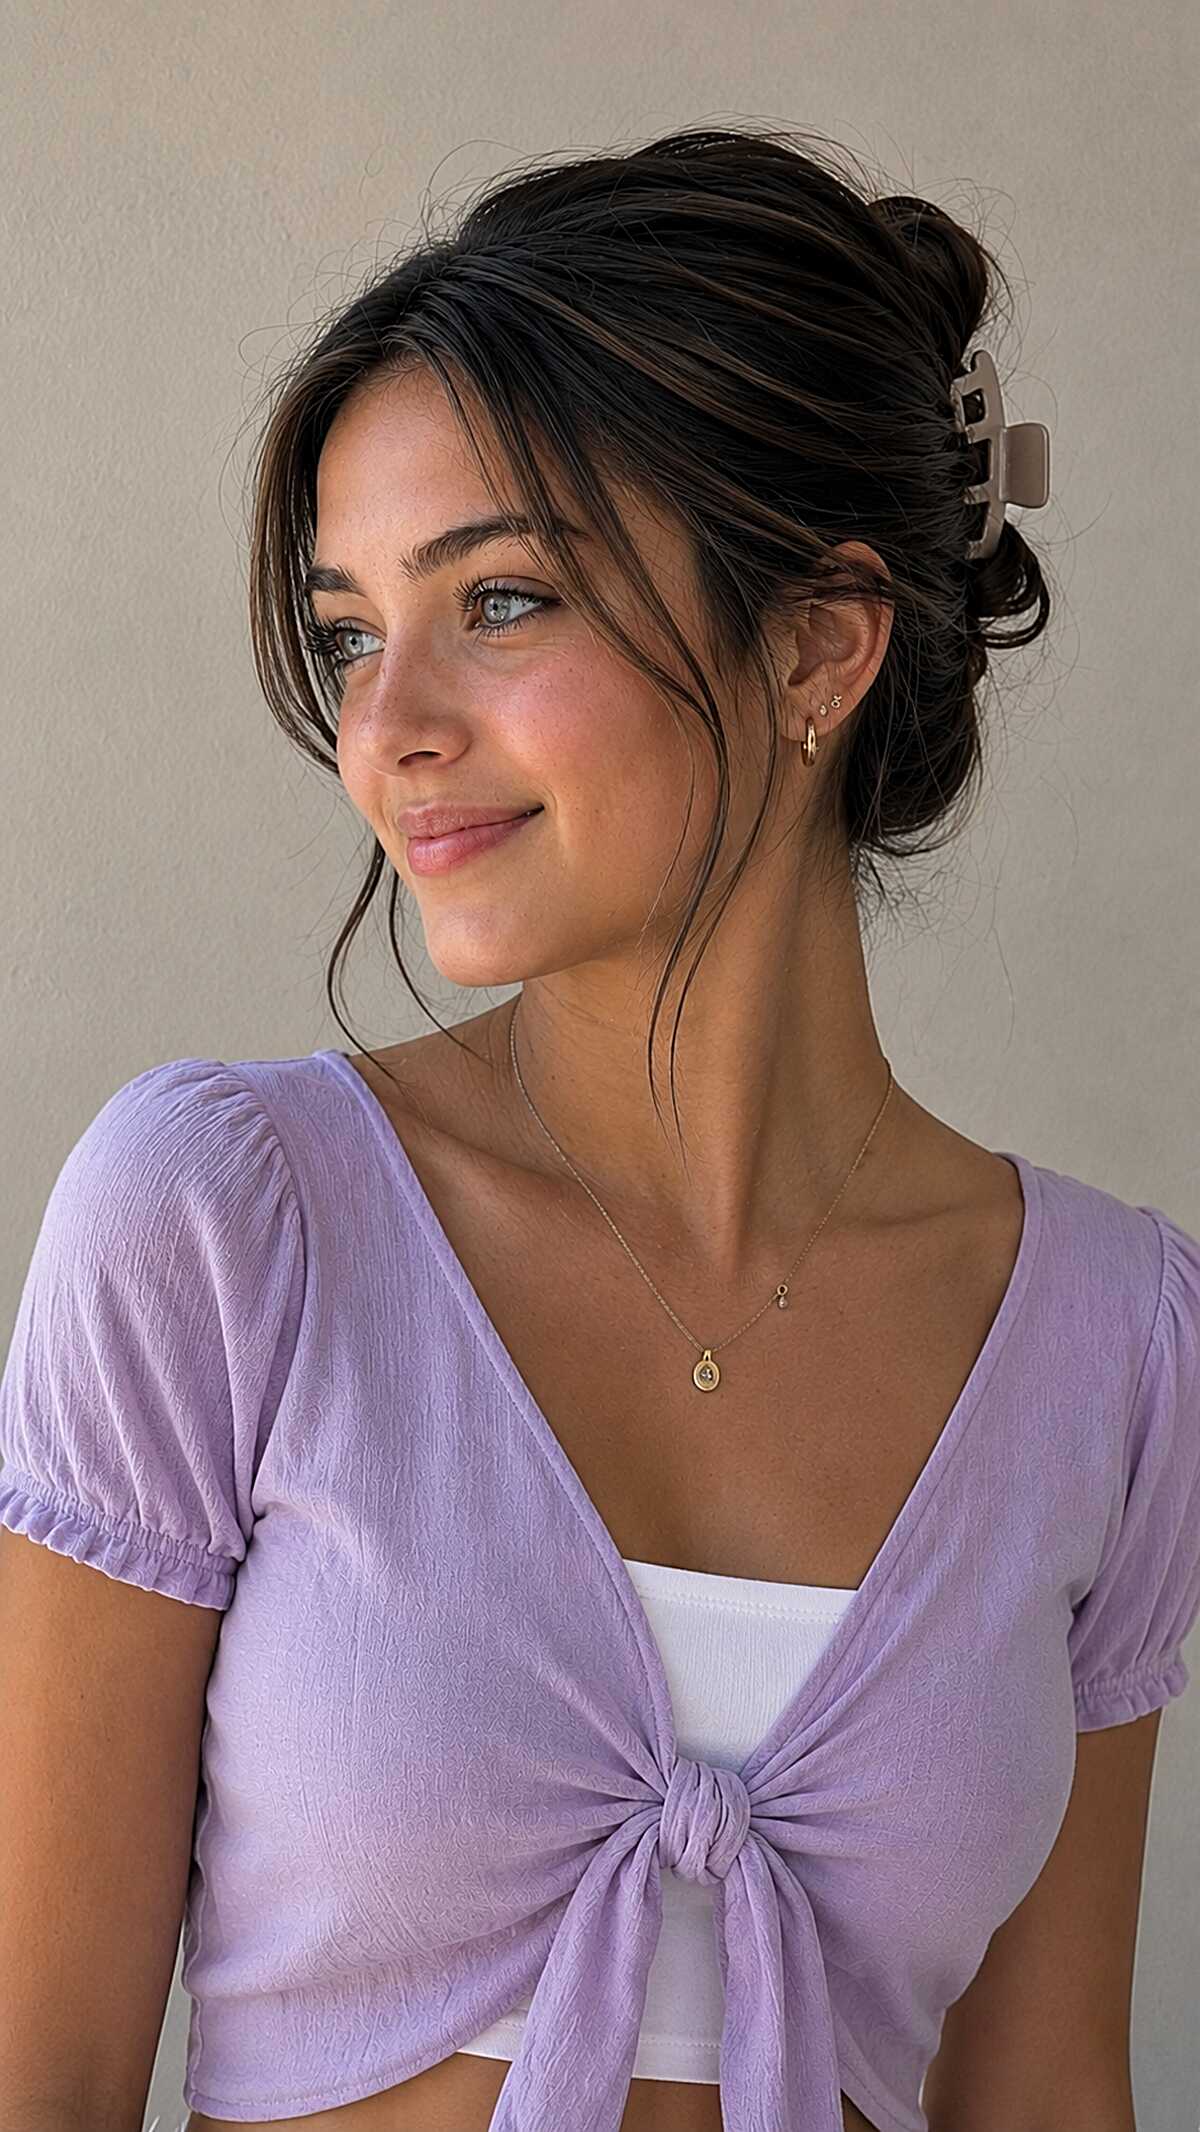
#19 Claw Clip Twist with Curtain Pieces
The long enough to jawline tendrils do all the work as the face-framing pieces. If they were shorter, it would just seem like hair that fell out. This is a twist located at the crown of the head held with a medium-sized claw clip, and this style is best for medium to long hair that is dense enough to fill the clip without looking too sparse. Hair that is too fine will collapse by second period. The clip is placed slightly off-center at the back which is what keeps the style from looking like a top knot, and that kind of placement makes more of a difference than most people assume. Such a style is really great for people with oval and heart shapes as it softens the forehead and doesn’t add bulk to the cheeks. If your hair is really soft and freshly washed, this will likely slide apart in just an hour or so.
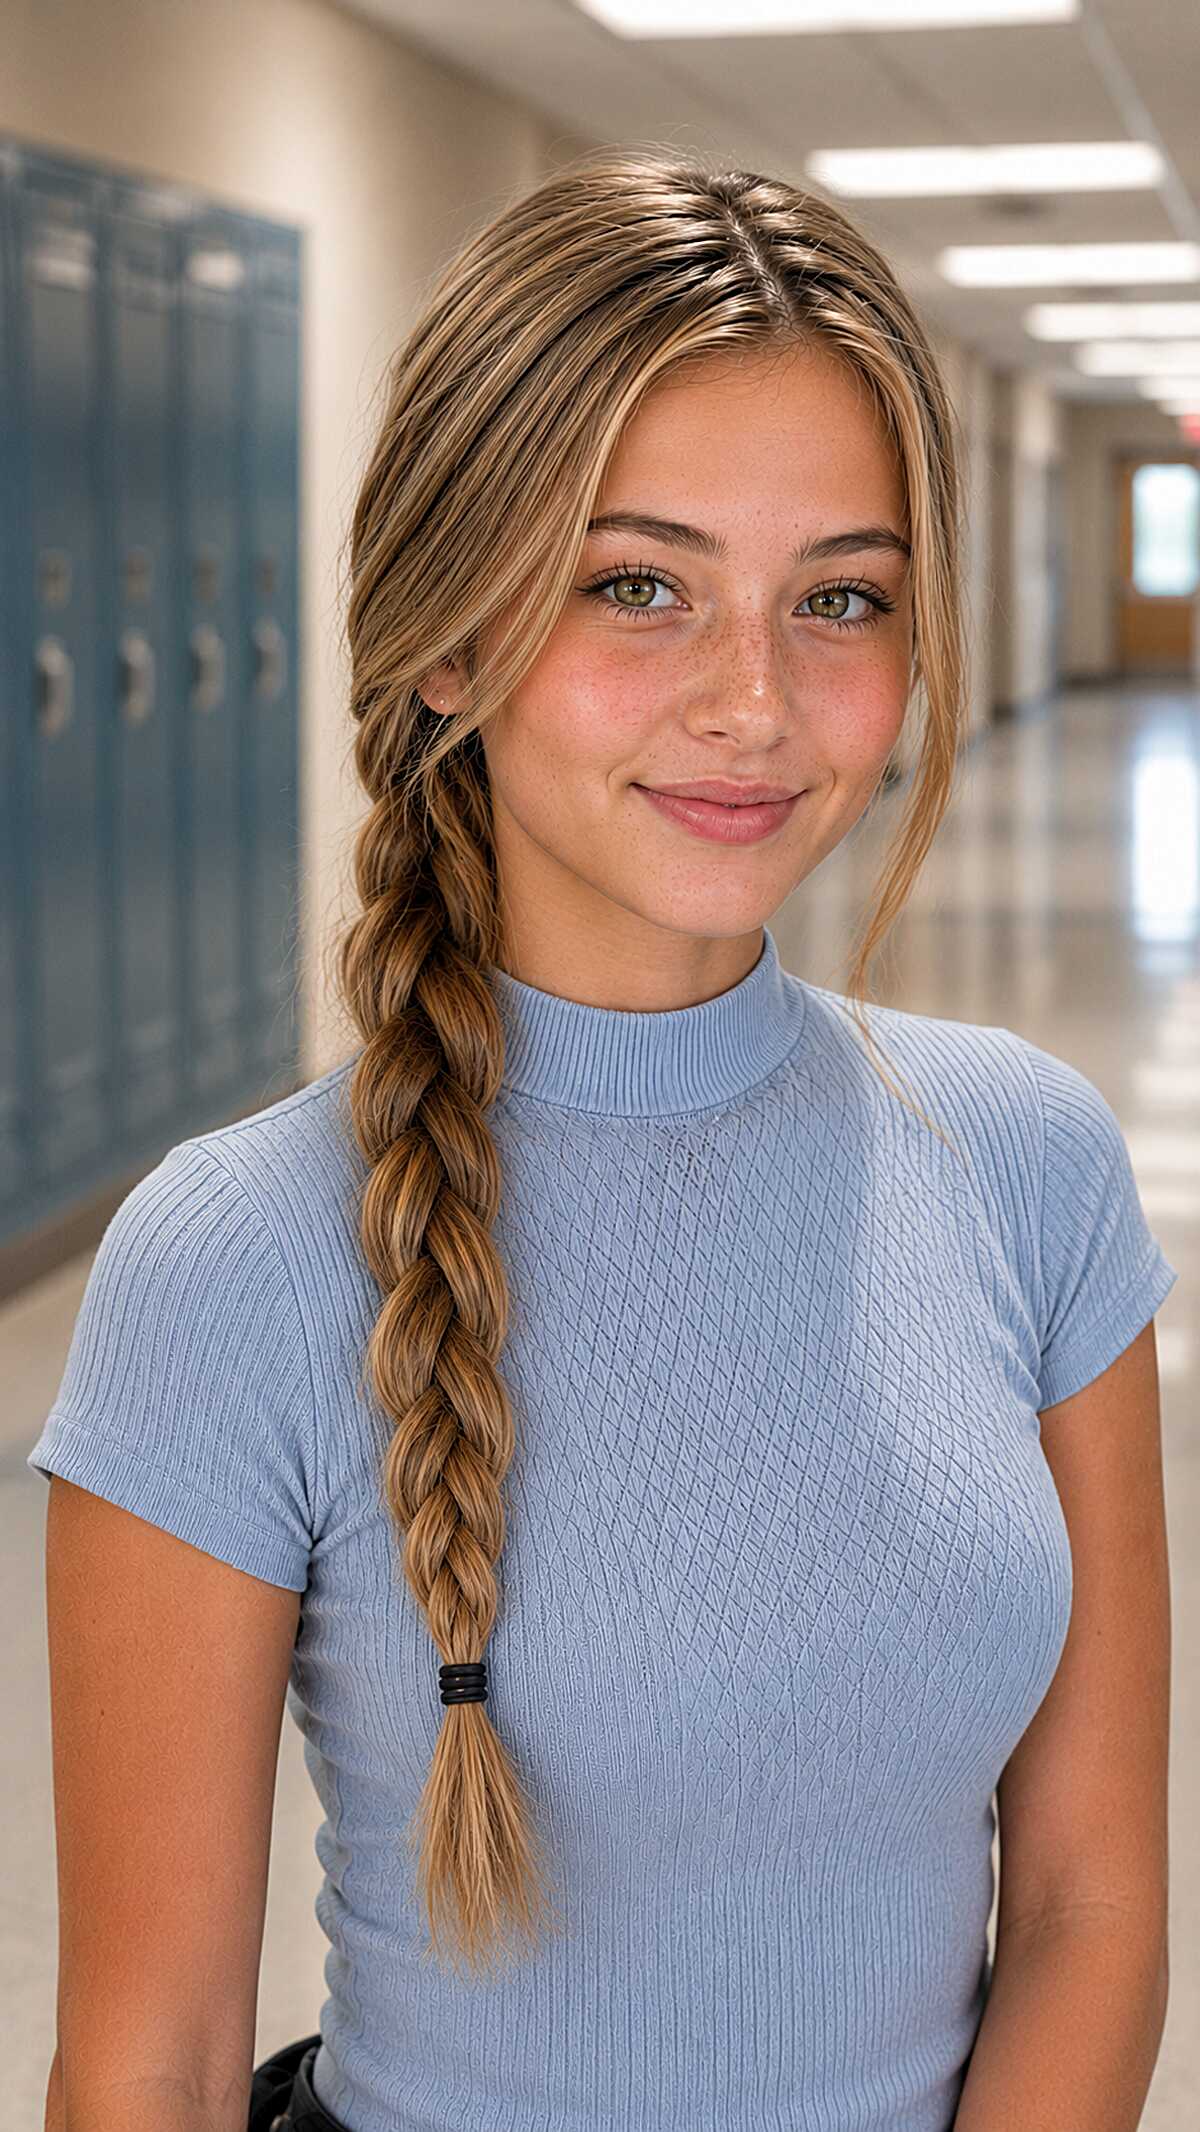
#20 Loose Rope Braid Pulled to One Side
This style will not work for short hair at all. You need at least mid-back length to get that tapered tail. You also need medium to thick density so the twist reads as full rather than stringy. What’s worth noticing here is that this is a two-strand rope braid and not a traditional three-strand, which is why it took about 30 seconds to do and it still looks intentional. All the sections are twisted in the same direction and then wrapped in the opposite direction so the braid sort of locks on itself. Side placement with soft front pieces breaking up the forehead is great for oval and heart shaped faces. Fine hair will expose your scalp through the twist and also deflate in less than an hour. If you have layered hair, shorter pieces will poke out of the braid in ways that look less relaxed and more unraveled, so this really favors one-length or long layered hair cuts.
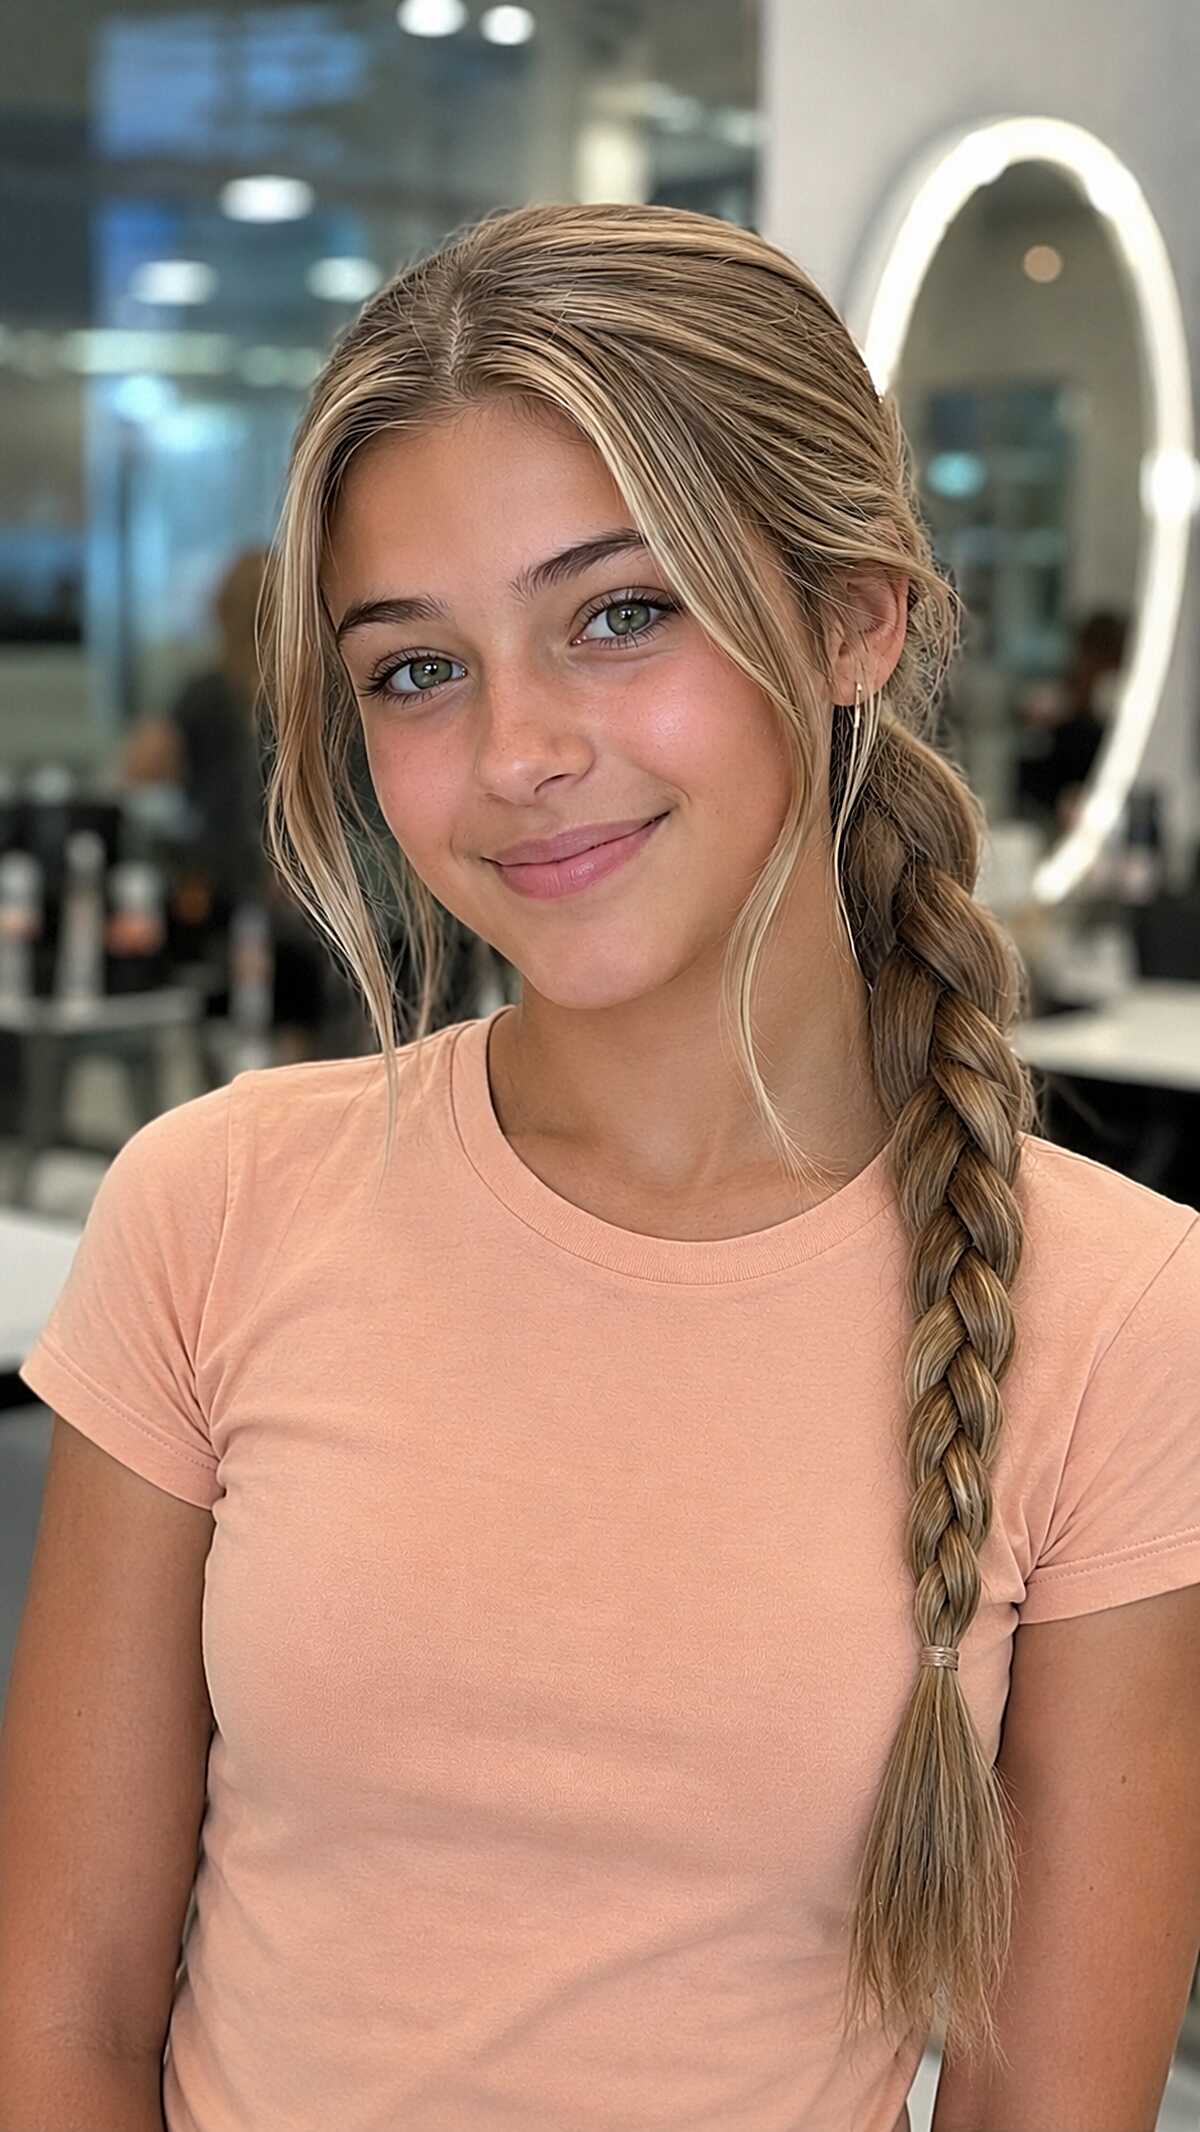
#21 Single Thick Braid with Blonde Dimension and Loose Front Pieces
This will not work on thin hair. To form that rounded, rope-like shape the braid has to be quite thick. A lot of the visual work here is the dimensional blonde, where finer babylights mix with chunkier money pieces so the braid shows light and shadow instead of reading flat. The front pieces are also taken from different lengths (one collarbone length and one chin length) so they don’t look like matching curtains. This is really meant for medium-thick hair that is ideally past the mid back. A standard three-strand braid with the sections pancaked just slightly gives you the width without unraveling by third period.
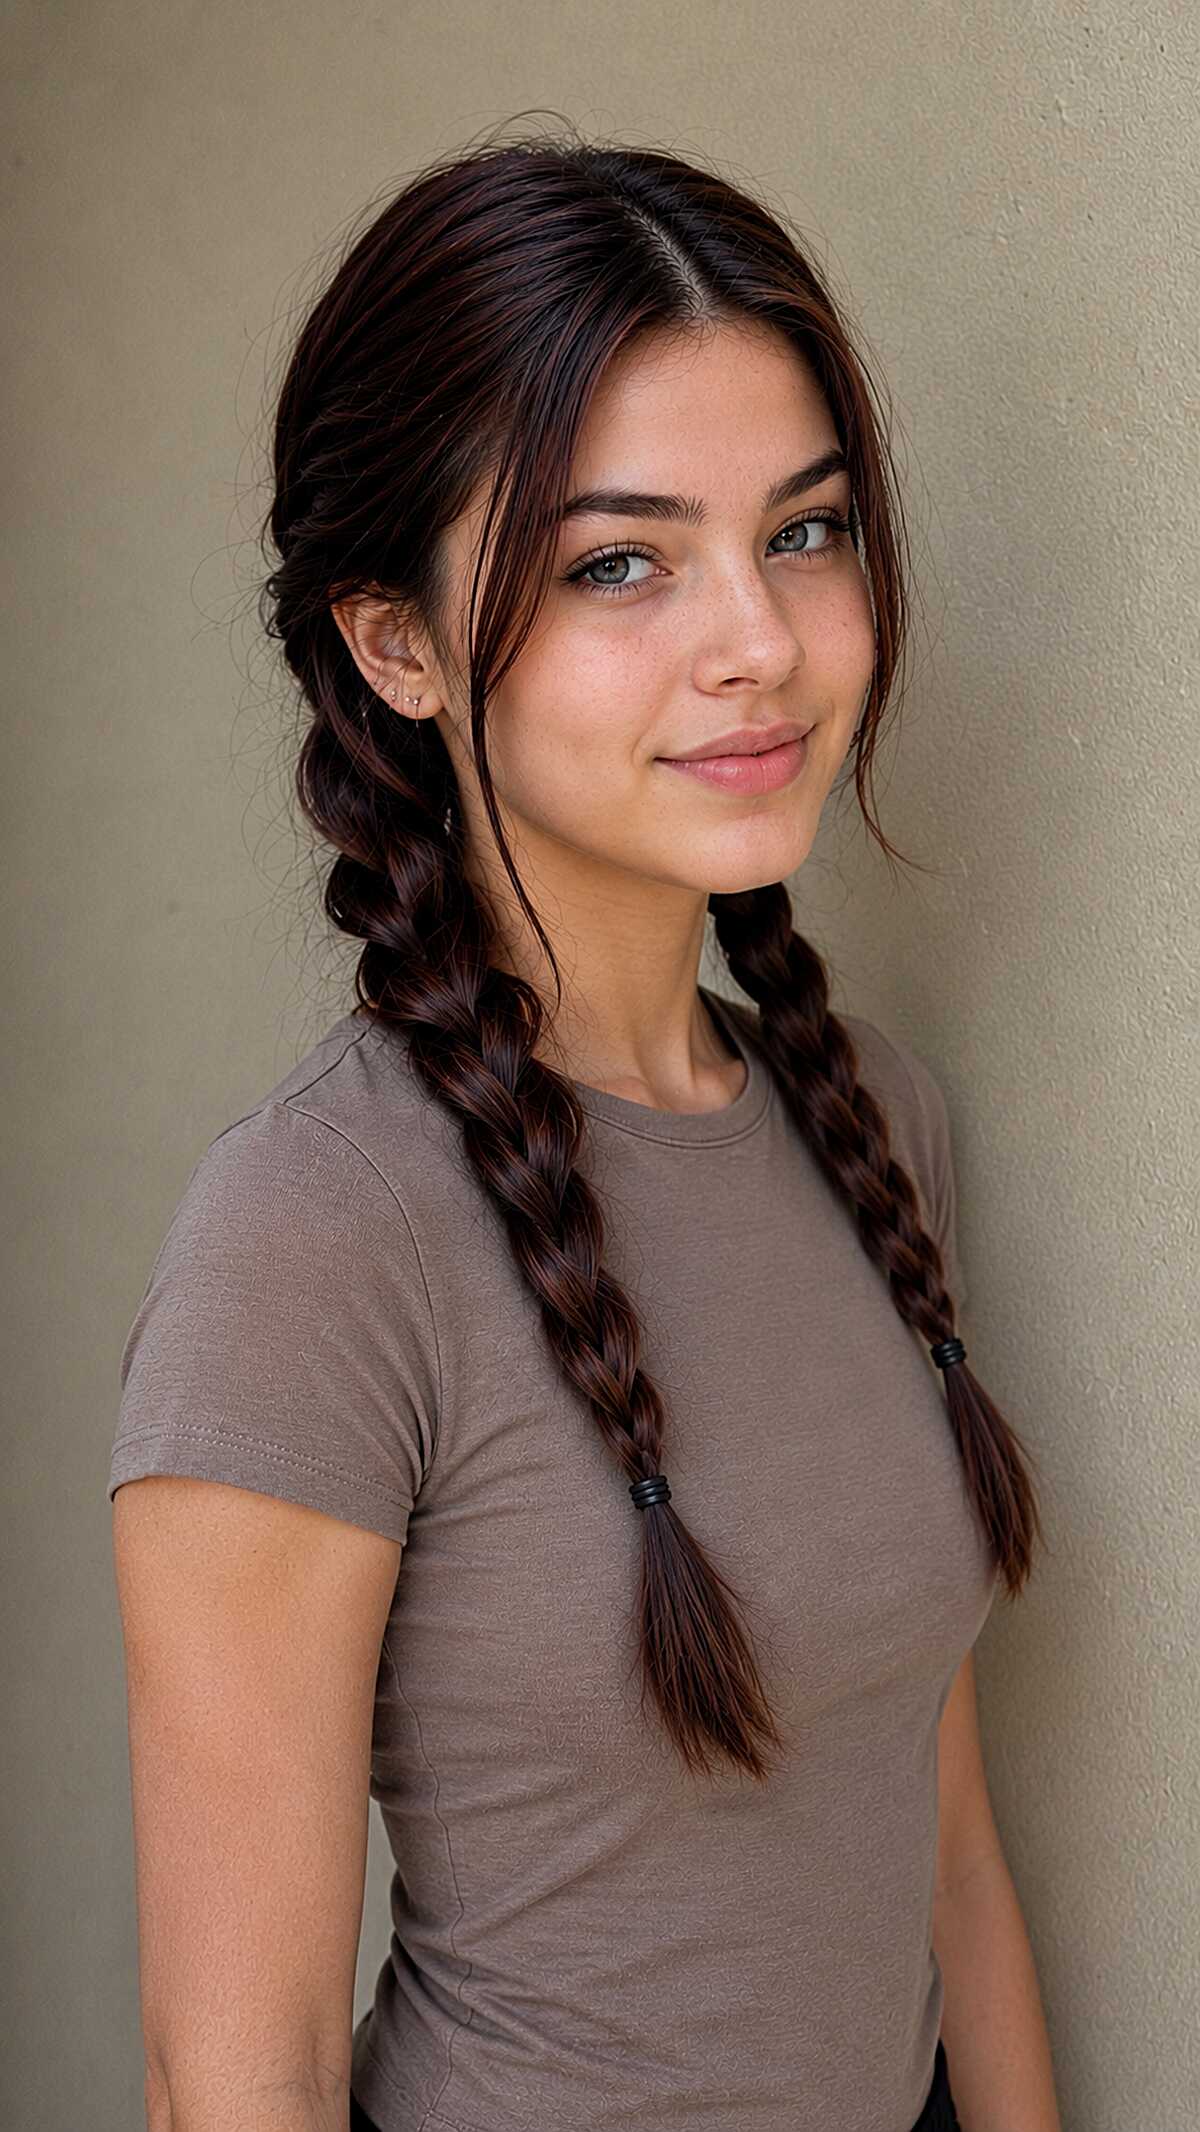
#22 Side Braid with Intentional Flyaways and a Double Elastic
That elastic is doing a lot more work than you think, keeping a 3-strand braid intact on hair that hasn’t been freshly washed in a while, or has even been slept on. This style is best for medium to thick hair that is long enough to go past the collarbone. If your hair is fine, it will end up looking like a pathetic little tail if you braid it that loosely. It’s the slightly different lengths on both sides of the face framing pieces that are pulled out that look staged and those are the pieces that make the whole look come together. If you have a rounder face, those pieces will narrow things up a bit. If you have layers that start above your chin, don’t do this, because they’ll stick straight out of the braid and won’t blend in.
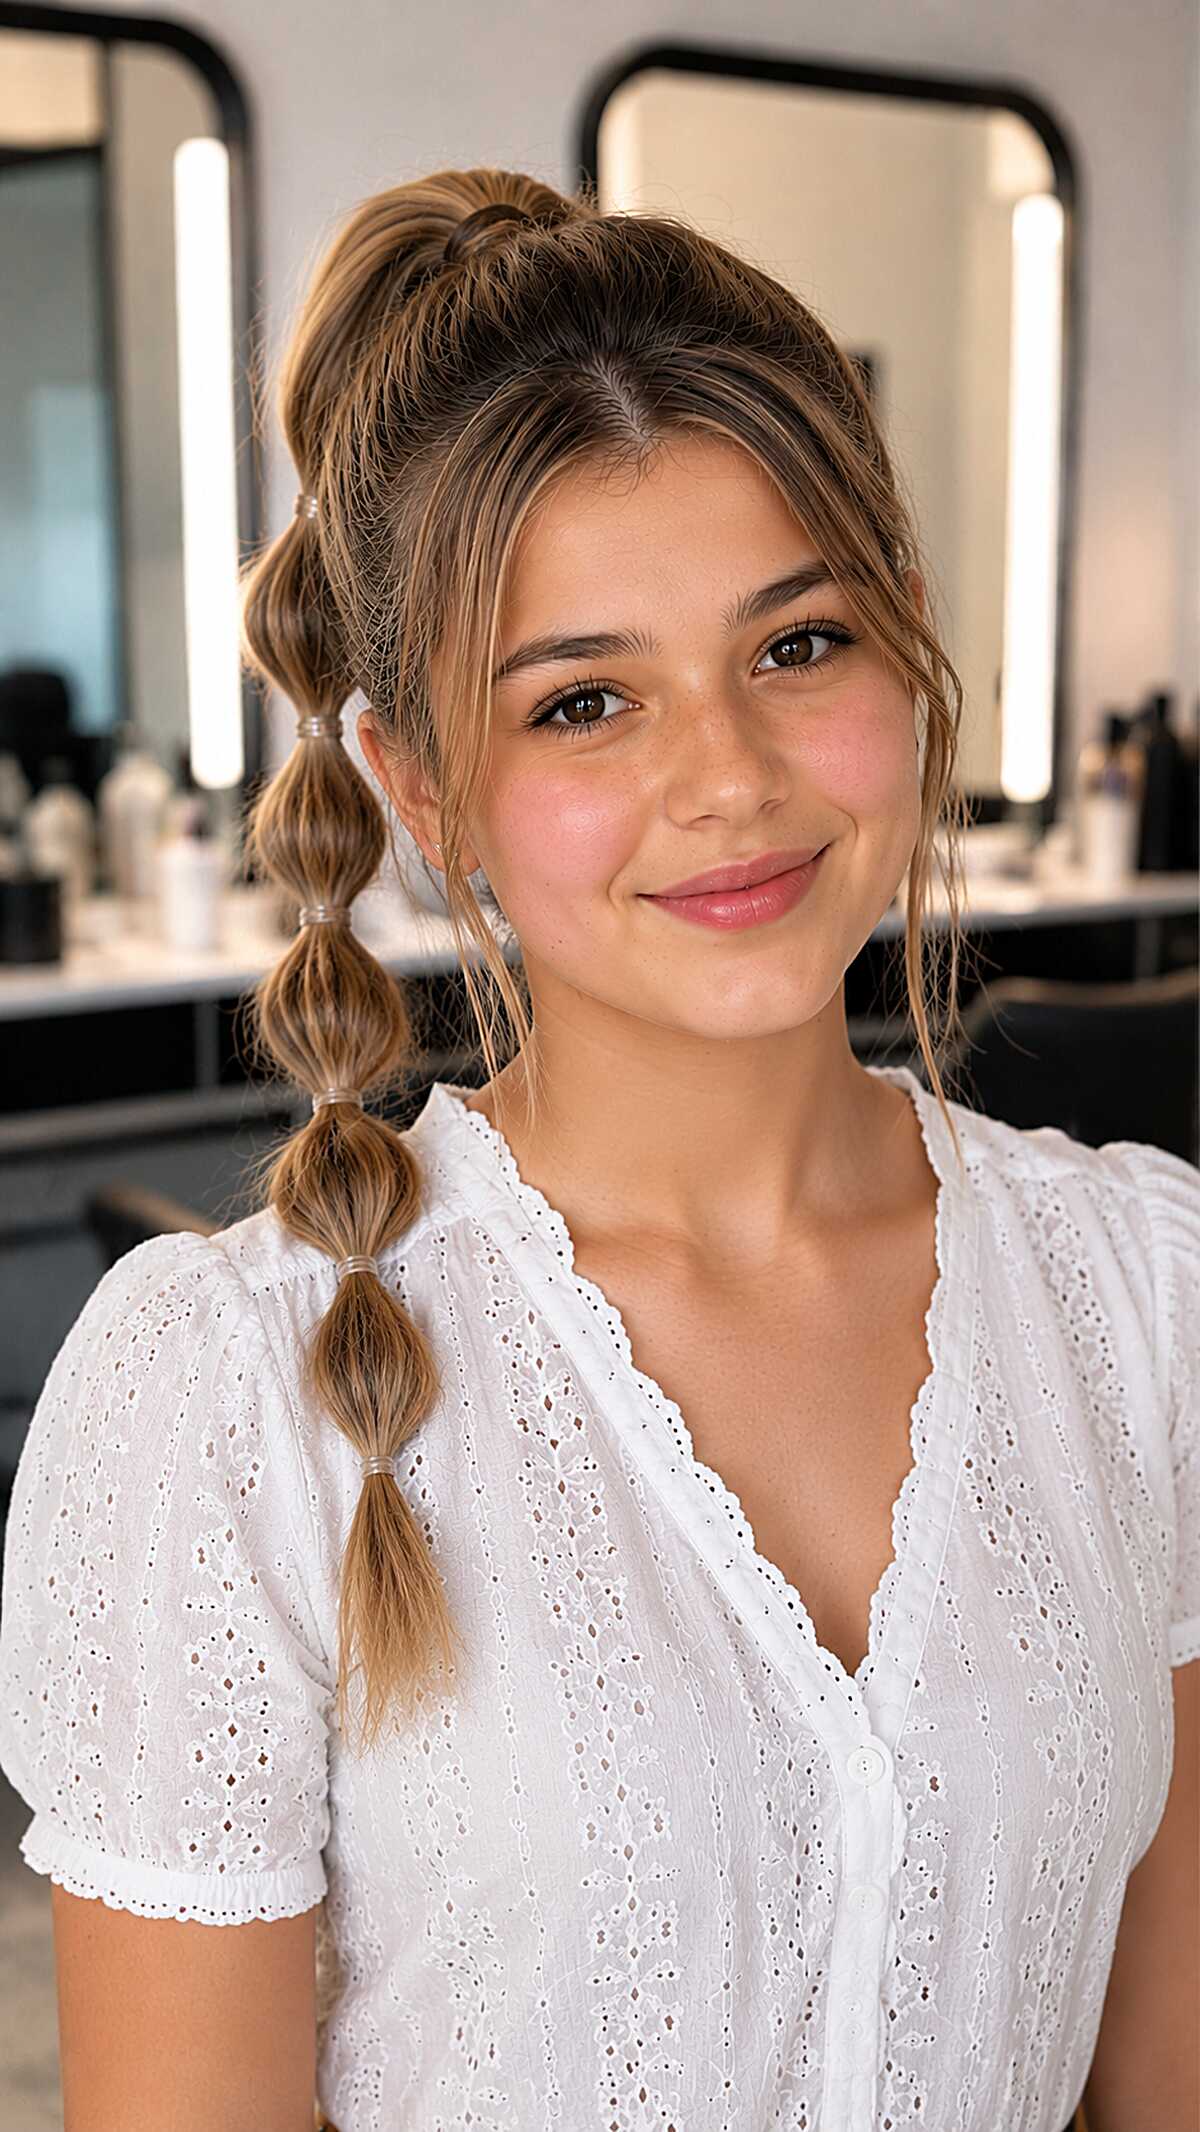
#23 Bubble Ponytail with Soft Tendrils at the Hairline
This method won’t work on fine hair. The bubbles should have enough density to pancake out into rounded sections, but with thin strands, each bubble looks like a knot on a string. This is medium to thick hair, mid-length, with a warm bronde balayage that gives each segment dimension. You can see each clear elastic disappear because the hair is pulled and puffed around it, and not just tied and left alone. It’s all about that pulling technique. Without it, you simply have a segmented ponytail that looks really flat. The face-framing pieces are wispy and intentionally messy, and that’s how it doesn’t look too fussy for a school morning. It works on straight to wavy hair! It really flatters rounder face shapes too because the high placement and loose pieces create a lot of length.
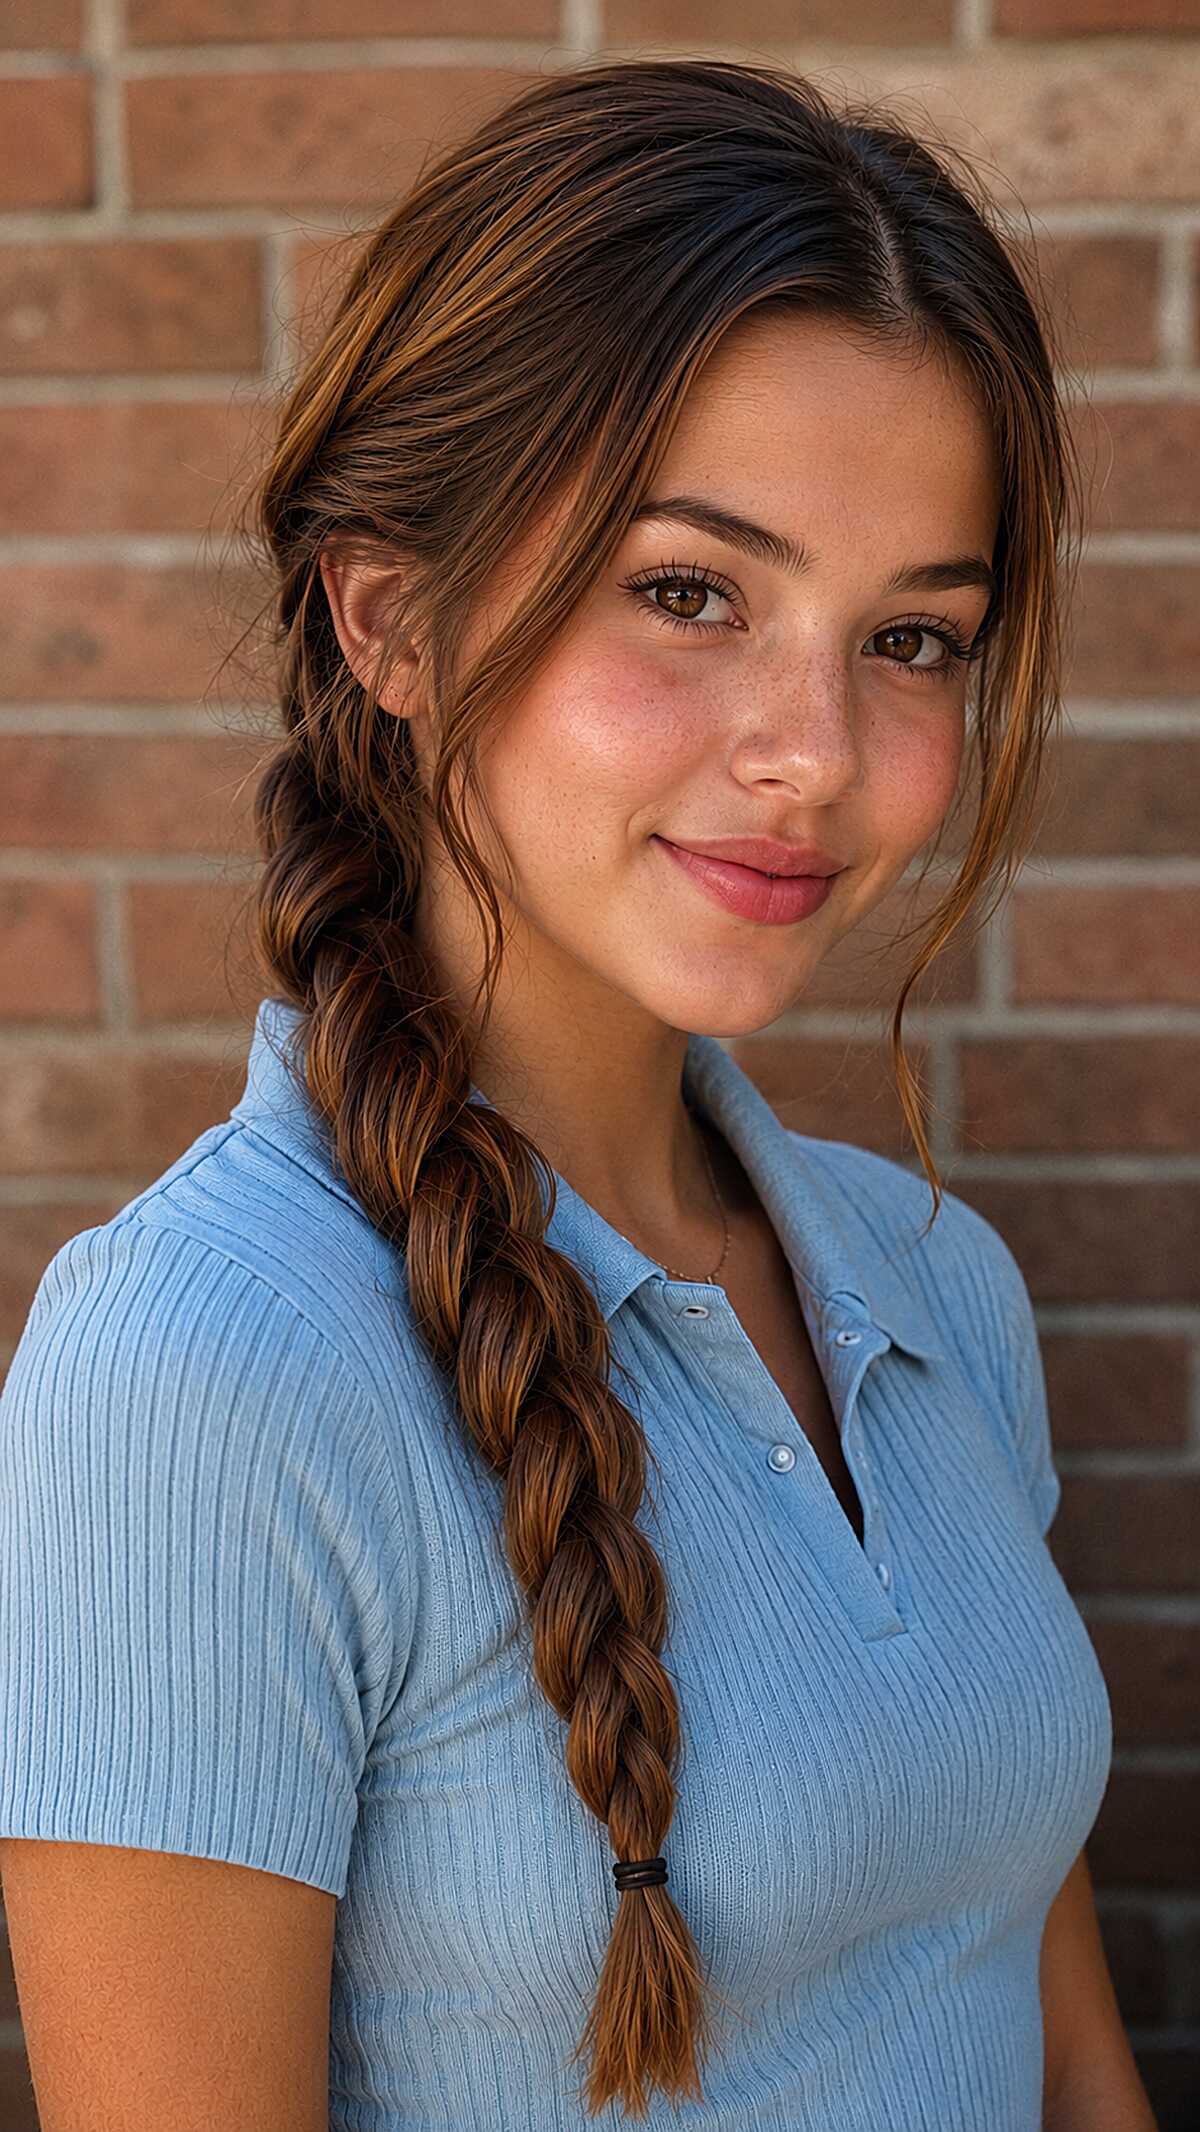
#24 Two-Strand Twist Braid with Warm Copper Pieces Pulled Forward
This isn’t a three-strand braid; it’s a two-strand rope twist. That’s important because it takes about half the time and holds better on medium density hair that’s been balayaged. The copper flecks interlaced with her natural brunette base catch light and create the illusion of more dimension in the twist. Fine hair will struggle here. Without enough density, a rope twist will go flat and stringy within an hour. What I notice is how deliberately those front pieces were pulled out before twisting, not after, which keeps them from looking like an afterthought. This works on oval and heart face shapes where softening around the temples is welcome. Round faces will want those pieces longer or skip them entirely because short tendrils at the cheekbone widen everything.
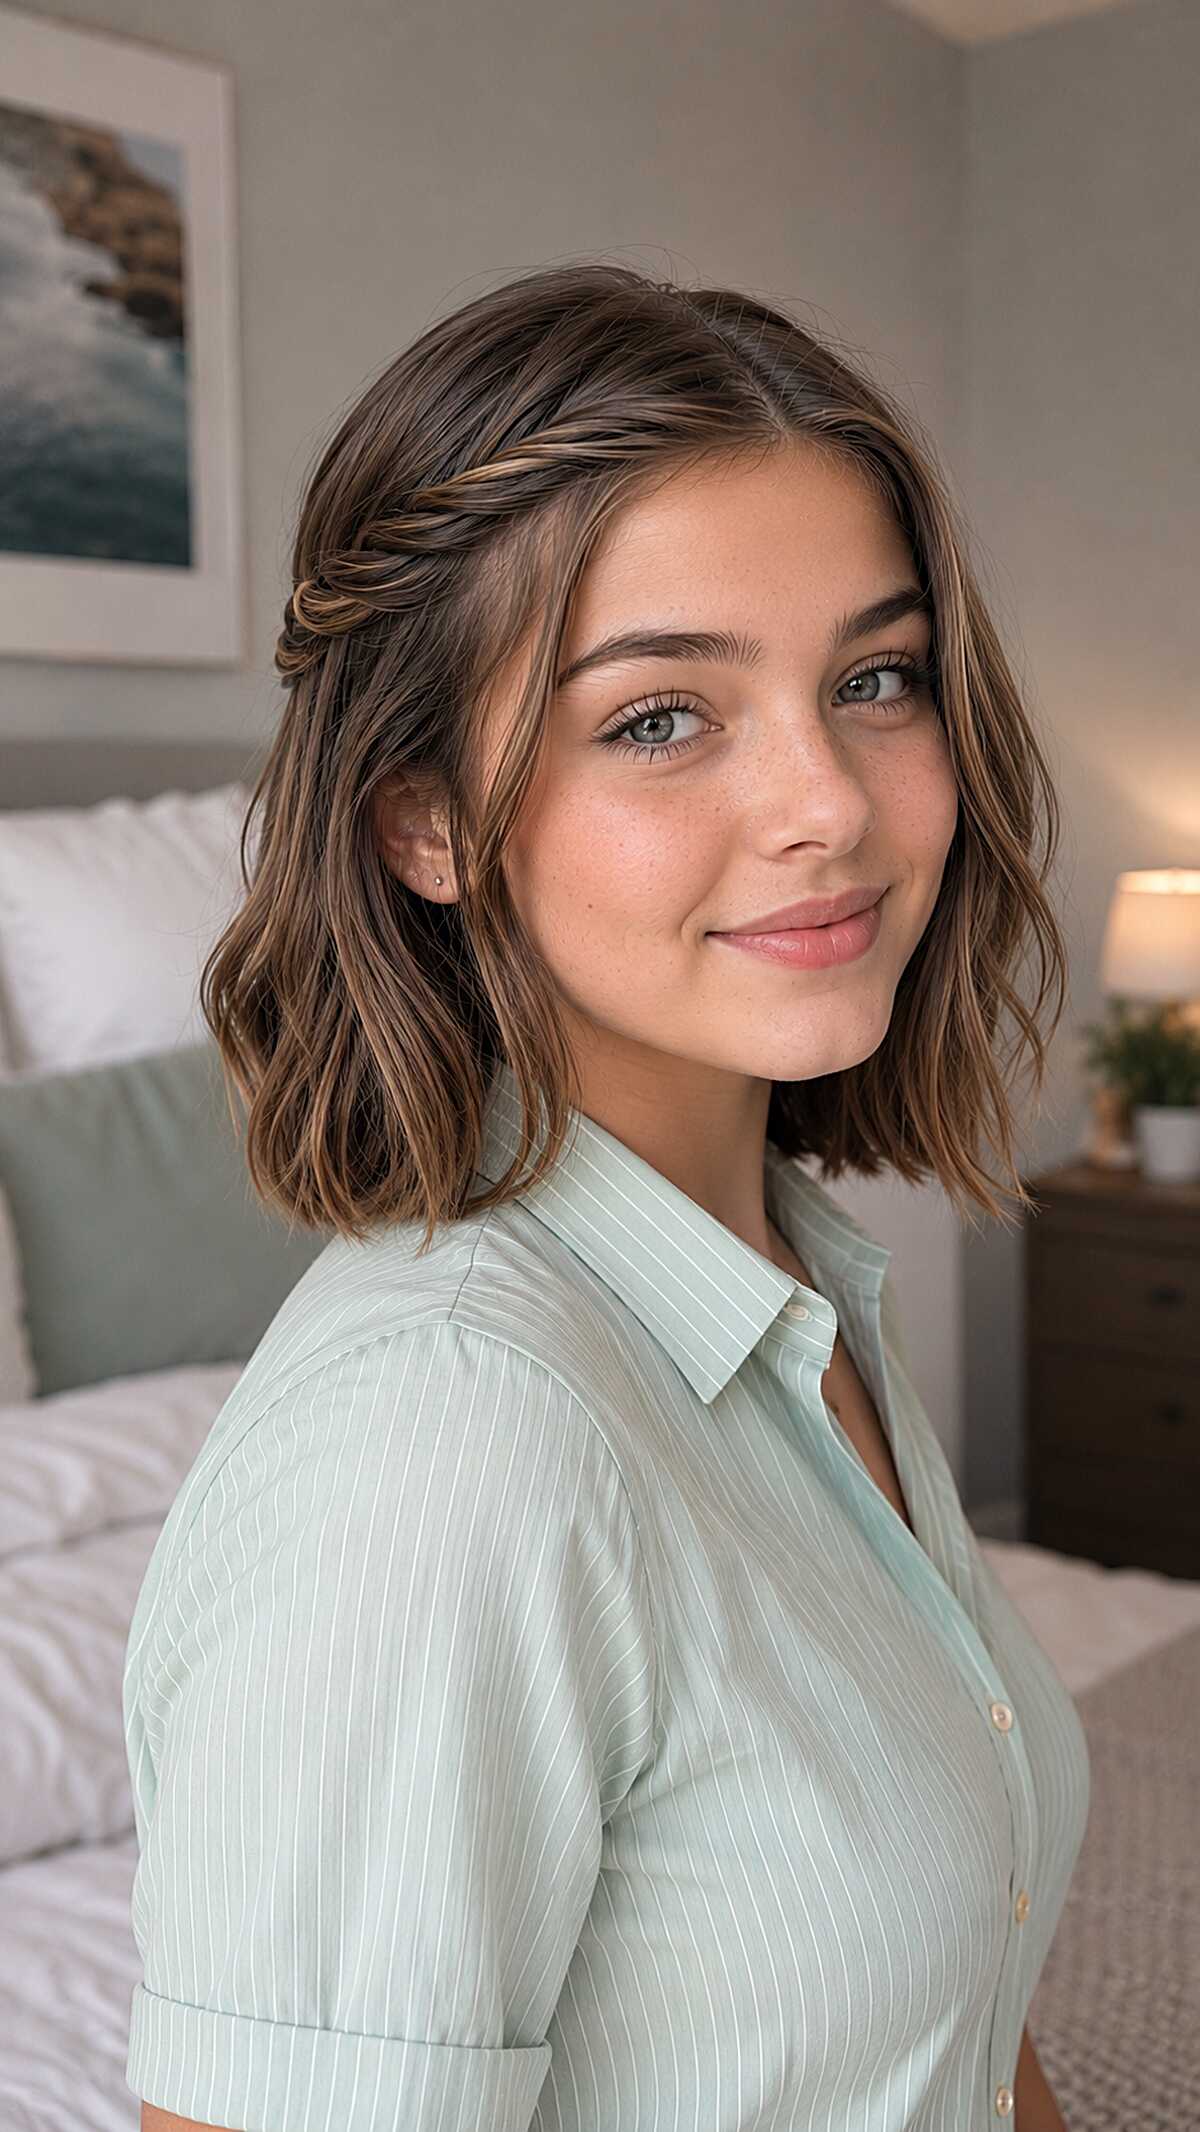
#25 Twisted Section Pinned Back on a Chin-Length Wavy Bob
This won’t stay on slippery freshly washed hair. That’s the issue with front twists on short bobs, You need a little grit, texture spray, or second-day hair so that the twist can grab enough hair and stay pinned behind your ear without sliding forward by second period. The twist is only a two-strand rope along the hairline that is pinned back with an invisible pin, and it takes maybe 90 seconds if your coordination is decent. What I find interesting is how the rest of the hair is left solo, just natural wave with no styling, which is what makes it “fast” hair rather than “fast.” Medium density chin length slight wave. If your hair is very fine and straight the twist won’t look as thick as you want and the opposite side volume won’t match. This looks great on round and oval faces because the asymmetry created by sweeping one side back opens up the face without showing everything.
Enter your email and get this picture and description straight to your inbox, and you'll also get new hair ideas ❤️
🔒 We don't spam or sell emails. See our Privacy Policy.