So here’s the thing about cruise hair that nobody warns you about, and I wish someone had told me before my first Caribbean sailing like ten years ago. You think you’re going to wake up, do your hair in the cabin bathroom with that teeny tiny mirror, and look like a resort commercial. What ACTUALLY happens is the humidity hits you the second you step on deck, the wind has a personal vendetta against your blowout, and by dinner you’re shoving everything into a scrunchie you found at the bottom of your beach bag. I’ve been on enough cruises now to know that the secret isn’t fighting the elements, it’s picking styles that literally work WITH all that salt air and wind and poolside chaos.
And honestly? Some of my favorite hair moments have happened on ships because I finally stopped trying to make “salon perfect” happen at sea and leaned into styles that look BETTER a little undone. I had a client last year send me a selfie from her balcony in Santorini with this messy twisted braid situation that she said took her four minutes, and she looked more incredible than she did at her own wedding. That’s the energy we’re going for here. These are styles that actually make sense when you’re living between sunscreen and a cocktail dress, and I’m going to tell you exactly which ones I’m obsessed with and which ones need a little real talk.
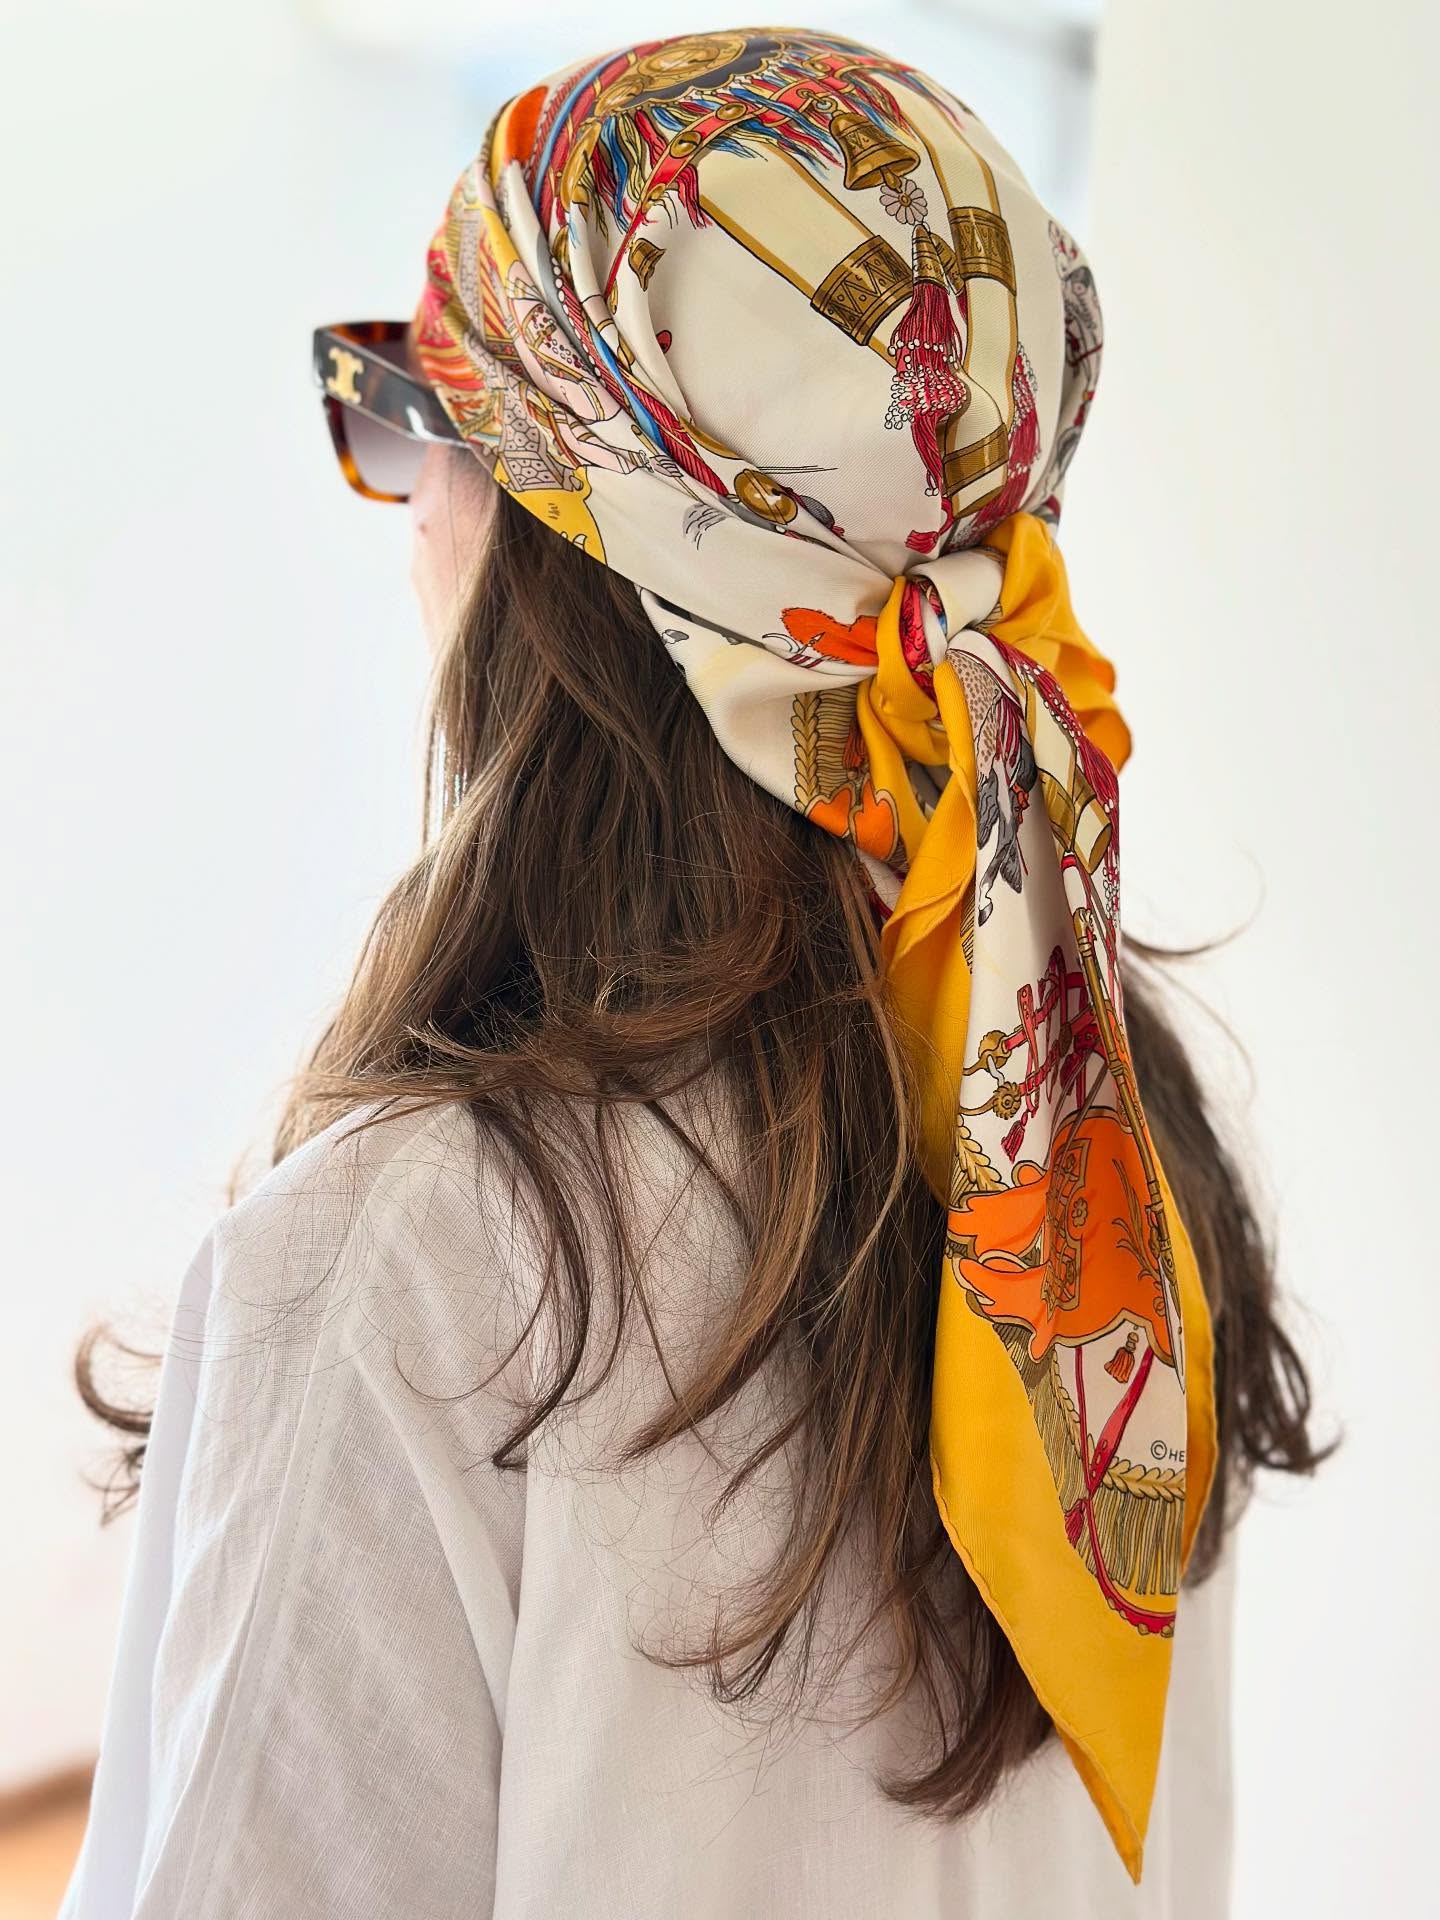

#1: Long Layers with a Silk Scarf Tied Back, and Yes It’s as Good as It Looks
OK so this is one of those looks where I want to grab you by the shoulders and say DO THIS ON YOUR TRIP. Long layers peeking out from a silk scarf tied at the back is giving effortless European woman who’s been sailing the Mediterranean her whole life. The scarf knot sits right at the occipital bone, which is the bumpy part at the back of your head, and that’s the sweet spot because it lets all those layers escape underneath with natural movement instead of just smashing everything flat. Plus you’re getting actual UV protection for your scalp and way less friction on your hair from the wind. The one thing I’ll say is if you have REALLY thick hair, you might want to ask your stylist for some texturizing before your trip because all that volume can fight the scarf a little. And yeah, it can flatten your crown if you’re not careful about how you position it, but honestly on a cruise day? That slightly relaxed look is the whole vibe.
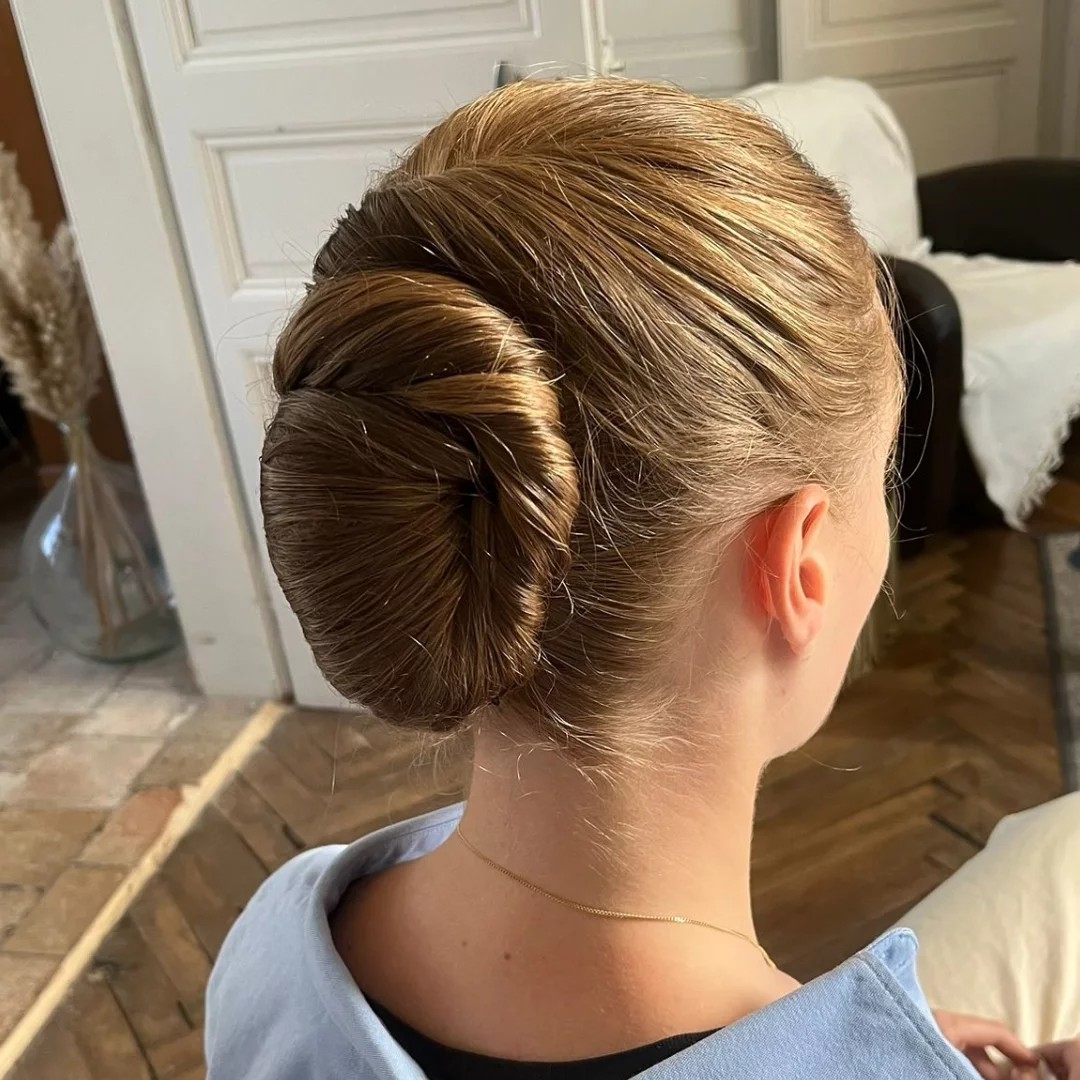
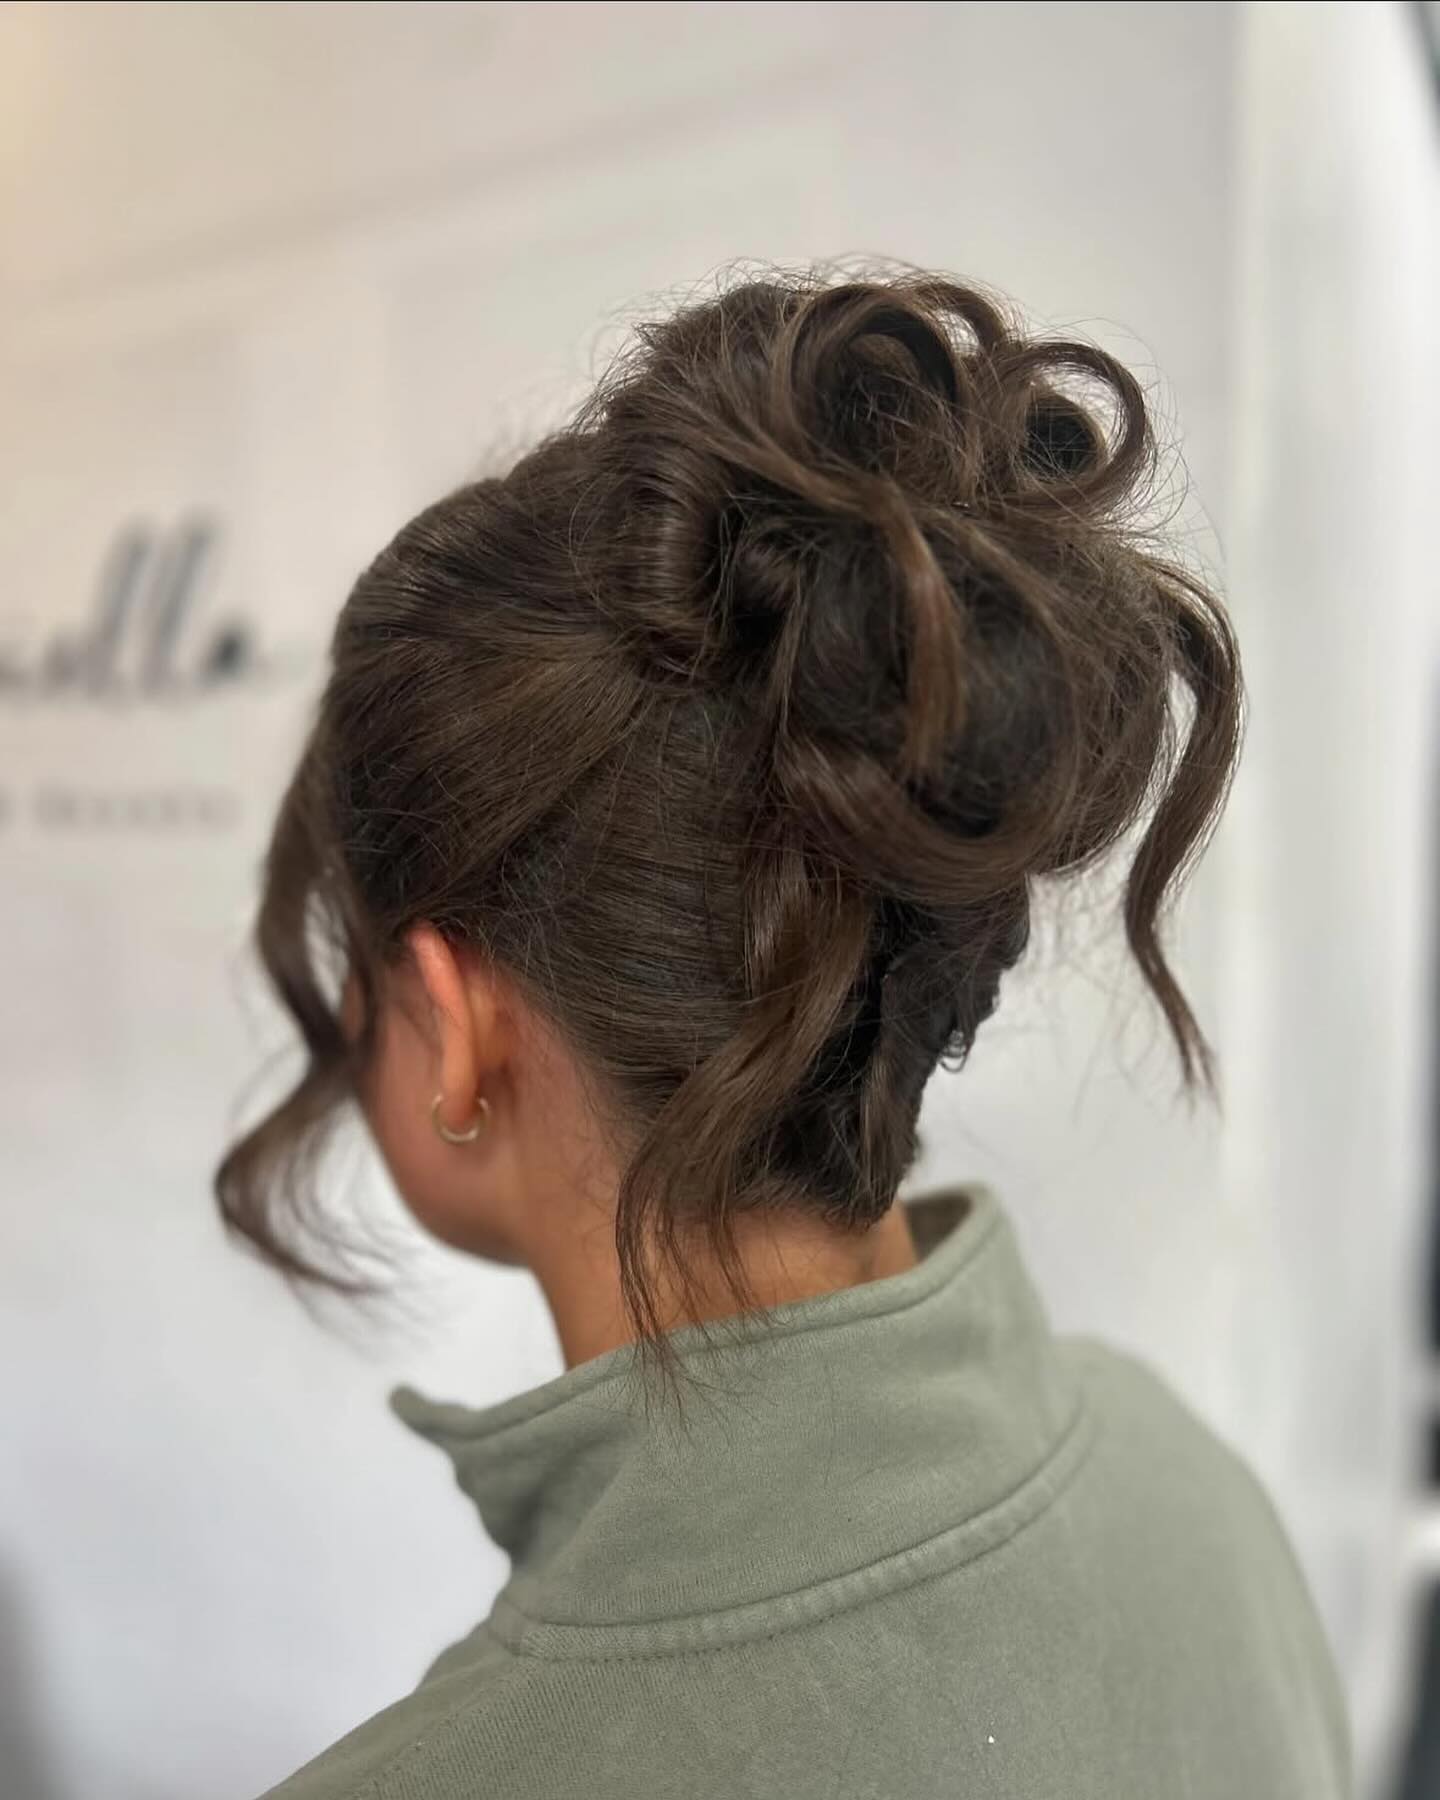
#2: That Fancy Rolled Spiral Chignon That Looks Way Harder Than It Is
I am OBSESSED with this one for cruise evening dinners because it’s basically a concentric spiral roll that gives you this gorgeous satin shell shape without needing a donut form or any of those gimmicky bun tools. It’s windproof, which, if you’ve ever tried to walk to the ship dining room on a breezy night with your hair down you KNOW why that matters. It sits low and flat enough that you could throw a hat over it during the day too. Now here’s the real talk, you need length for this, at least mid-back, and the whole mirror-sheen thing comes from smoothing your hair first and using a light serum or gel before you start rolling. The trick is your bobby pin direction, they need to go with the roll, not against it. If you fight the natural direction of the spiral you’ll get bumps and it’ll unravel by the appetizer course.
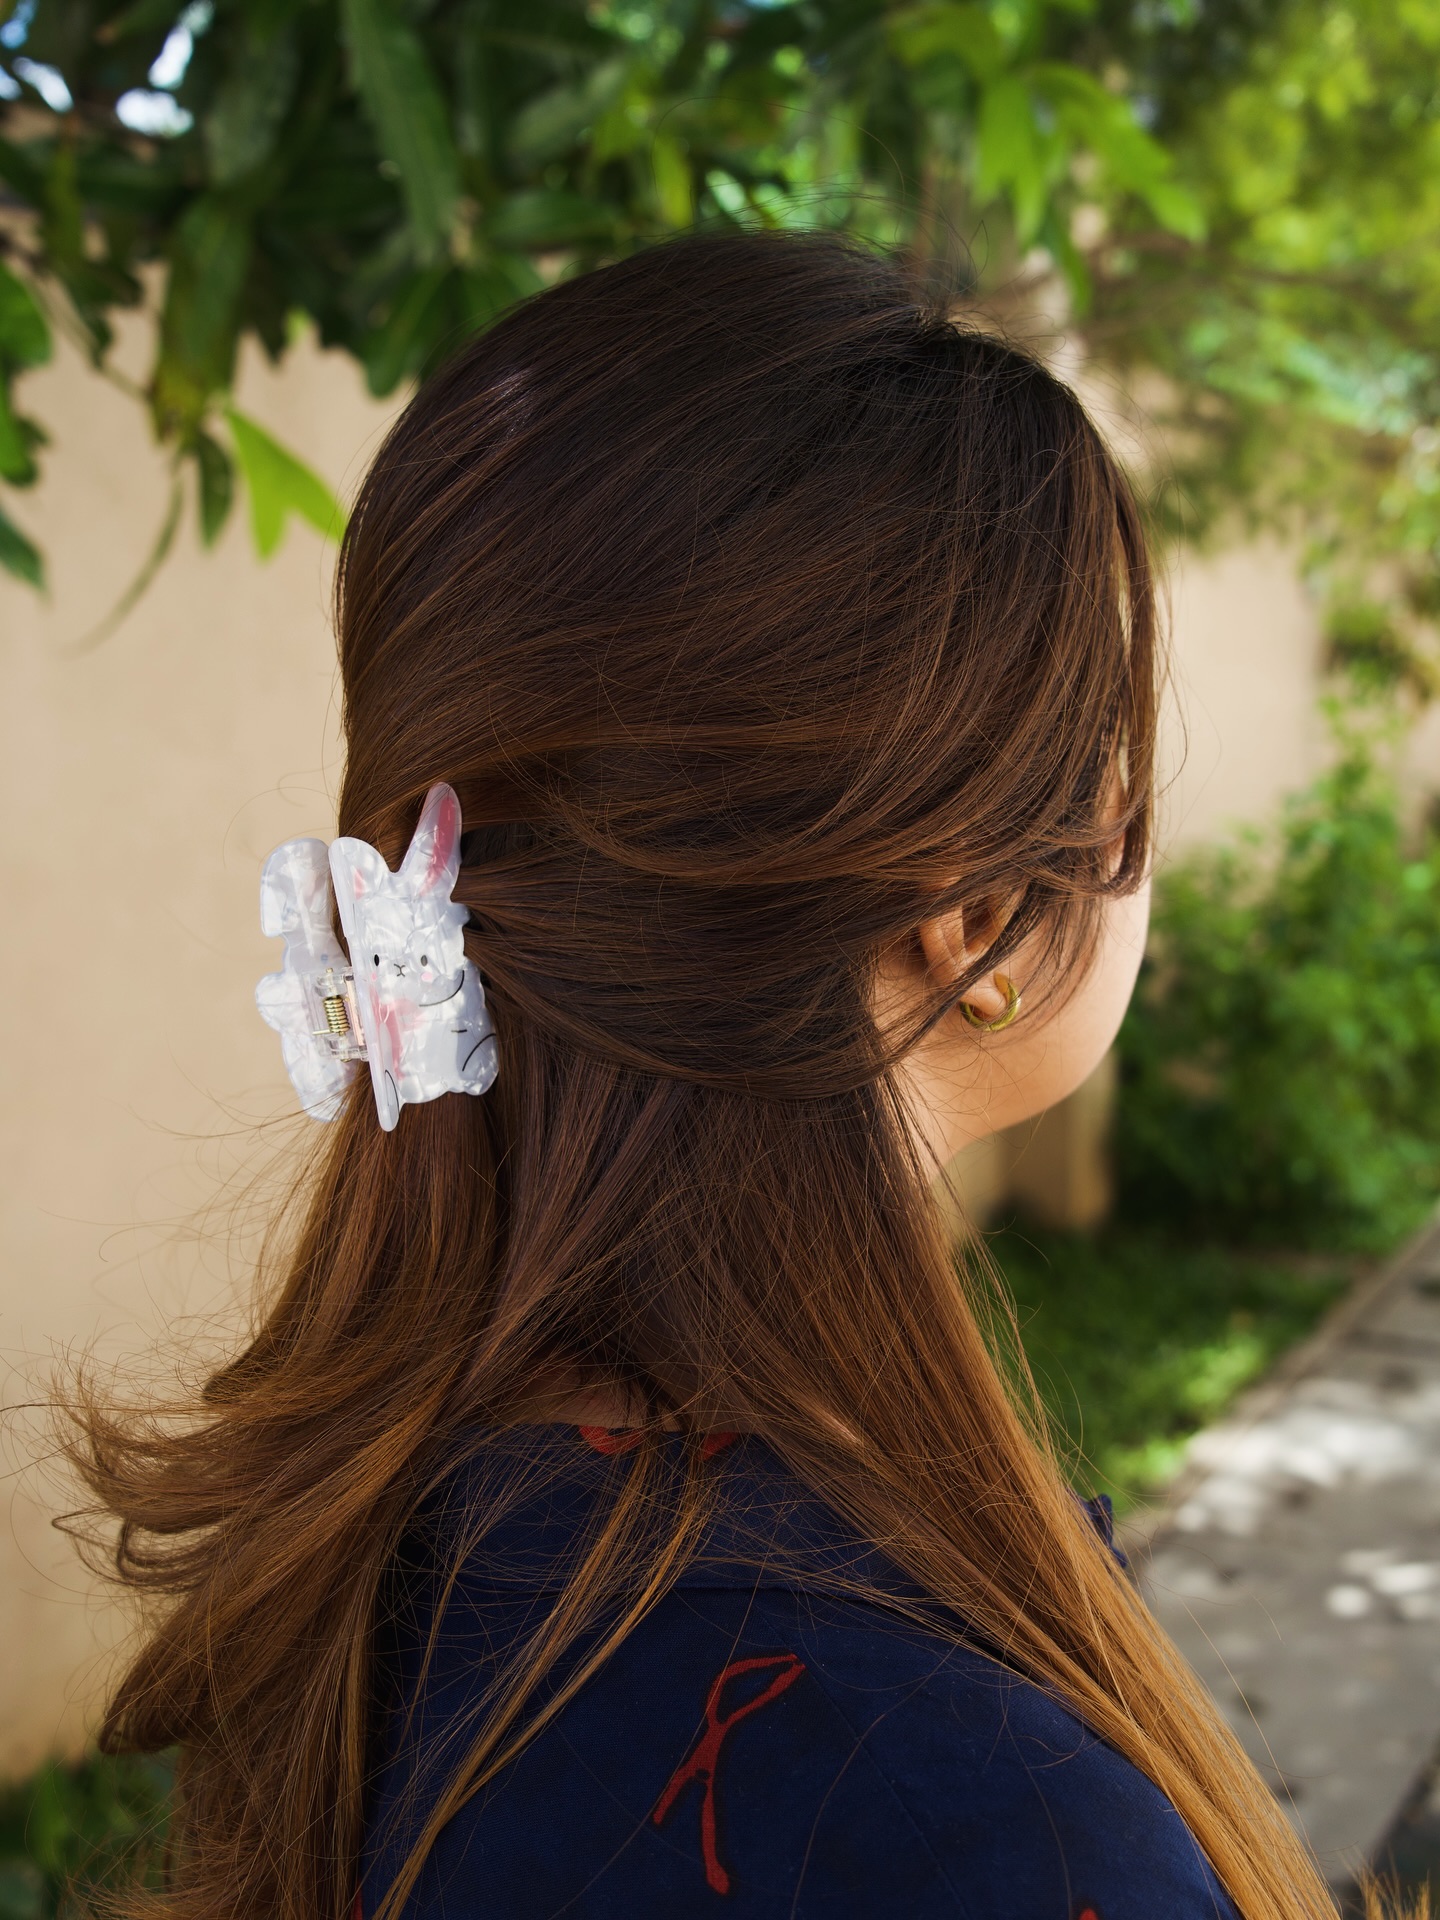
#3: Half-Up with a Bunny Claw Clip Because We’re on VACATION
Listen, I know a marbled pearlescent bunny-shaped claw clip sounds like something a twelve year old would pick out and that is EXACTLY why I love it for a cruise. You’re on vacation! Have fun with it! This half-up with long layers shows off a really pretty subtle balayage and those feathered ends that move so nicely in ocean air. The root shadow situation means you don’t have to stress about regrowth showing, which is one less thing to think about when you should be thinking about which pool bar to hit next. If your hair is on the finer side, the clip might slide, so twist the section once before you clamp it and hit the roots with a little texturizing spray for grip. And maybe don’t wear this one on the top deck when it’s really windy because that clip will end up in the Atlantic.
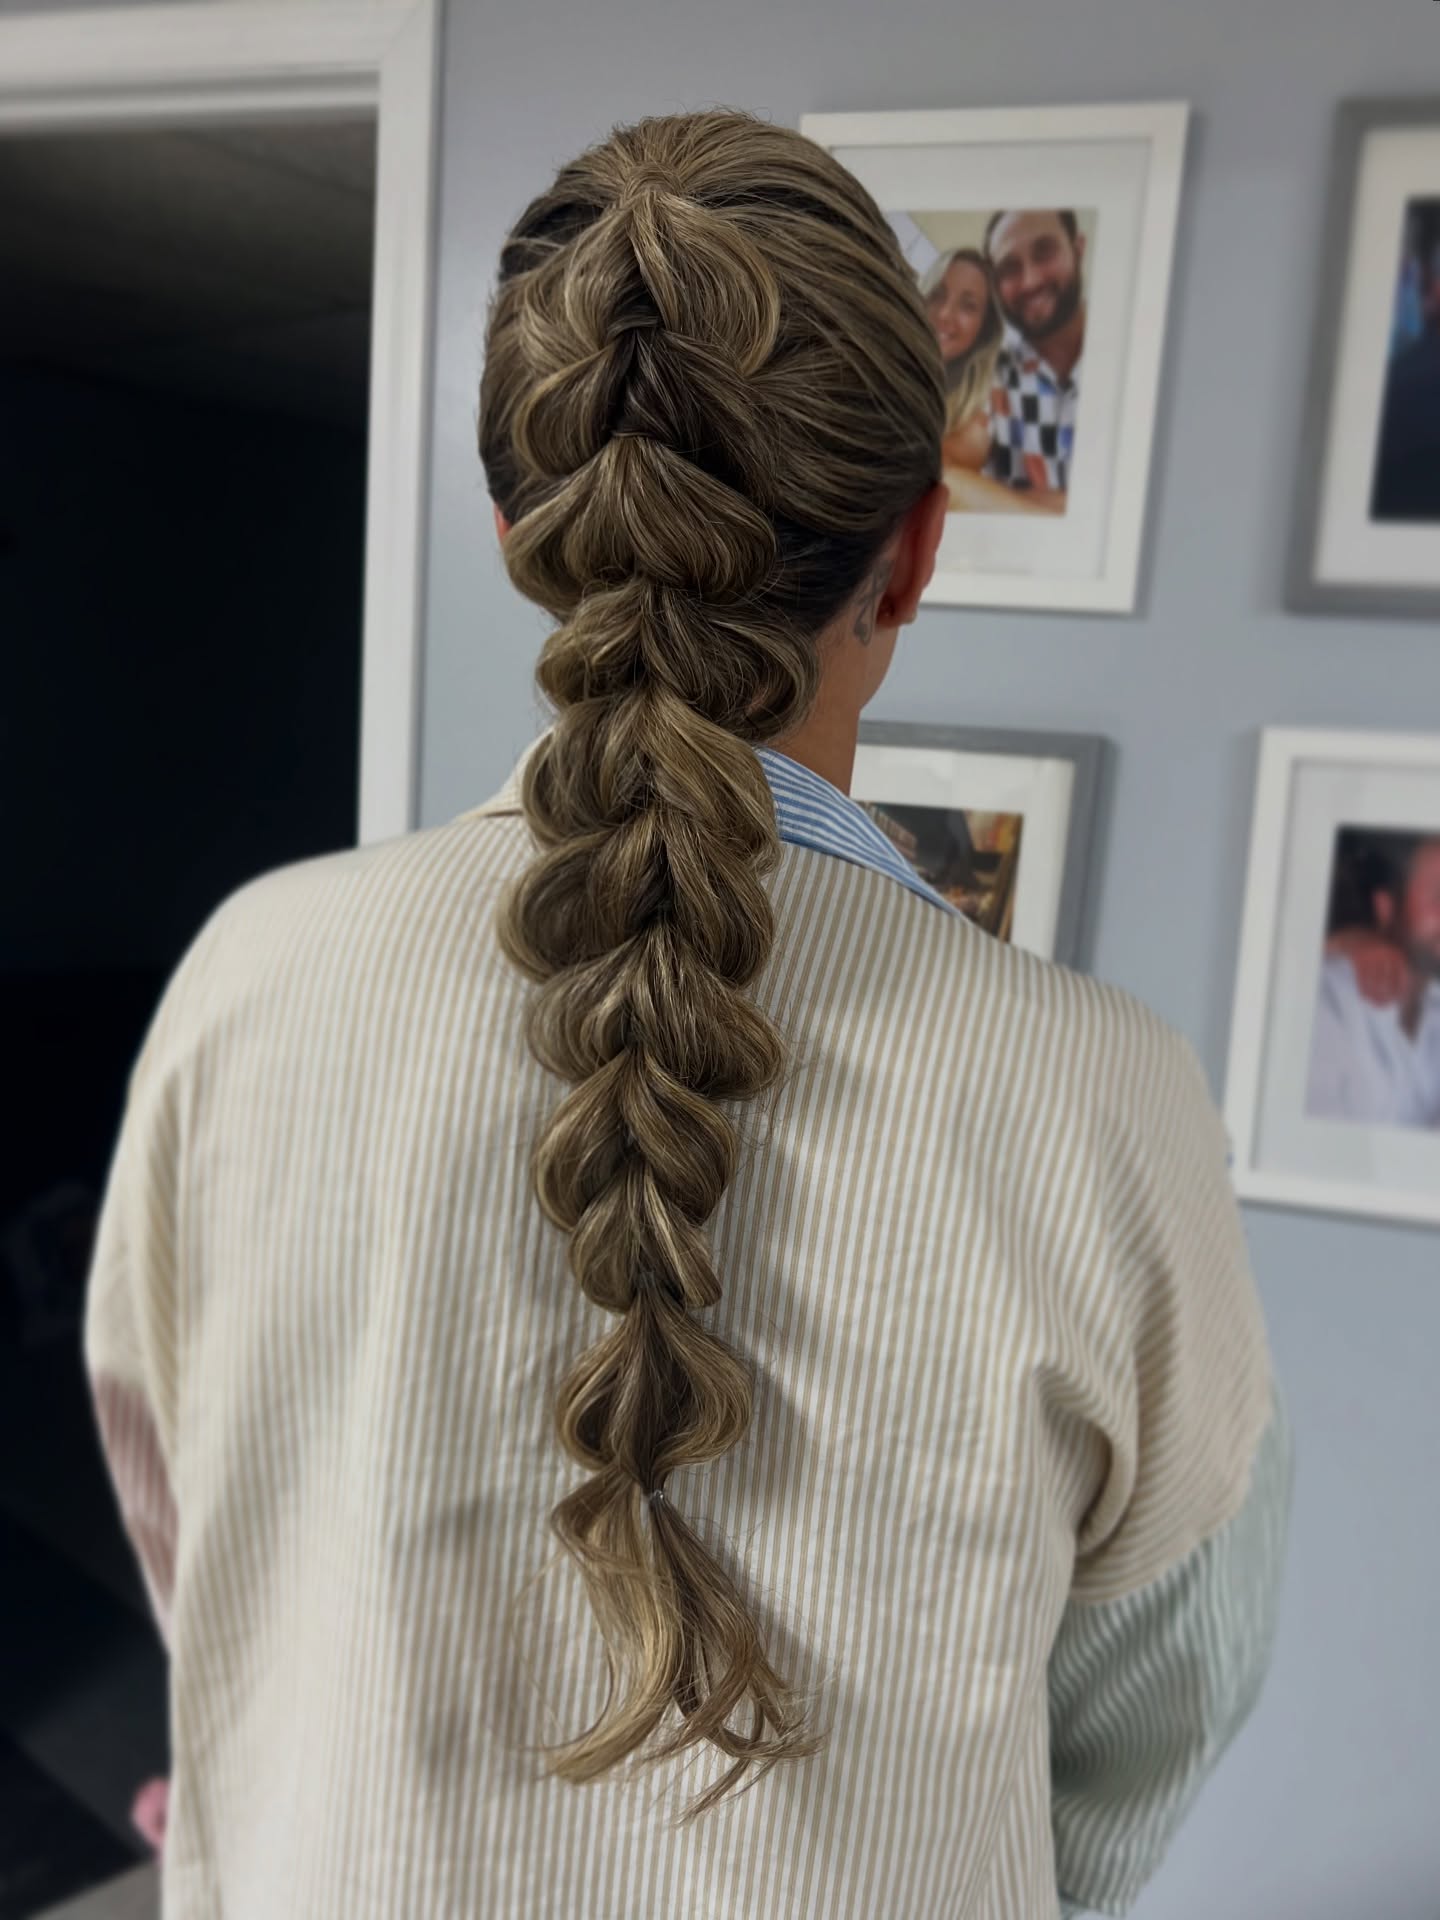
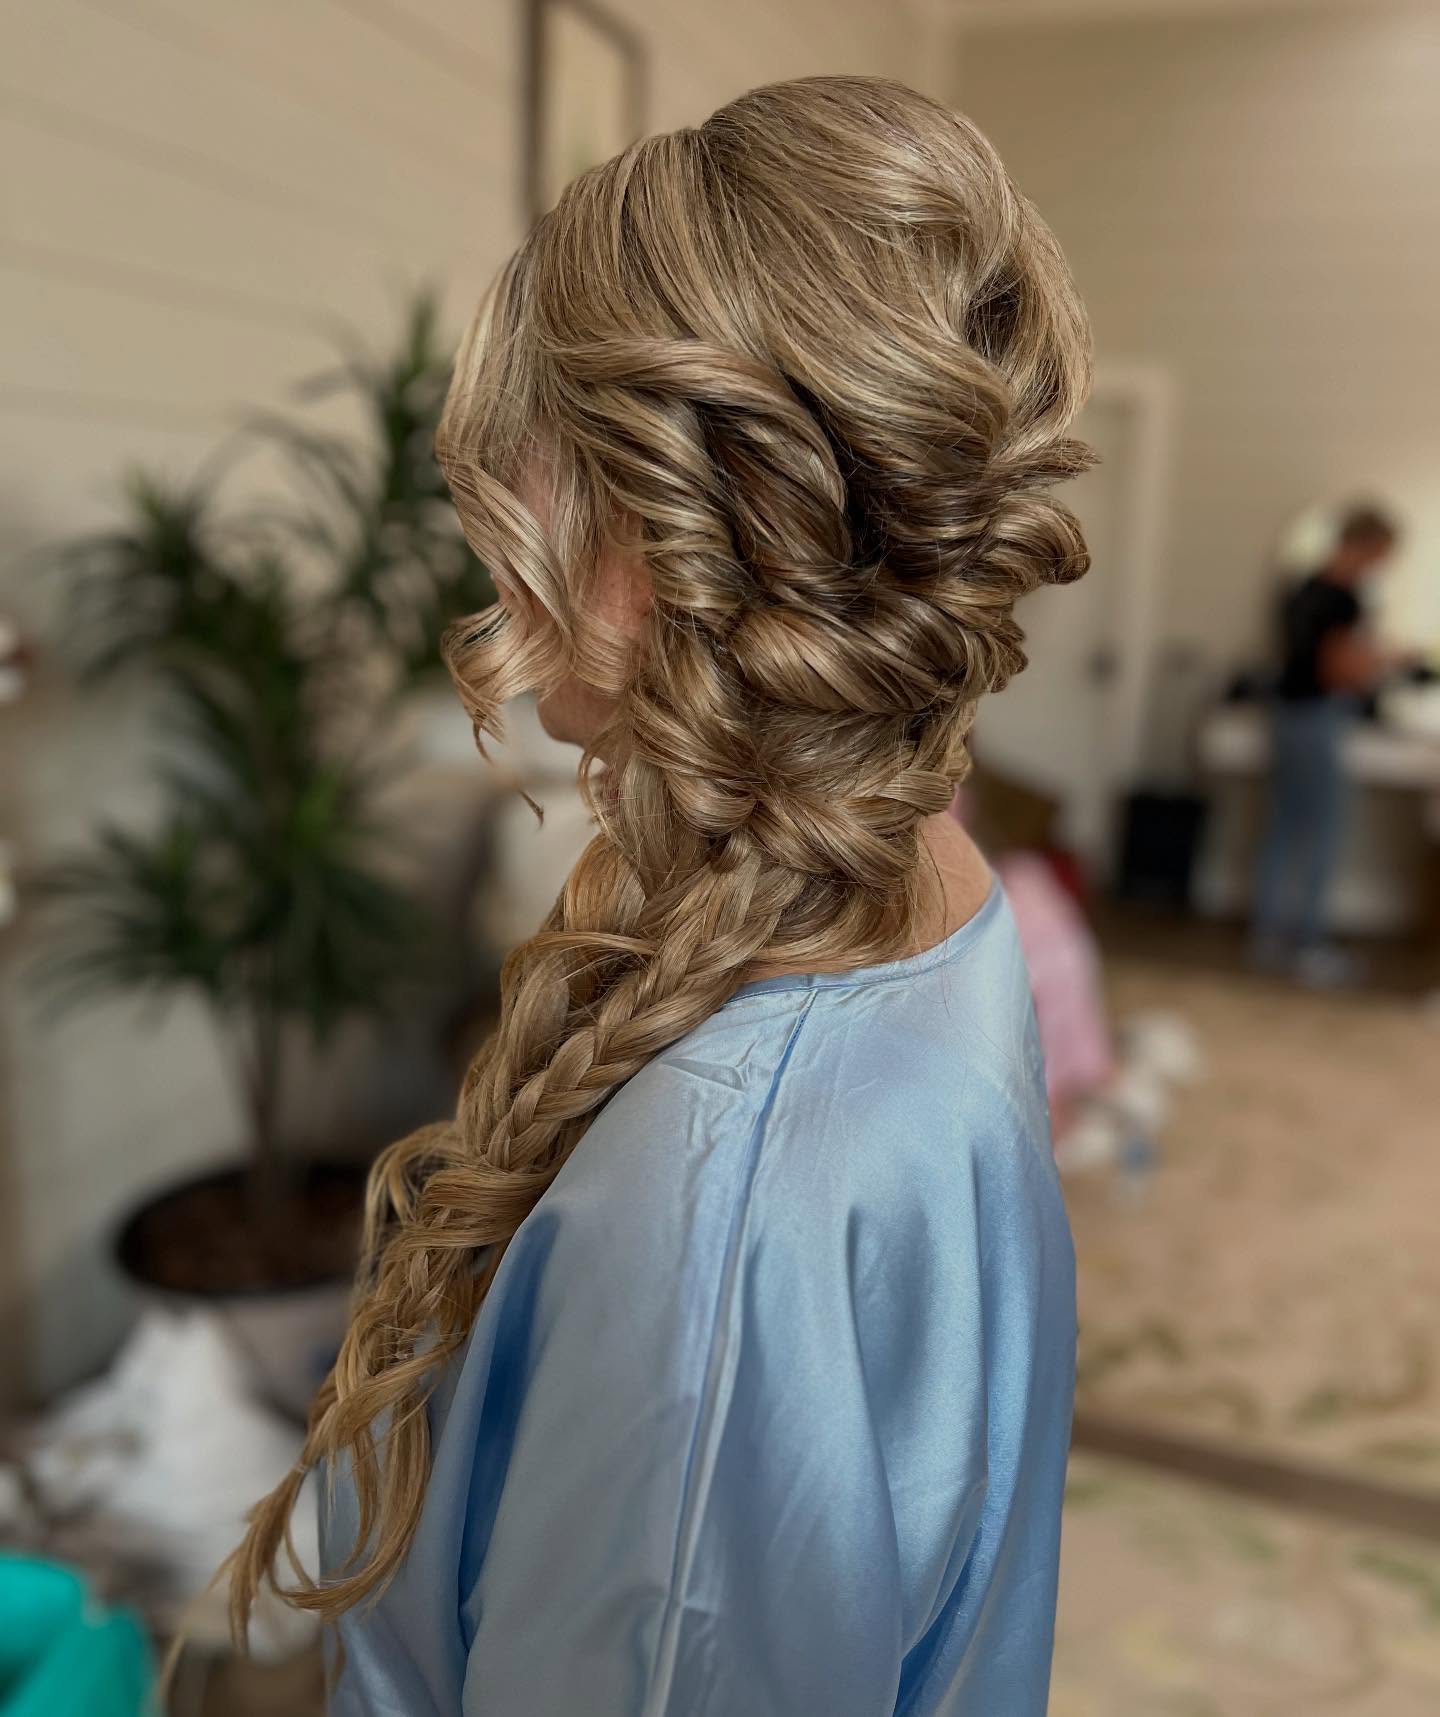
#4: Pull-Through Bubble Braid That’s Basically Made for Vacation Photos
If you want the braid that gets the most compliments on a cruise, this is it. The pull-through with pancaking gives you this insane volume that photographs SO well, like every angle is your good angle. And that bronde root shadow adds depth that makes the whole braid look dimensional instead of flat and one-note. It holds beautifully in humidity too which is a huge win. I’m not going to pretend it’s quick though, you’ll need a handful of small clear elastics and some patience, and if your hair is very fine or silky the sections won’t grip each other well enough to get that puffy look. See how the last four inches or so are left loose at the bottom? That’s intentional and I love it because it gives you that beachy softness at the ends instead of the braid just stopping abruptly.
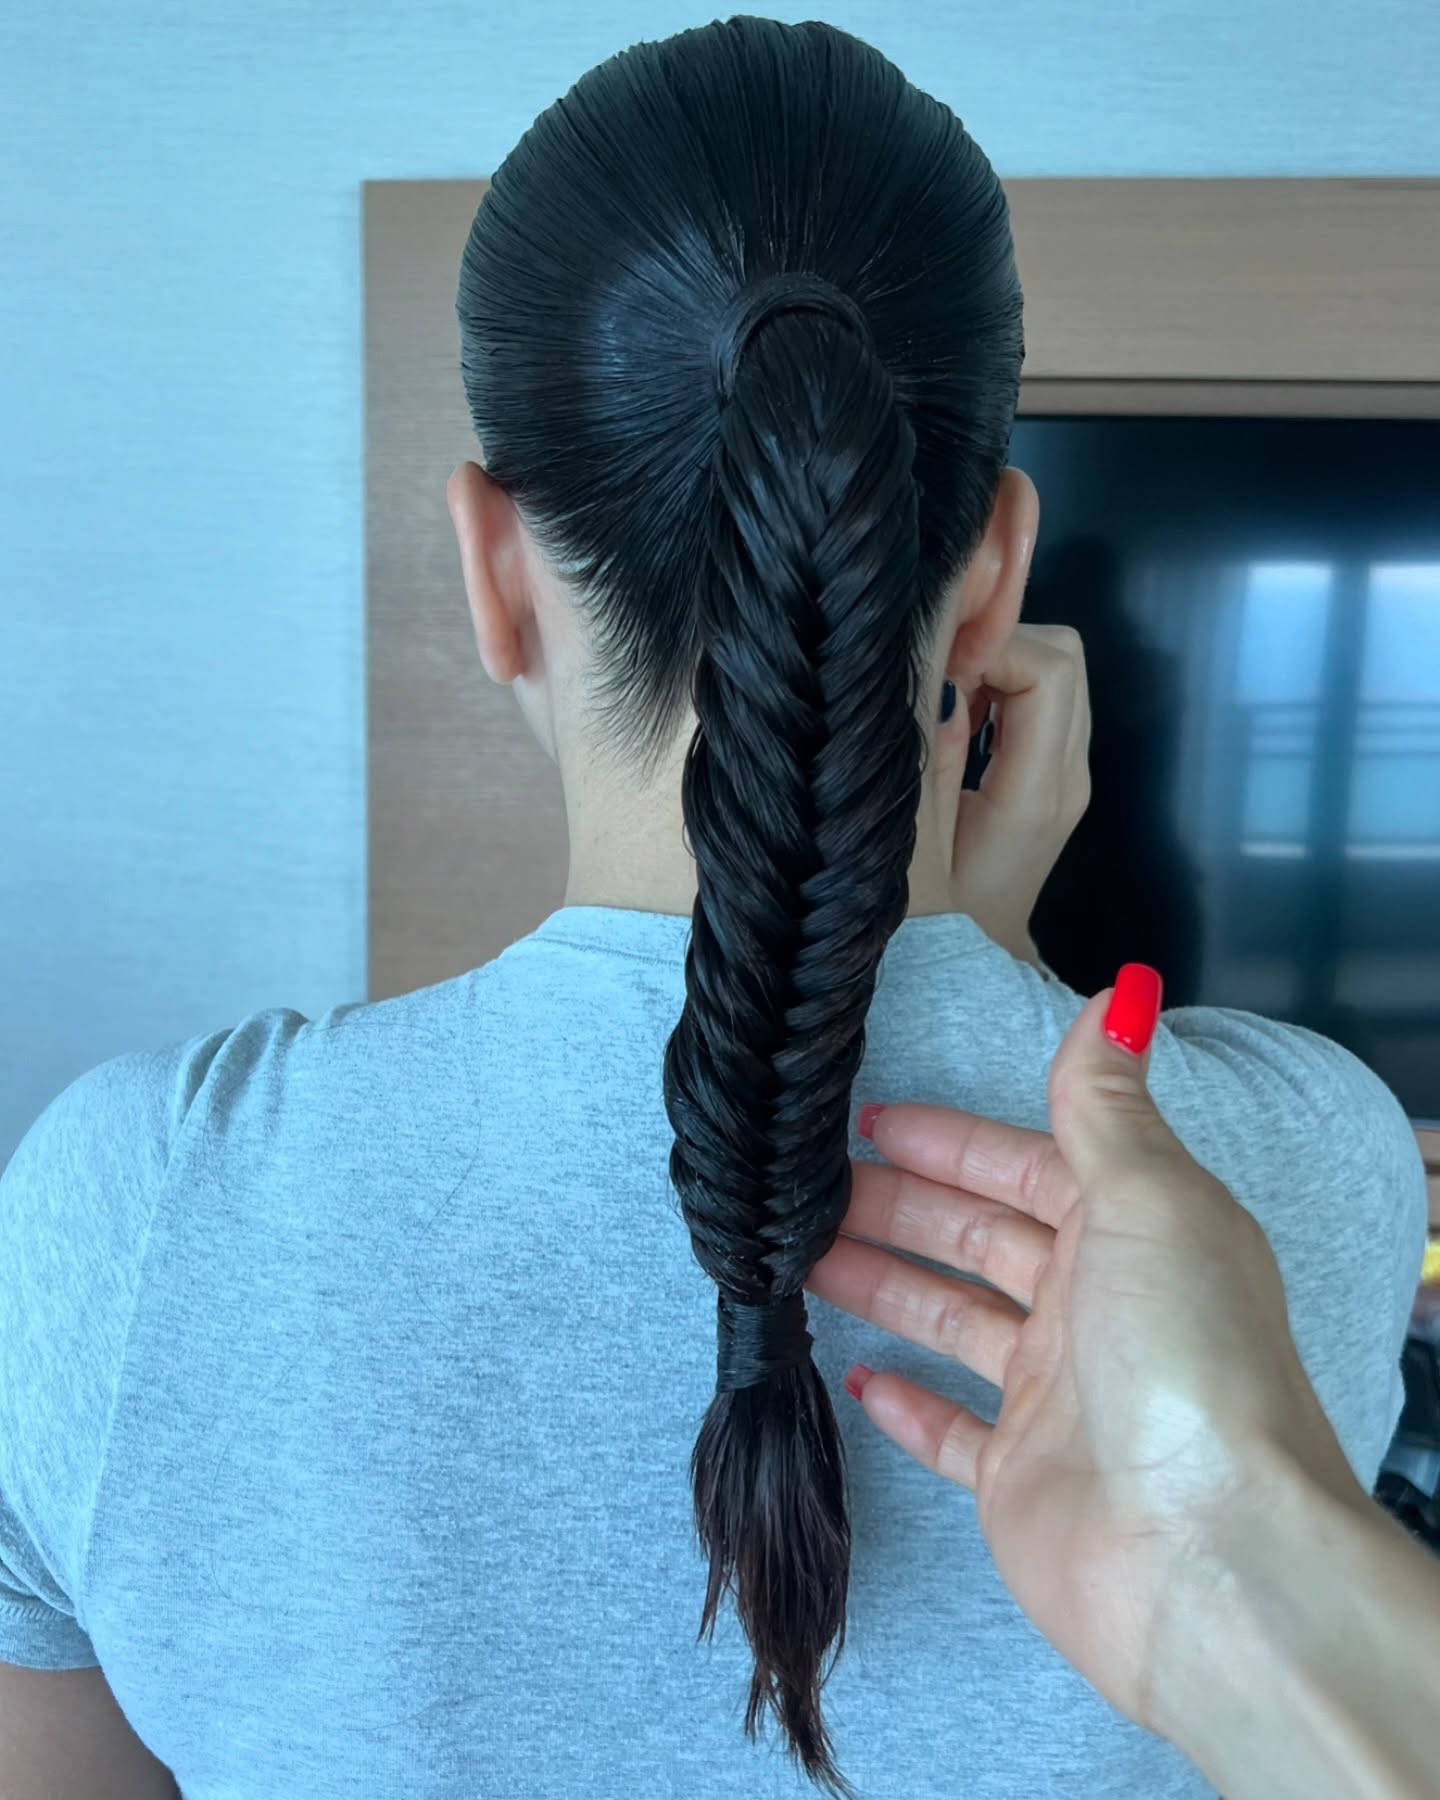
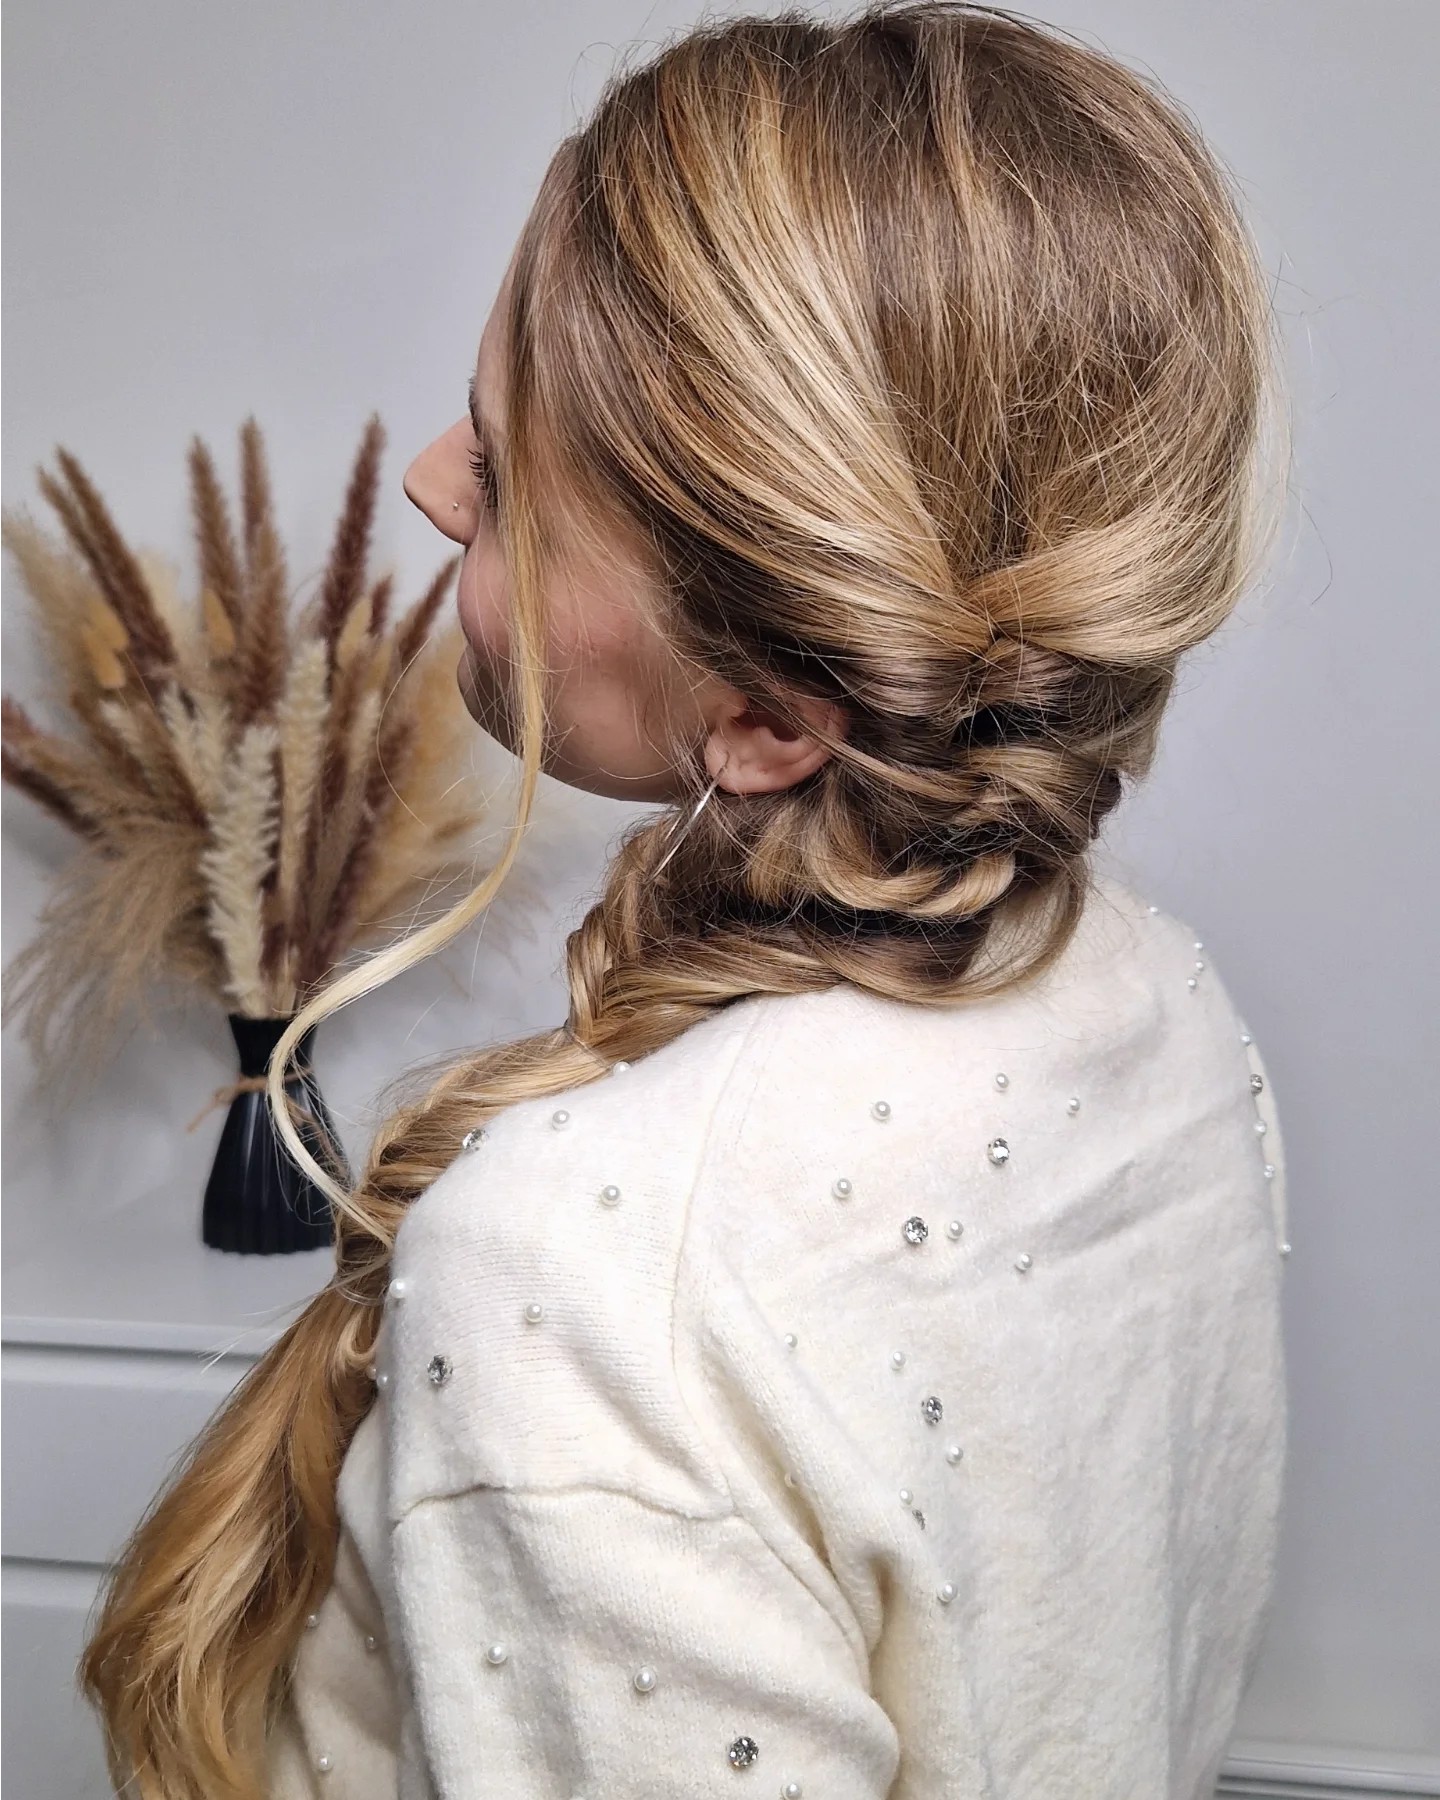
#5: Sleek Fishtail Pony with the Hair-Wrap Detail
This is giving “I look incredibly polished but my hair is completely out of my way” which is honestly the dream for a cruise day that goes from excursion to dinner. It’s a high ponytail fishtail-braided down to mid-back with the elastic hidden by wrapping a thin strand of hair around it, and the whole thing has that sleek gelled finish. Stays put, zero frizz, totally off your neck. Now I WILL say that wet-look finish requires product to achieve, and if you’re pulling everything back this tight consistently, be gentle at the nape because that tension can cause breakage over time. The smart thing here is that the braid starts from the ponytail base, not from the scalp, so it’s way less strain than a full French or Dutch braid would be. Just use a strong hold gel to get that glossy slicked look and you’re set.
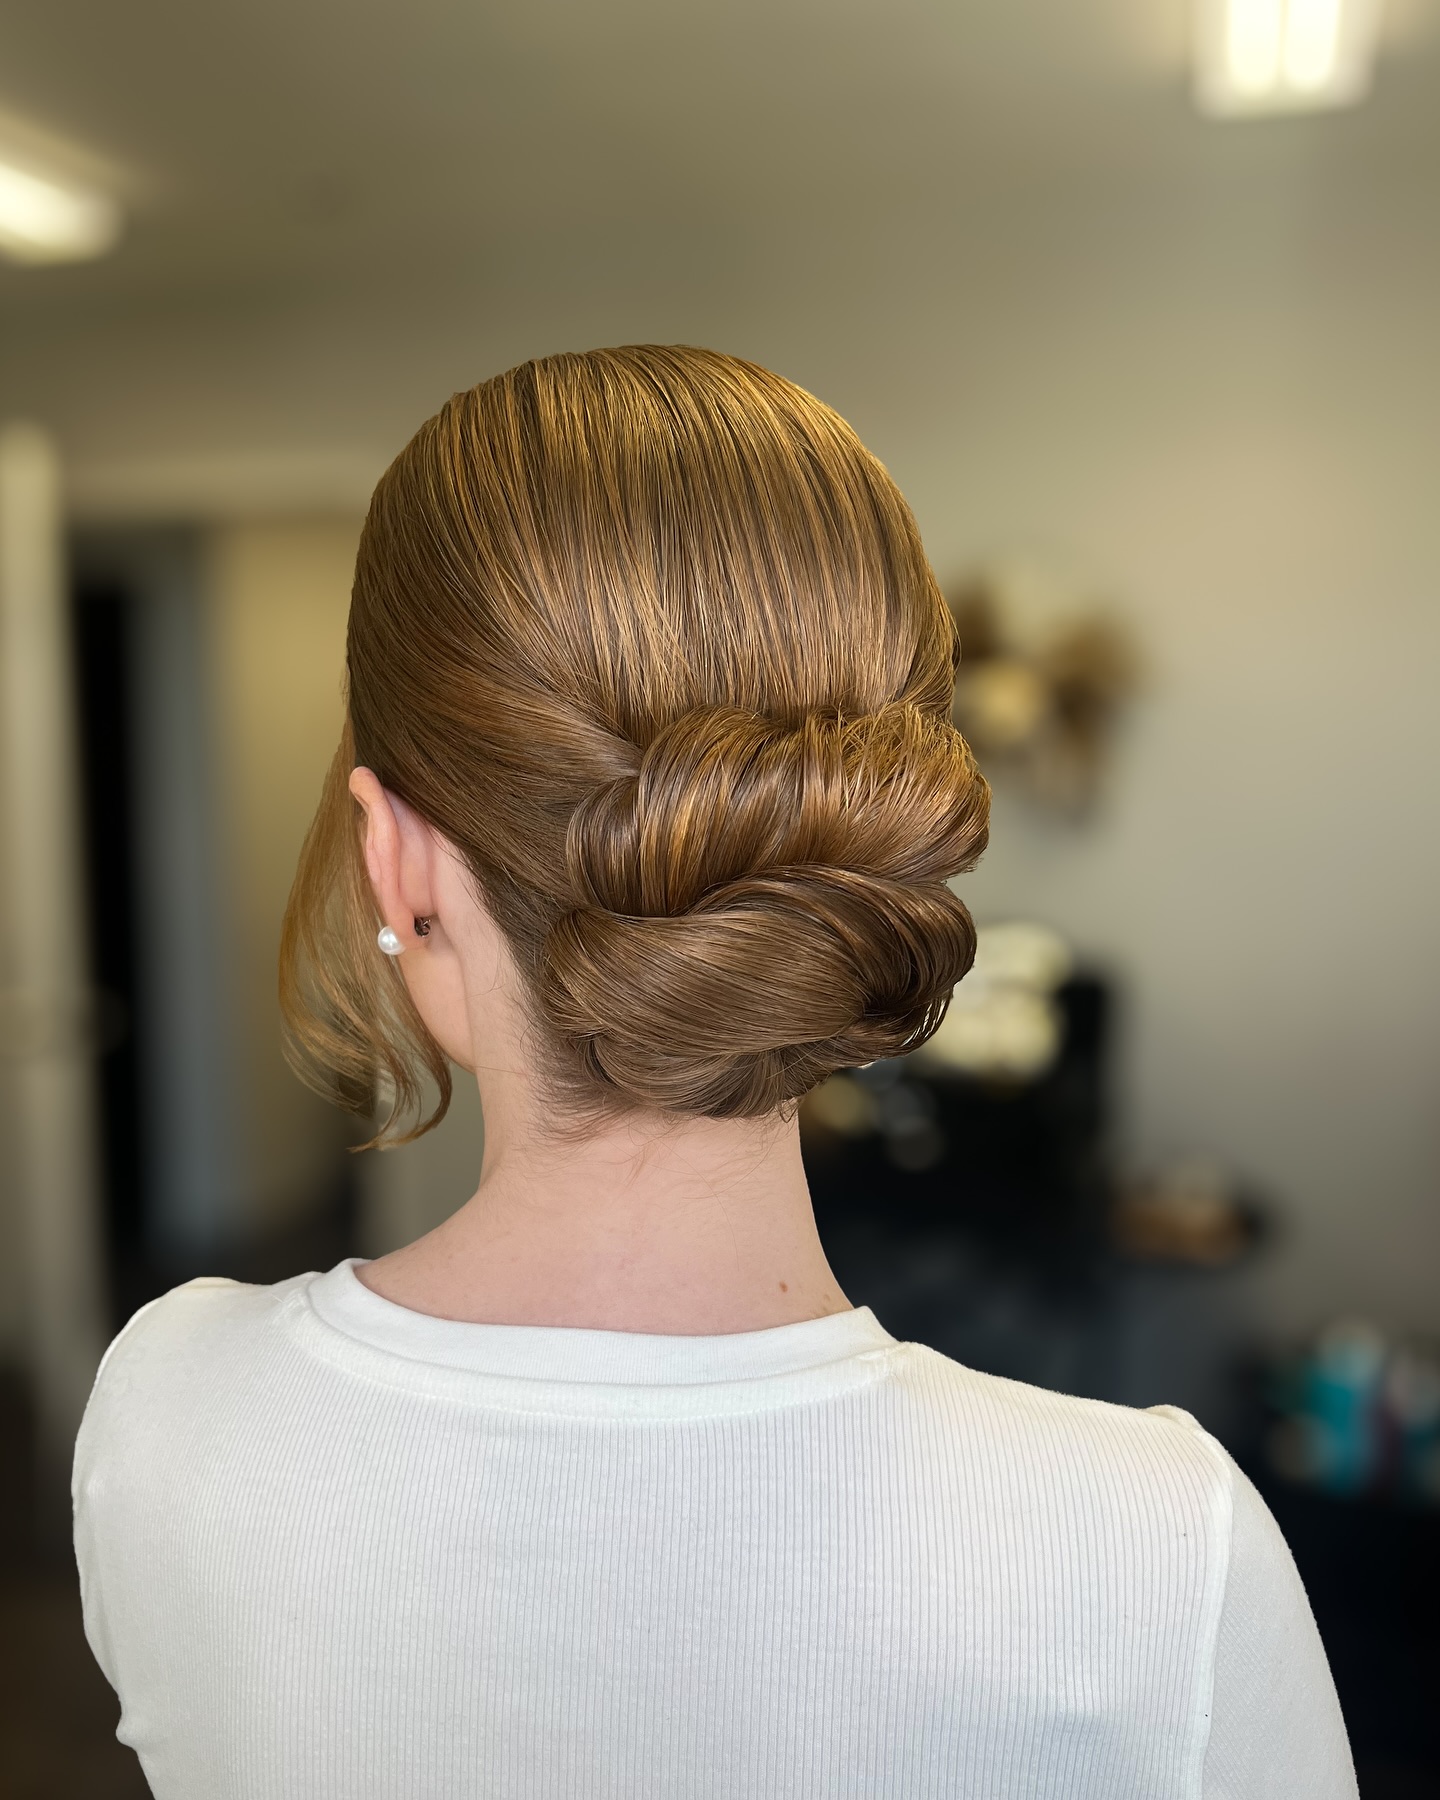
#6: The Rolled Low Chignon with One Perfect Tendril
Can we talk about how ONE single face-framing piece can completely change a look? Because this rolled low chignon would be beautiful on its own but that tendril makes it feel alive and soft instead of uptight. It’s basically a shell-shaped fold held with French grips and it reads so elegant for evening events on the ship. You’ll want to flat-iron first for that glossy finish and then set the whole thing with a firm setting spray because the internal tuck needs to STAY tucked. If your hair is on the thinner side, you might need a little padding inside the roll to get that full shape, and no-slip grips are non-negotiable here or the whole thing slowly slides down the back of your head during dinner. Which I have watched happen to someone in real time and she had no idea until her husband told her, so, learn from that.
#7: Micro-Bang and a Heart Headband Situation That I Am HERE For
OK this is one of those cuts where you either commit or you don’t, and I respect that energy. A blunt rounded micro-bang with long single-length hair and a wide heart-print headband is SO much personality and I am living for it on a cruise. The bangs frame your face immediately and the headband keeps everything in place for travel days. Here’s the thing though, micro-bangs are HIGH maintenance in terms of precision. Like, even a millimeter off and the whole shape changes, so get them cut right before your trip and get them cut DRY so your stylist can see exactly where they’ll sit. The copper-to-black color situation going on here is gorgeous but that shade fades fast in the sun, so pack a color depositing conditioner if you want to keep it vibrant. And if your hair is very fine and slippery, add a tiny bit of texturizing paste before clamping the headband or clip into place.
#8: Dutch Crown Braid into a Low Chignon, AKA the Cruise Formal Night MVP
This style is the one I recommend more than any other for formal nights on a cruise because it looks like you spent an hour in a salon but it actually holds up ALL night without falling apart. It’s an inside-out Dutch braid that follows the hairline and feeds down to the nape where it twists into a loose chignon with hidden pins. The braid hides darker regrowth too which is such a bonus when you’re mid-grow-out. You’ll want to mist everything with a texturizing mist before you start braiding so the sections grip each other, especially if your hair tends to be slippery. The main thing is you need at least shoulder-length hair with decent density to pull this off, otherwise the braid looks stringy and the chignon won’t have enough volume. Fine-haired friends, a small clip-in piece tucked into the bun can be your secret weapon here.
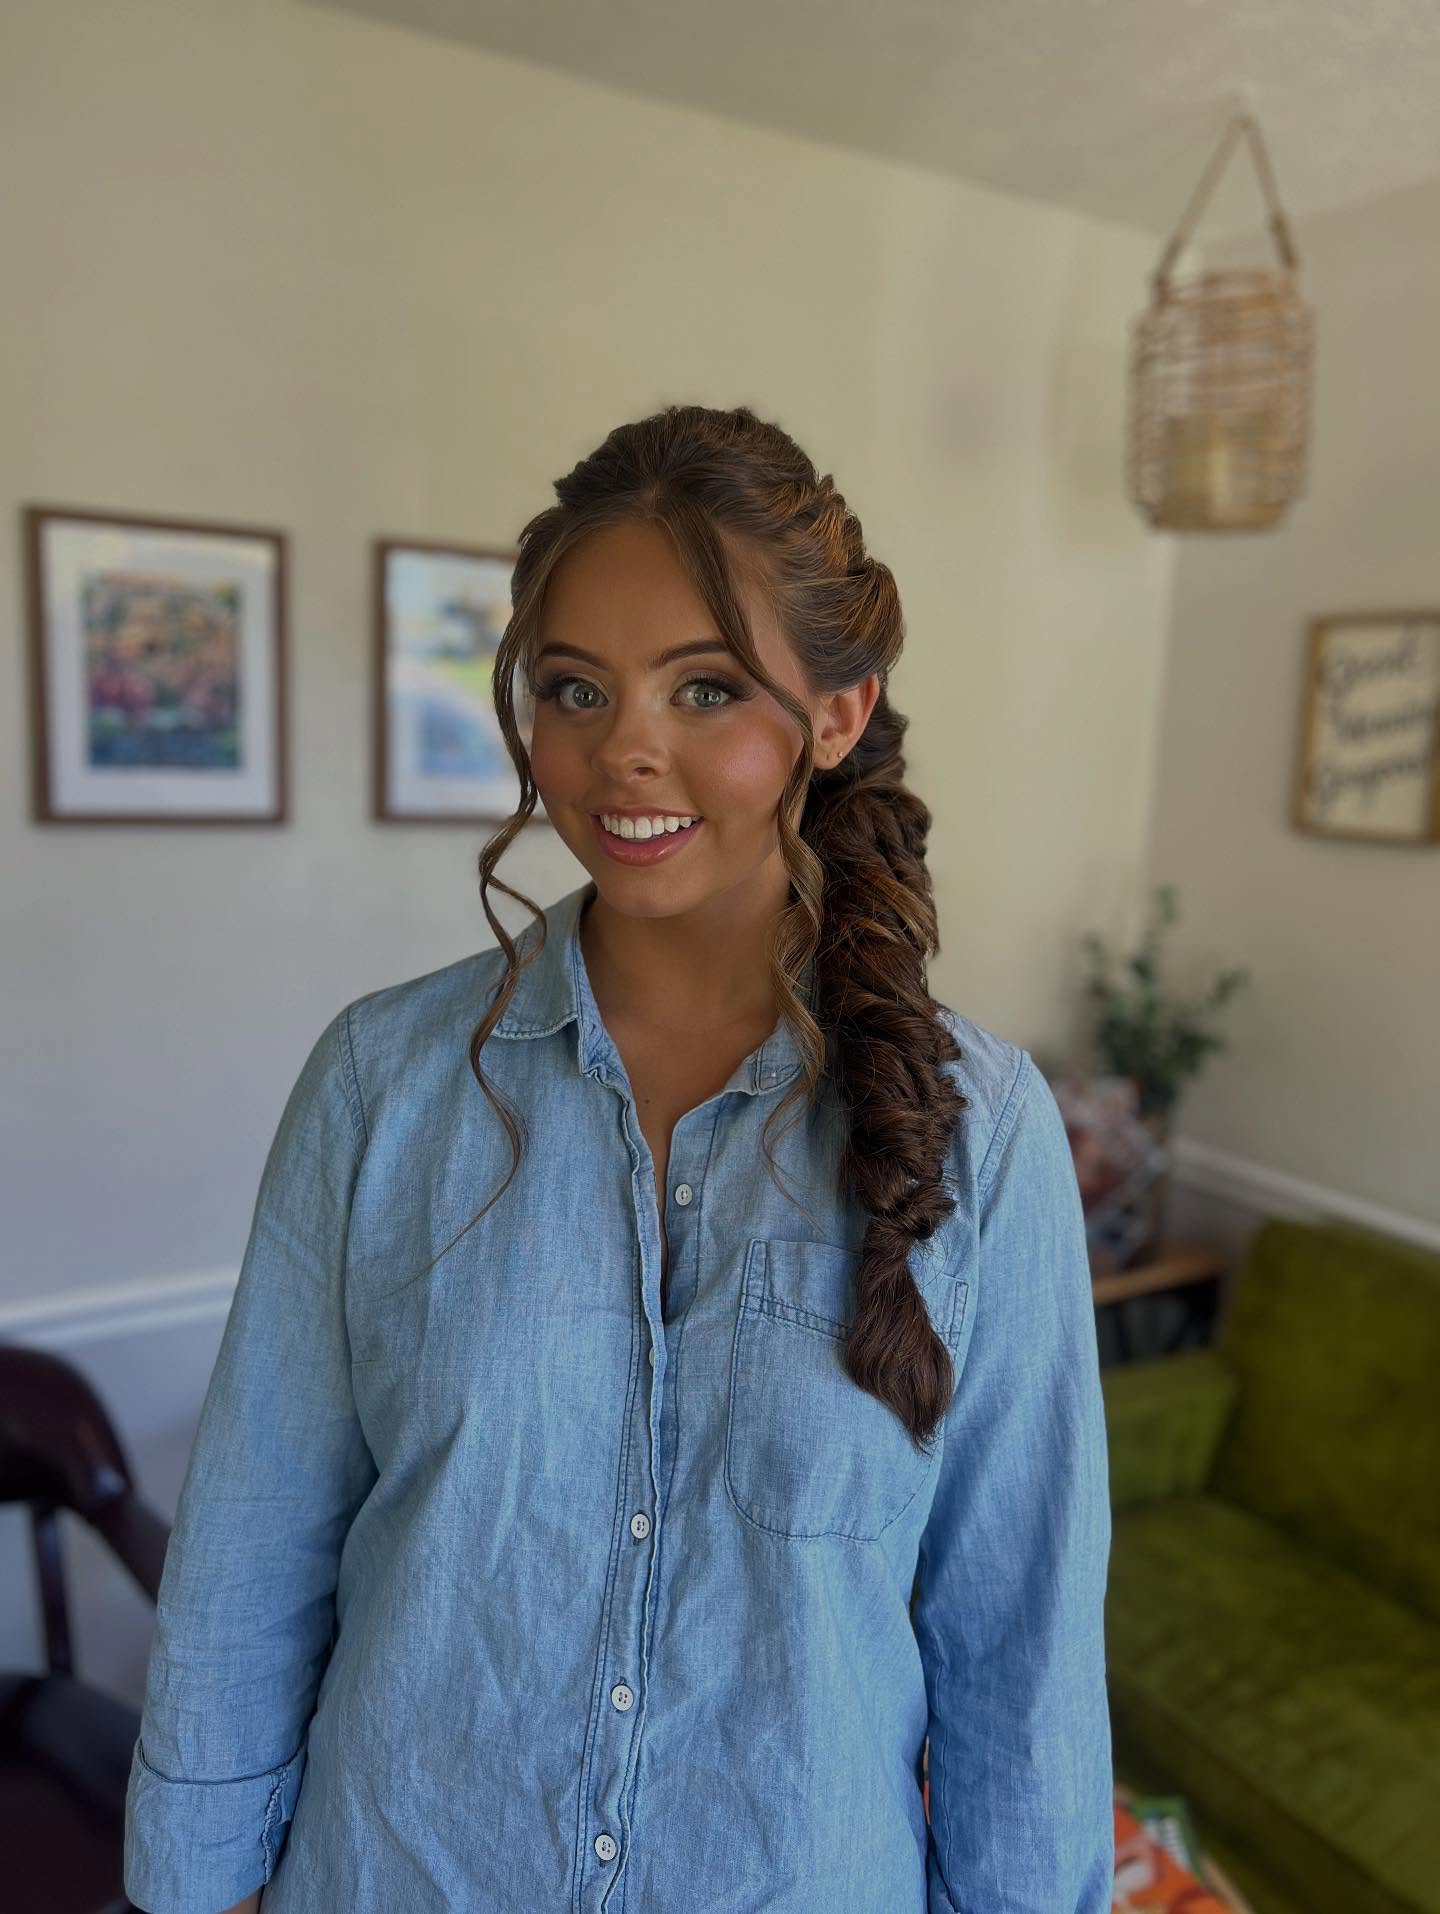
#9: Twisted Side Braid with That Gorgeous Blonde Balayage
I love how this braid is basically three techniques in one and yet it looks like you just casually tossed your hair to one side. There’s backcomb at the crown for lift, rope twists feeding into a loose three-strand braid, and the face-framing balayage pieces that brighten everything up. It’s travel-friendly because you don’t need heat to style it and it doesn’t really “expire” throughout the day the way a blowout does, it actually gets BETTER as it loosens up. The one thing, if your hair is very coarse or resistant you might need to smooth the surface a bit before braiding or it can look fuzzy instead of intentionally textured. And keep a purple gloss handy if you’re swimming a lot because that sun plus salt water combo will turn blonde balayage brassy faster than you’d think.
#10: Jaw-Length Wavy Bob for the “I’m Not Fussing with My Hair on This Trip” Energy
This bob is what I’d call the ultimate low-effort cruise cut because the texture does all the work for you. Jaw-length with a center part and soft internal layers that let the wave pattern do its thing naturally. You literally diffuse it on low heat with a light curl cream, scrunch, and go. The movement in this is so good. But I want to be honest, if you have natural frizz, you’re going to need to address that BEFORE the humidity hits or you’ll get uneven curl clumping where some pieces wave and some just poof. A tiny amount of smoothing serum at the roots helps, and I can see a slight front cowlick here that would need taming. The great thing is if you want to dress it up for dinner, this length goes into a little twist or clip-back in about thirty seconds.
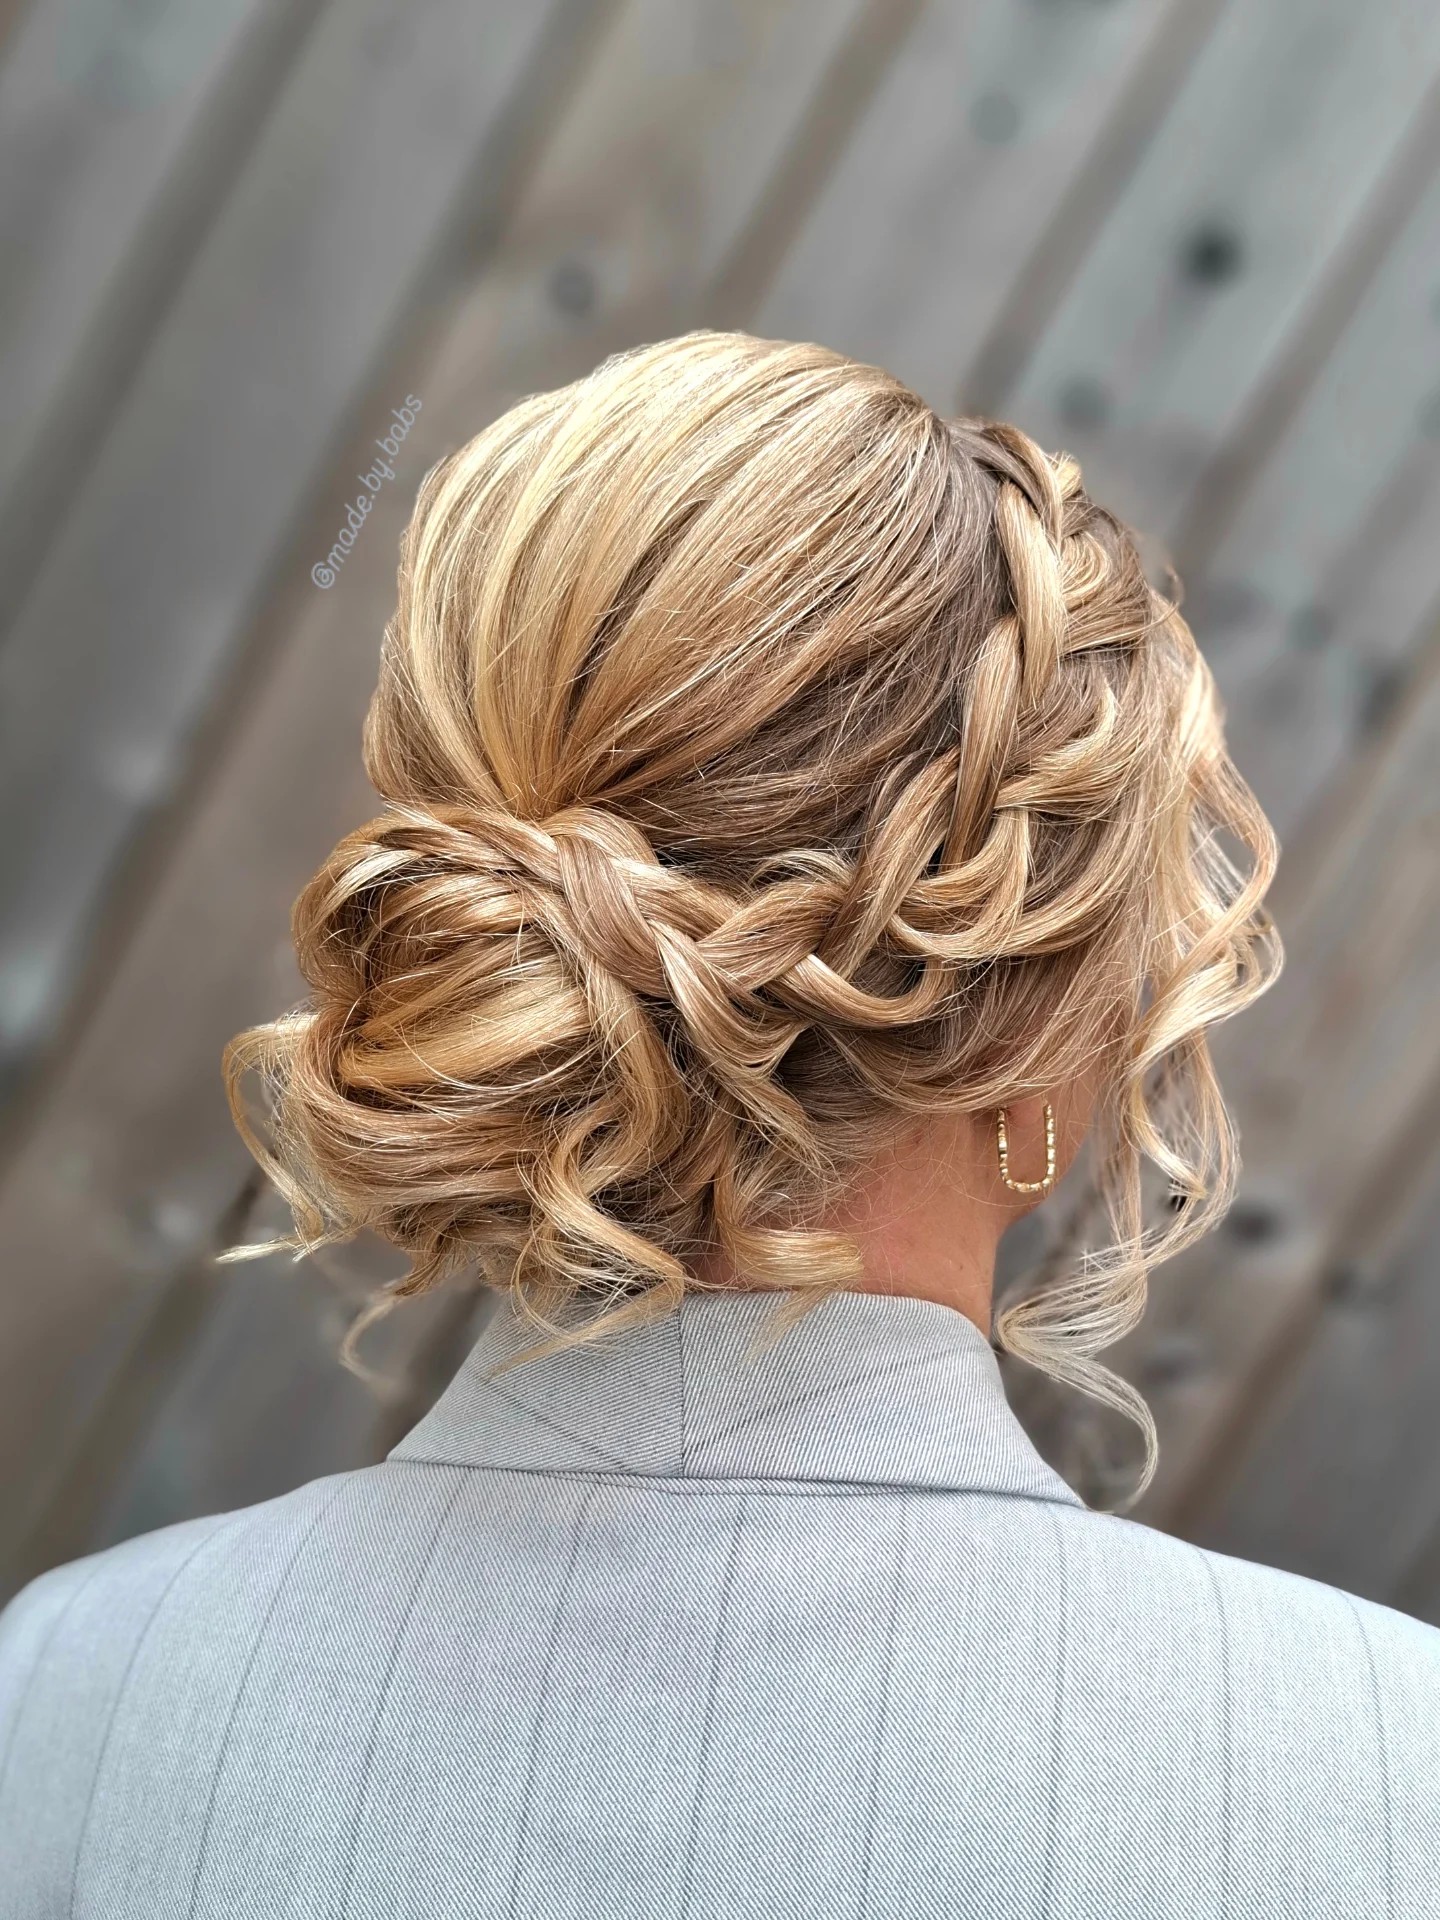
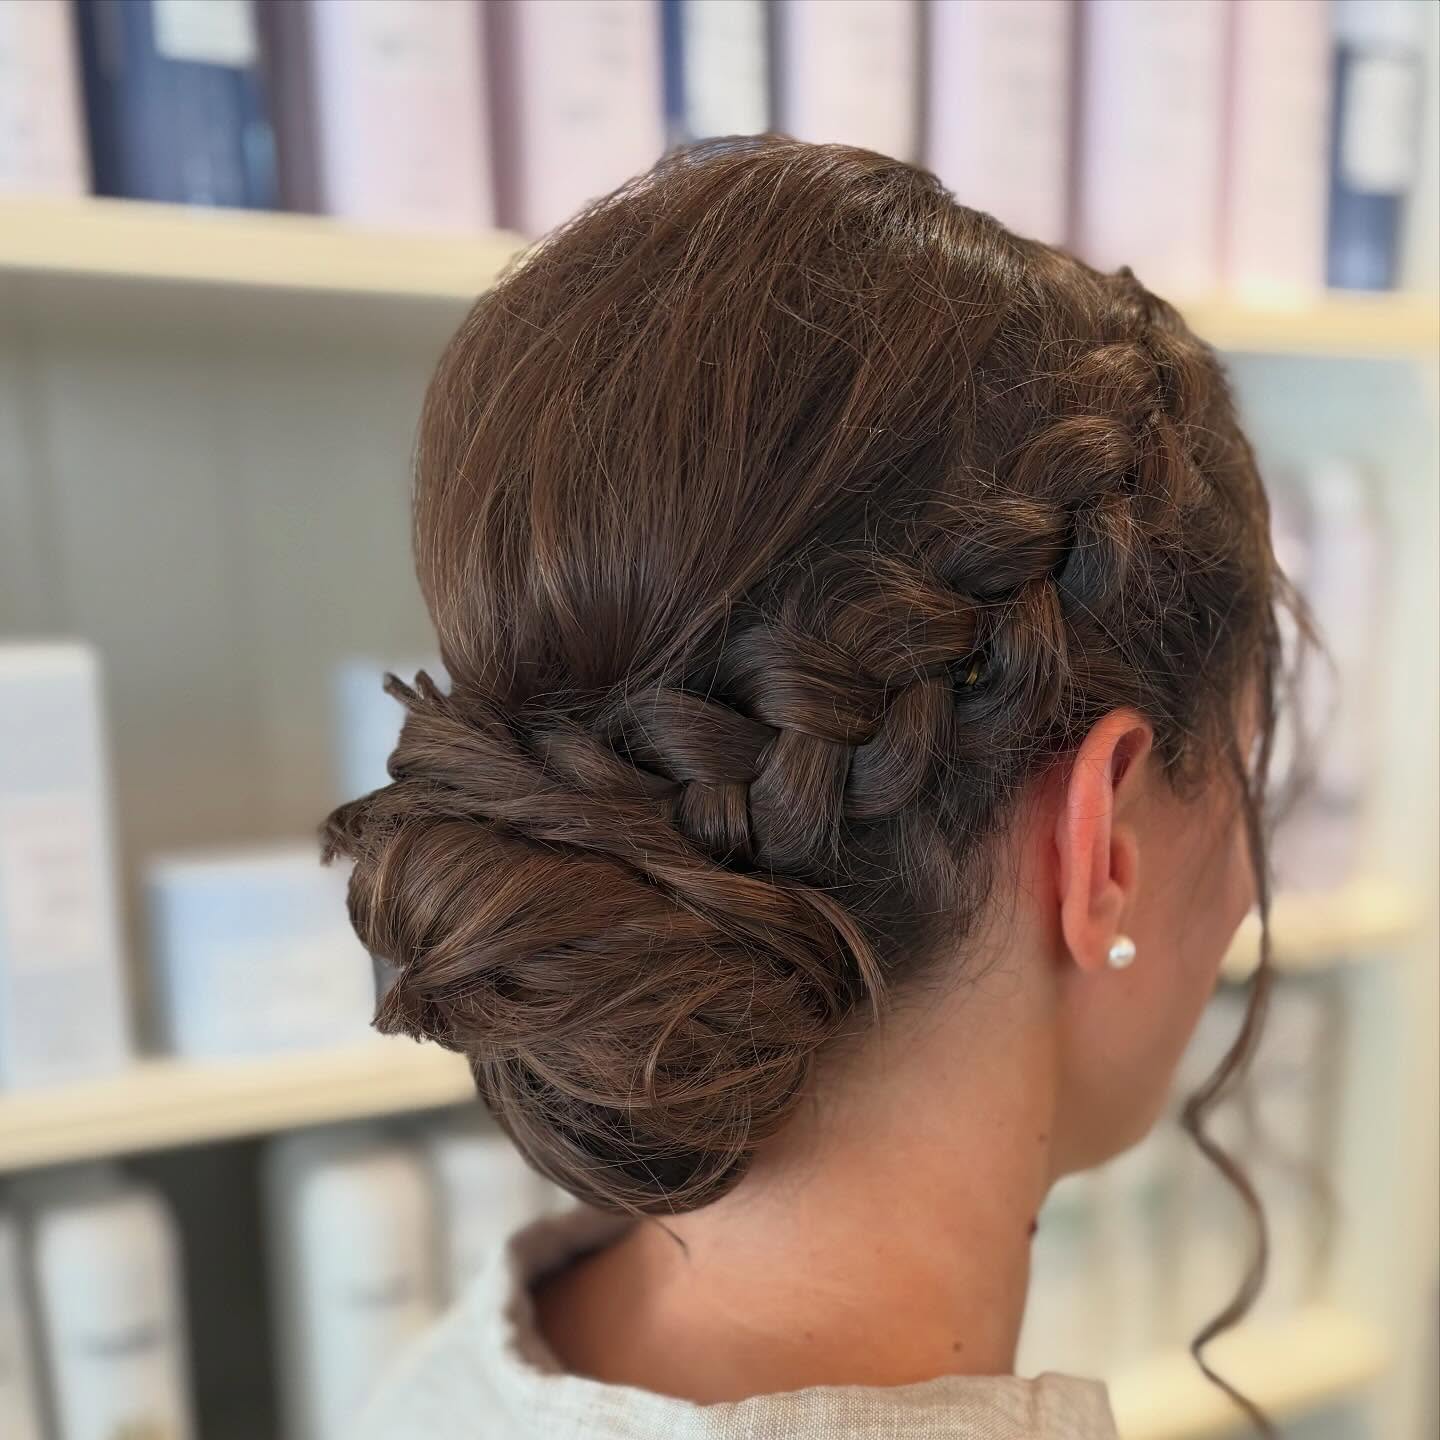
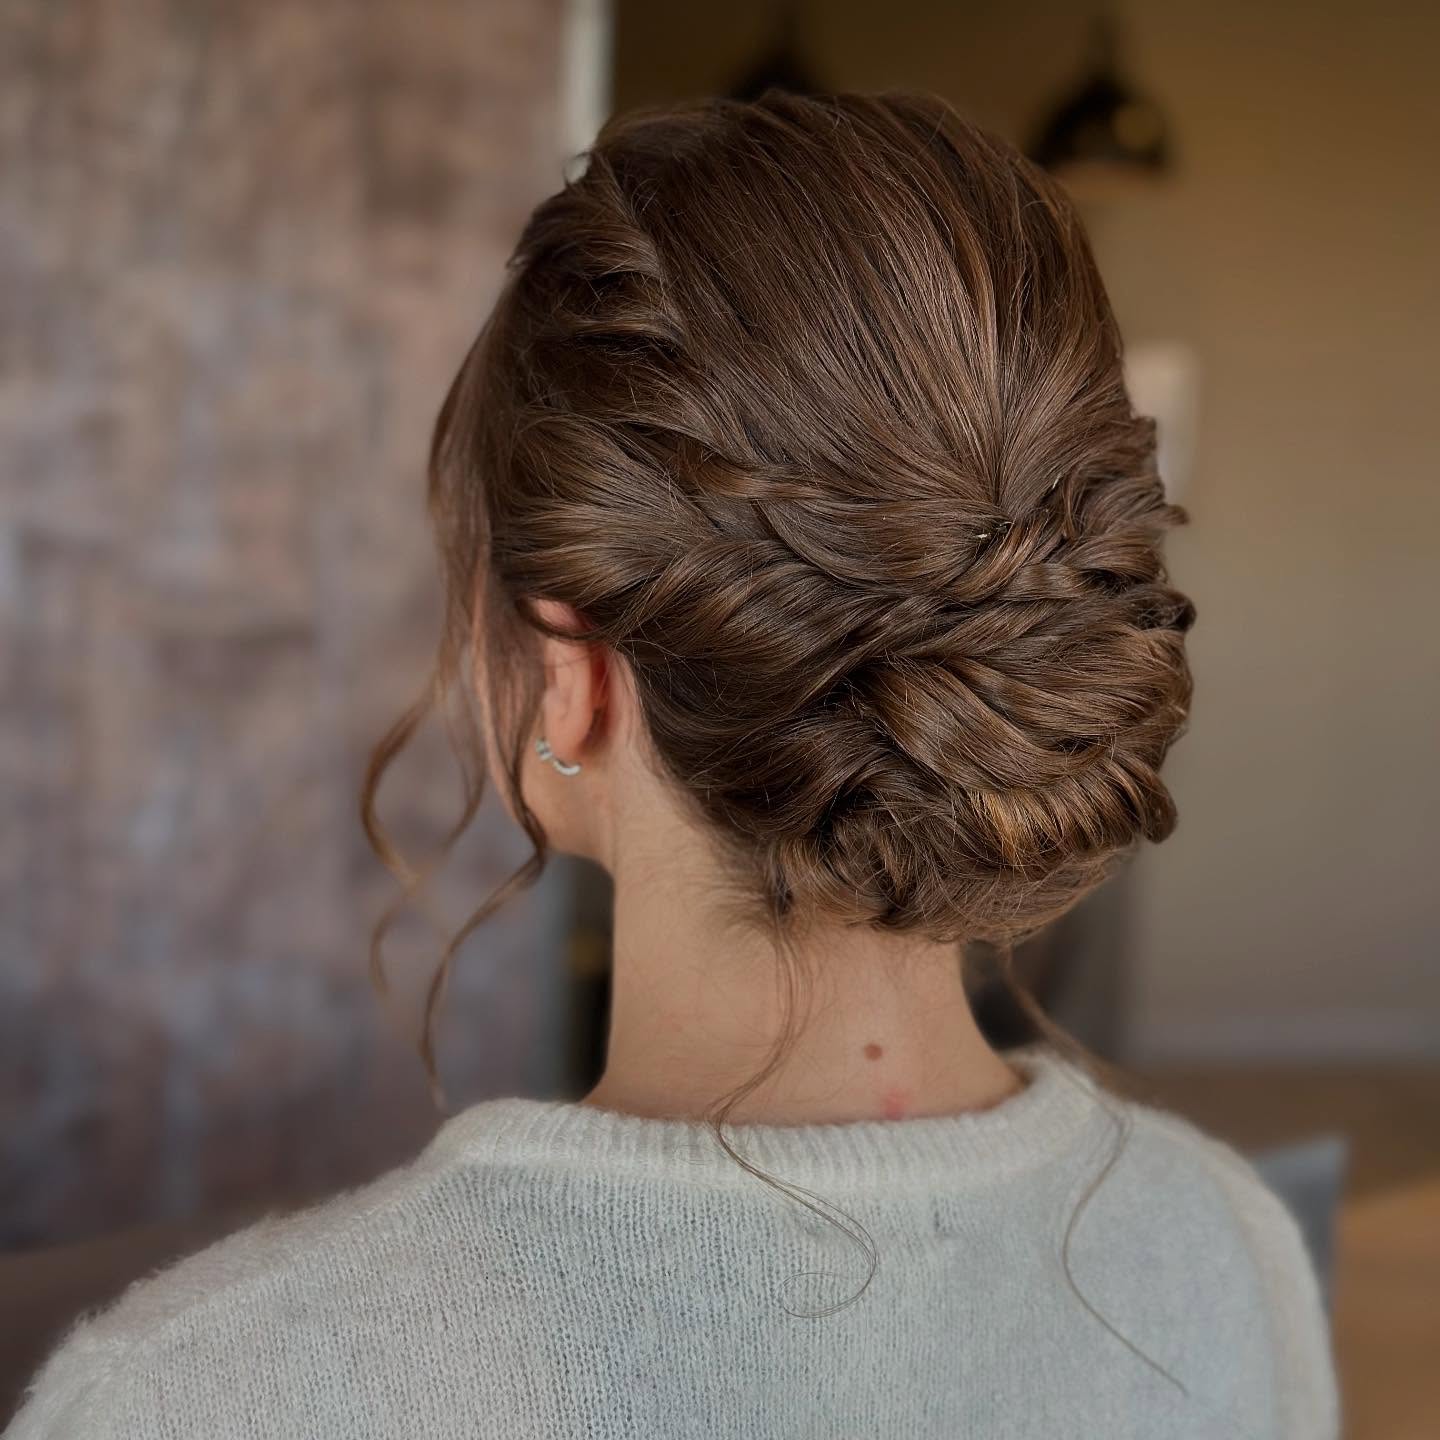
#11: Low Braided Chignon with the Prettiest Loose Tendrils
This is one of those updos that makes me go “YES, this is what I mean when I say effortlessly elegant” because the texture and the loose spiraling face-framing pieces keep it from looking stiff. It’s built from a side French braid that wraps into a textured bun, and if you look closely you can see the braid forms almost a figure-eight loop over the bun which is such a gorgeous detail. The balayage blend, like a warm blonde melt with cooler lowlights, gives the whole thing dimension so it doesn’t read flat from across the room. Now this one takes time, I’d say 25 to 40 minutes depending on your skill level, and you need U-pins not bobby pins because they hold the internal structure better. If your hair is fine, keep the products LIGHT because heavy creams will collapse all that beautiful lift you worked so hard to build.

#12: Platinum Loop Bun with Curtain Waves, Because Why Not
When I saw this I immediately thought “deck party hair” because it’s fun and airy and a little dramatic in the best way. It’s a high ponytail where you fold sections into petal-like loops and pin them into a flower shape at the crown, with curtain waves framing the face from a small-barrel iron. The root shadow against the platinum gives it depth so it doesn’t wash out in photos. You need LENGTH for this though, and medium density at minimum, because if your hair is too thick the loops won’t hold their shape and if it’s too short you just can’t get enough material to fold. Keep some pins in your bag for touch-ups because the wind will loosen things over the course of the evening, but honestly a slightly undone version of this is still gorgeous.
#13: Long Caramel Balayage with Those Dreamy S-Waves
THIS color. Can we just appreciate this color for a second? This caramel balayage with a soft root shadow is the kind of thing that looks incredible on a cruise because the sunlight catches those ribbon-like highlights and the whole thing just glows. The S-waves starting at mid-length are from a triple barrel waver and they hold really well in thick, dense hair like this. The root melt is doing double duty because it looks intentional AND hides regrowth so you don’t have to think about your color for weeks. My one warning is that long, heavy hair gets HOT on deck, like noticeably hot on your back and shoulders, so have an elastic ready to throw it up. And if you’re doing a lot of swimming, especially in chlorinated pools, those luminous ends will start to pull brassy. Pack a purple gloss for the shower and you’re golden. Well, caramel. You know what I mean.
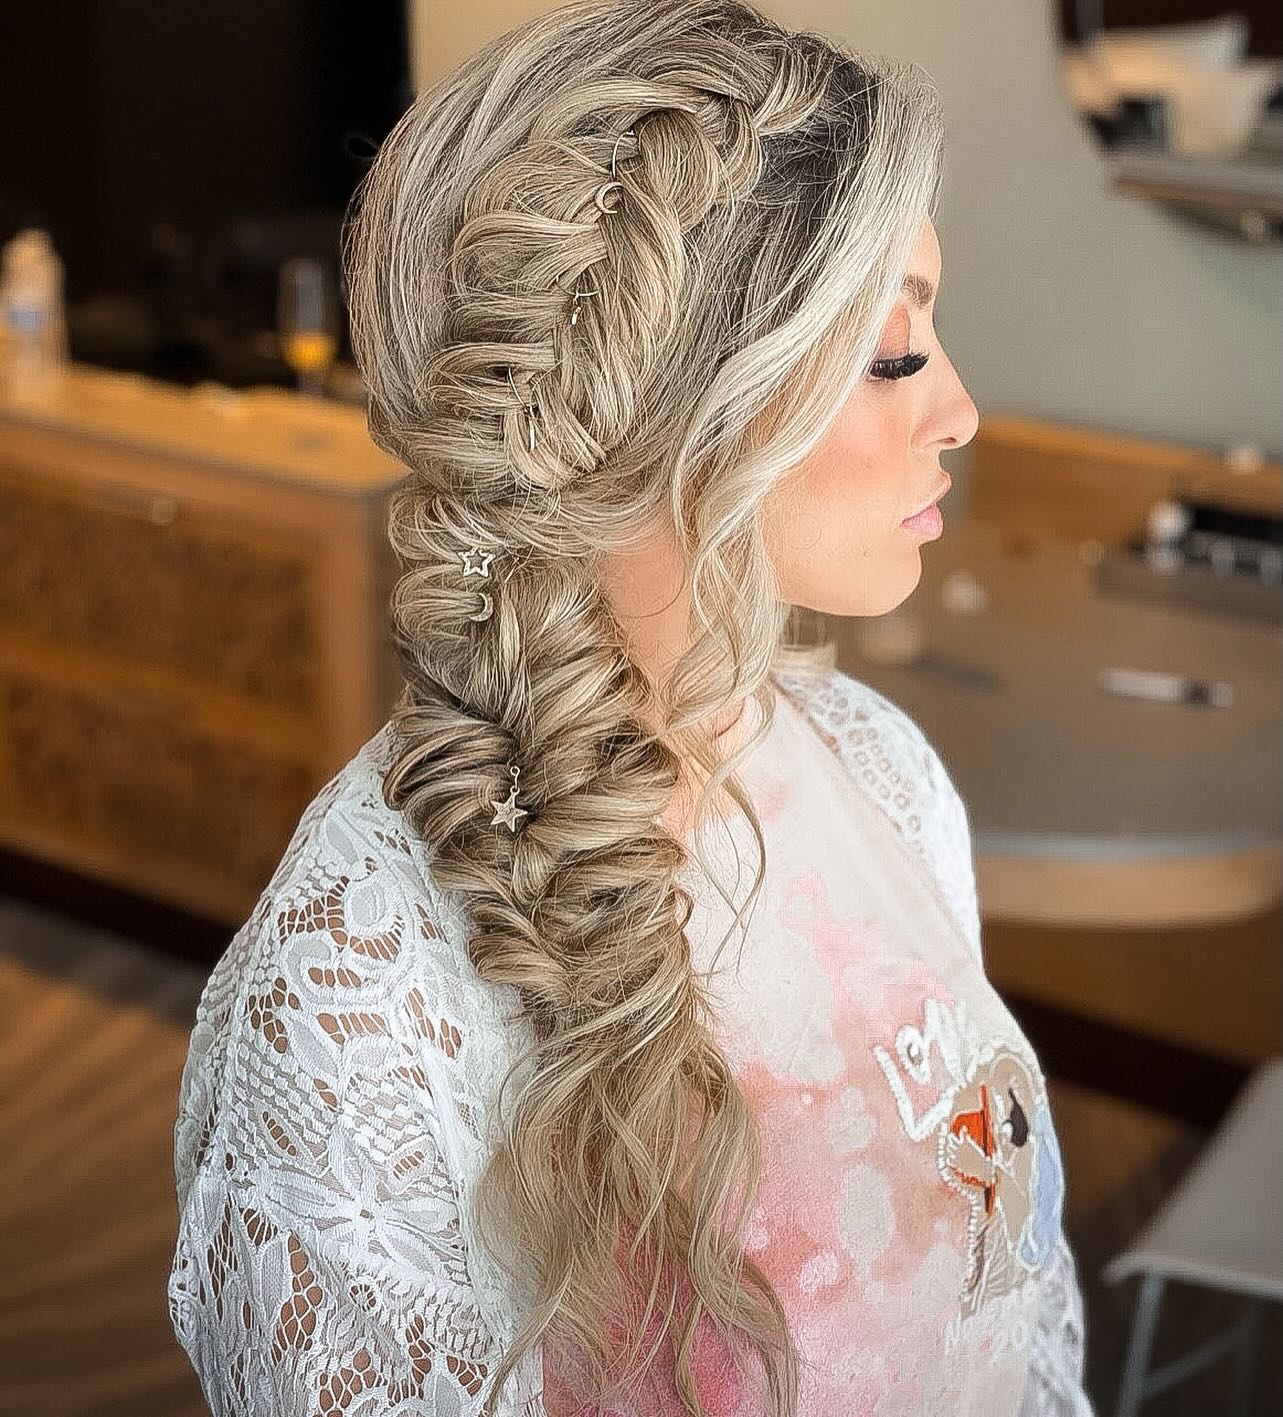
#14: Ash Blonde Pull-Through Side Braid with Little Star Charms
The star charms on this braid are the kind of detail that makes me unreasonably happy because it’s such a small thing but it takes the whole look from “nice braid” to “wait, I need a photo of that.” It’s an ash-blonde pull-through braid draped to one side with face-framing layers left loose, and the color is a root-smudge balayage with babylights that creates this really natural sun-bleached effect. Super photogenic and holds up well in wind which is the whole point for a cruise, right? The real talk is that pull-through braids take longer than they look, and if your hair is very silky the sections will want to slide out of the elastics unless you texturize first. Pancake each section as you go, don’t wait until the end, trust me on this because the volume distributes way more evenly that way.
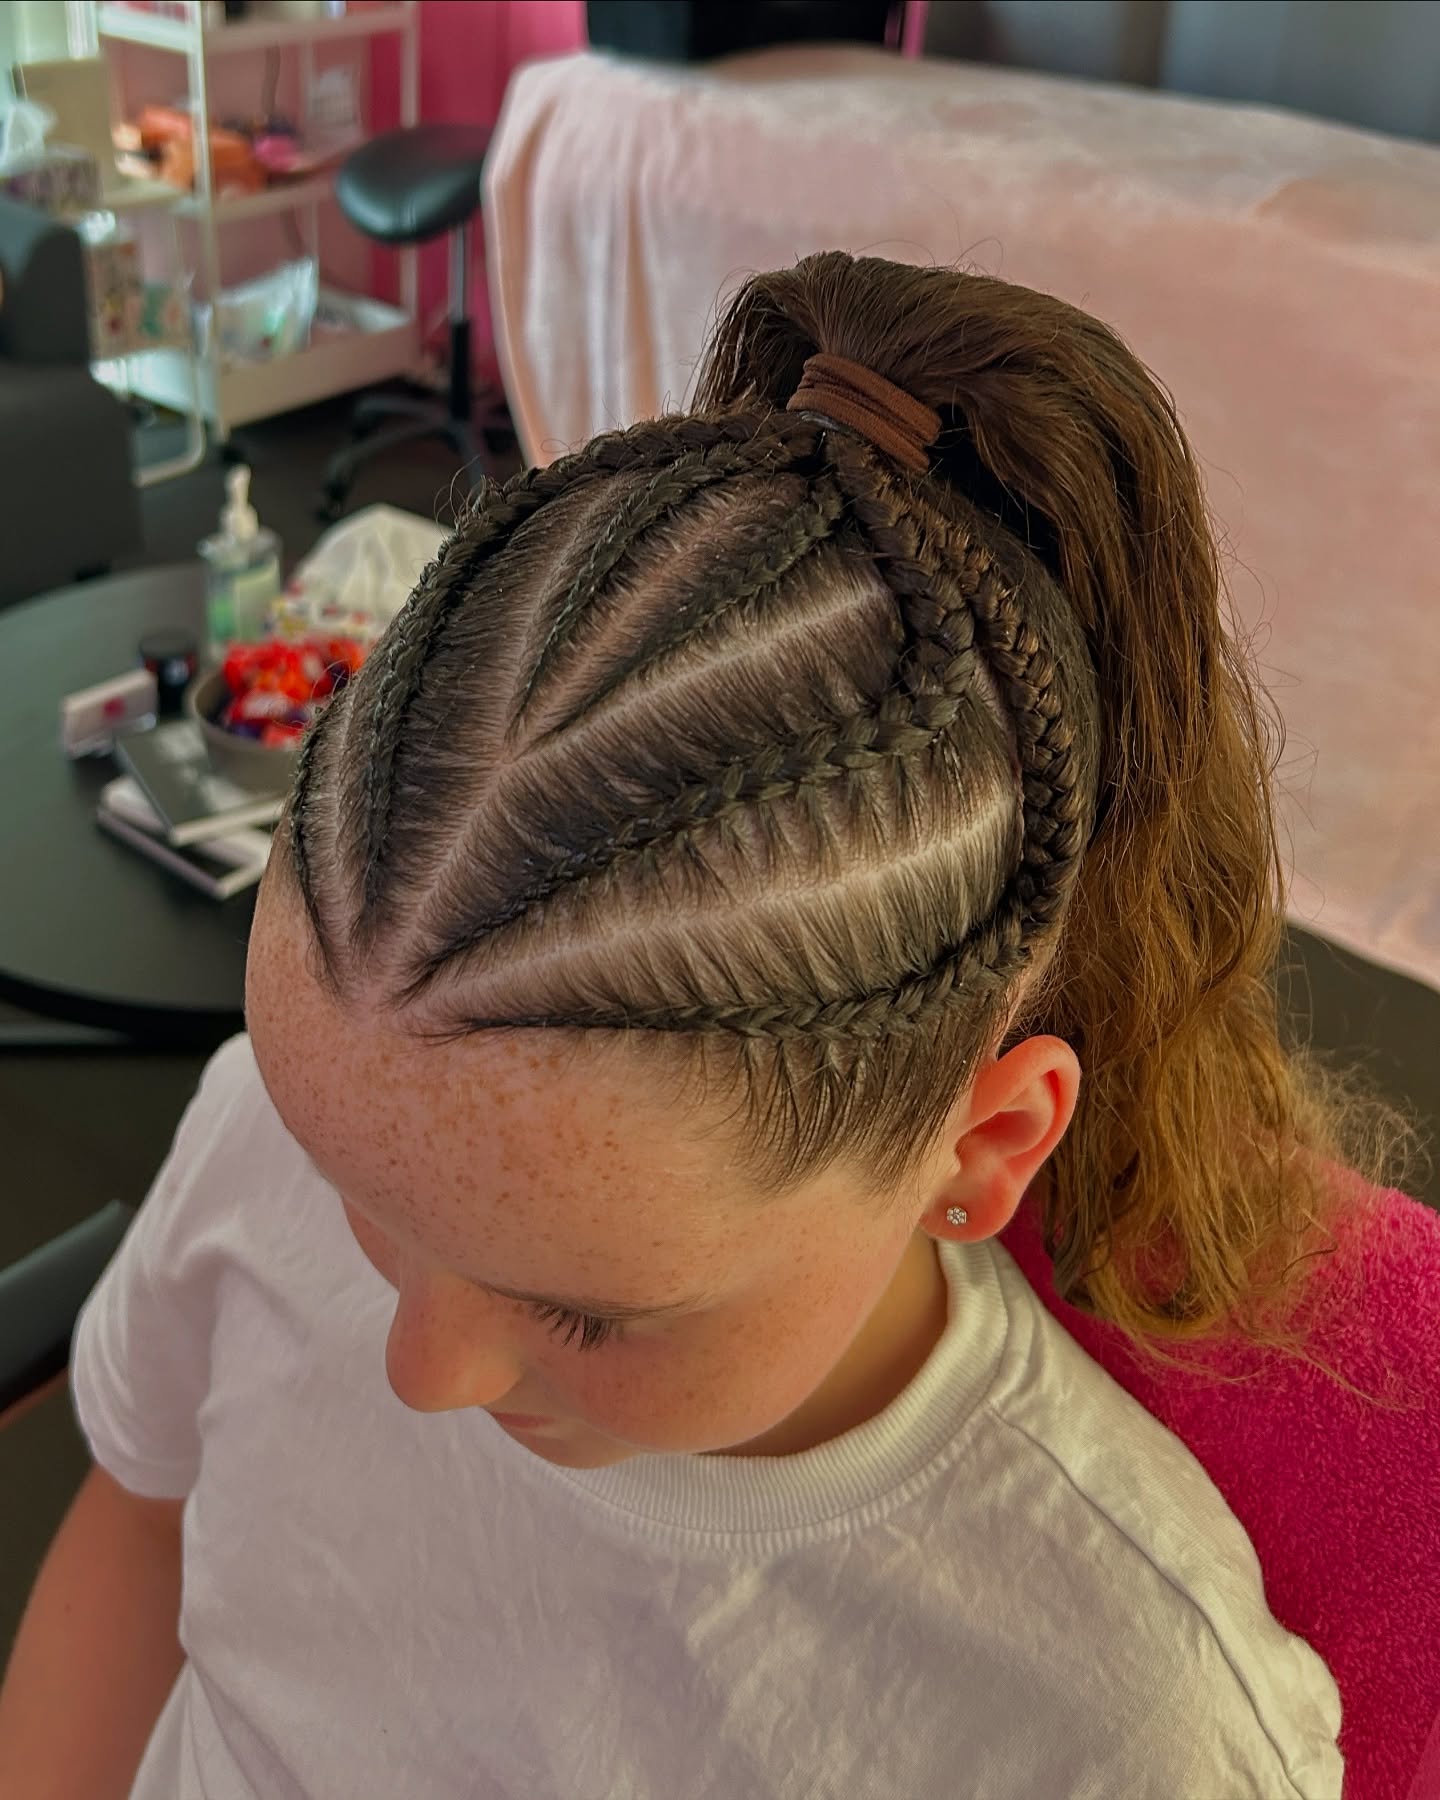
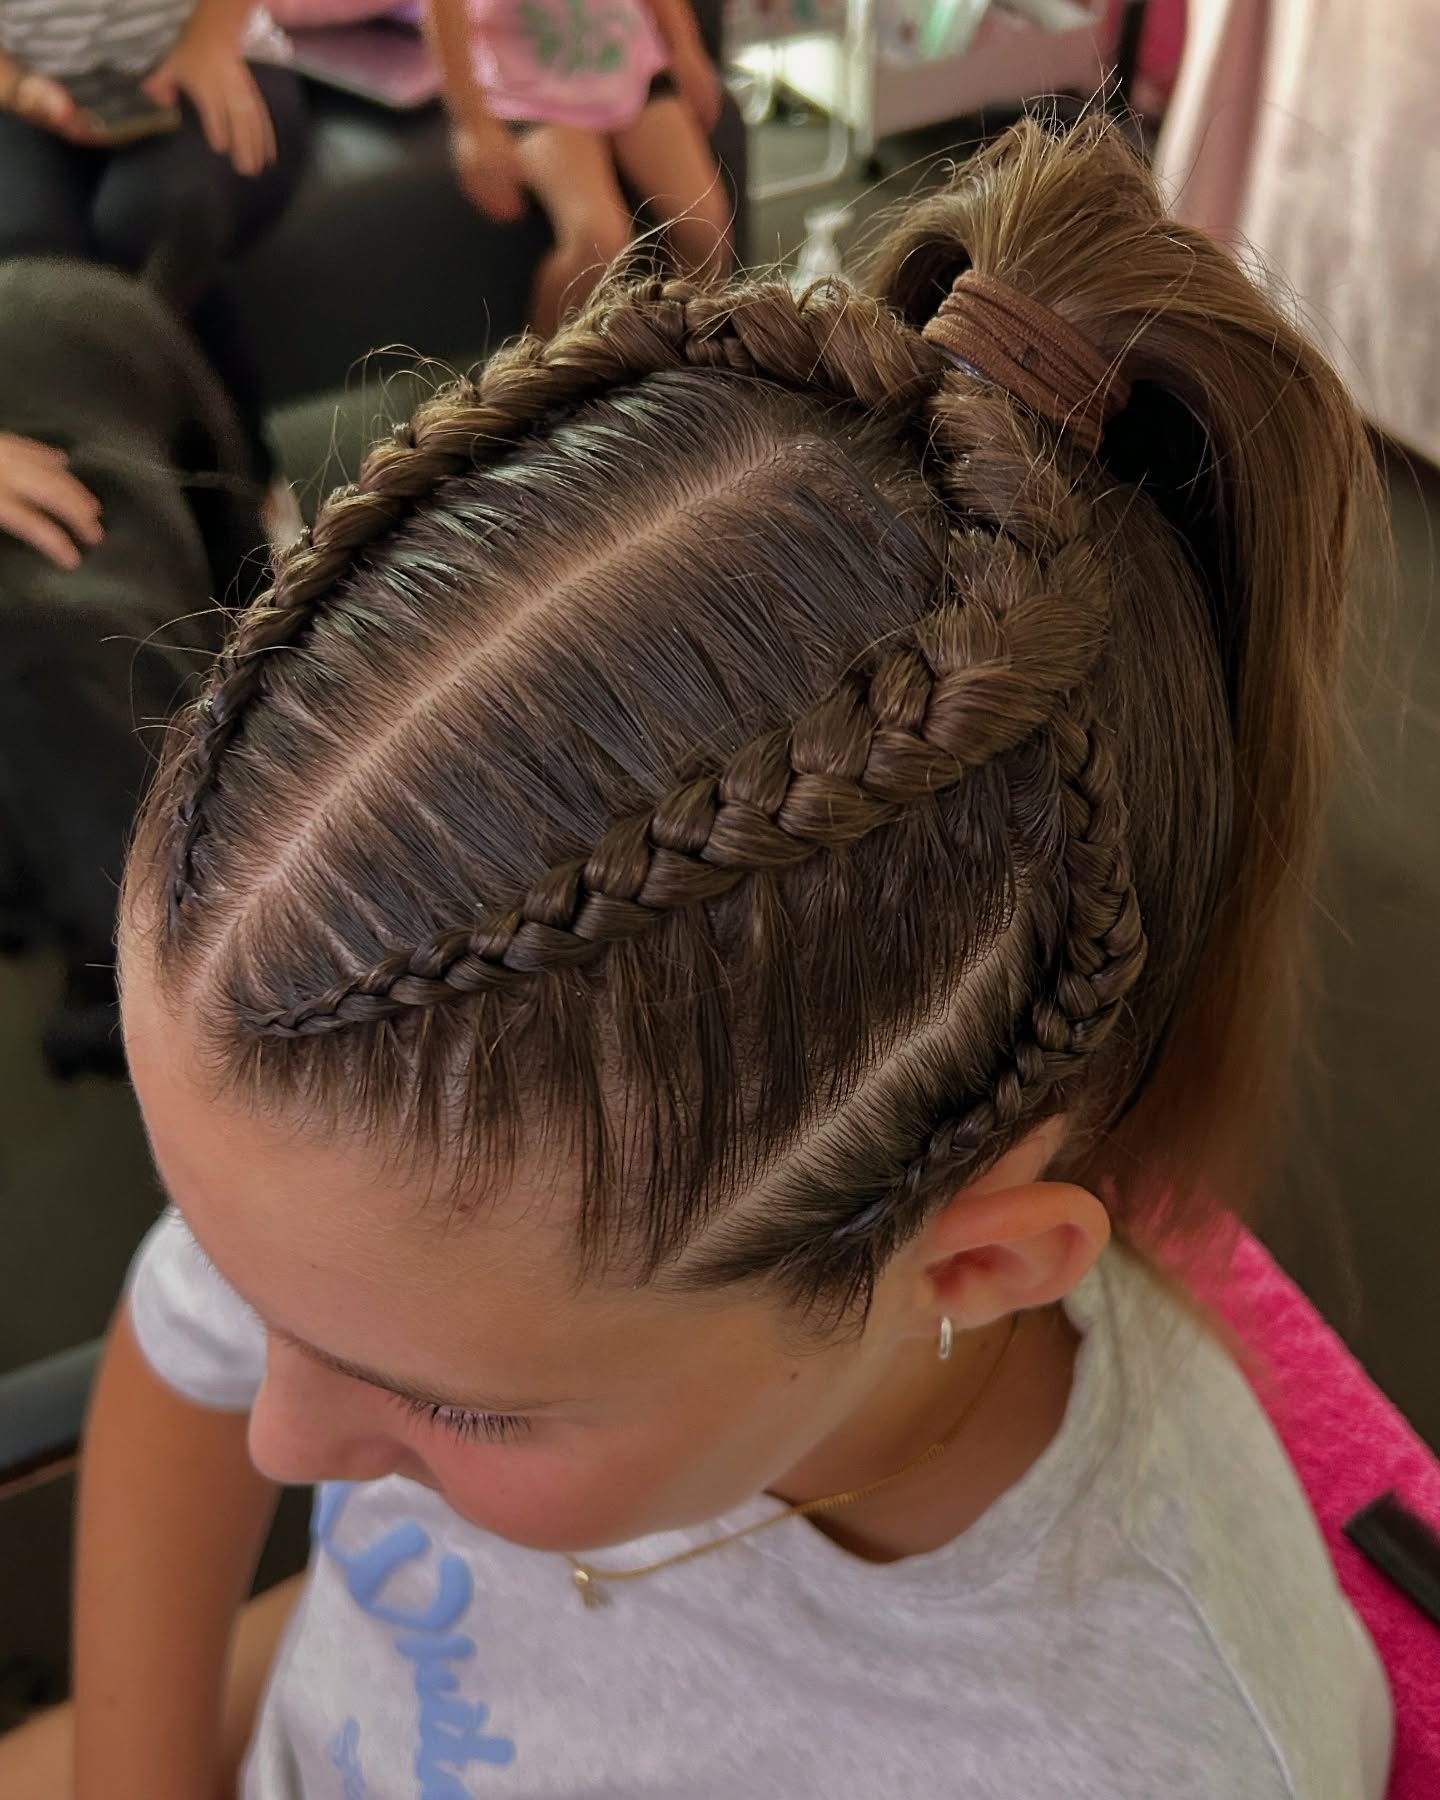
#15: Triangular Feed-In Cornrows into a High Pony
OK if you want a truly “set it and forget it” cruise style, cornrows are it and this triangular feed-in pattern is really beautiful. The diagonal panels channel up into a high ponytail and the whole thing stays put through swimming, excursions, windy deck days, all of it. This is the style where you can literally not think about your hair for your entire trip which is honestly the greatest luxury. I use 4 to 6 millimeter sections with a feed-in technique so the braid bases sit flat against the scalp instead of poking up. The thing I always tell clients is to talk to your braider about tension, especially around the hairline and edges, because if it’s too tight you risk breakage and traction damage. A lightweight edge control gel helps keep things smooth without pulling.
#16: Woven Low Twist Chignon That Looks Like Actual Art
Every time I see a woven chignon done well I get this little flutter of excitement because the construction of it is just so satisfying. This one is built from rope-twist panels with internal pin channels that create a laddered texture across the crown, and it’s the kind of style that makes people say “how did you DO that” when they see the back of your head. It’s secure, polished, totally keeps the weight off your neck for warm cruise days, and reads dressy enough for evening events without being “mother of the bride” territory. Budget about 20 to 30 minutes for this, and if your hair is finer you’ll want to work some texturizing spray through before you start twisting or the sections won’t hold their shape. Medium-to-thick, straight to soft-wavy hair is the sweet spot for this look.
#17: Copper Blunt Fringe with a Claw Clip and a Secret Nape Taper
I love a look with a hidden detail and this one has a subtle nape taper underneath that gold claw clip that you’d never know about unless someone told you, and now I’ve told you, and you’re welcome. The blunt copper fringe with disconnected side pieces is giving French girl on a yacht and I am NOT mad about it. The root shadow growing in actually works here, it adds depth and keeps the grow-out forgiving which is exactly what you want on a longer trip. The cons are real though, copper fades FAST in sun and salt air, and the bangs need to be cut with serious precision, like we’re talking every strand matters. If your hair is fine and tends to slip out of claw clips, use a texturizing paste at the twist before you clip and it’ll grip so much better.
#18: Side Braid with Sculpted Barrel Waves for Maximum Drama
If you want the braid that makes the whole restaurant look up when you walk in on formal night, this is the one. The volume on this is UNREAL, and it comes from a combination of large barrel-wave loops from a 1-inch iron, light teasing at the crown, and then pancaking the fishtail out to its maximum width. The ash-blonde root shadow with babylight dimension keeps it from looking like a costume piece because the color is grounded and natural even though the style is big and bold. You do need medium-to-thick hair for this to work without extensions, and it’s definitely not a five-minute situation, but sealed with a flexible-hold spray it will last through dinner, dancing, and the late-night deck walk back to your cabin.
#19: Pulled-Through Fishtail That Looks Effortless But Is Actually Engineering
This braid has that perfect “undone-elegant” thing happening where it looks like you maybe woke up this way but really there’s a whole system of crown twists hiding an anchor elastic and carefully placed texture. The pulled-through fishtail gives you SO much volume and movement, and the soft root-smudge balayage means the color has depth without harsh lines. It’s great for cruises because it genuinely holds in the wind and looks beautiful at every stage of coming undone. The honest truth is you need length and density for this to look as full as it does here, if your hair is thinner it’ll read more like a skinny twist than a lush braid. Use light texturizer and small clear elastics, and don’t overthink it because the beauty is in the imperfection.
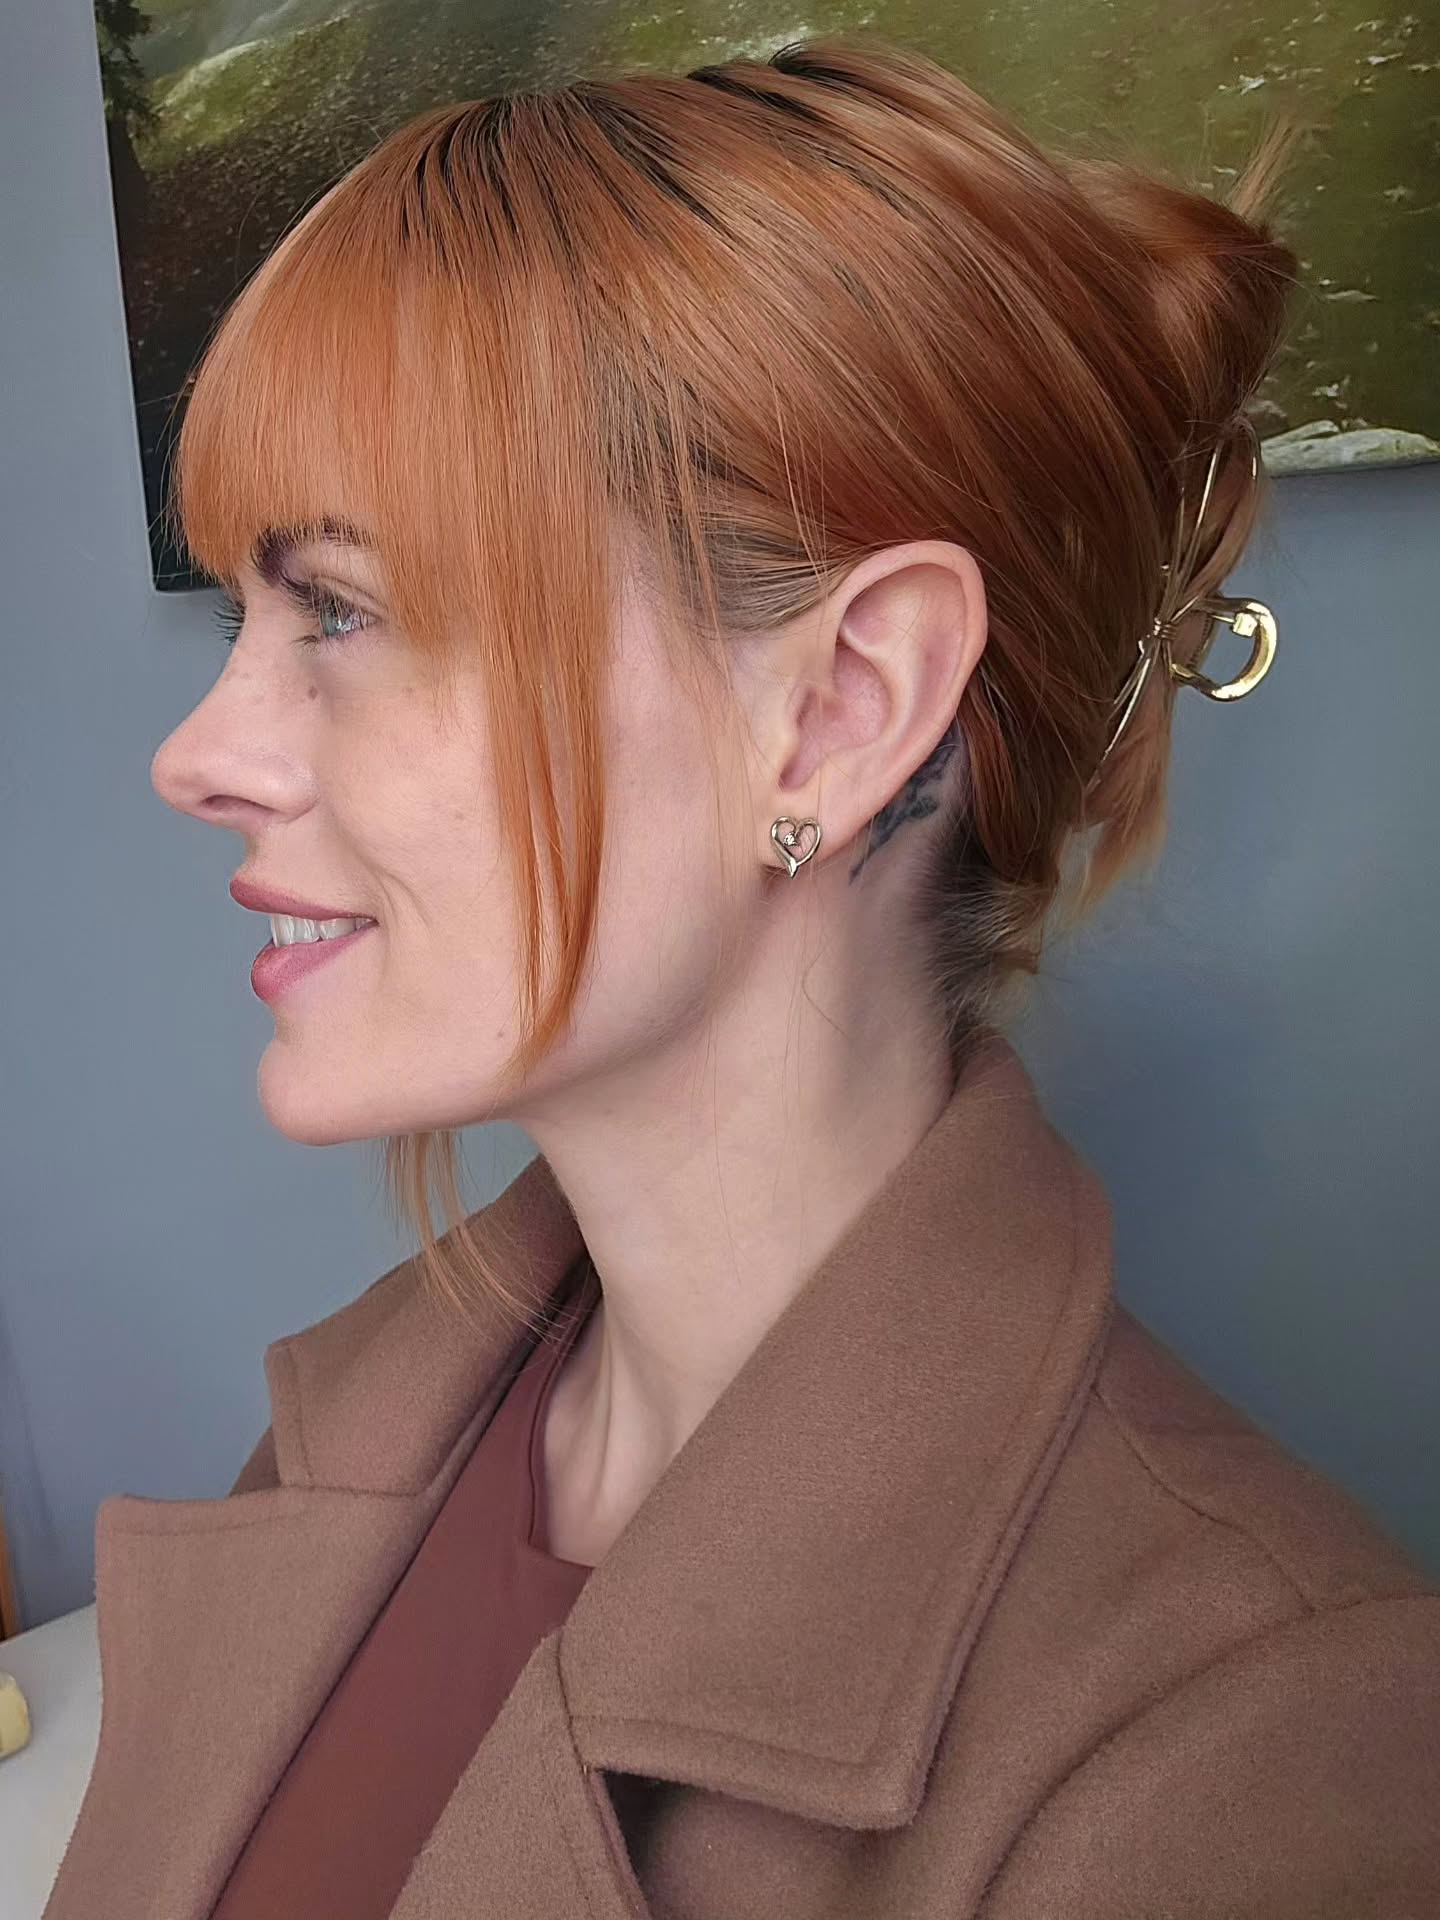
#20: French Twist with a Gold Claw Clip, Classic For a Reason
French twists are one of those styles I feel like people forget about and then when they see one done well they’re like “oh RIGHT, that’s gorgeous.” This one uses a sculptural linked S-shaped gold claw clip instead of traditional pins, and what’s clever about it is the clip creates a vertical tension grid that actually holds finer hair better than backcombing would. You get this clean, lifted silhouette with soft tendrils at the jaw that keep it from looking severe. The chestnut color with a natural root melt is SO pretty in warm light. If your hair is very thick or freshly washed and slippery, the clip might not grip well enough, so a light texturizing powder at the base and maybe one invisible pin as insurance will keep everything secure even on a windy evening.
#21: Shoulder-Length Lob That Basically Styles Itself on a Cruise
This is the cut I recommend to clients who tell me they want to look cute on their cruise but they do NOT want to spend time on their hair, because this lob literally gets better with salt air and humidity. The root melt into vertical babylights gives you that sun-kissed blonde that grows out beautifully, so you’re not stressing about your roots for weeks. I cut long face-framing layers and used point-cutting with texturizing shears to build in movement that happens naturally. Tousle it, leave it, you’re done. The one thing to watch for is the ends, they’ll need toner when you get back if you’ve been swimming a lot because blonde plus sun plus chlorine equals brass. And don’t let anyone over-thin the ends because on finer hair that goes from “textured” to “stringy” really fast.
#22: High Knotted Updo with Face-Framing Tendrils for Night Two Through Seven
I call this a “night two through seven” style because once you figure out how to do it, you’ll want to wear it every single evening of your cruise and honestly why wouldn’t you. It’s a textured high knotted updo with tendrils pulled out around the face, built with a hidden folded roll at the nape and light backcombing for lift. It’s elegant without being fussy and it softens the face beautifully, especially with those loose pieces catching the light at dinner. Naturally wavy, medium-to-thick hair is ideal here because it grips itself during the construction. If your hair is fine or limp, you’ll need more backcombing and some serious texturizing spray to get the structure to hold, and use long pins instead of bobby pins because they anchor into the roll better.
#23: Warm Brown Top Knot for Literally Every Daytime Activity
This tension-free top knot is the hairstyle equivalent of your favorite oversized T-shirt, it’s comfortable, it looks good on everyone, and you can throw it on in under a minute. The warm light brown with that root shadow is really flattering and the fact that the shadow disguises regrowth means you don’t even have to think about your color. Long internal layers give the pieces that hang down some movement instead of just looking limp. I do want to say that if your ends are thin or sun-bleached and brassy, the top knot can kind of emphasize that because the wispy bits are right there in the spotlight. A gloss treatment before your trip and some soft layering to remove weight from the bottom will make this look about ten times better.
#24: Low Braided Tucked Chignon That Works Under a Sun Hat
Here’s something I don’t think people consider enough when planning cruise hair: will it fit under a hat? Because this low braided tucked chignon sits so flat and compact that you can throw a sun visor or wide-brim hat right over it and nothing gets crushed or weird-looking when you take the hat off. It’s a loose French braid that feeds into a low tuck with a small center knot anchor, and it’s genuinely secure for excursion days where you’re walking around, getting on and off boats, doing all the things. If your hair is fine, you’ll probably need to backcomb the braid sections before you start or the chignon won’t have enough body. And use a strong but flexible spray to lock it because humidity will try its absolute best to loosen everything up and you want to be exploring, not fixing your hair in a bathroom mirror somewhere.
#25: Feed-In Cornrow Halo with a High Pony, the Ultimate Active Cruise Style
This horseshoe halo cornrow pattern is genuinely one of the most FUNCTIONAL styles you can wear on a cruise, and it also happens to look incredible. The arched partitioning feeds into a high ponytail and the whole thing is basically wind-proof and water-resistant, which means you can snorkel, kayak, dance at the pool party, and still look put together at dinner without touching your hair. A micro-braid anchor at the base keeps everything secure. The most important thing, and I will say this every single time cornrows come up, is TENSION. Talk to your braider about keeping it comfortable, especially at the hairline and edges, because too tight means breakage and traction issues that you’ll be dealing with long after the cruise is over. The style should feel snug but never painful.
Enter your email and get this picture and description straight to your inbox, and you'll also get new hair ideas ❤️
🔒 We don't spam or sell emails. See our Privacy Policy.