

When your teen wants a cute braided style that holds up through school, sports, and selfies—you need options that are equal parts stylish and practical. But here’s the thing: if the foundation isn’t solid (like using a firm-grip leave-in and parting clean with edge control), that style won’t last past lunch. Whether your baby’s rocking 4C coils or looser curls, the right prep makes all the difference. I always say: feed-in braids with minimal tension and a touch of shine foam will save you from the mid-week redo.
Looking for inspo that actually works for real life and real textures? Scroll on through and screenshot your faves before that next wash day.
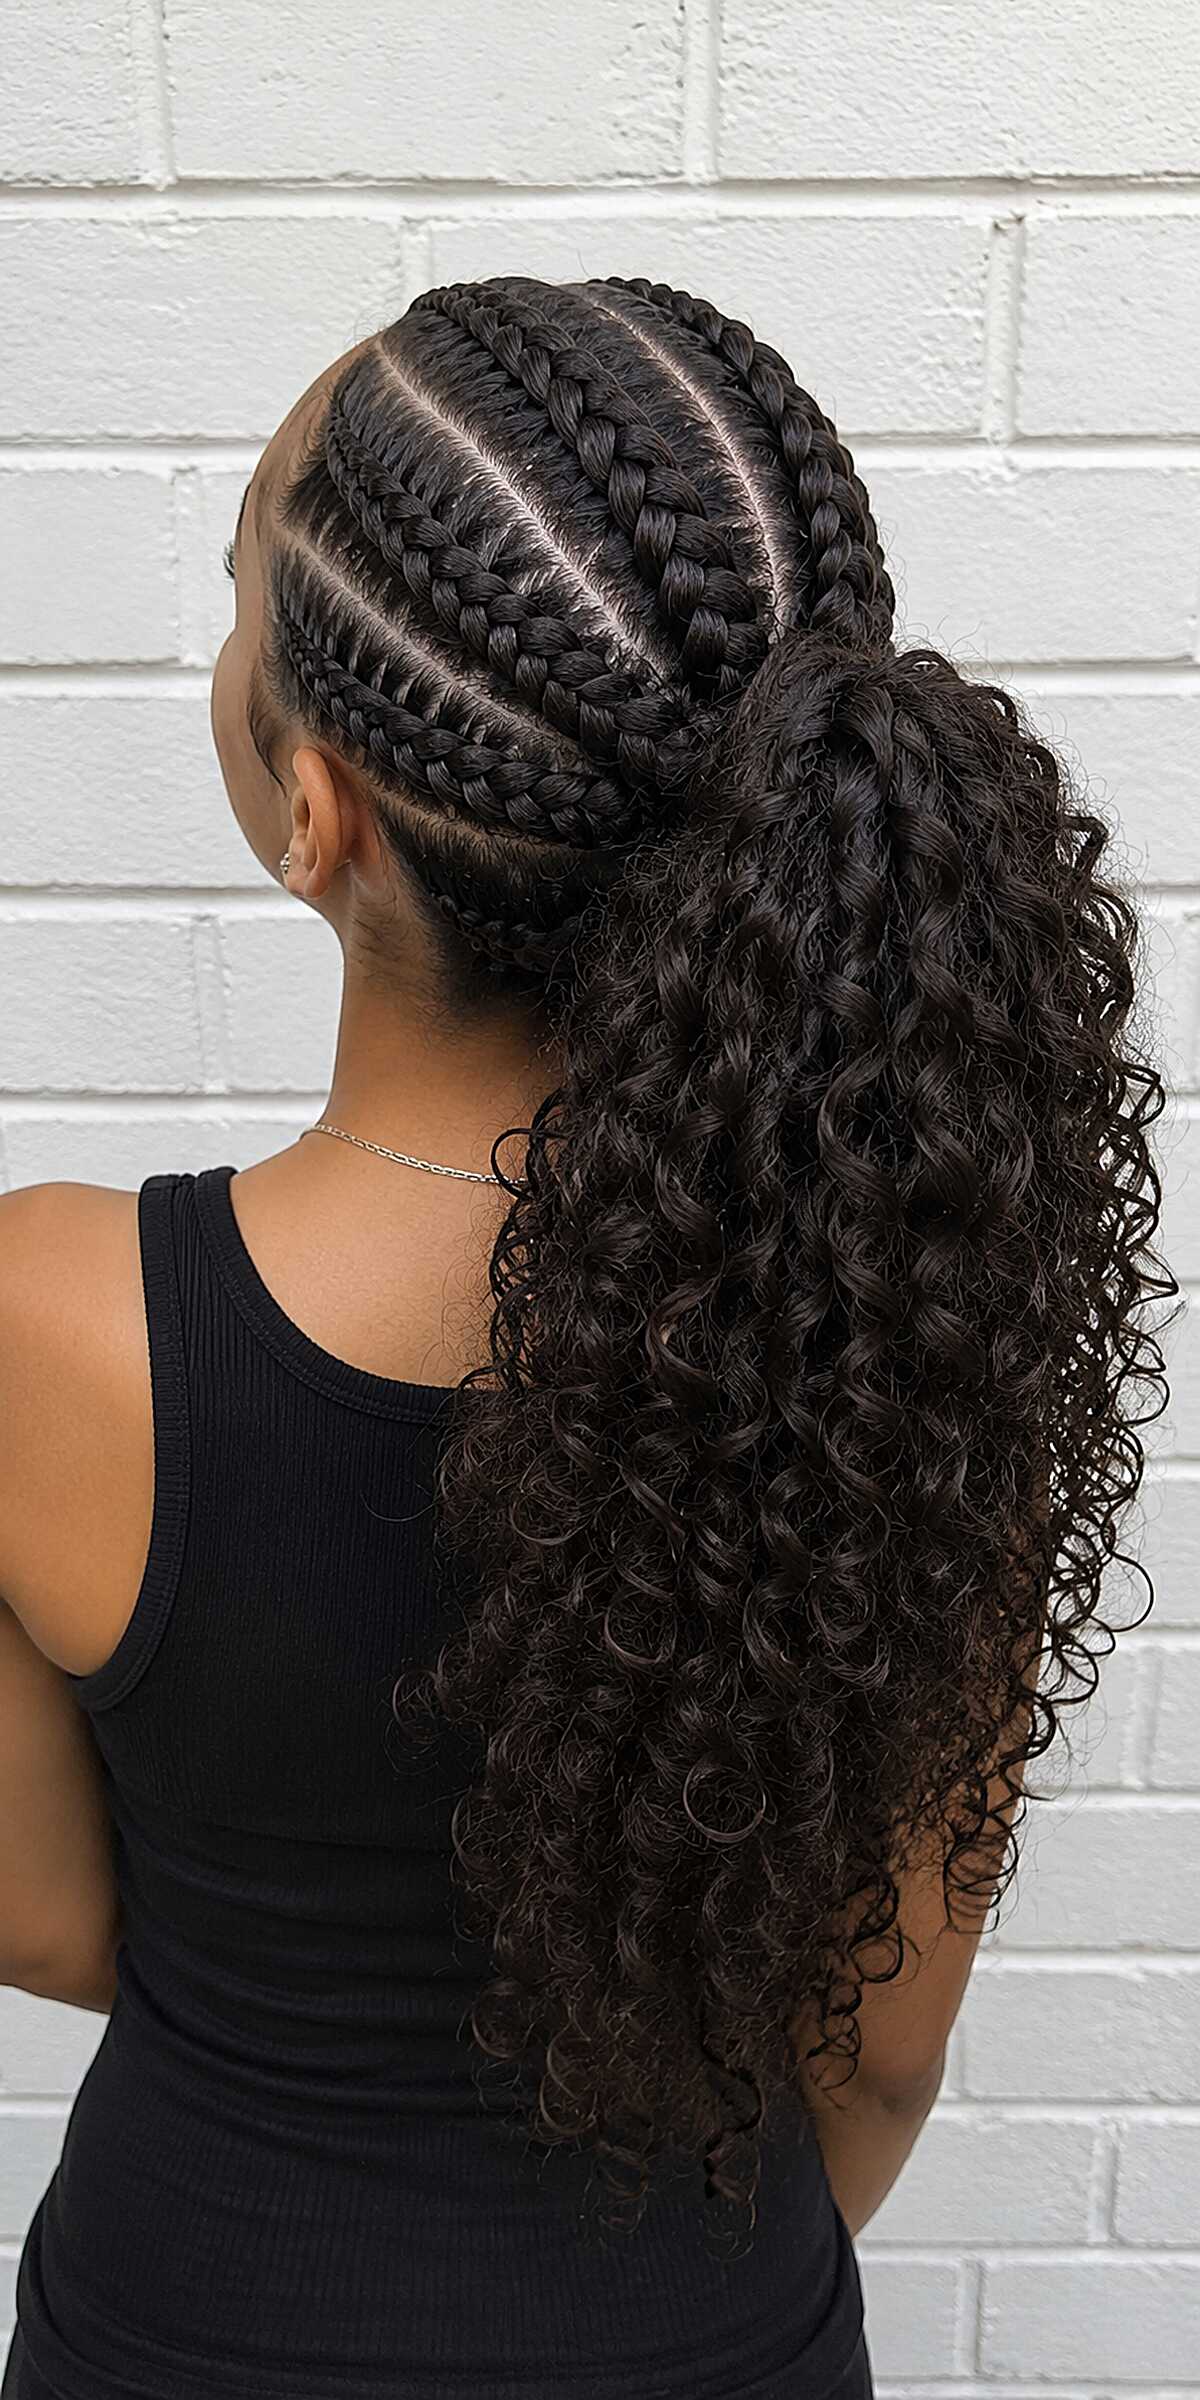

#1: Feed-In Cornrows with Curly Ponytail
The parting here is what sells it. Clean, even, slightly curved lines that follow the head shape perfectly, which tells you the braider knew what they were doing. Feed-in technique keeps the front edges flat and tension-free, and the curly crochet or added hair at the ponytail gives fullness without weight pulling on the cornrows. This works on medium to thick natural hair and suits every face shape because the braids sit tight while the volume stays at the back. If your edges are thin or fragile, this style will expose that immediately. No hiding behind loose pieces. The curly ponytail extension blends well here because the natural texture at the hairline matches, something that gets overlooked when choosing added hair and shouldn’t be.
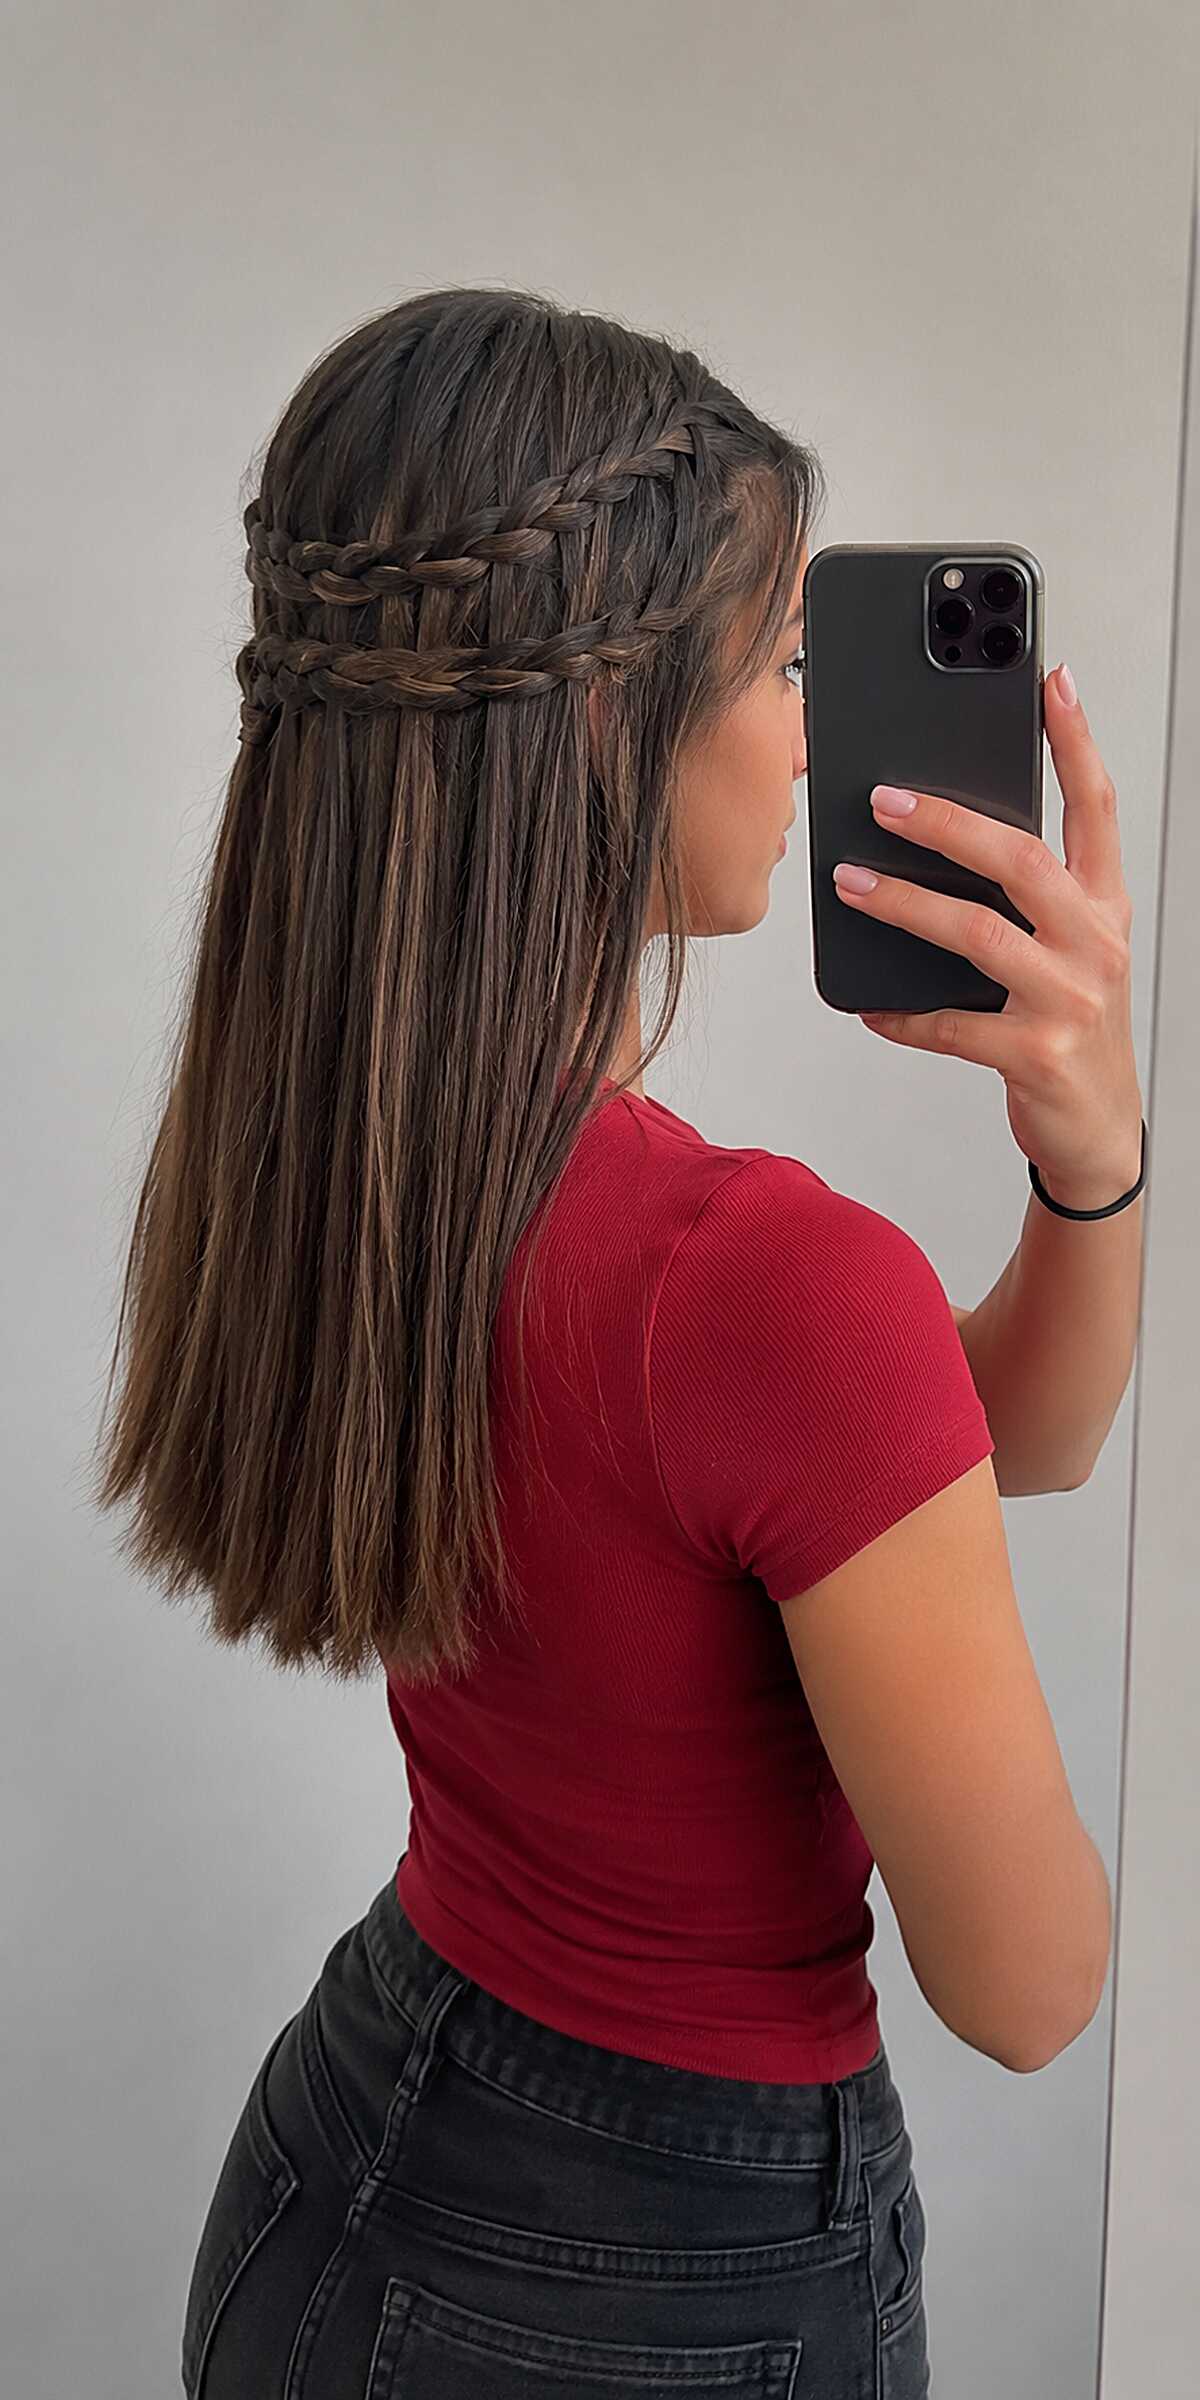
#2 Double Waterfall Braid on Straight Hair
If your hair is fine or thin, skip this one. The two stacked waterfall braids need medium to thick density to read as intentional rather than sparse, and the dropped sections between them will expose any gaps. What’s worth noticing here is how the second braid catches the strands released from the first, creating that layered cascade effect that only works when both braids sit at exactly the right tension. Too tight and the hair between them bunches. Too loose and the whole thing slides apart within an hour. This is mid-length straight hair, no shorter than collarbone, and the technique requires picking up and dropping strands in a continuous three-strand pattern while keeping even horizontal lines across the back of the head. Doing it on yourself, in a mirror, is genuinely hard. Face shape doesn’t matter much since the hair still falls freely around the face. It suits anyone with straight or slightly wavy dark hair where the braid texture contrasts nicely against the smooth lengths.
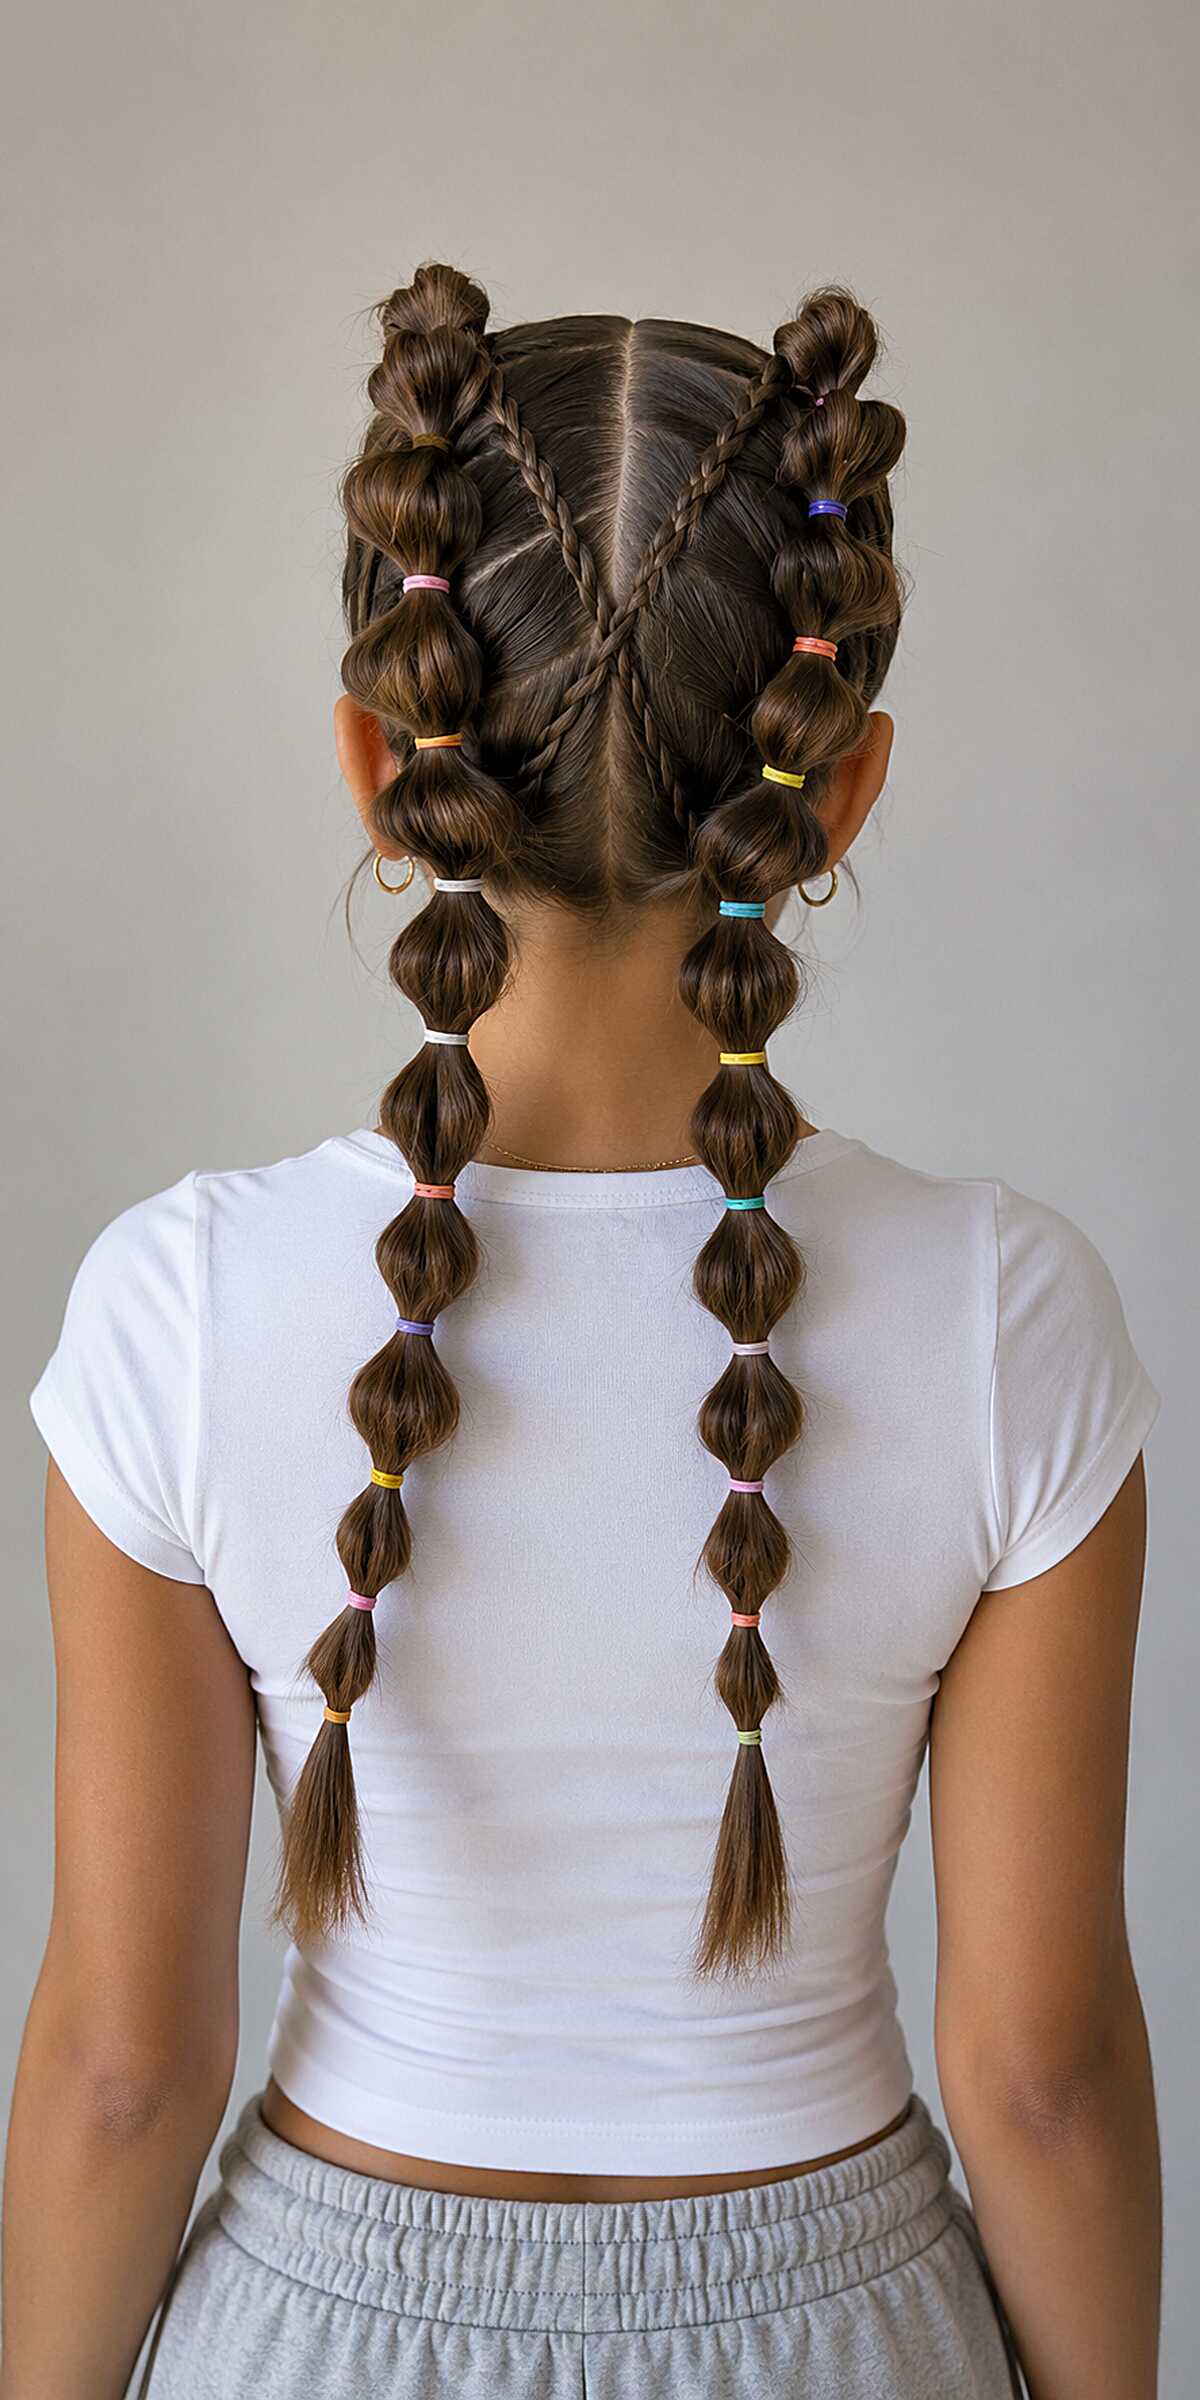
#3 Bubble Pigtails with Criss-Cross Rope Braids
Those thin rope twists crossing at the crown are doing all the heavy lifting here, and most people will miss them entirely because the colorful elastics steal focus. You need waist-length hair or close to it. The bubble sections are pancaked out between each band to create fullness, which means medium to thick density works best since fine hair will look sparse no matter how much you pull. The diagonal parting at the back is precise and clean, which tells me this took real time and a second pair of hands. If your hair is shoulder length, skip this one entirely. It will not translate. Face shape is irrelevant because everything is pulled back and the volume sits behind the head.
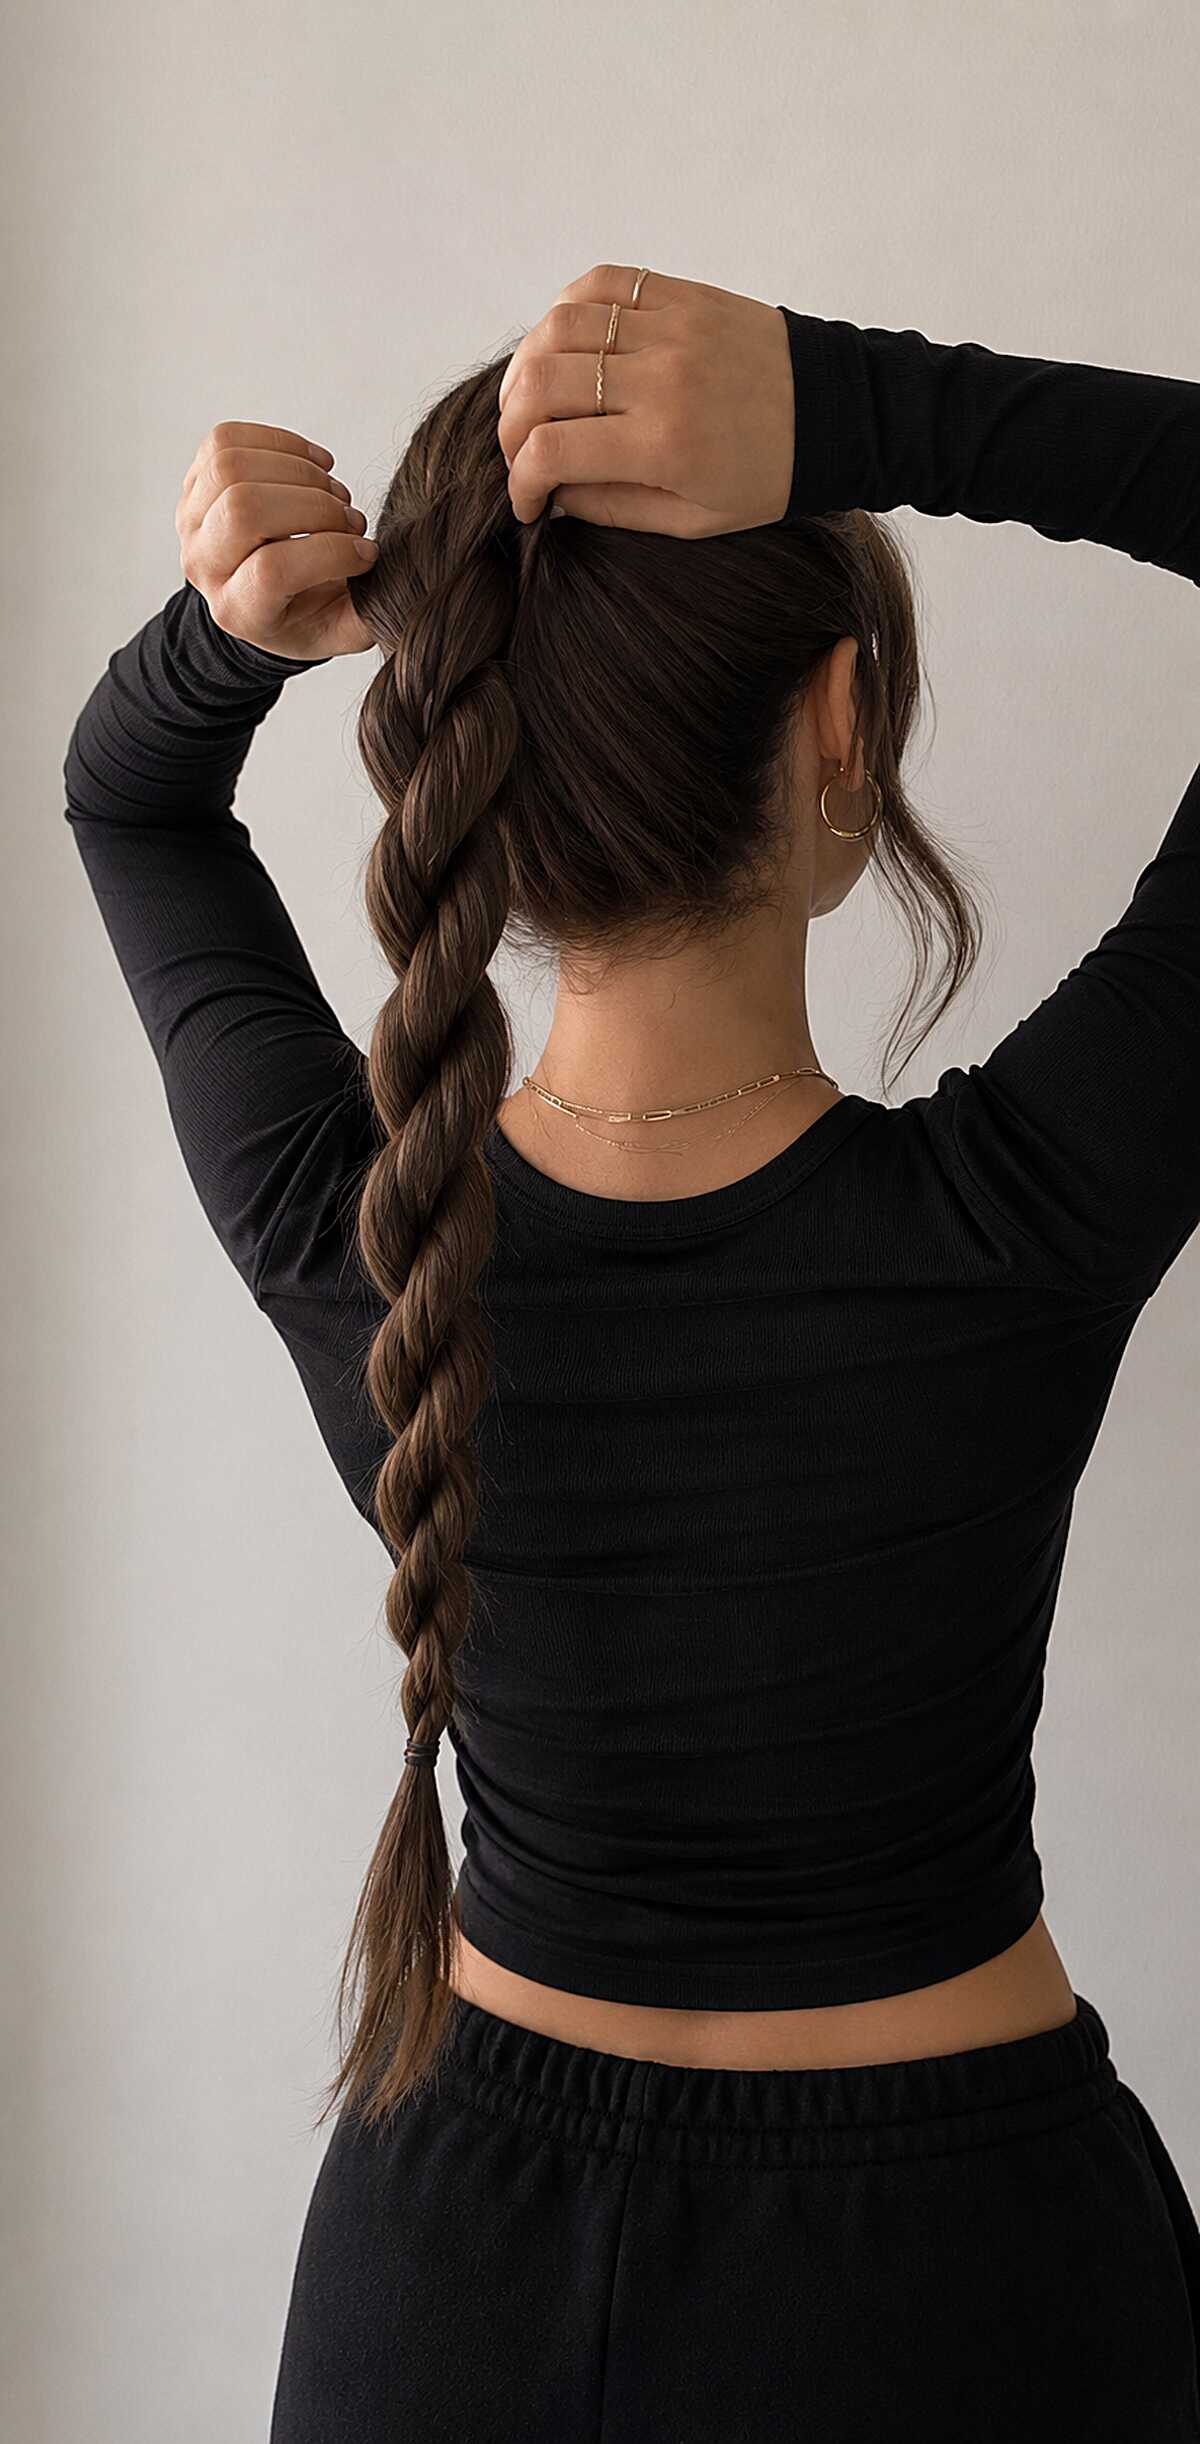
#4 Low Rope Twist Ponytail in Brunette
On fine hair, this will look like a limp noodle. That’s the honest starting point. What makes it work here is the density, medium to thick straight hair with enough weight that the two-strand rope twist holds its shape without unraveling or flattening out. You need waist-length hair minimum to get that full spiral running down your back. Notice how the twist isn’t pancaked or loosened at all, it’s kept tight and clean, which is actually harder to maintain than a messy pull-apart braid. The technique is simple, split the pony into two sections, twist each one in the same direction, then wrap them around each other the opposite way. Works on any face shape because everything is pulled back. If your hair has layers shorter than your shoulders, they’ll slip out within the hour.
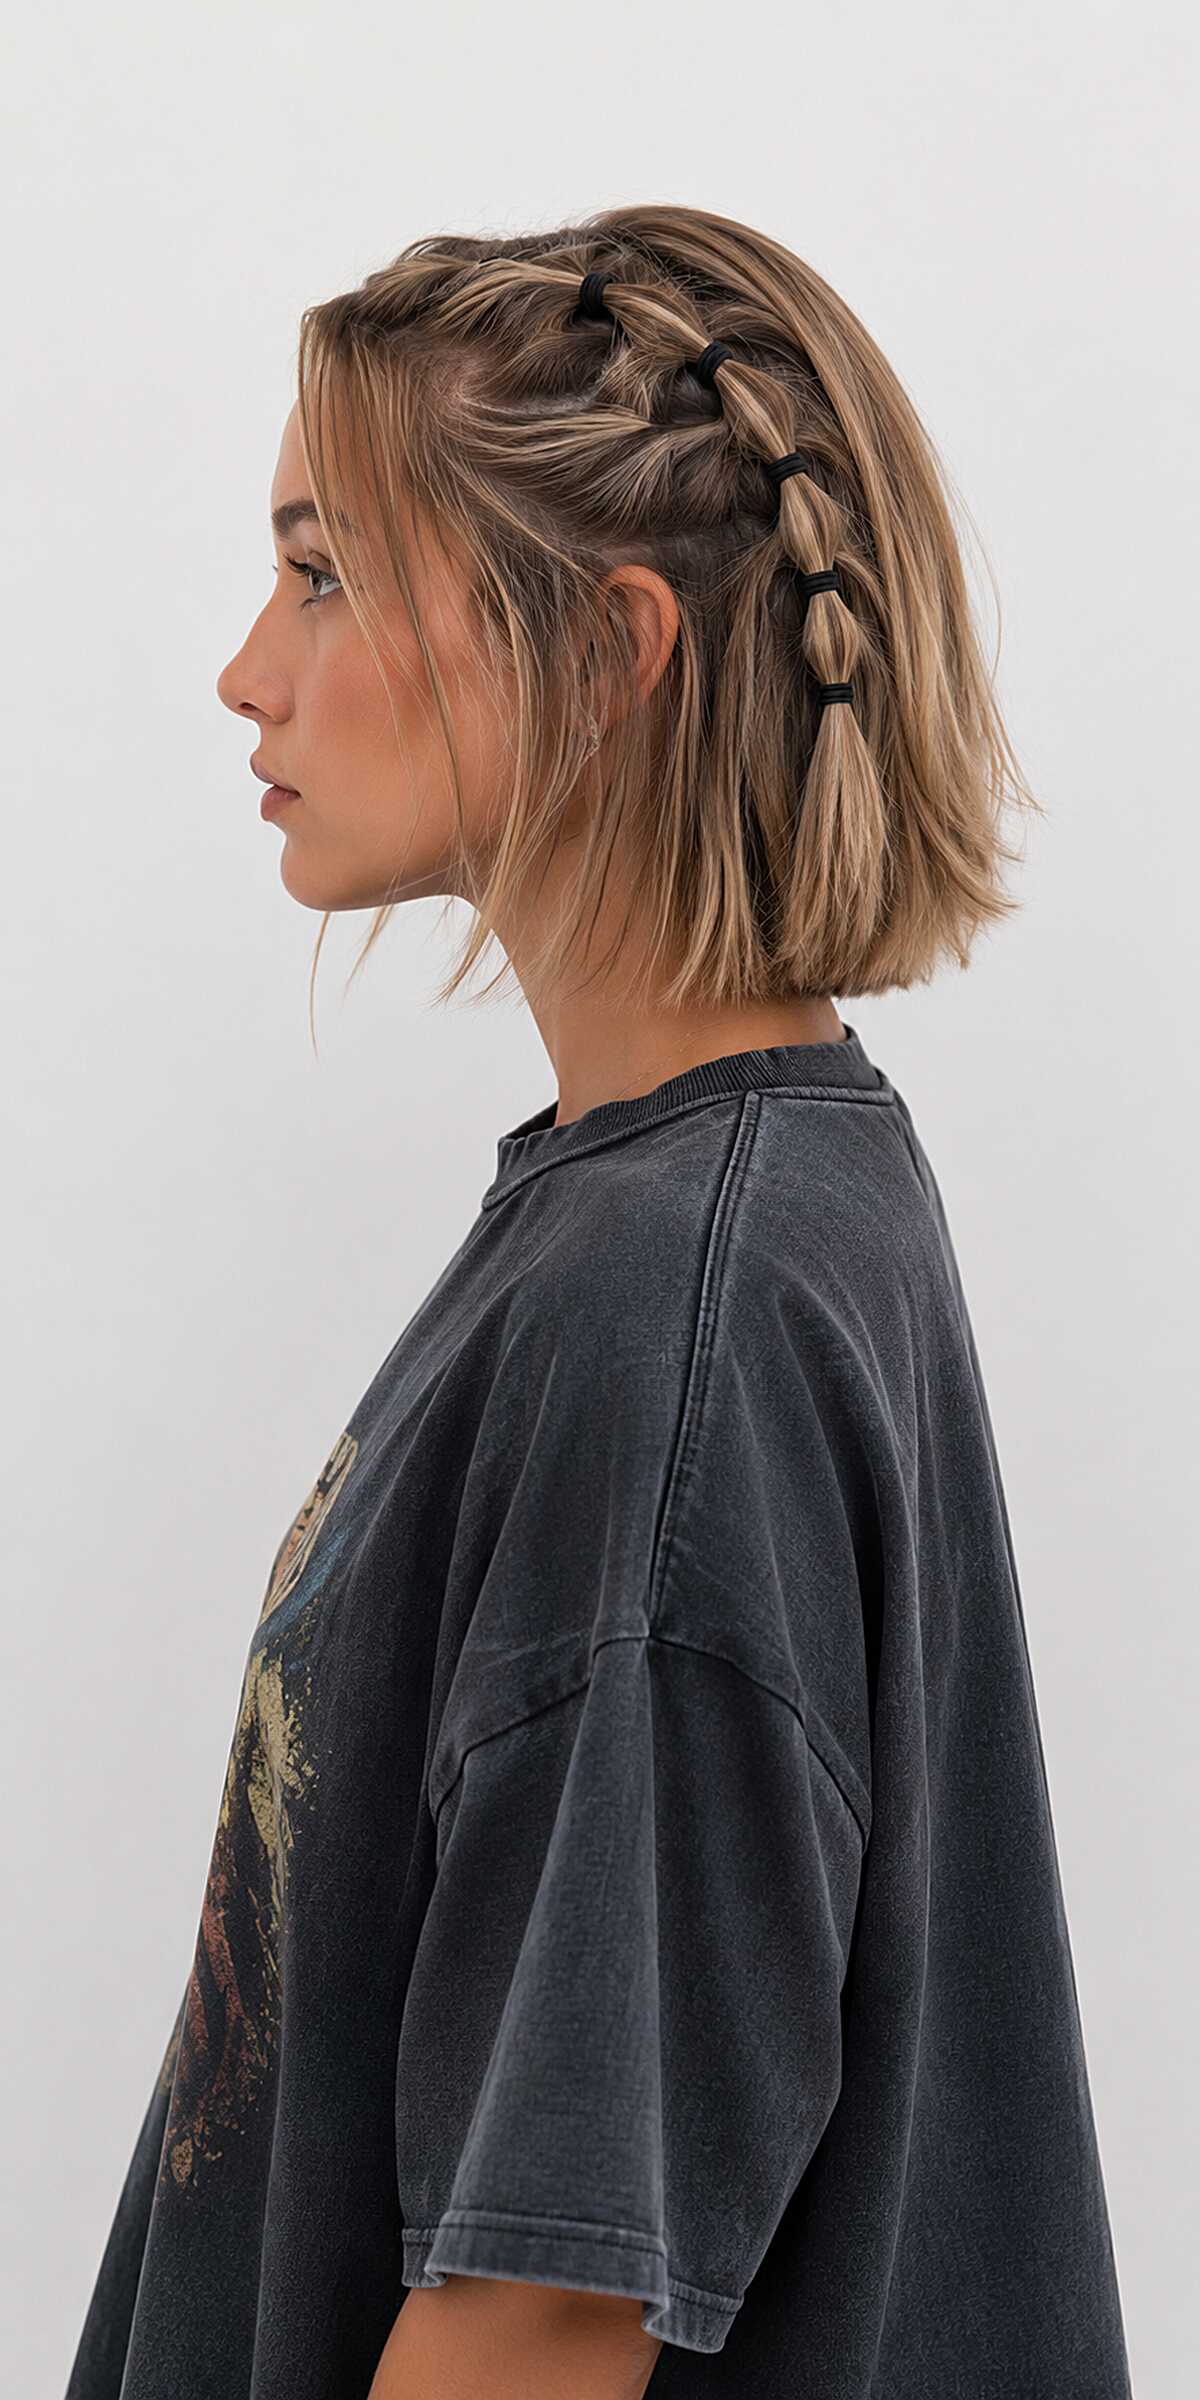
#5 Side Bubble Braid on a Short Bob
If your hair is shorter than chin length, skip this one. The bubble sections need enough length to actually puff out between the elastics, and on anything above a bob it just looks like a row of tiny knots. This works on straight to slightly wavy hair, medium density, right around that collarbone-or-shorter range. Notice how the face-framing pieces are left completely out, which is doing a lot of the work here, keeping it from looking like a rushed gym style. The braid itself is not a true braid at all, just a pull-through secured with small black elastics and gently pancaked between each tie. It will not last past one evening without a texturizing spray to grip the sections. Fine hair will slip out of this in an hour.
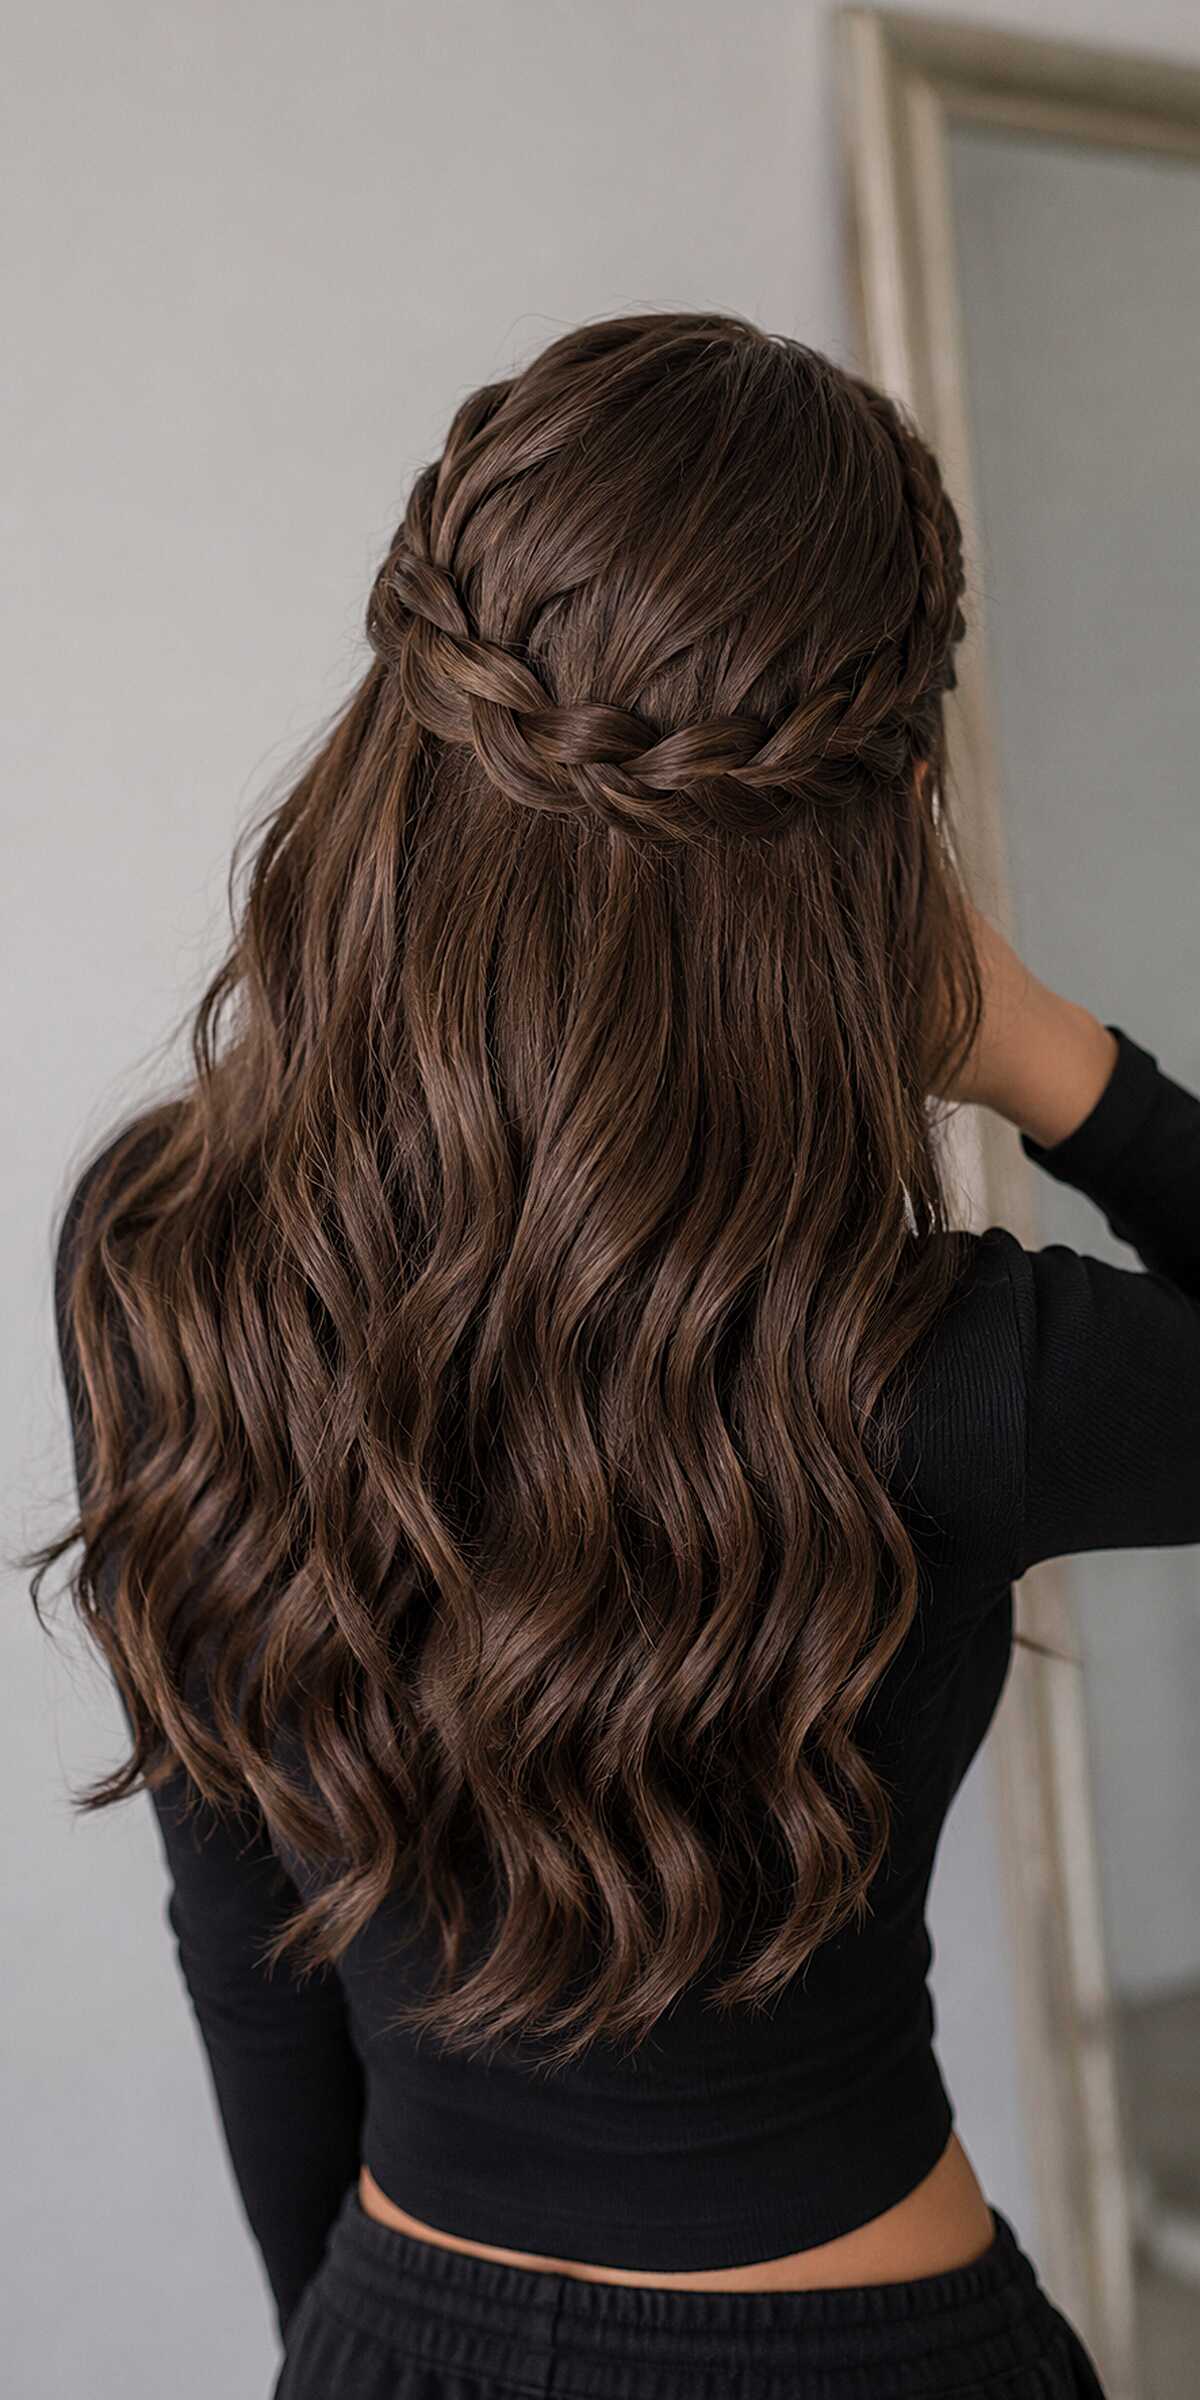
#6 Half-Up Crown Braid with Loose Waves
If your hair is fine or thin, skip this one. The braid wrapping around the back needs real density to read as a crown rather than a limp twist, and the model here has thick, medium to long hair that gives the whole thing its weight. Notice how the two three-strand braids meet at center back and tuck under each other cleanly, with no pins visible. That takes practice. The waves below are clearly done with a 1.25-inch barrel, left unclamped at the ends so they stay open and relaxed instead of ringlet-tight. Works on any face shape since everything frames from behind. The honest problem: this unravels fast on second-day hair unless you anchor it with at least four bobby pins you cannot see.
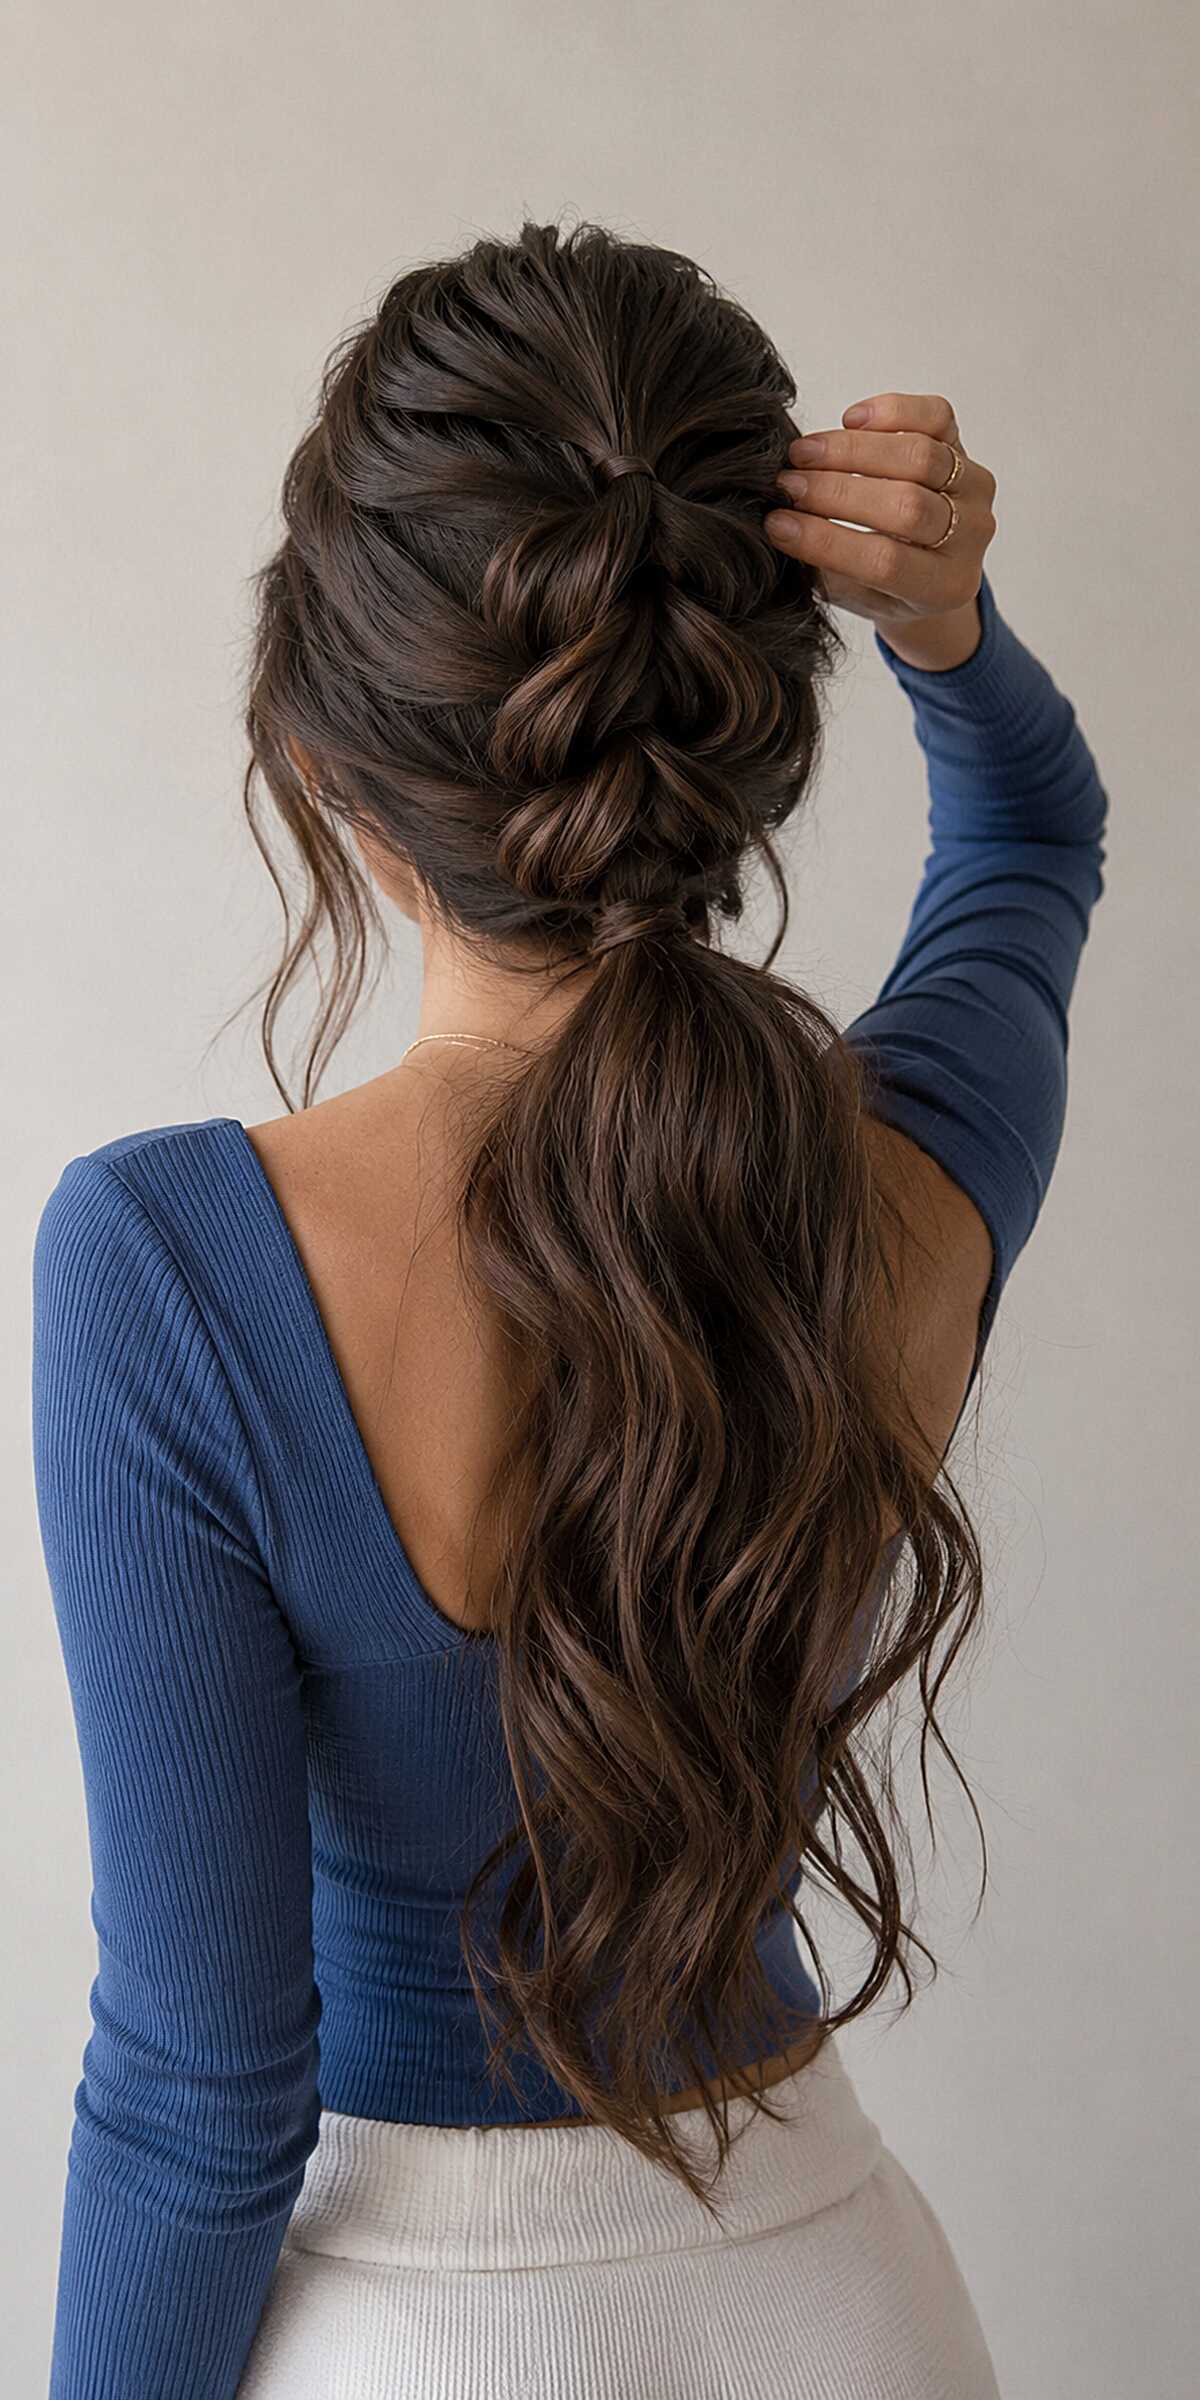
#7 Loose Pull-Through Braid into a Low Wavy Ponytail
If your hair is fine or thin, skip this one. The whole look depends on pancaking each pull-through section wide enough to create that stacked, full effect, and without medium to thick density it just looks sparse. You need long hair here, past mid-back at minimum. Notice how the face-framing pieces are deliberately pulled free before the braid even starts, which keeps the crown from looking too tight or formal. The texture in the ponytail tail is a loose wave, not a curl, done with a large barrel iron and barely held. This will not last a full school day without hairspray.
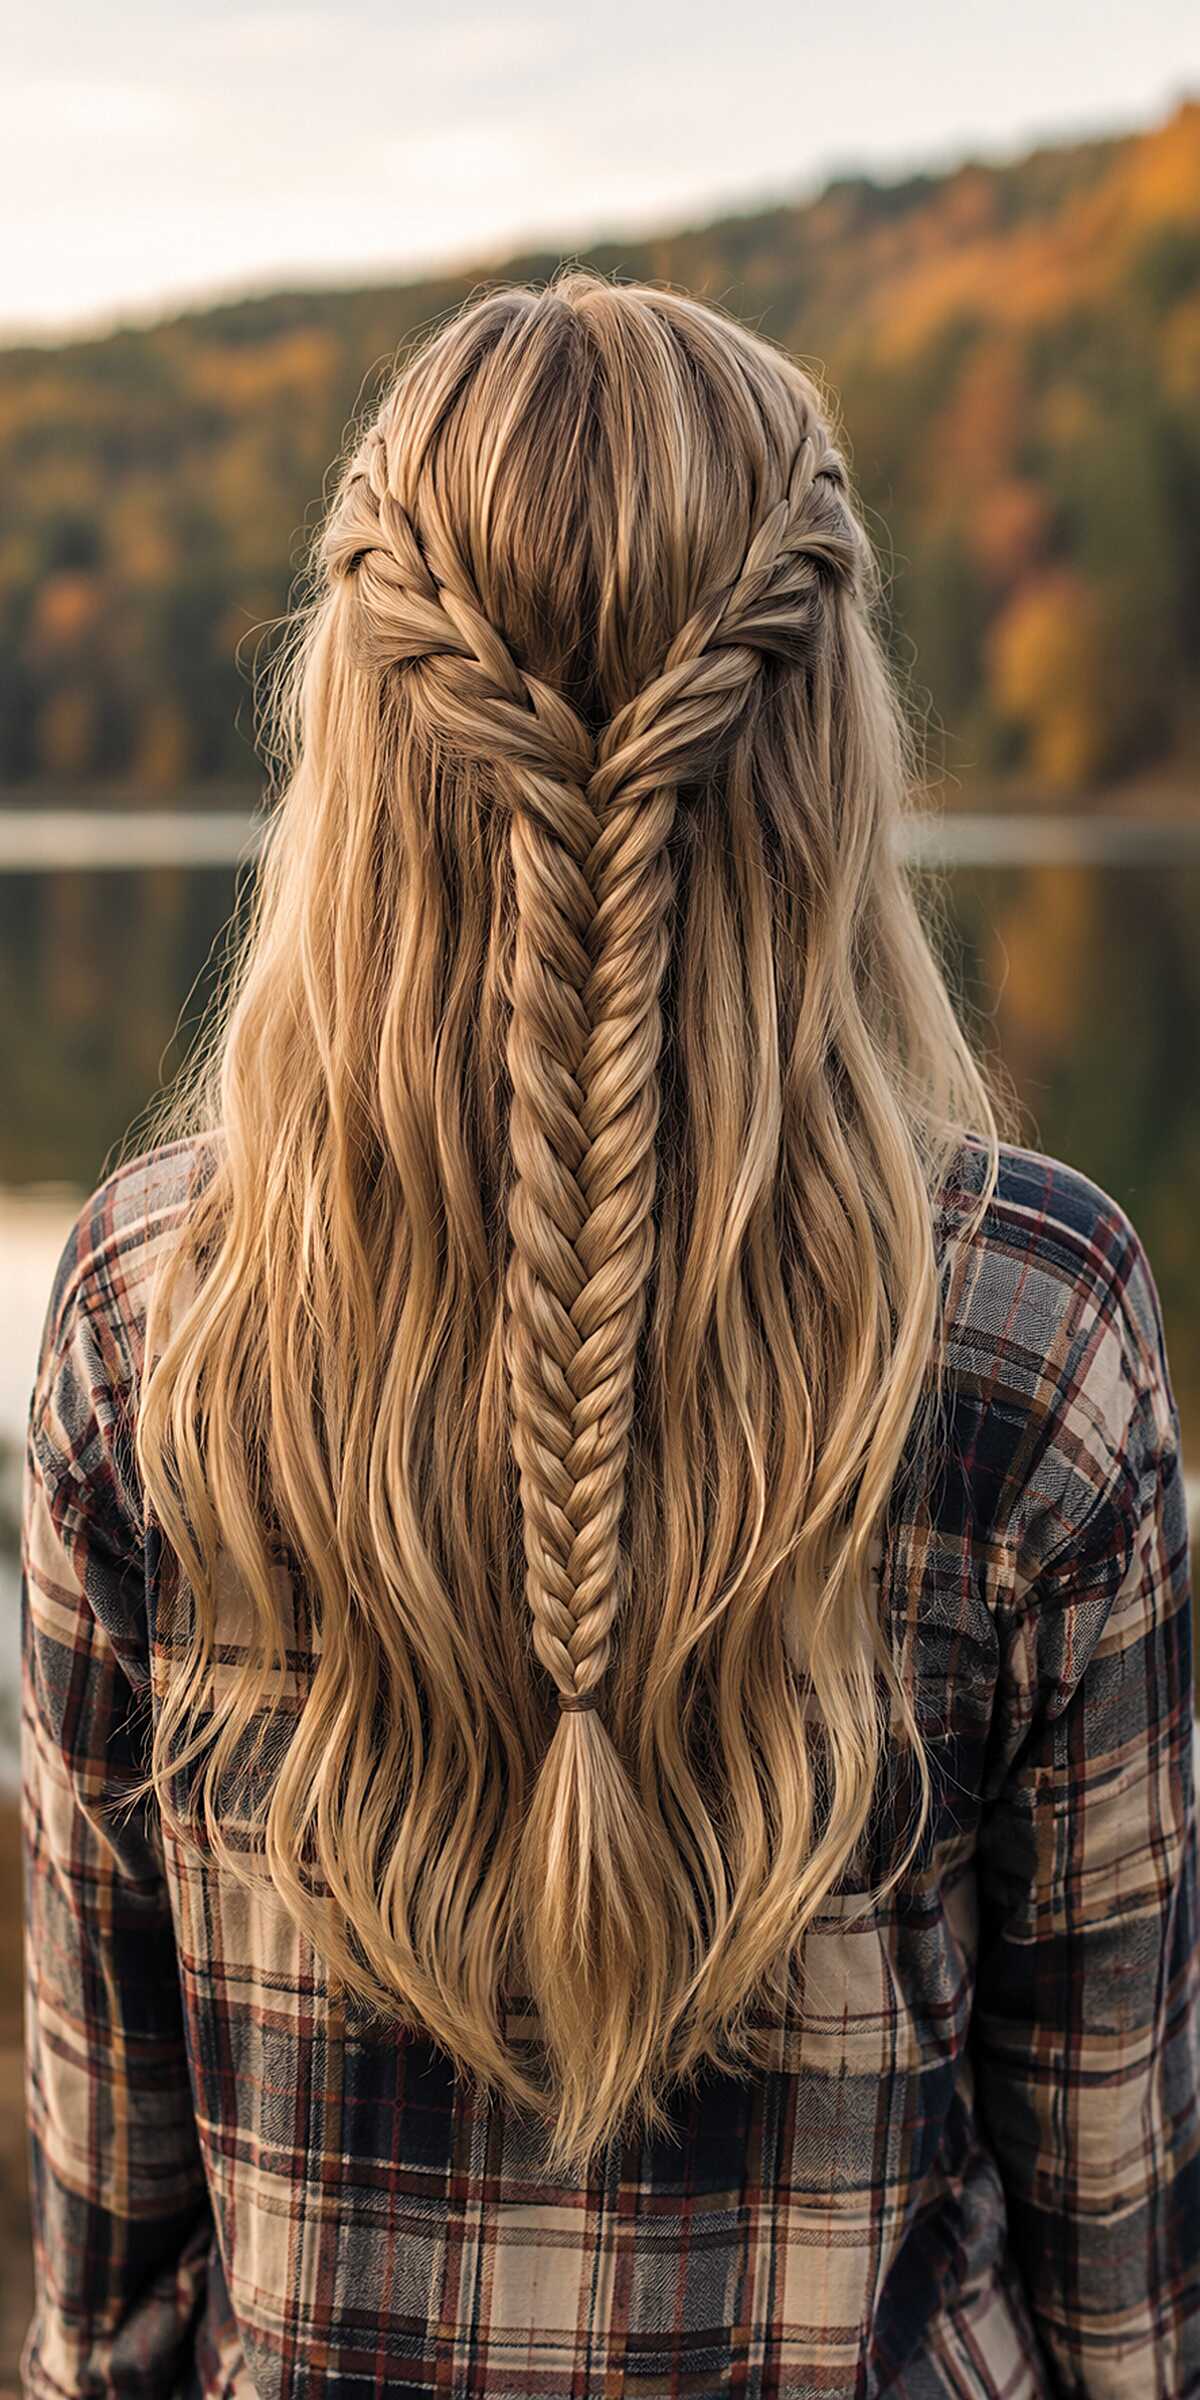
#8 Half-Up Fishtail Braid on Long Blonde Waves
If your hair is fine or thin, skip this one. The fishtail technique uses small two-strand sections alternating side to side, and it needs density to read as a full braid instead of a wispy rope. This person has thick, long hair with a subtle balayage warming up from a darker root into brighter blonde at the ends, and that tonal shift is what makes every woven section visible against the next. Notice how the braid sits slightly off-center where the two gathering twists meet at the crown, which keeps it from looking too staged. Works on straight or wavy textures past the mid-back. Face shape is irrelevant here since everything frames from behind.
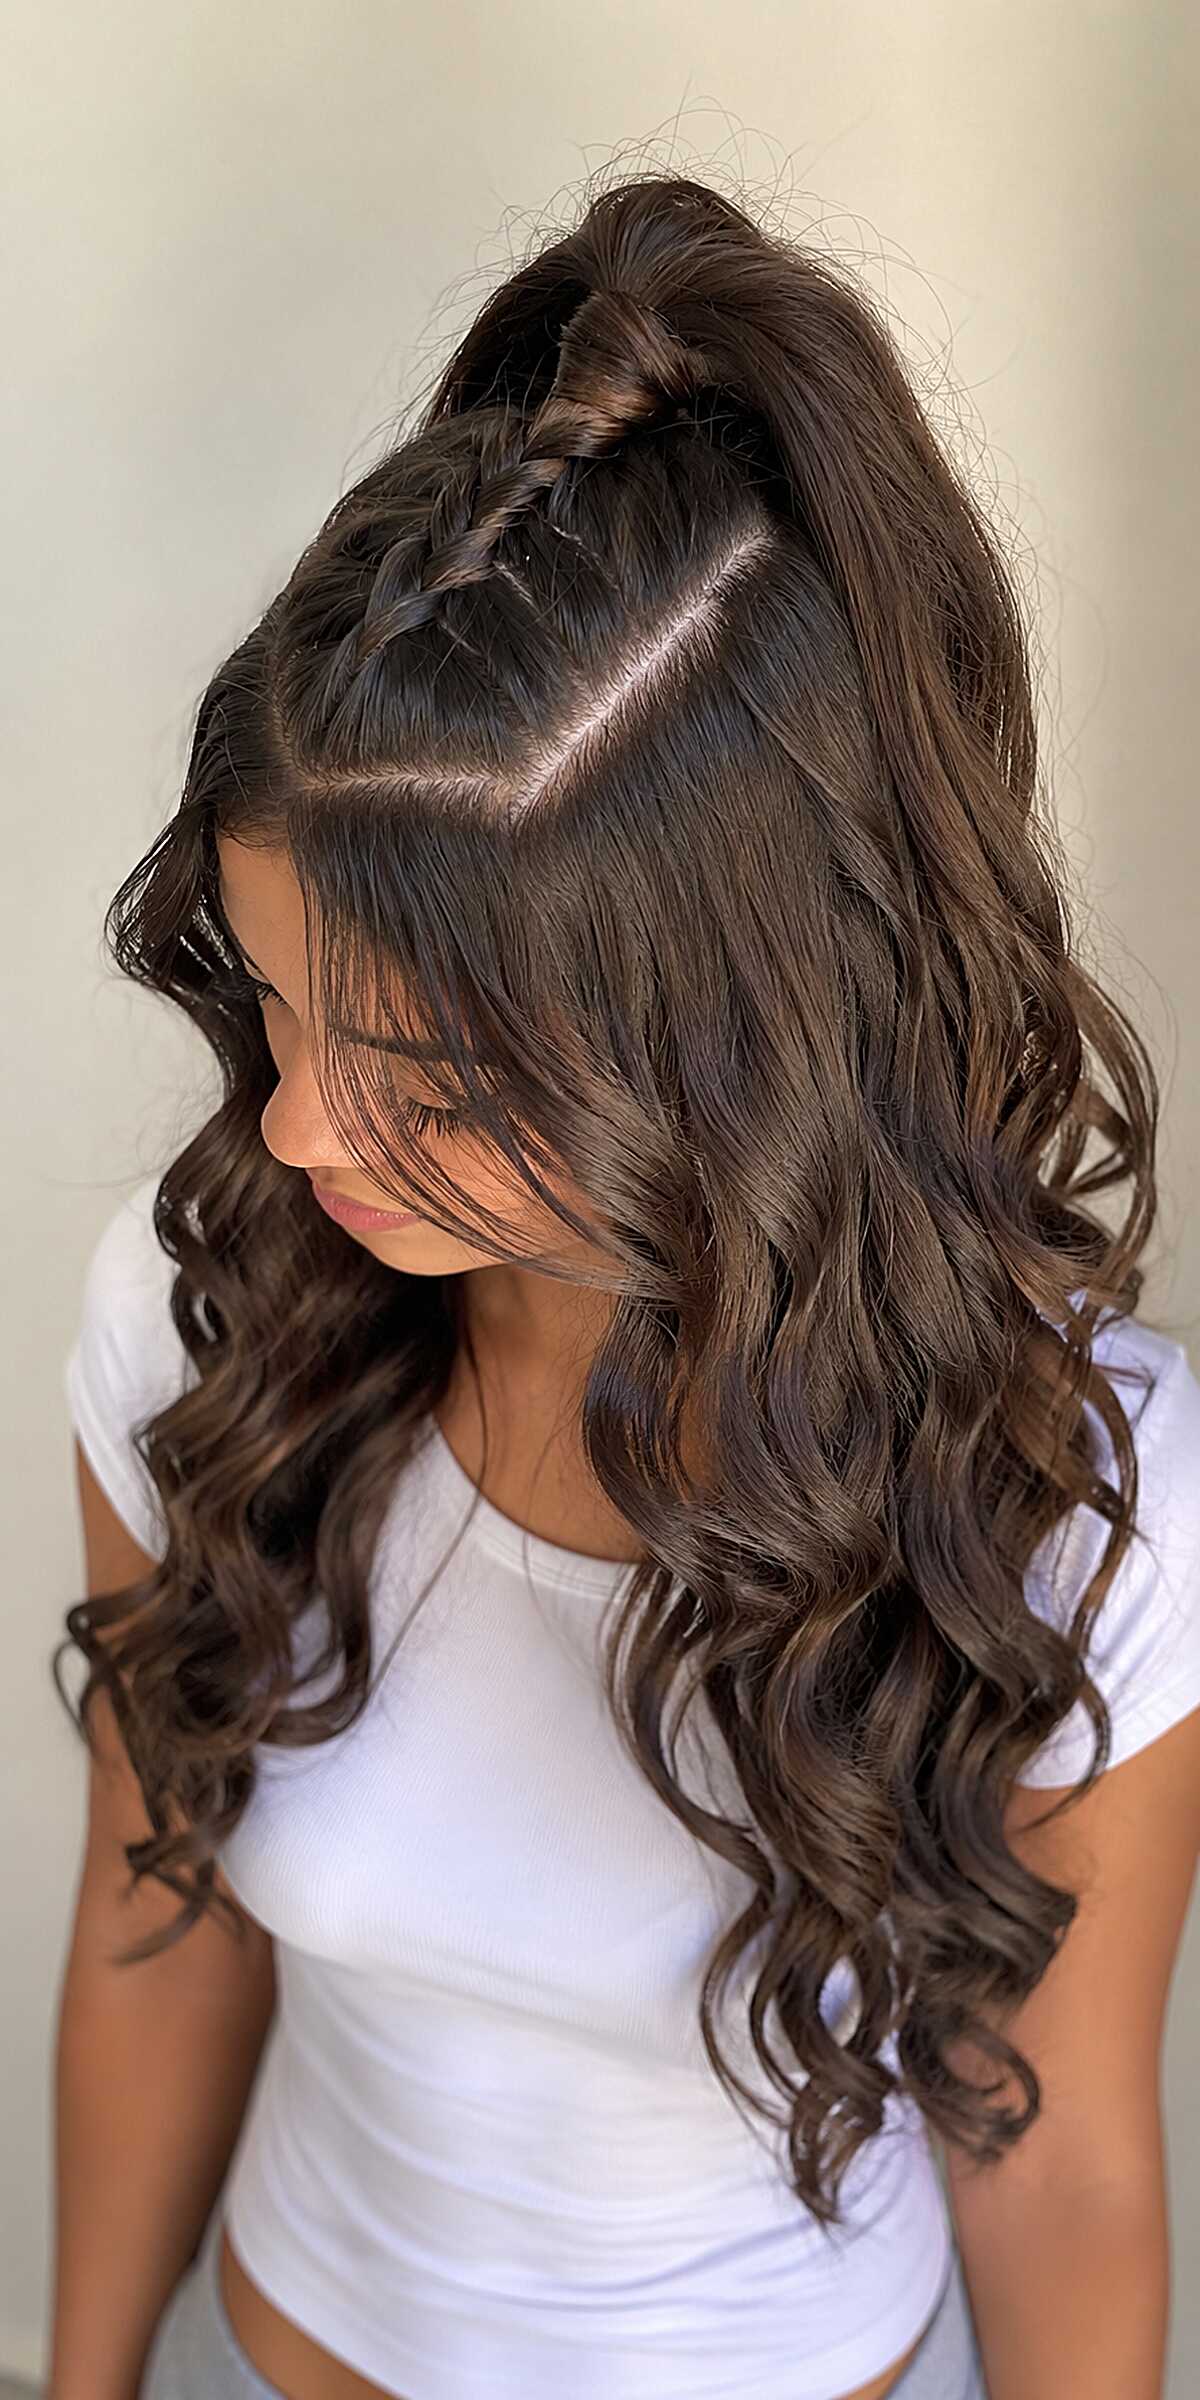
#9 Single French Braid Accent with Curled Brunette Lengths
If your hair is fine or thin, this will not work for you. The braid section along the part line needs enough density to hold its shape without looking wispy or exposing too much scalp. This is a single three-strand French braid picked up from a deep side part, angled back toward the crown, and it only reads as intentional when you have medium to thick hair with real length past the collarbone. The curls here were clearly done with a 1.25-inch barrel, alternating directions, which is what keeps them from clumping into one mass. What I notice is how much the flyaways along the braid actually help it. Too clean and it looks like prom 2014. You need long hair for this, full stop.
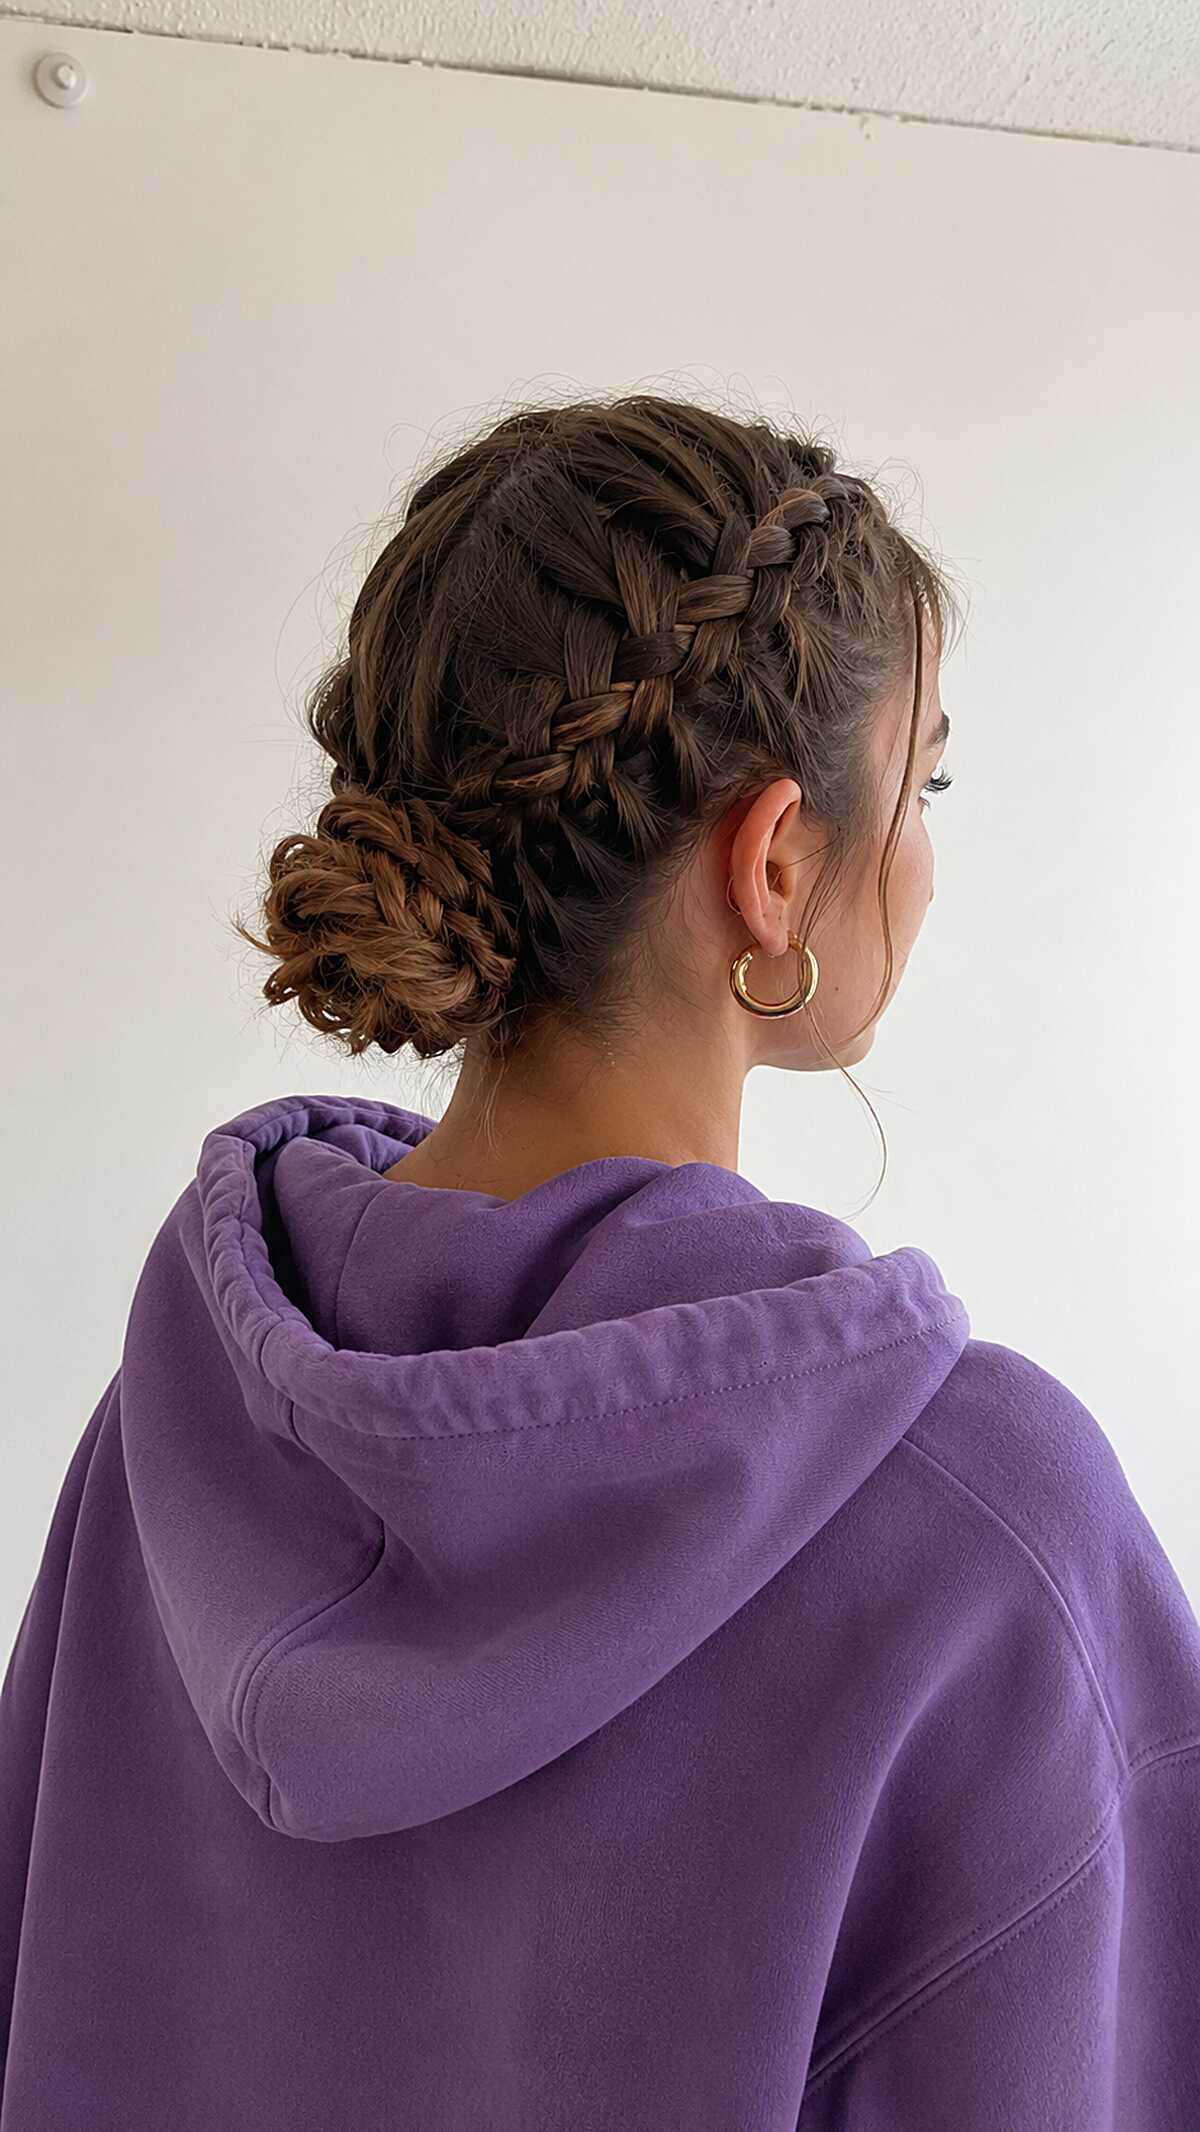
#10 Double Dutch Braids into a Braided Low Bun
If your hair is fine or thin, this will disappoint you. The bun at the nape needs real density to hold that coiled shape without looking flat or falling apart by noon. What caught my eye here is how the two Dutch braids aren’t pancaked at all, which means the texture and volume are coming from the hair itself, not from pulling the edges loose afterward. That’s medium to thick hair doing the work. You need at least shoulder length to get enough tail to wrap into that bun, and collarbone length would be tight. The face-framing pieces left out around the ears are doing a lot of quiet heavy lifting, softening the overall pull without making it look unfinished. This works on almost any face shape because everything sits low and back. Layered hair will give you trouble here, with shorter pieces escaping the braids within an hour or two.
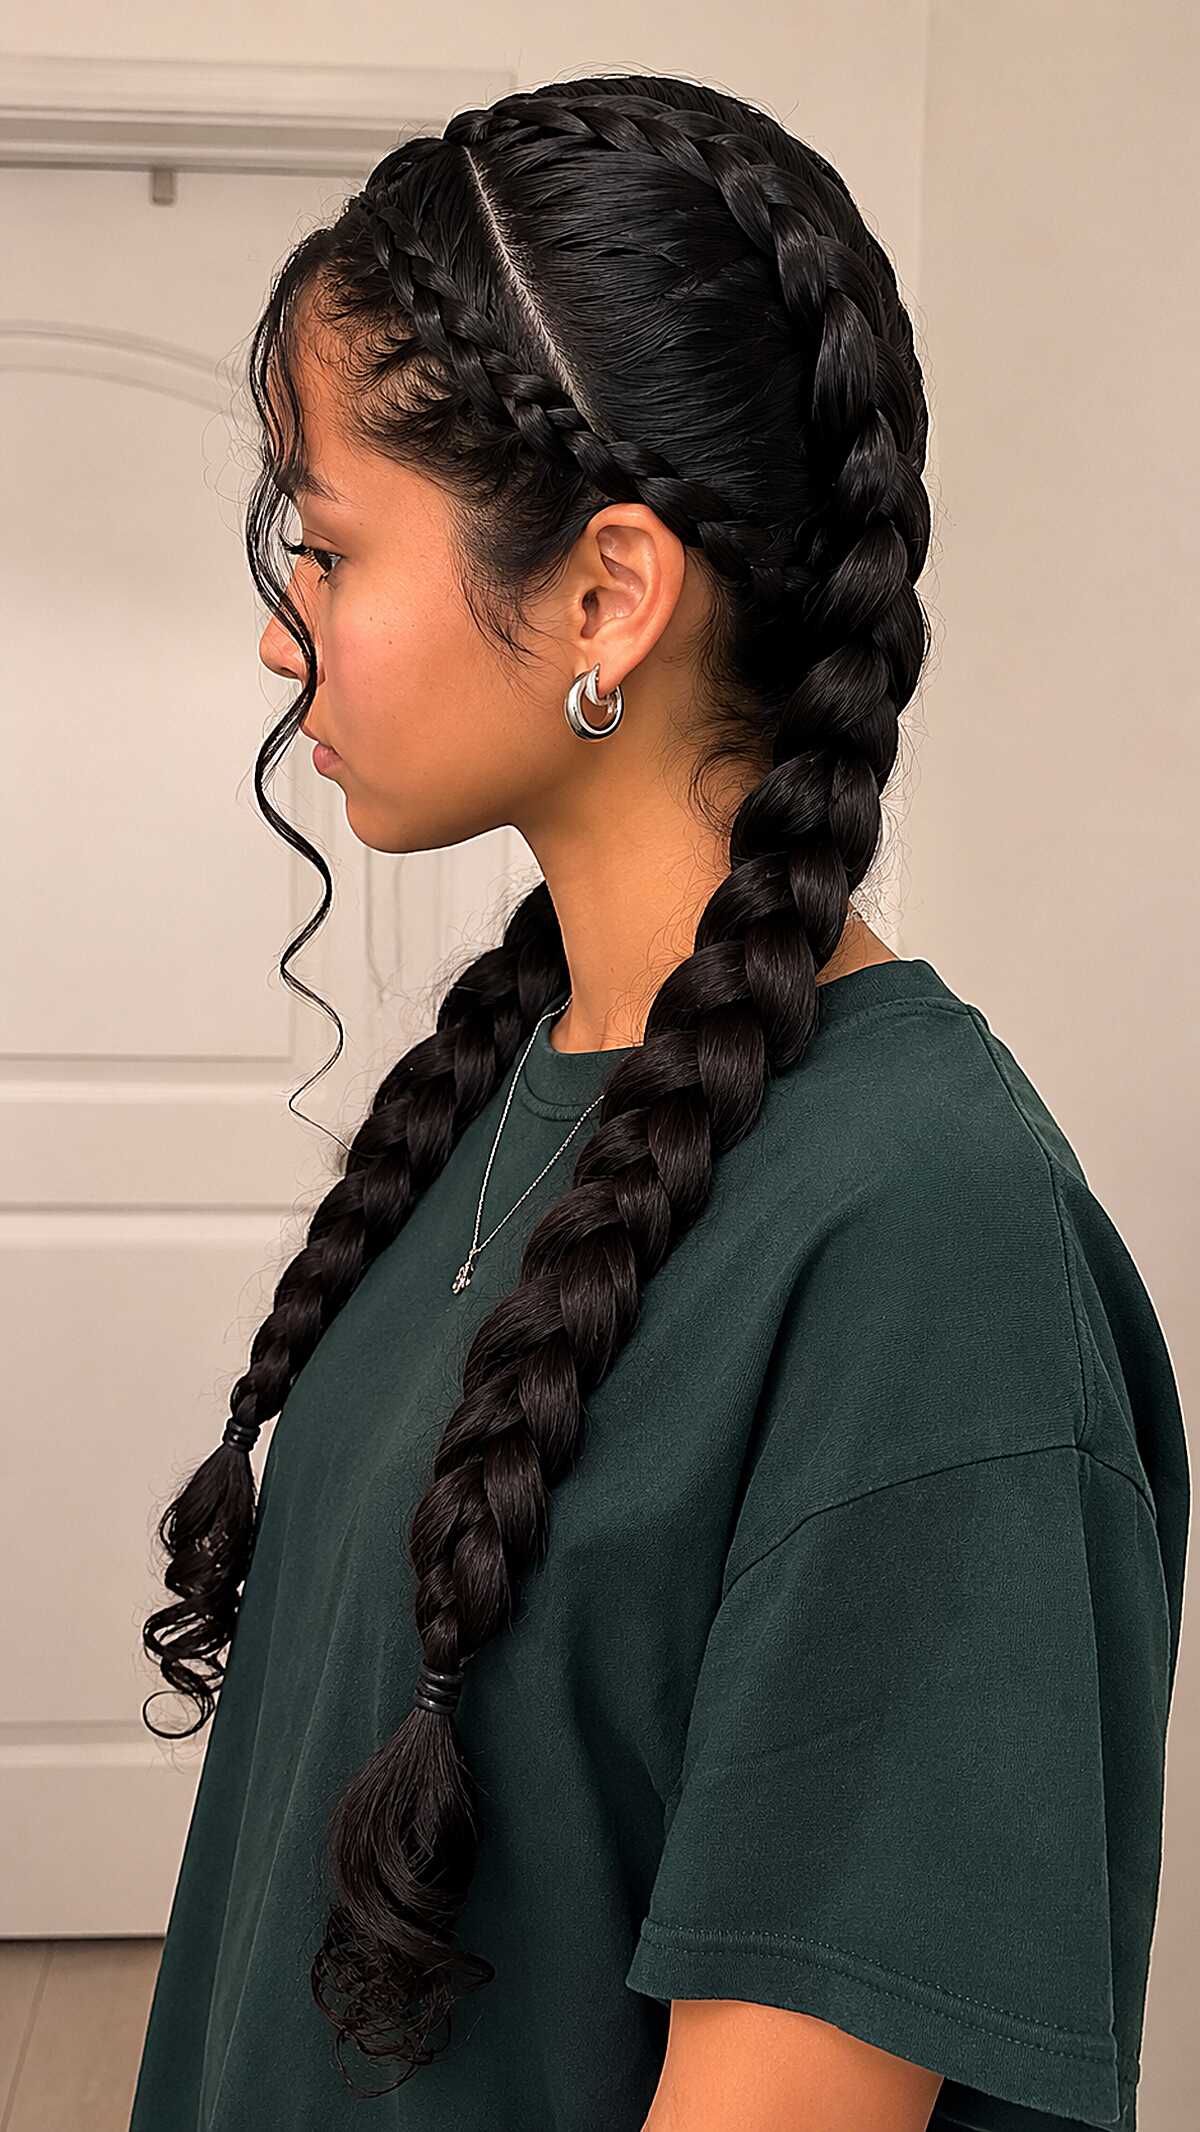
#11 Twin Dutch Braids with Face-Framing Tendrils on Dark Hair
Those curled tendrils at the front are doing all the heavy lifting. Without them, this is just two tight Dutch braids, and on a round or wider face shape that tightness would not be flattering. The tendrils soften everything and give the illusion of narrowing at the temples. You need long, thick hair for this, genuinely waist-length or close, because the braids rely on density to hold that chunky, rounded shape all the way down. Fine hair will look like two flat ropes by lunchtime. The center part is clean and precise, which tells me second-day hair or a good texturizing spray was involved to keep sections from slipping during the under-crossing. If your hair is freshly washed and silky, skip this until tomorrow.
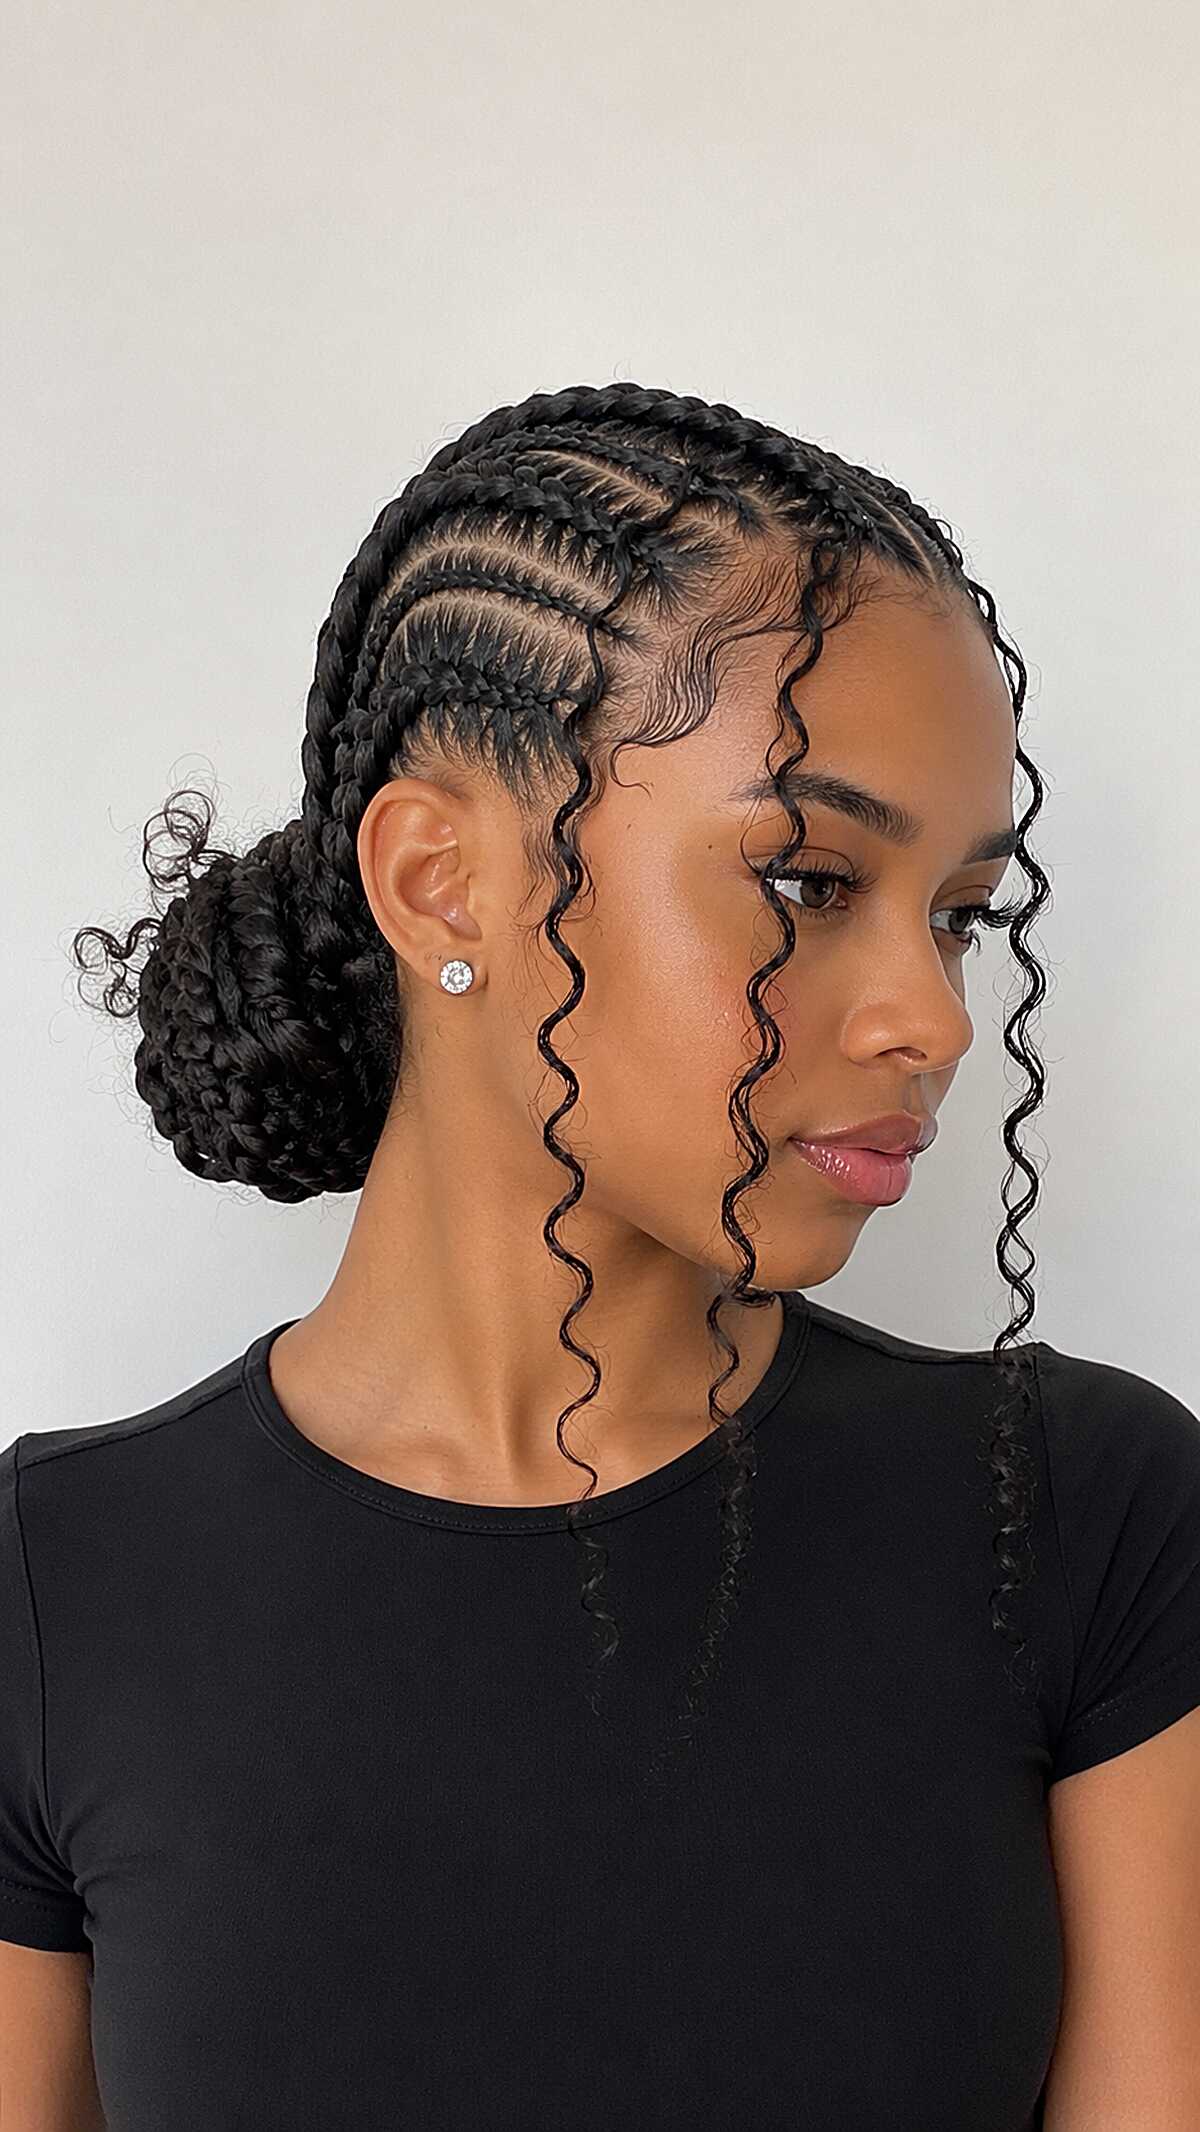
#12 Stitch Cornrows into a Low Braided Bun with Wavy Tendrils
Those tendrils are doing real work here. They’re not random loose pieces; someone took the time to leave out precise sections at the hairline and set them into uniform S-waves, which is what keeps the whole look from reading as purely athletic. The stitch cornrows are clean and tight with visible parts between each row, feeding back into a low bun that mixes braided ends with curly texture. If your edges are sparse or your hairline sits high, this style will expose that. It suits medium to long natural hair, and the bun sits compact enough that face shape barely factors in. The curly pieces peeking from the bun tell me braiding hair with a wavy texture was added, not just the natural ends tucked in. Worth knowing: this is a sit-in-the-chair-for-hours style, and it will not last more than two weeks looking this precise.
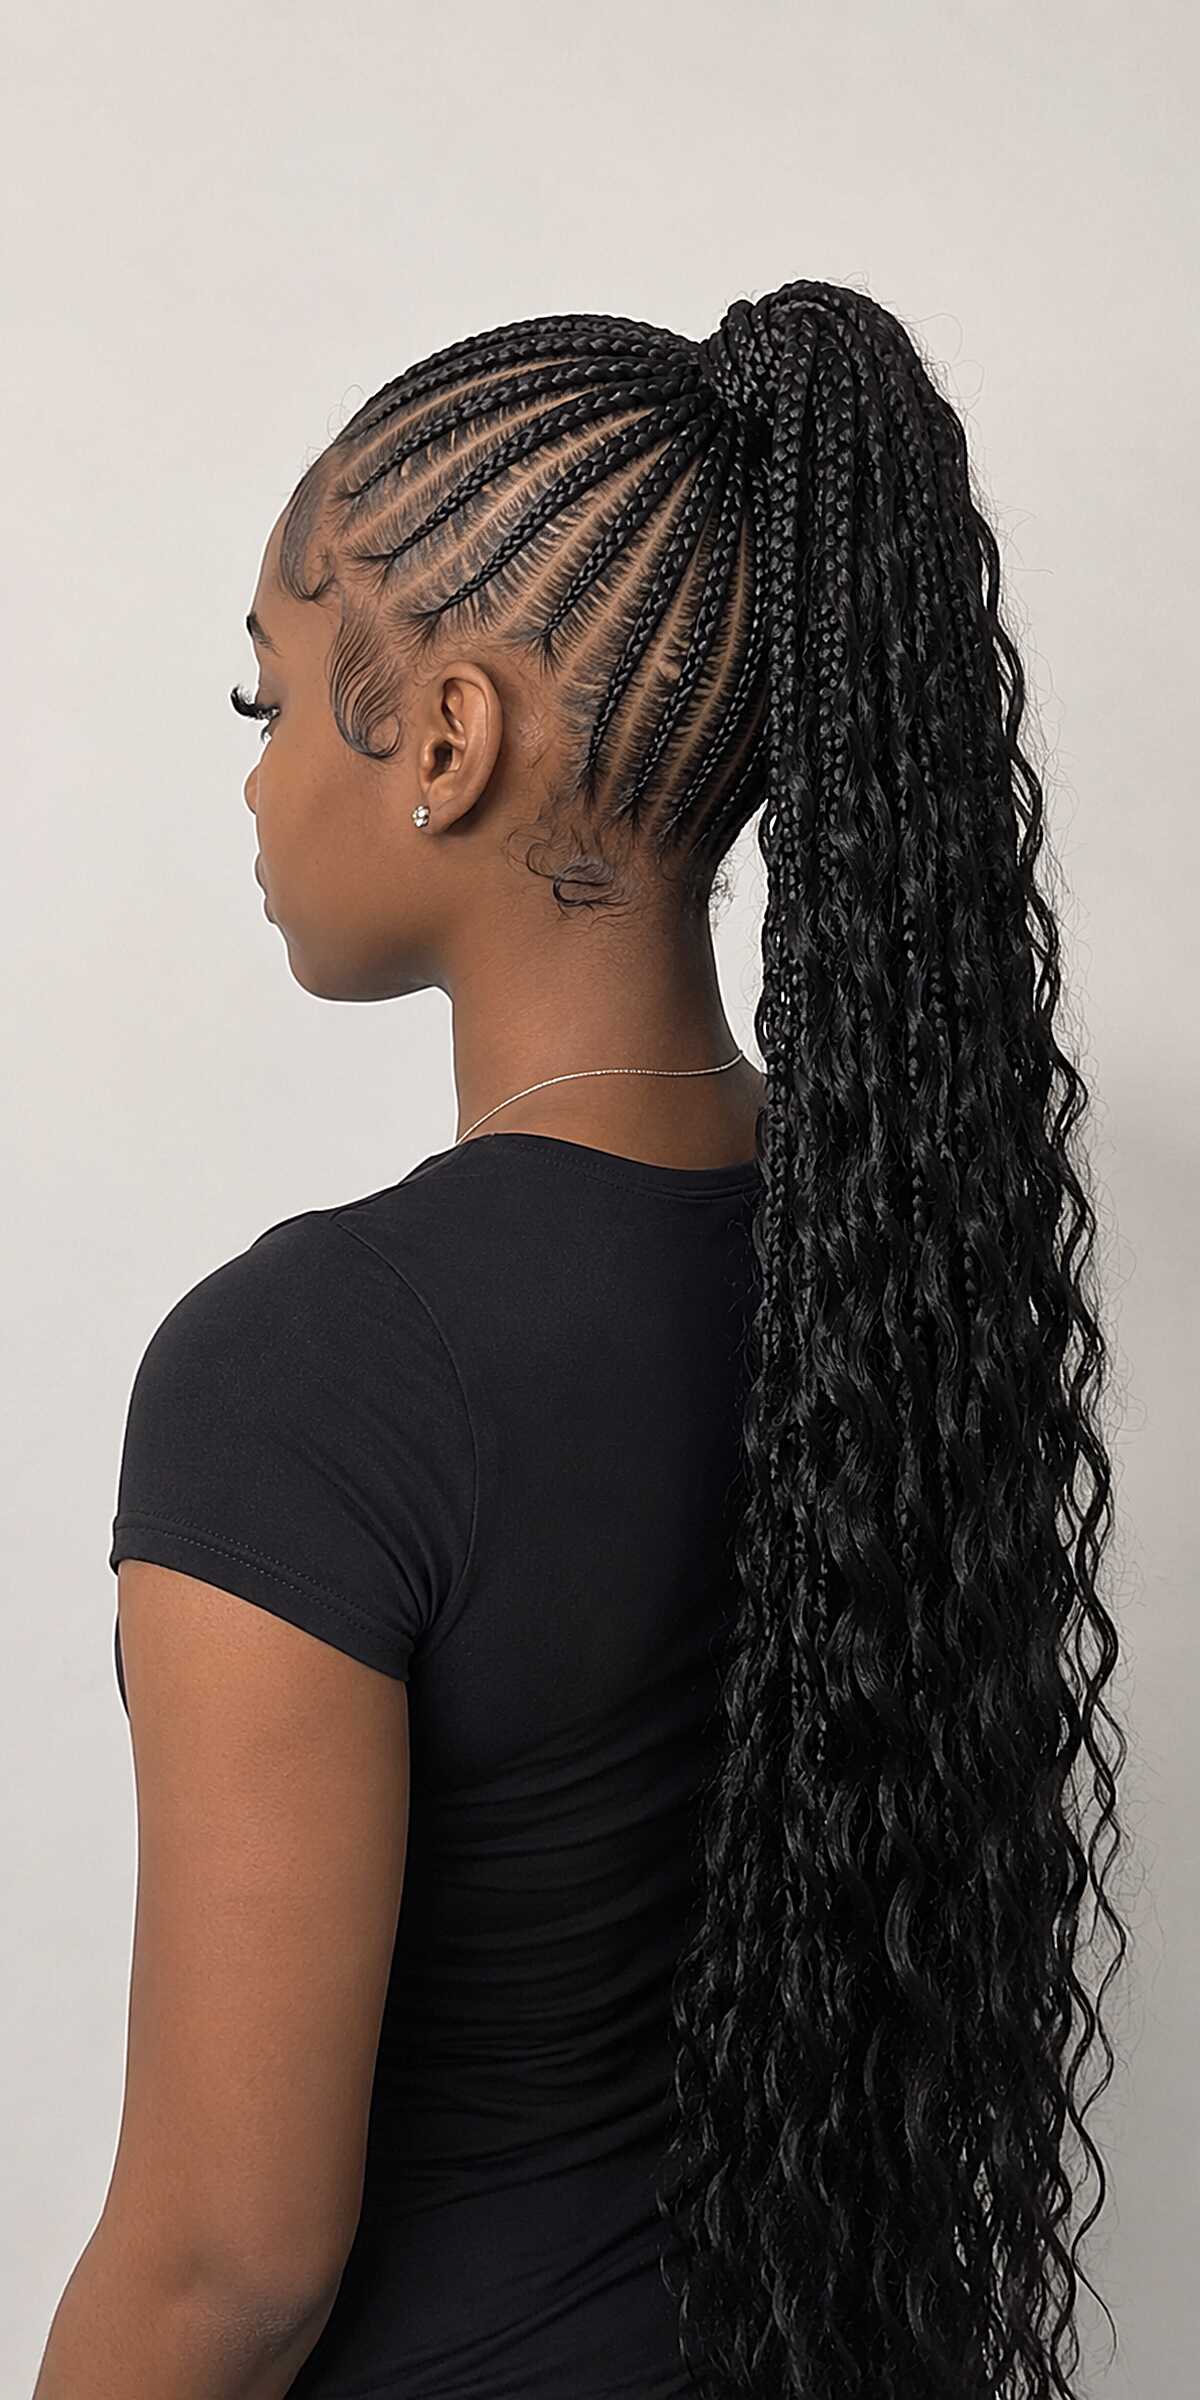
#13 Stitch Cornrows Swept into a High Ponytail with Loose Curl Extensions
That baby hair work is deliberate and clean, not an afterthought, and it tells you whoever braided this took their time with the edges before even starting the cornrows. The stitch pattern is tight and even all the way from the hairline to the crown, with each cornrow feeding directly into a gathered high ponytail where loose wave extensions blend with a few individual braids left hanging through. If you have a tender scalp, this will test you because the tension at the crown where everything converges is real. Works on most face shapes since the height of the ponytail elongates the profile, though round faces benefit the most. You need medium to thick density natural hair for the cornrows to grip properly and hold the weight of those extensions without slipping. The mix of textures in the ponytail, some braided and some curly, is what keeps it from looking one-note. Expect the curly extensions to tangle within a week if you sleep without wrapping them.
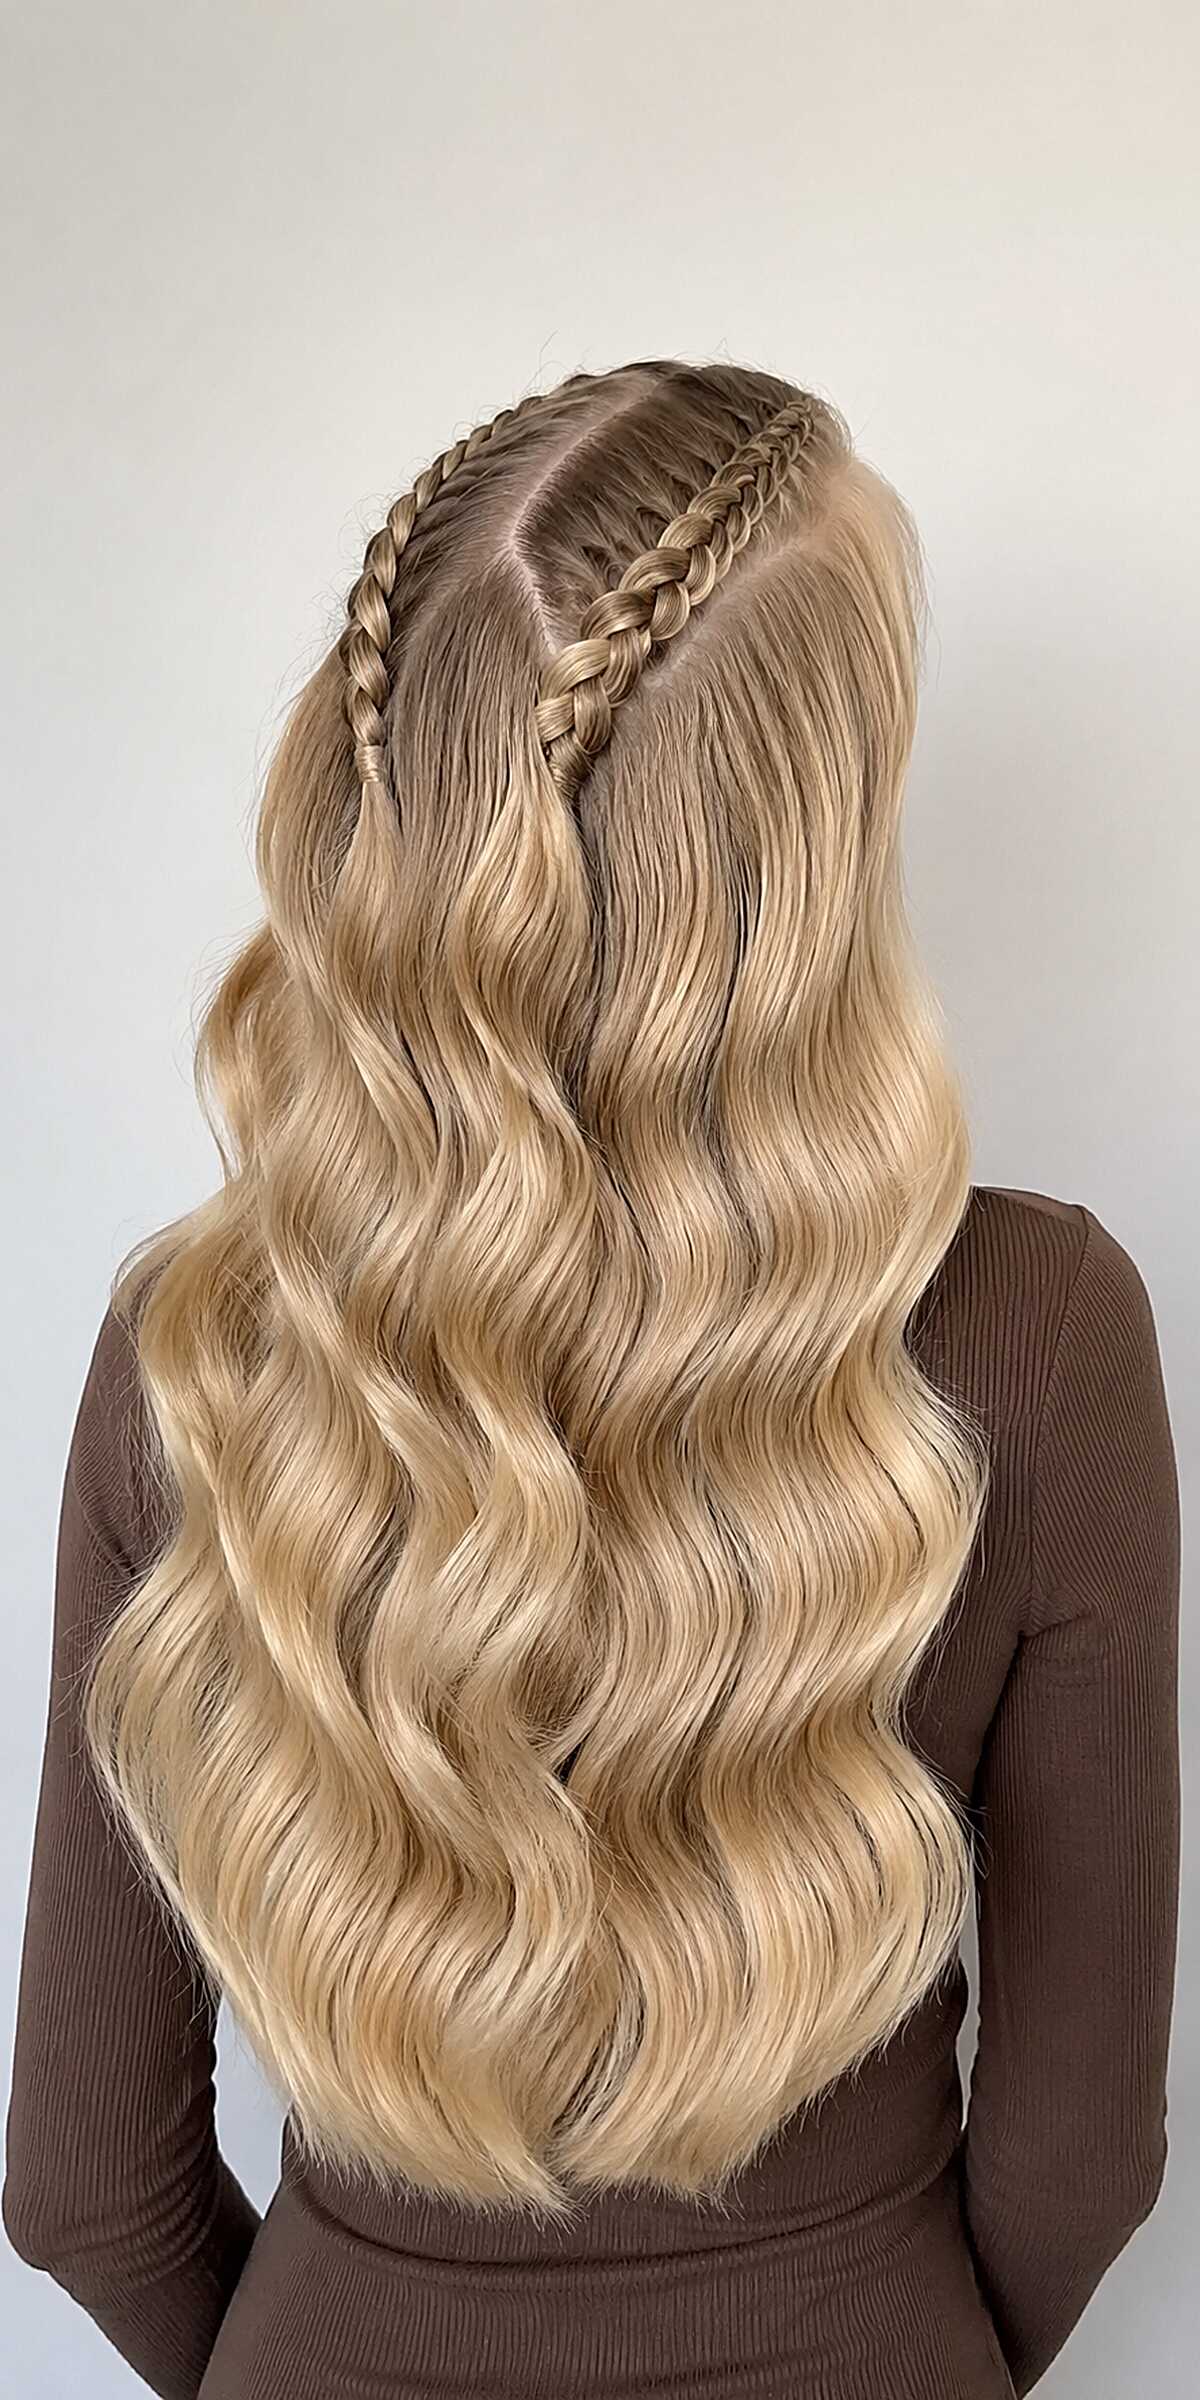
#14 Center-Part Dutch Braid Crown on Long Blonde Balayage Waves
If your hair is fine or thin, skip this one. The braid running along the center part needs genuine density to hold its shape and not look stringy within an hour. What makes this work here is thick, waist-length hair with a rooty blonde balayage where the darker base at the crown gives the Dutch braid visible dimension against the lighter lengths. That contrast is doing more work than the braid itself. The technique is a single Dutch braid starting at the part line and curving back along one side, pancaked just enough to widen it without losing structure. Waves below are clearly done with a 1.25-inch barrel, brushed out loosely. Face shape is irrelevant since everything falls behind the shoulders. This will not survive humidity or a long day without a solid hold spray, and redoing it means re-curling everything too.
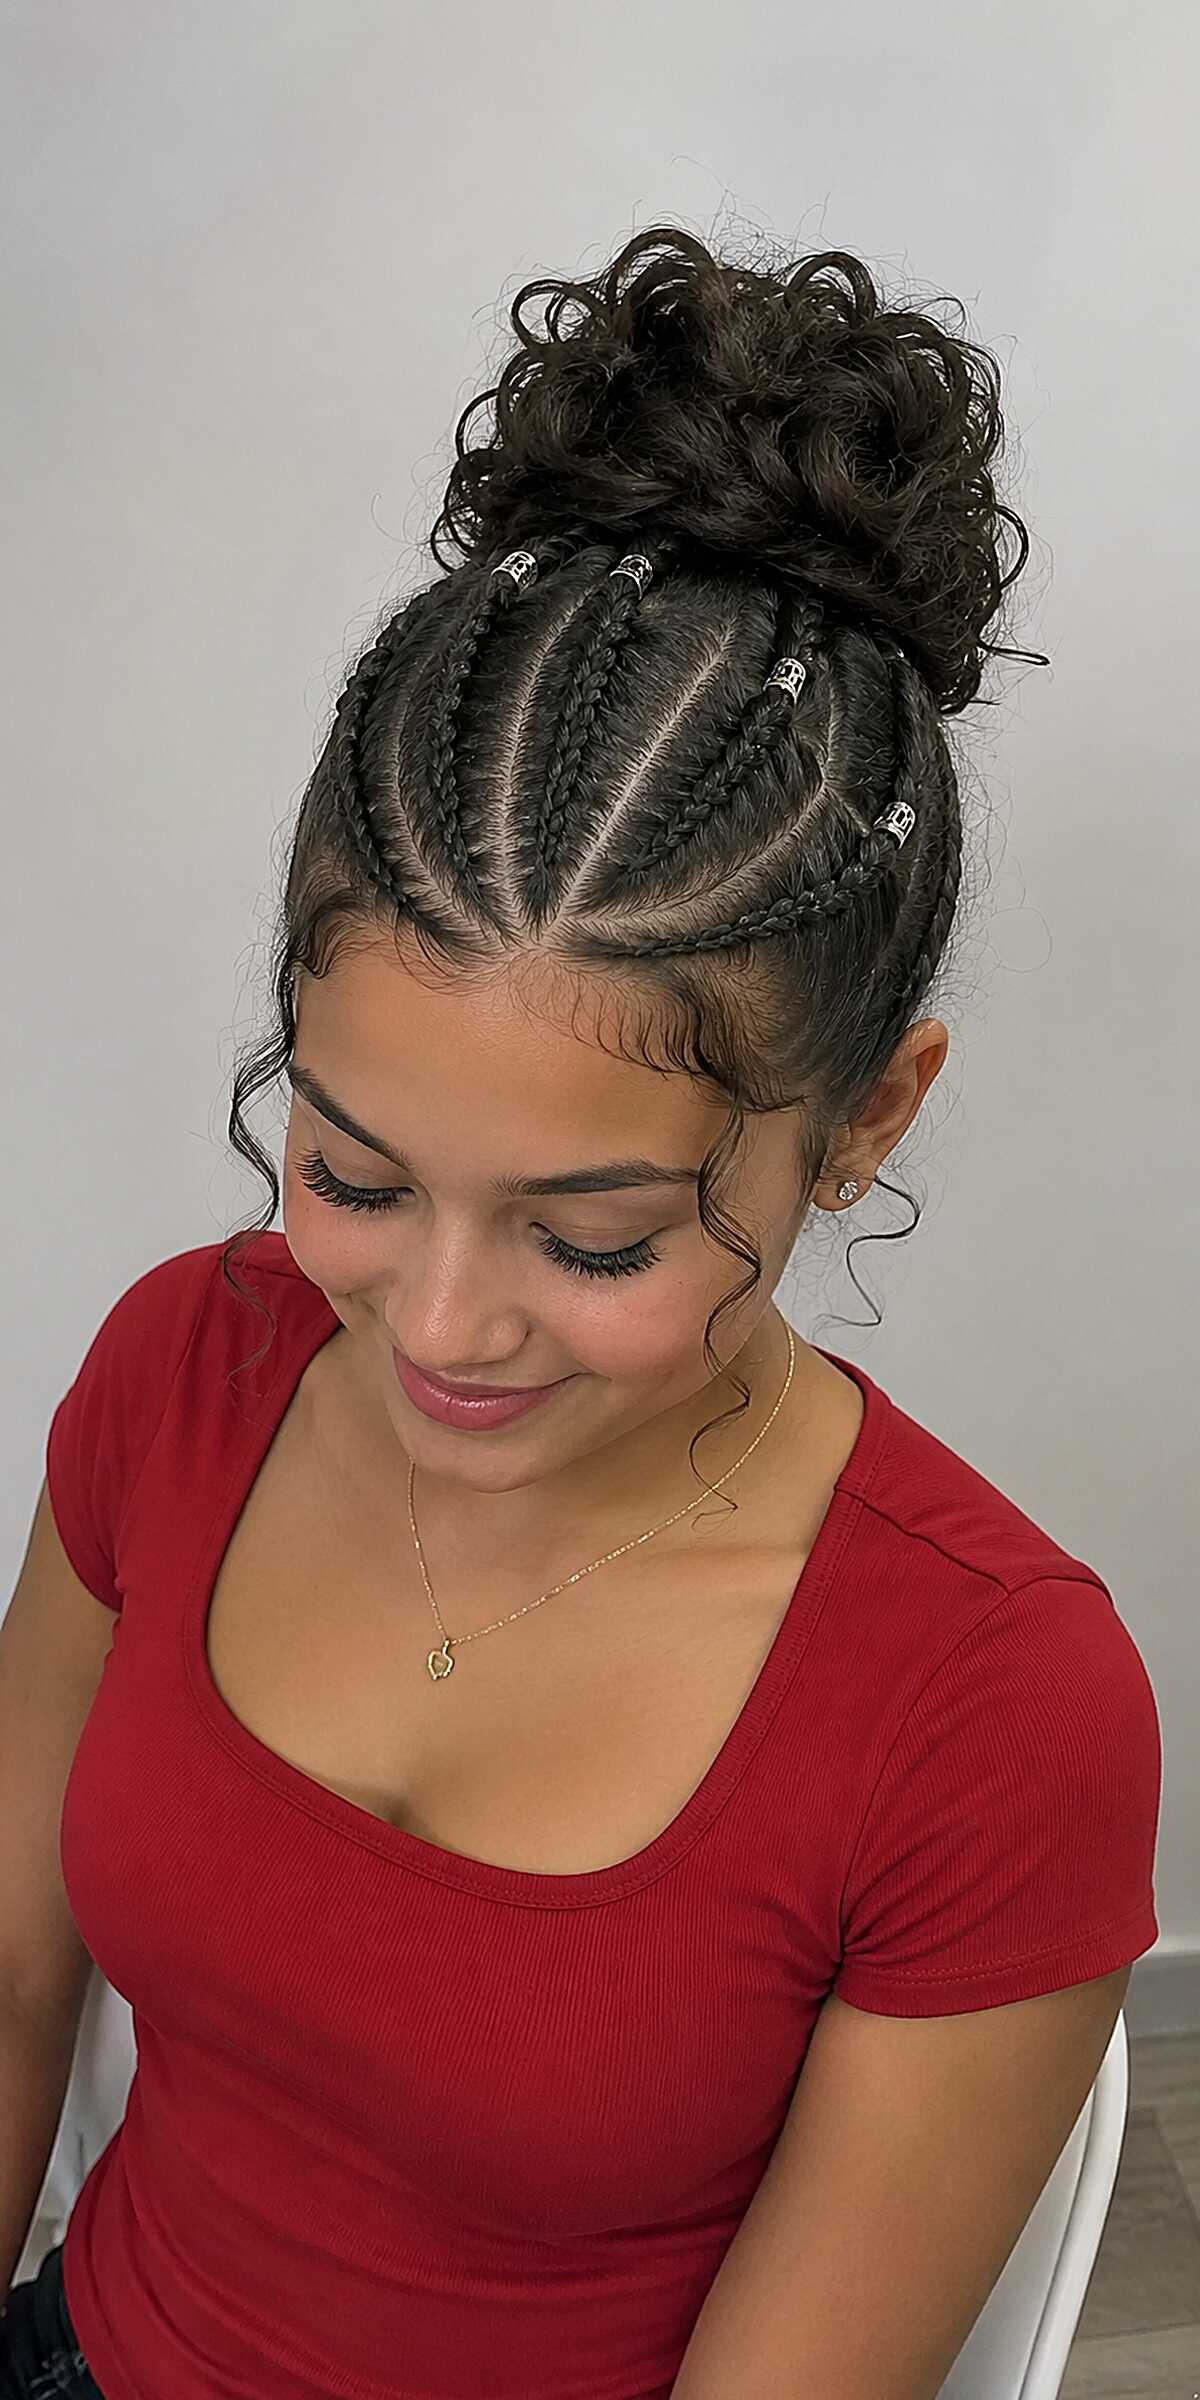
#15 Cornrow Updo with Curly Bun and Silver Cuffs
Those silver cuffs placed right where the cornrows meet the bun are doing more work than you’d think, because without them the transition from flat braids to that messy curl cluster would read unfinished. The cornrows here are tight, clean, and fed straight back with no partings that curve or angle, which means this works best on medium to thick hair with enough density to fill each channel without the scalp dominating. If your hair is fine or sparse at the temples, this style will expose that honestly. The curly bun on top is likely a combination of natural texture and added curly hair bundled together, giving it volume that most people’s hair alone won’t produce. Face shape matters less here than you’d expect because the height of the bun elongates almost everyone, though round faces benefit most. Those wispy face-framing pieces were left out intentionally and curled, not just stray hairs, and they soften the whole look. Tension on the hairline is real with this one. Skip it if your edges are already fragile.
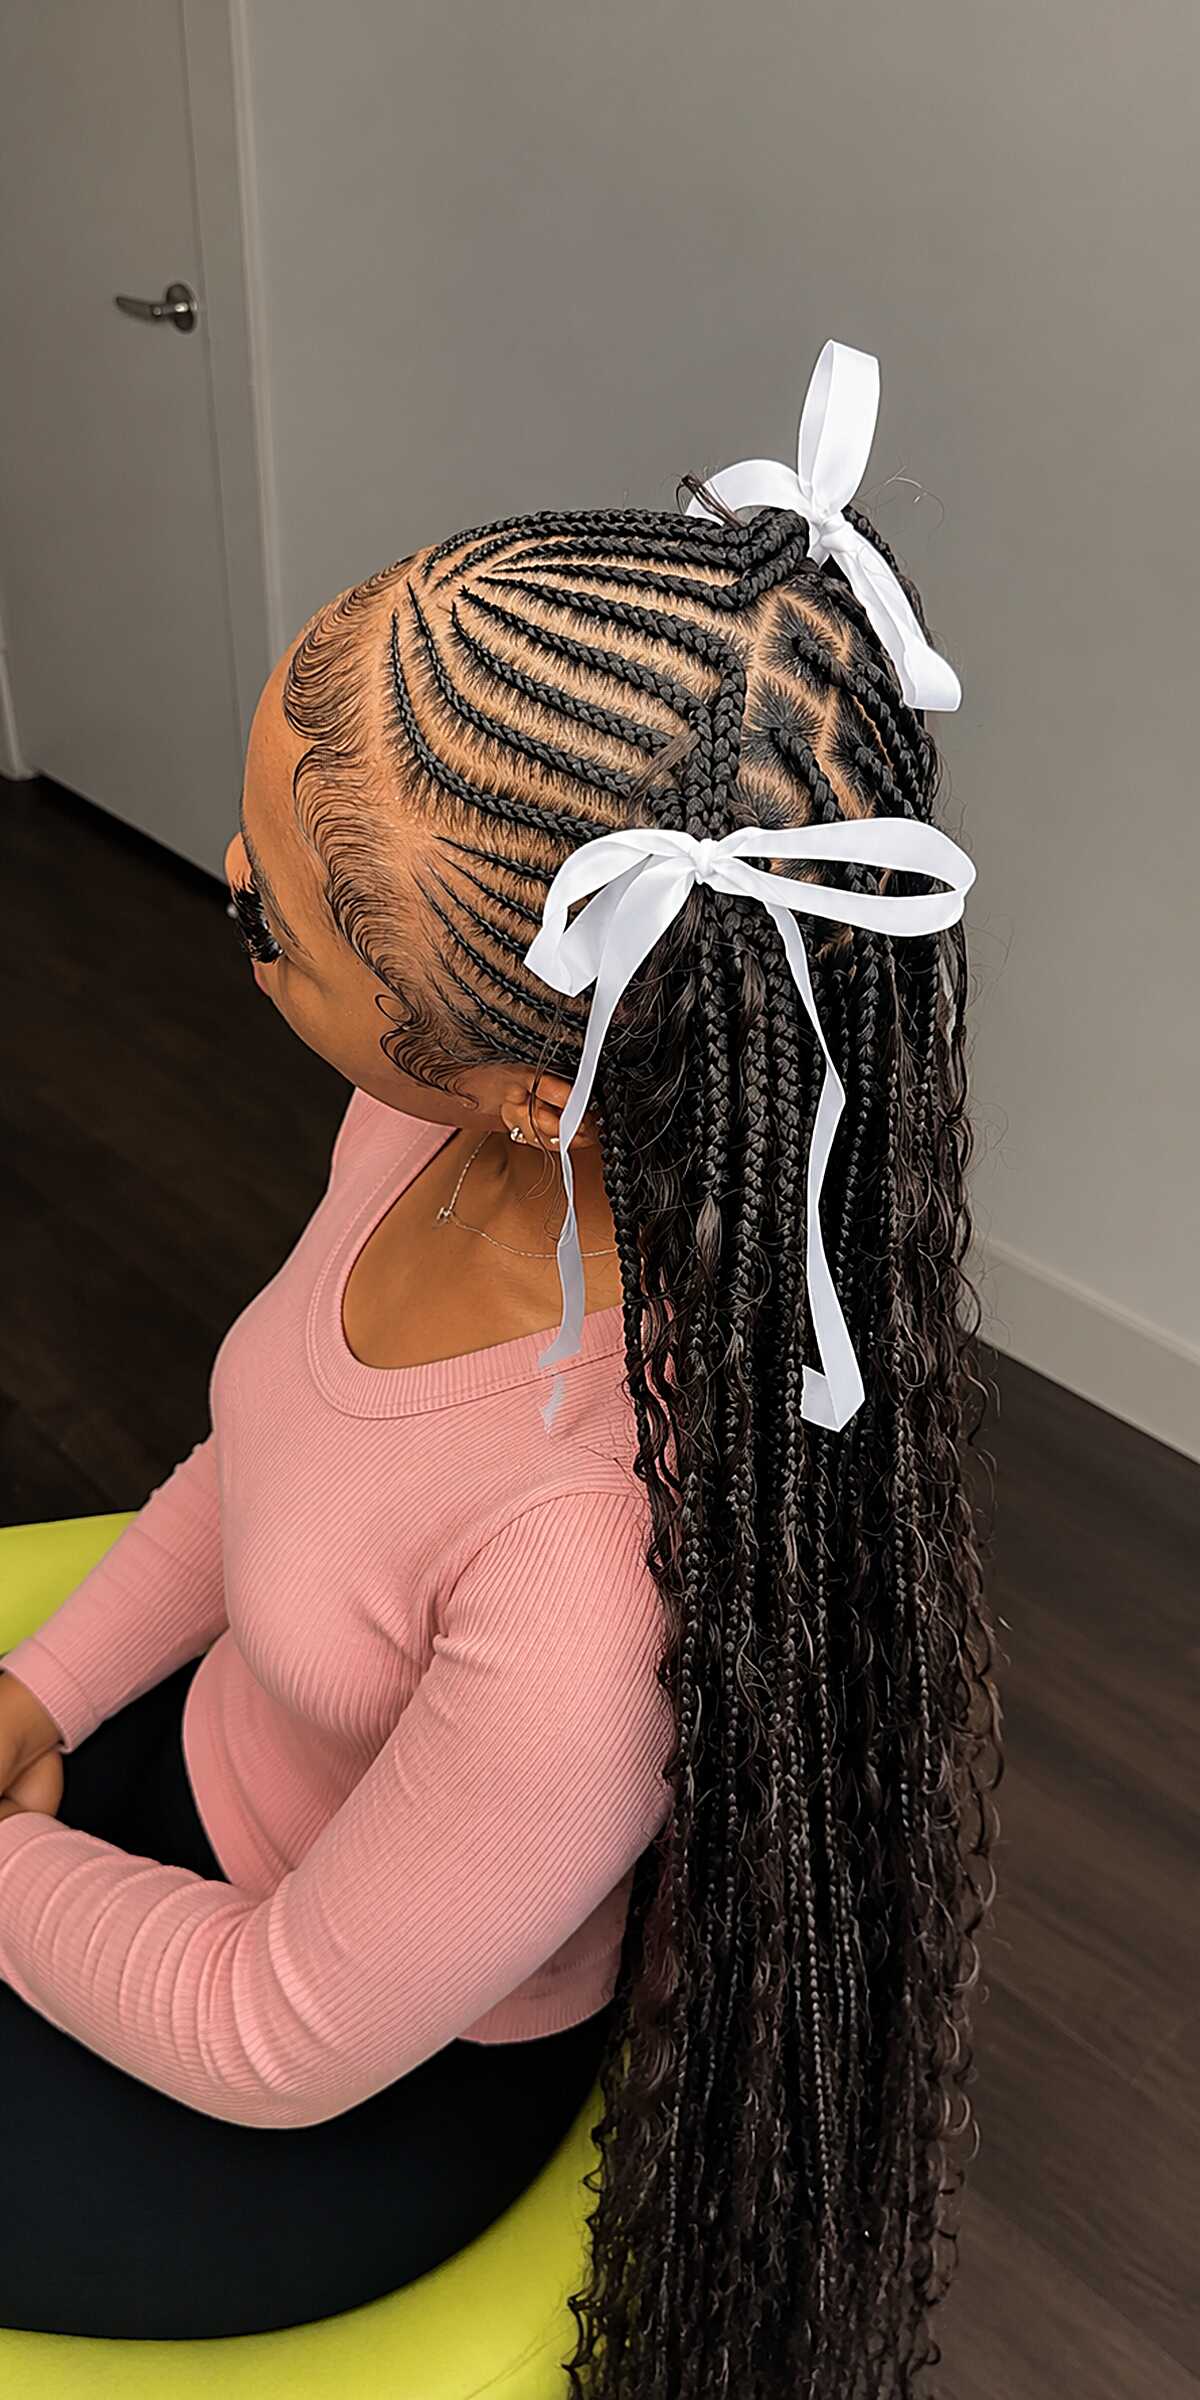
#16 Ribbon-Tied Cornrows into Flowing Knotless Braids with Curly Ends
If your edges are thin or tender, this install will expose that immediately. The cornrows fan outward from the crown in a starburst pattern, which means every part line is visible and the tension distribution has to be precise. Look at where those white satin bows sit: they mark the exact transition point where the flat cornrows release into individual knotless braids with curly extension ends, and that junction is where a less skilled braider will leave bumps. This works on medium to thick natural hair, any length, because the extensions do the heavy lifting below the braids. The curly ends mixed with the straight braid texture give it dimension most people won’t notice unless they’re looking closely. Sitting time is long, probably five to six hours. The ribbons are a small detail that will not survive a week of sleeping on them.
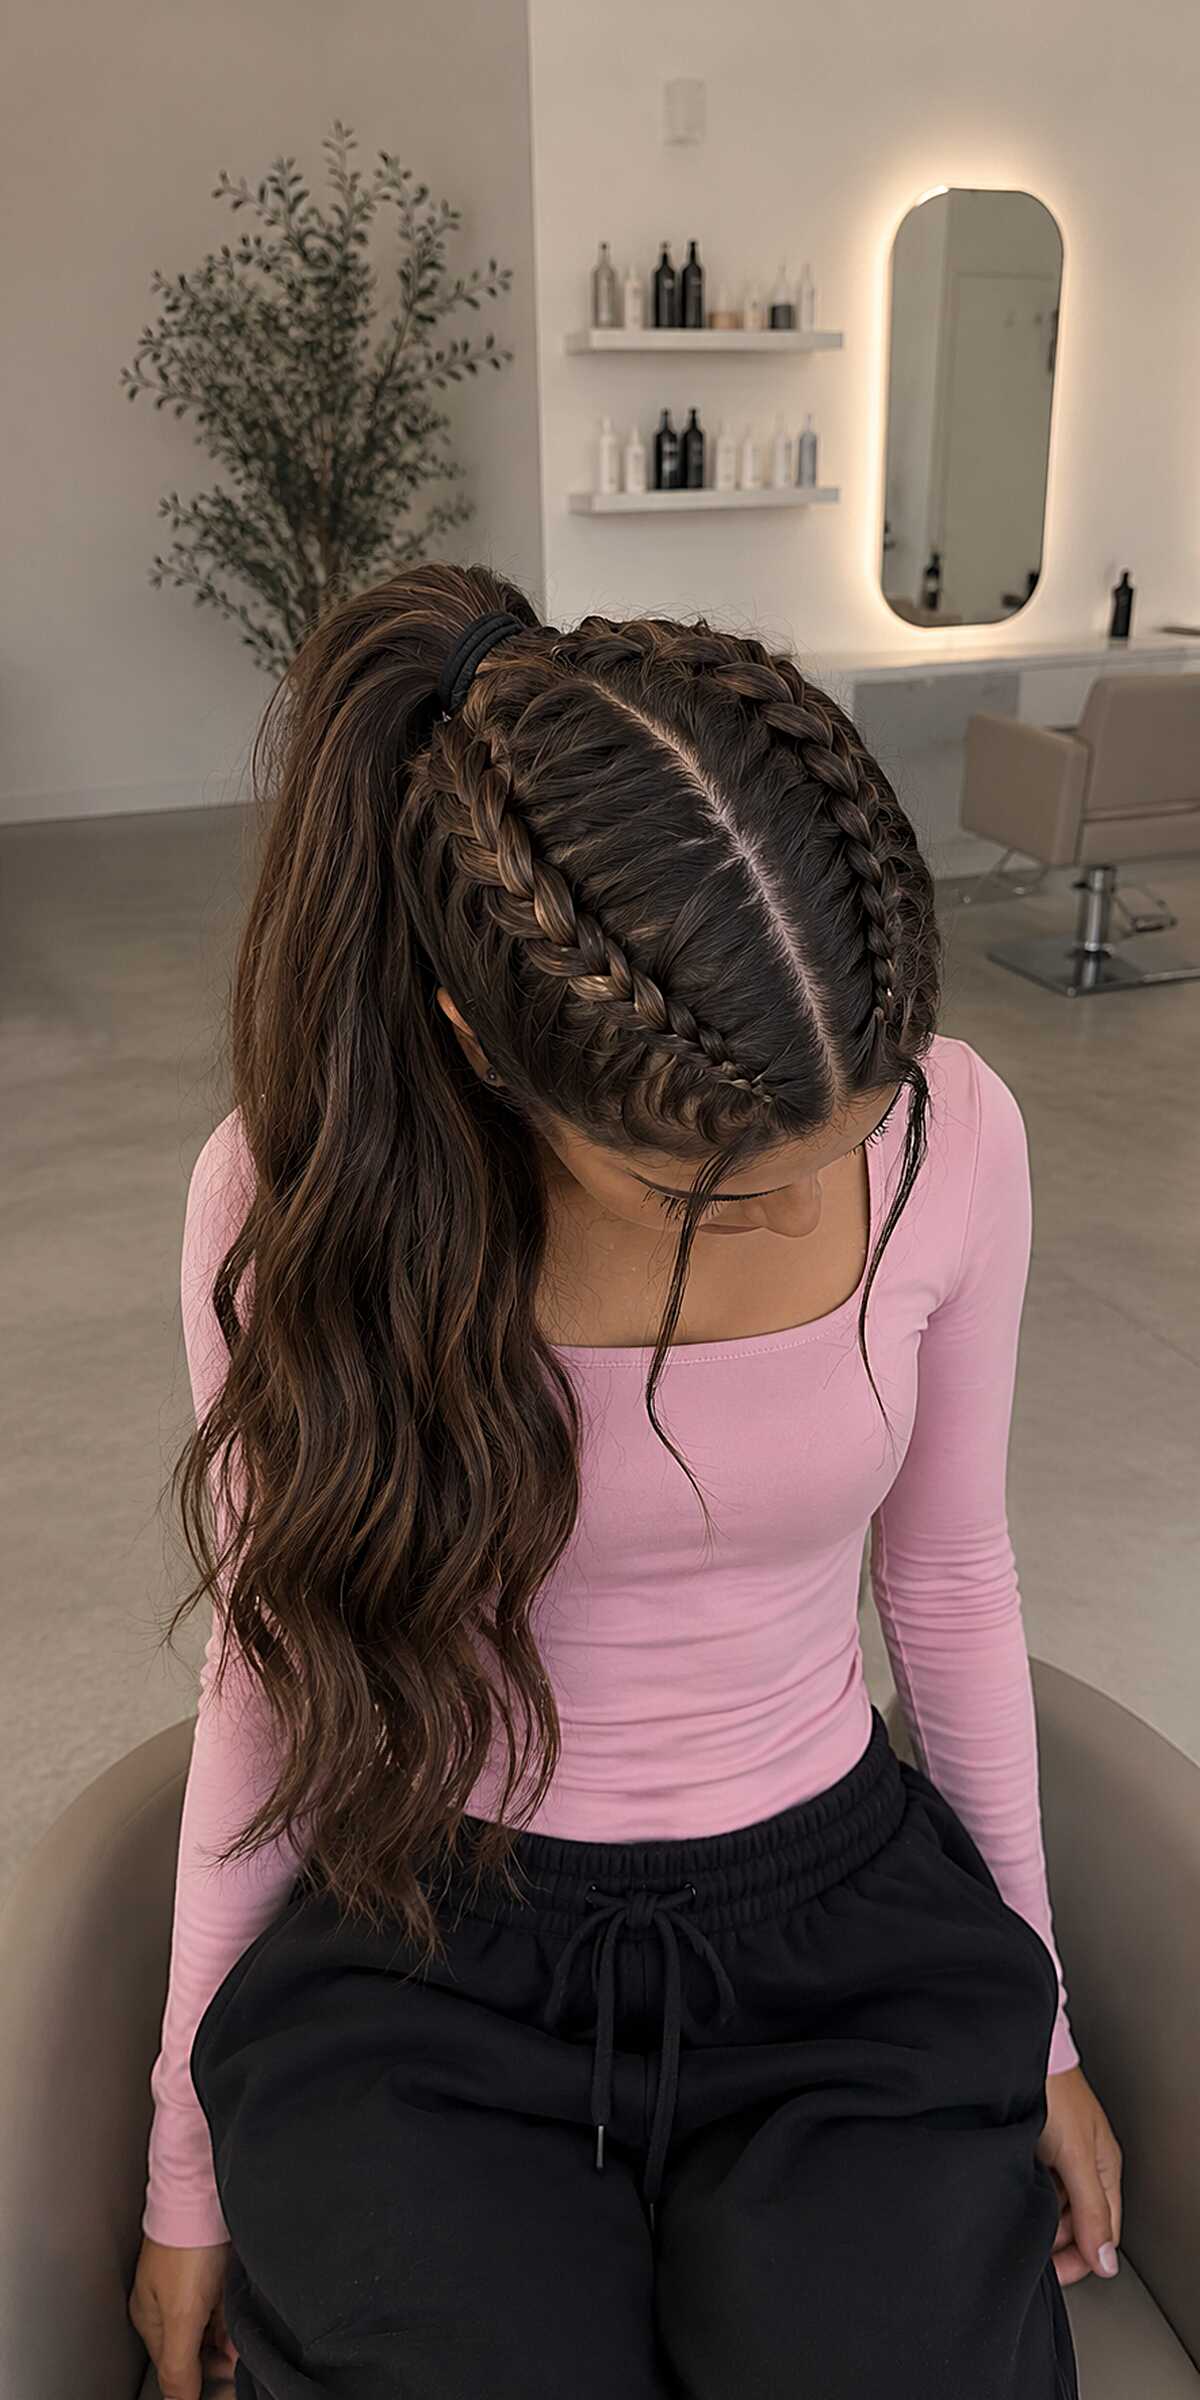
#17 Triple Dutch Braids into a High Wavy Ponytail
If your hair is fine or thin, skip this one. Three Dutch braids feeding into a high ponytail demands density, and without it the braids look starved and the pony falls flat. What caught my eye here is how tight the center braid is compared to the two flanking it, which keeps the part lines clean and prevents that lumpy look you get when all three compete for the same space. You need mid-back length minimum, and thick, straight-to-wavy hair is ideal. The wave in the ponytail looks like it was set with a flat iron twist rather than a curling iron, giving a more natural, unstructured texture. This will not last two days. By evening, the braids at your temples will start loosening.
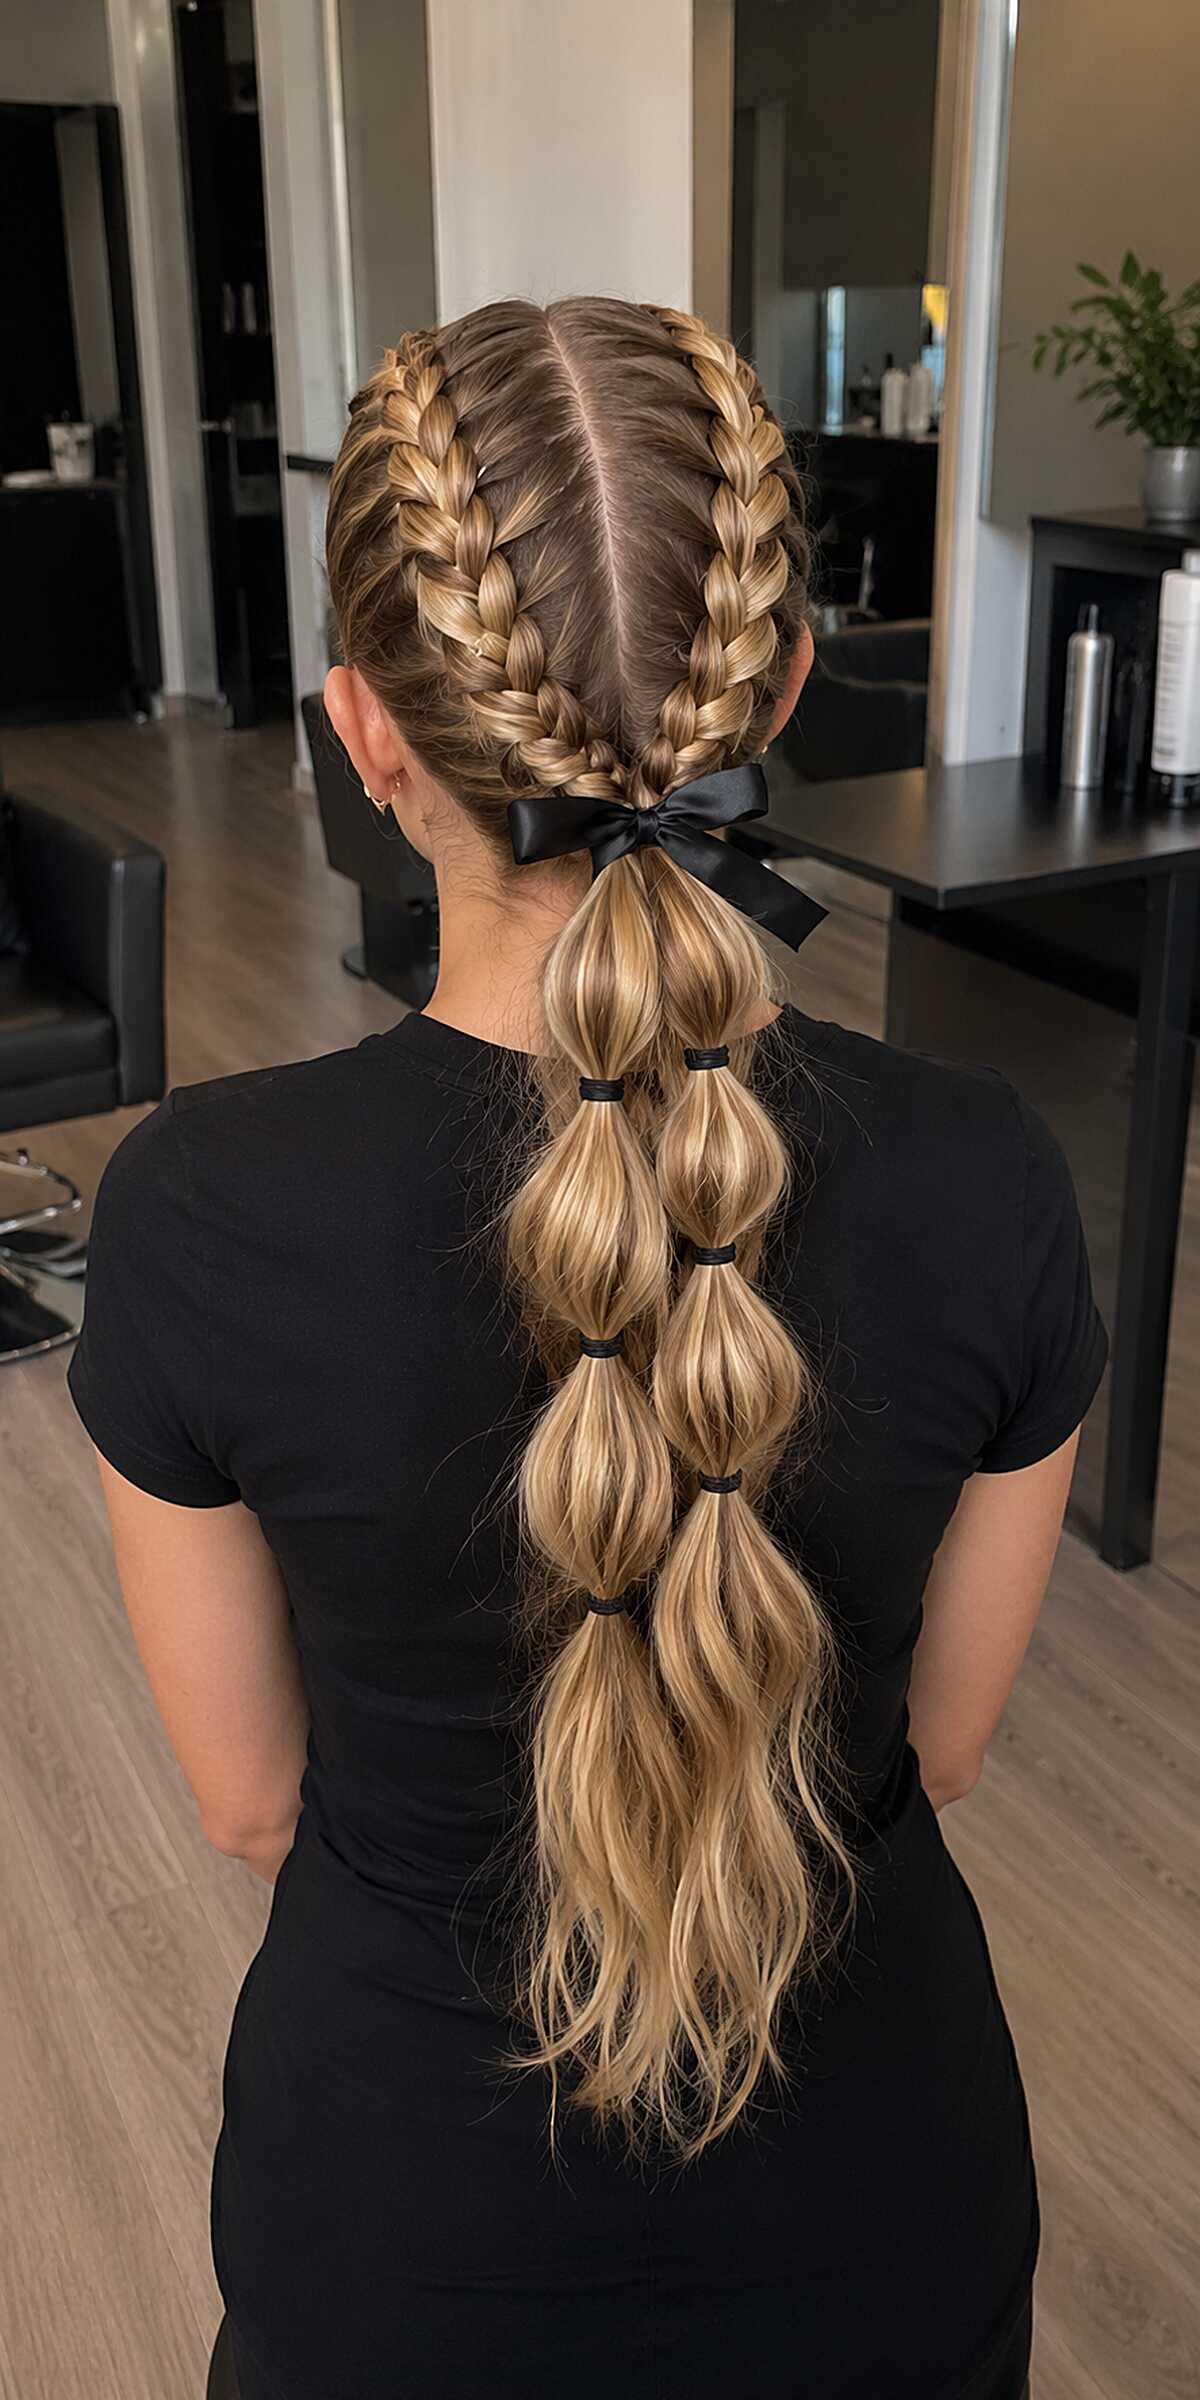
#18 Double French Braids into a Bow-Tied Bubble Ponytail
If your hair is shorter than mid-back, this will not look like this. The bubble section needs real length to get six or seven segments that read as full and round, and pancaking each one only does so much on thin or fine hair. The two French braids are clean and tight to the scalp with a center part, merging at the nape where a black satin bow sits right at the join point. That bow is doing more work than it seems, hiding the transition where both braids become one ponytail. You need medium to thick density for those bubbles to hold volume without looking deflated by hour three. The dimensional blonde over darker roots gives the braid pattern real contrast and makes the weave visible in a way solid color wouldn’t. Great for straight to wavy textures that hold an elastic without slipping.
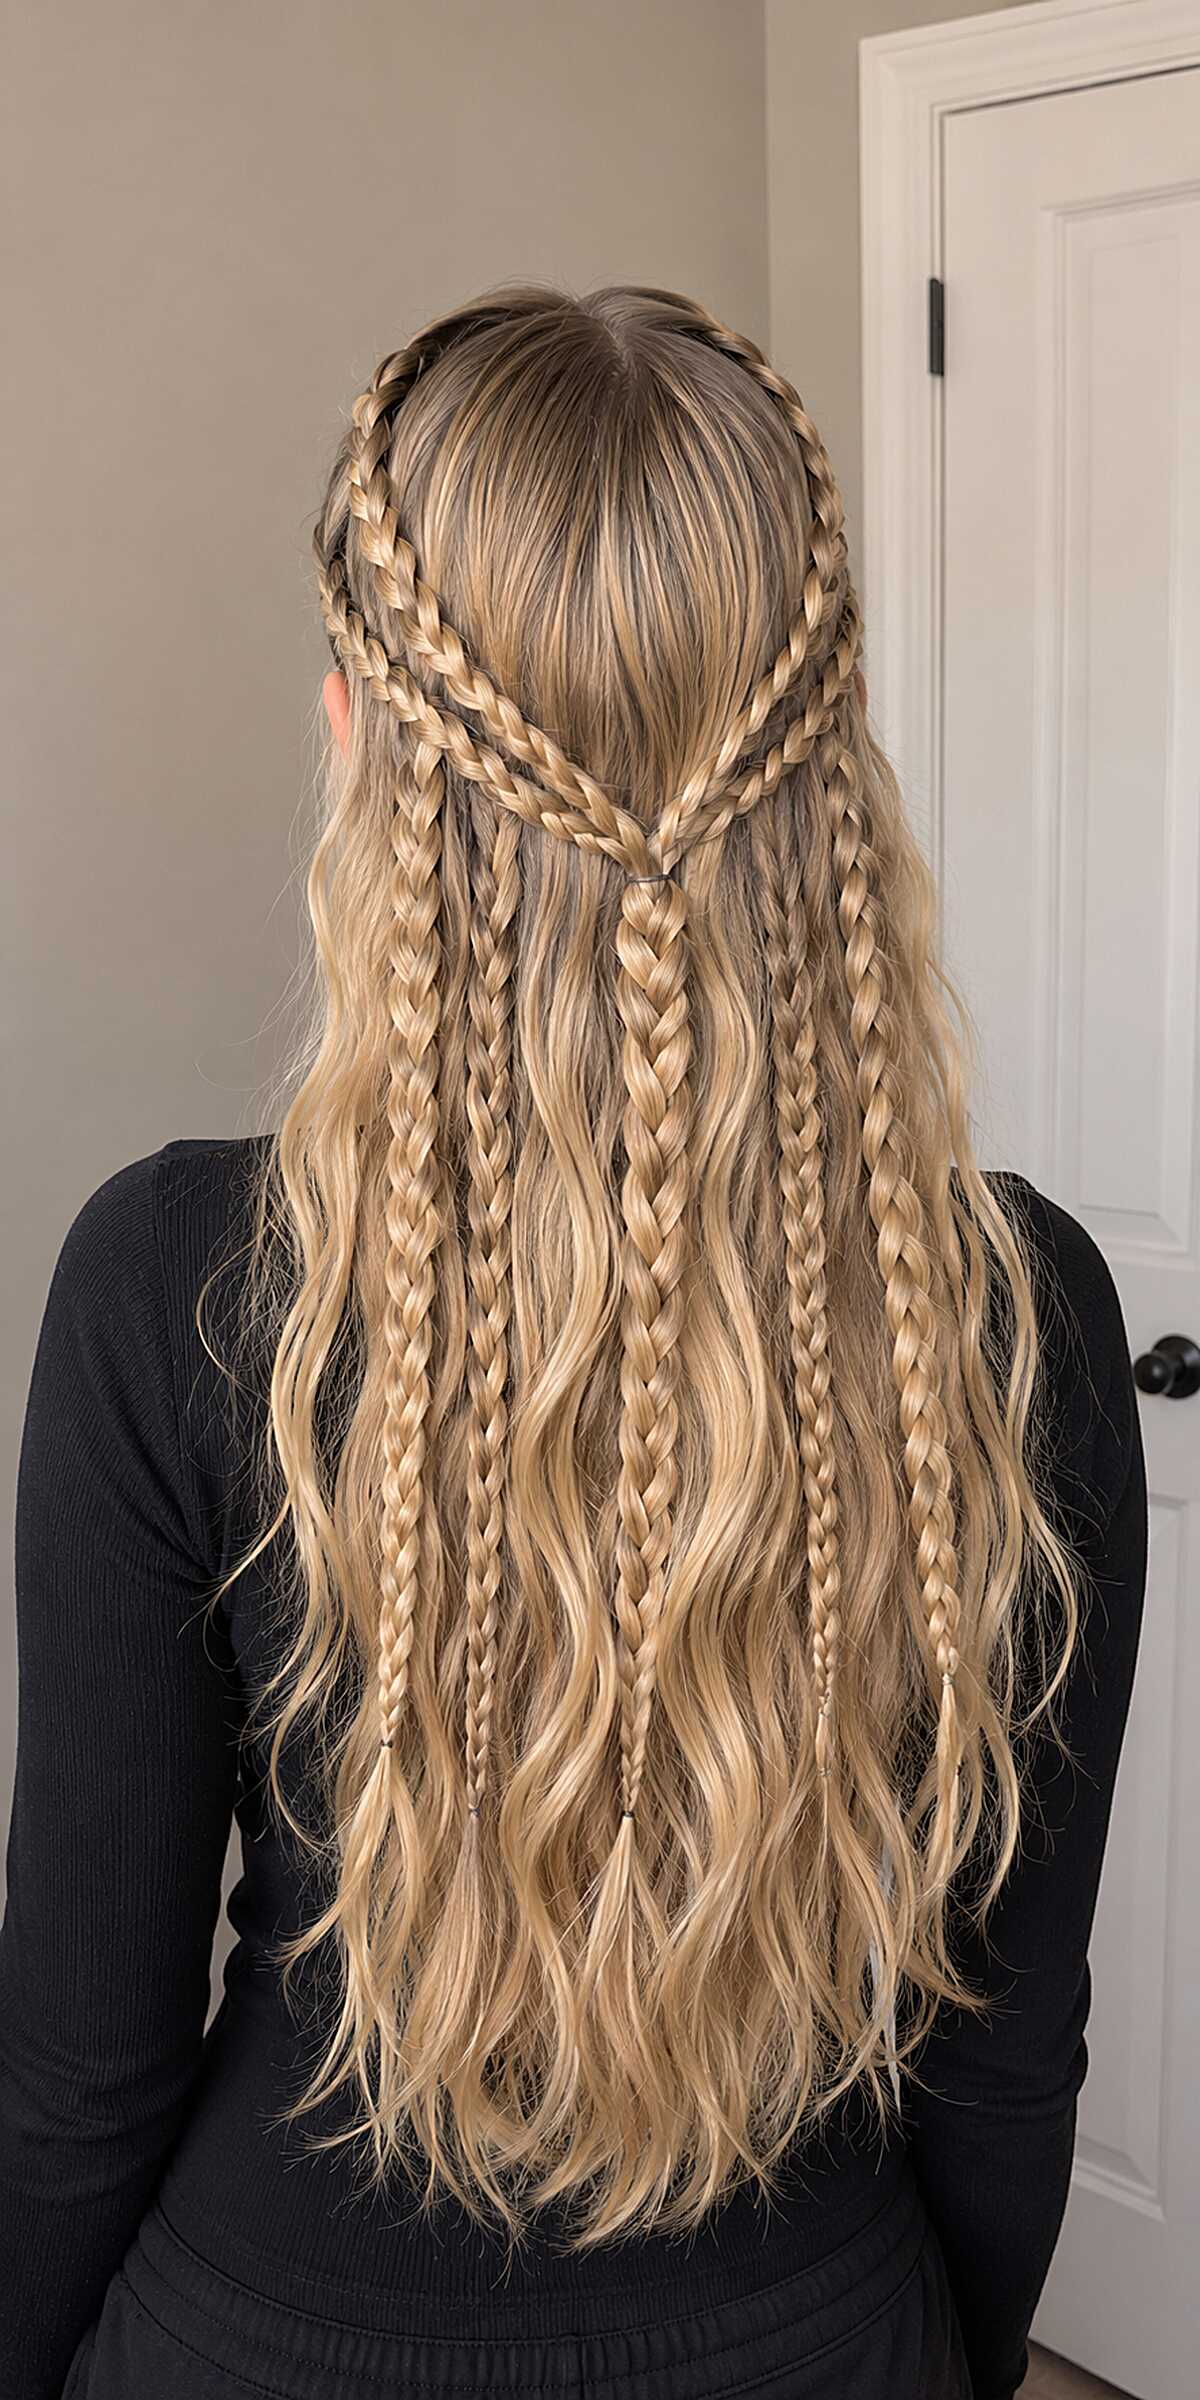
#19 Half-Up V-Shaped Multi-Braid on Long Blonde Waves
If your hair is fine or thin, walk past this one. It needs serious density to pull off multiple three-strand braids without looking sparse between them. What’s happening here is two braids starting at the crown, meeting in a V at mid-back, then splitting into four or five smaller braids that hang free over wavy lengths. The dimensional blonde balayage is doing a lot of the work, because the color shift from darker roots to lighter ends makes each braid read as its own texture against the loose waves. You need waist-length hair minimum, and the wave pattern in the unbrushed sections has to hold on its own or you’ll spend the whole day re-curling pieces that fall flat. This is genuinely striking on someone with thick, long hair and a natural wave.
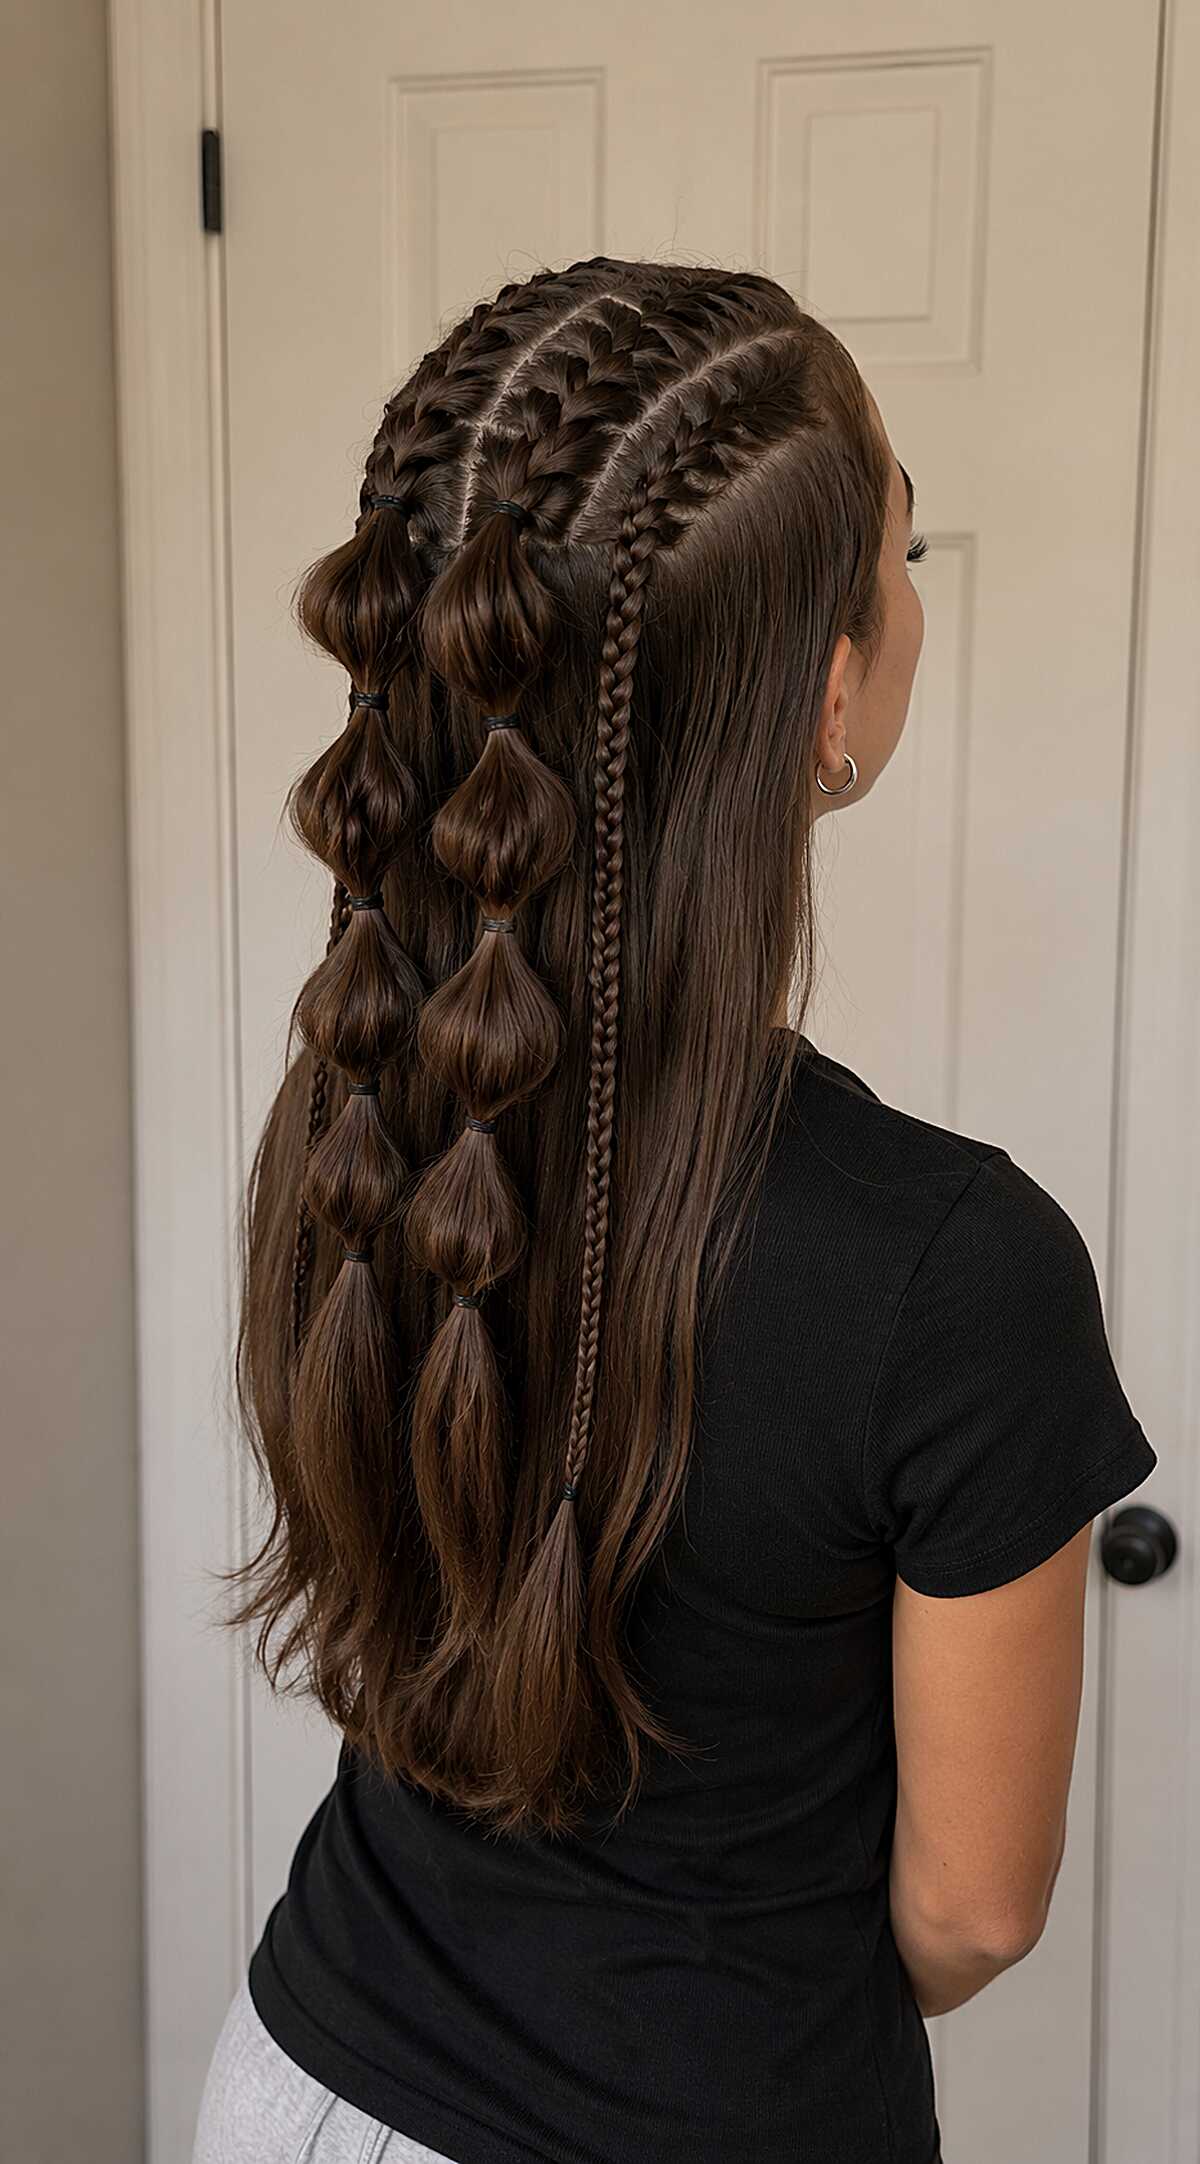
#20 Half-Back Dutch Braids with Bubble and Micro Braid Details
If your hair is fine or thin, skip this one entirely. The bubble sections need real density to puff out, and without it they just look deflated. What makes this work is that three Dutch braids feed from the crown into two chunky bubble braids flanking one tight micro braid down the center, with the rest of the hair left long and loose underneath. That skinny center braid is easy to overlook, but it’s doing all the structural work, keeping the two larger braids from merging into a single mass. You need mid-back length minimum, straight to wavy texture, and thick hair to get those rounded bubble segments looking full like this. The elastics are color-matched to dark brunette here, which keeps things clean. On lighter hair, mismatched elastics will cheapen the whole thing fast. It won’t survive a full day without some bubbles loosening unevenly, so treat it as a few-hours style rather than an all-day one.
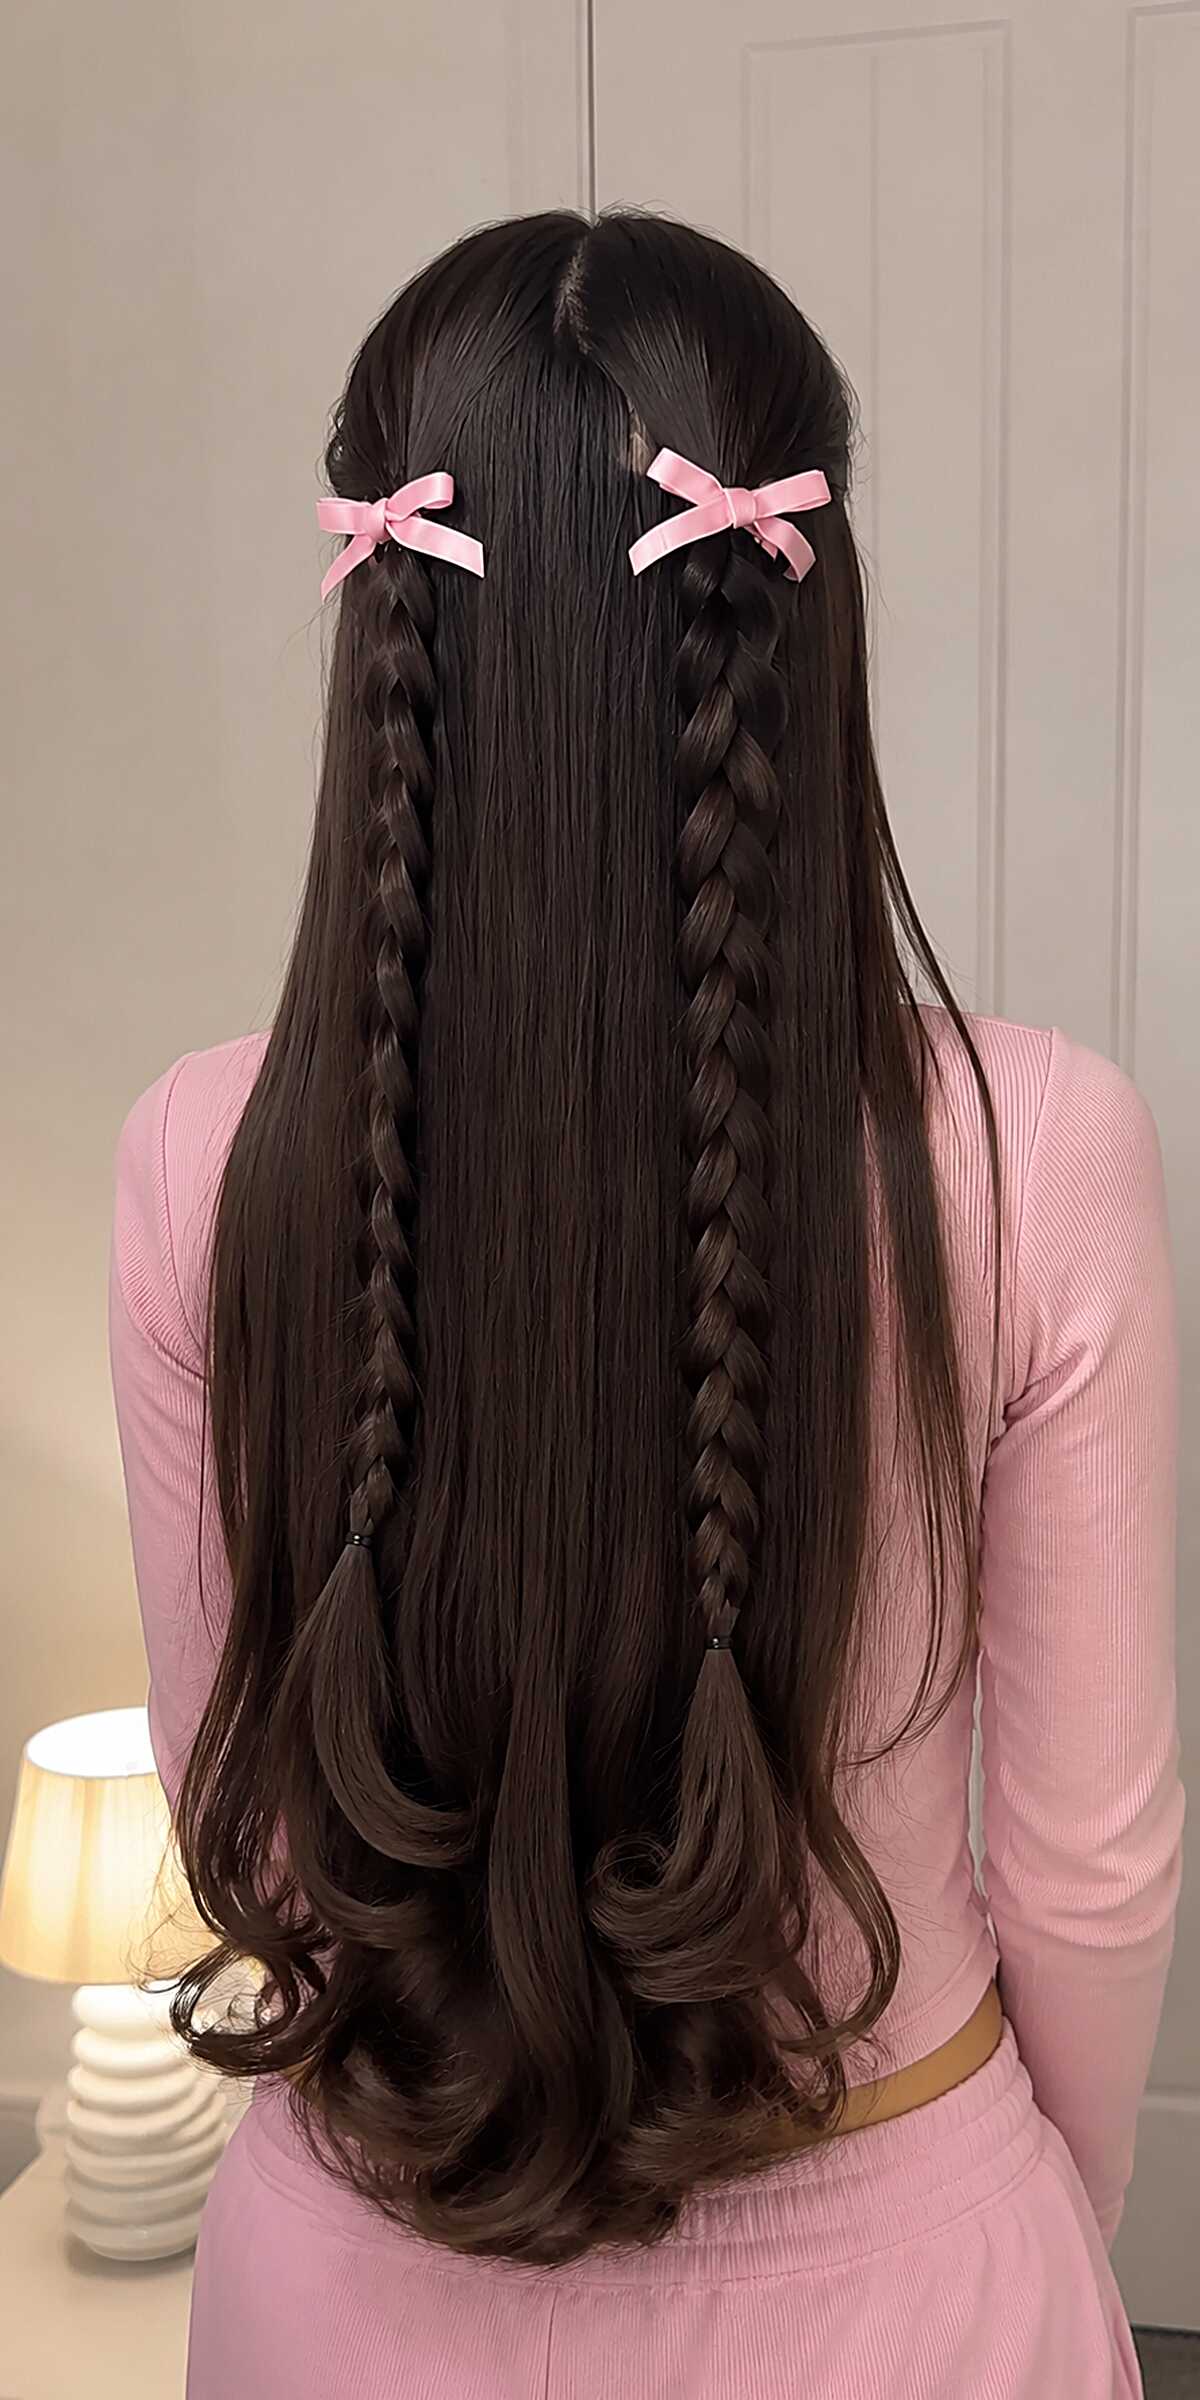
#21 Twin Three-Strand Braids with Pink Ribbon Bows on Long Dark Hair
If your hair is fine or thin, skip this one. It needs density. The two simple three-strand braids sit close together near the center back, each starting just below crown level and secured with a small clear elastic before the pink satin bows are tied on top to hide them. What caught my eye is the ends, which are curled inward with a flat iron or large barrel to create those bouncy flips that give the whole look a polished finish instead of letting the braids just trail off limply. You need waist-length hair minimum, straight to slightly wavy, and enough thickness that leaving the majority of it down still reads as full on both sides of the braids. Face shape is irrelevant here since everything falls behind the shoulders. This is genuinely easy to do yourself in ten minutes. The trade-off is that it won’t last through wind or movement the way a tighter, pinned style would, and by midday those bows will likely shift position.
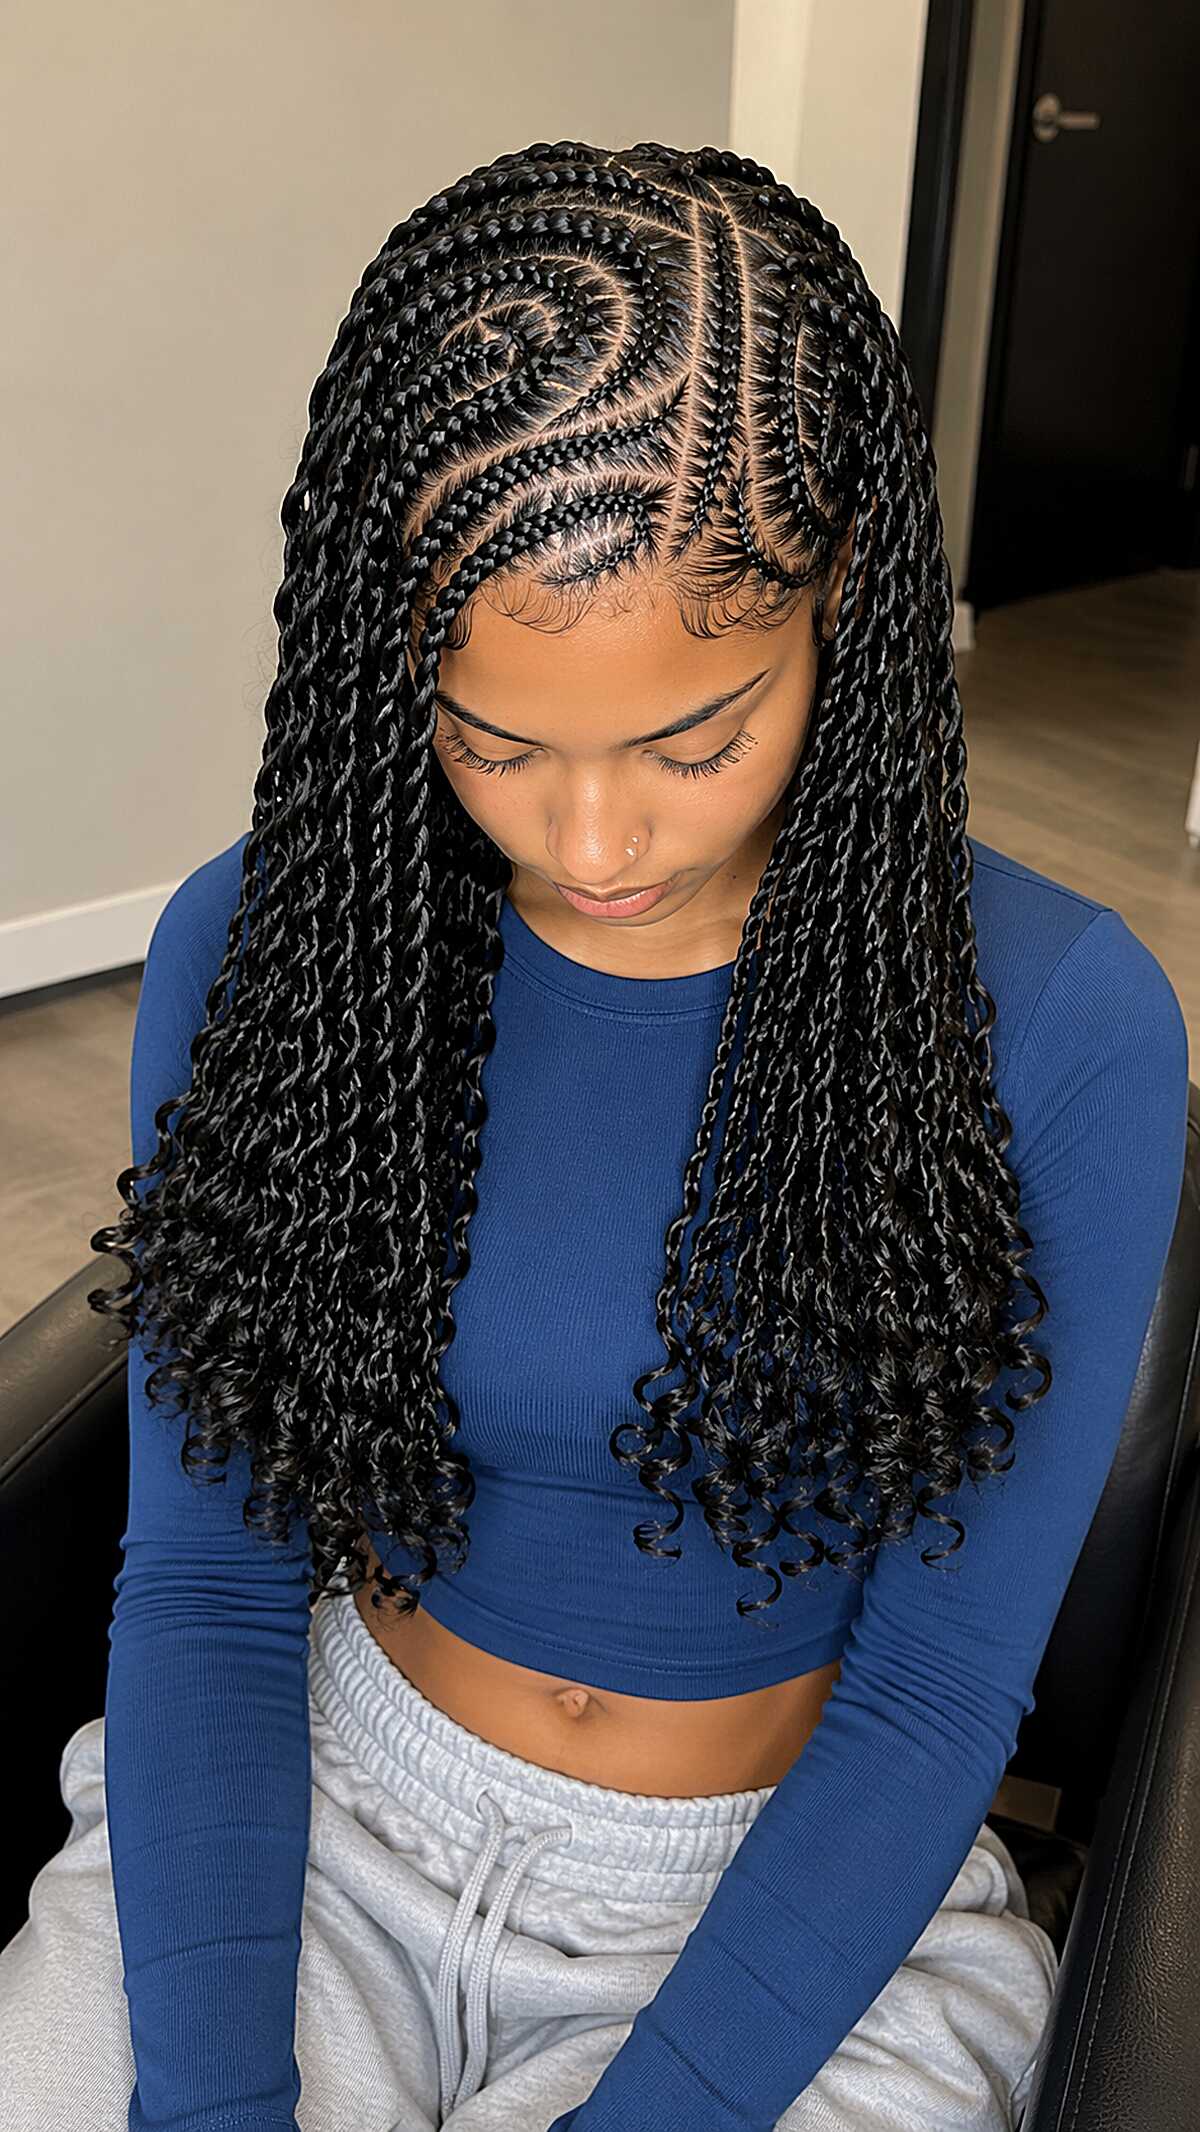
#22 Swirl-Part Cornrows Flowing into Waist-Length Knotless Braids with Curly Tips
That swirl parting on the right side is doing serious work, and most people will scroll right past it. It requires a braider who can carve a clean curved part while keeping consistent tension on every cornrow feeding into it, which is not a beginner skill. The cornrows transition into individual knotless braids at about ear level, and the curly extensions at the tips soften everything. This is a long install, likely four to six hours. If you have a tender scalp, be honest with yourself about that before committing. Works on all face shapes because the length pulls the eye down and the parting detail adds interest up top. The laid baby hairs along the hairline tell me the natural hair underneath is fine to medium density, which is ideal here since thicker hair can make the cornrow base sit too high.
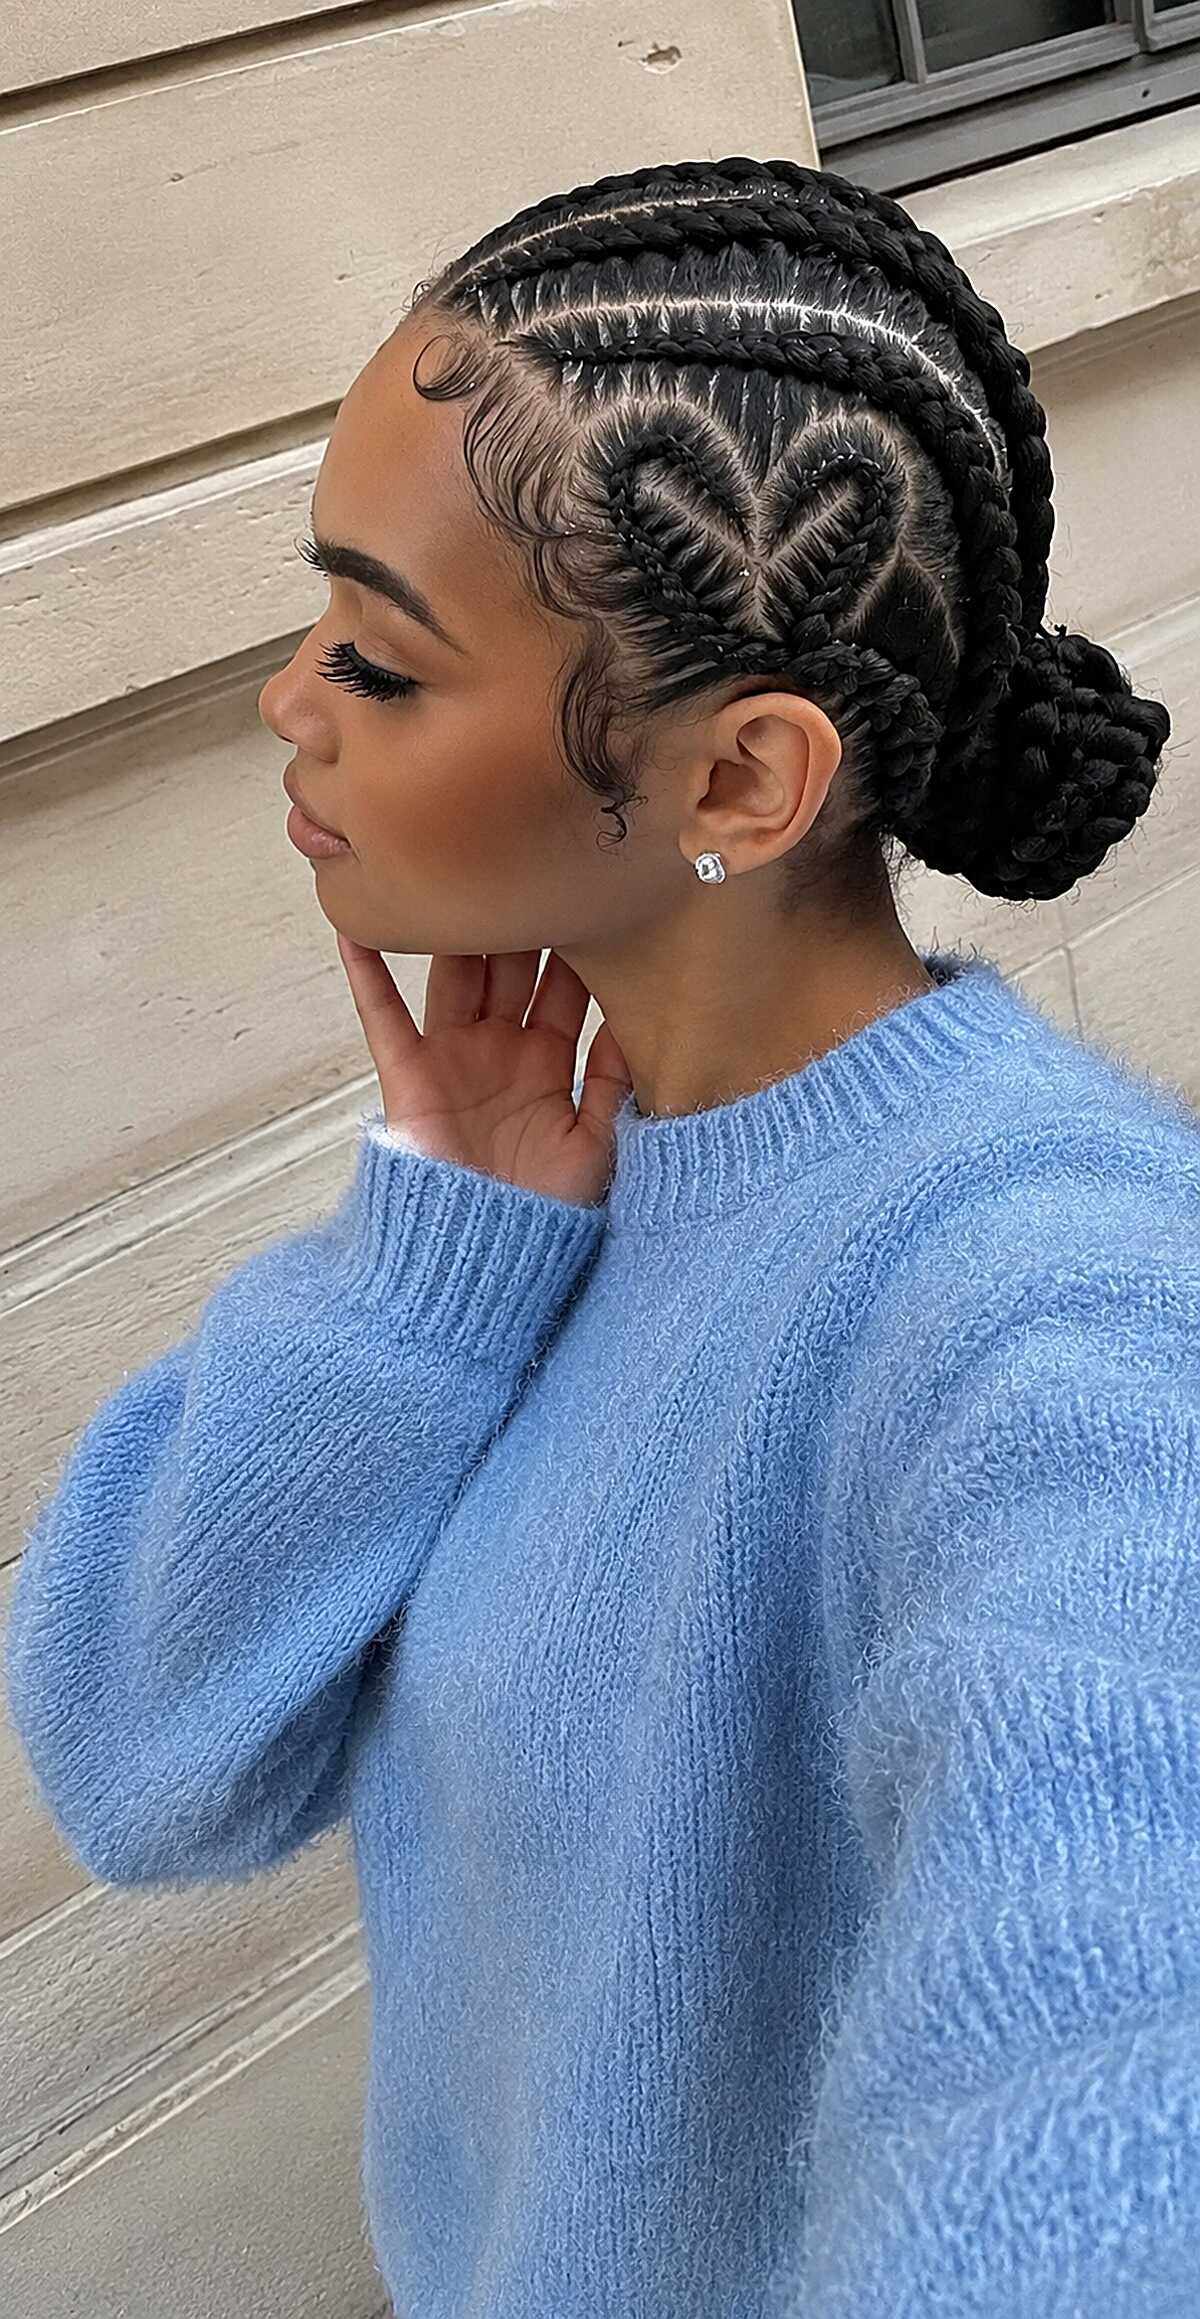
#23 Heart-Shaped Cornrow Design with a Braided Low Bun
That heart is not a stencil or a shortcut. Every line feeding into its outline is a separate cornrow curved precisely enough to form a clean symmetrical shape, which means your braider needs real skill and patience. This works on medium to thick natural hair, type 3c through 4c, and the tighter your curl pattern the crisper those parts will read. Look at the baby hairs laid along the hairline; they frame the whole design without competing with it, which tells you the stylist understood restraint. The low bun keeps everything compact so the heart stays the focal point. If your hair is fine or your density is low, the heart shape will lose definition because there won’t be enough volume in each cornrow to hold the shape visually. Expect to sit for three hours minimum. This is a style that flatters every face shape because the cornrows pull everything up and back cleanly, but it will not last more than two weeks looking this sharp.
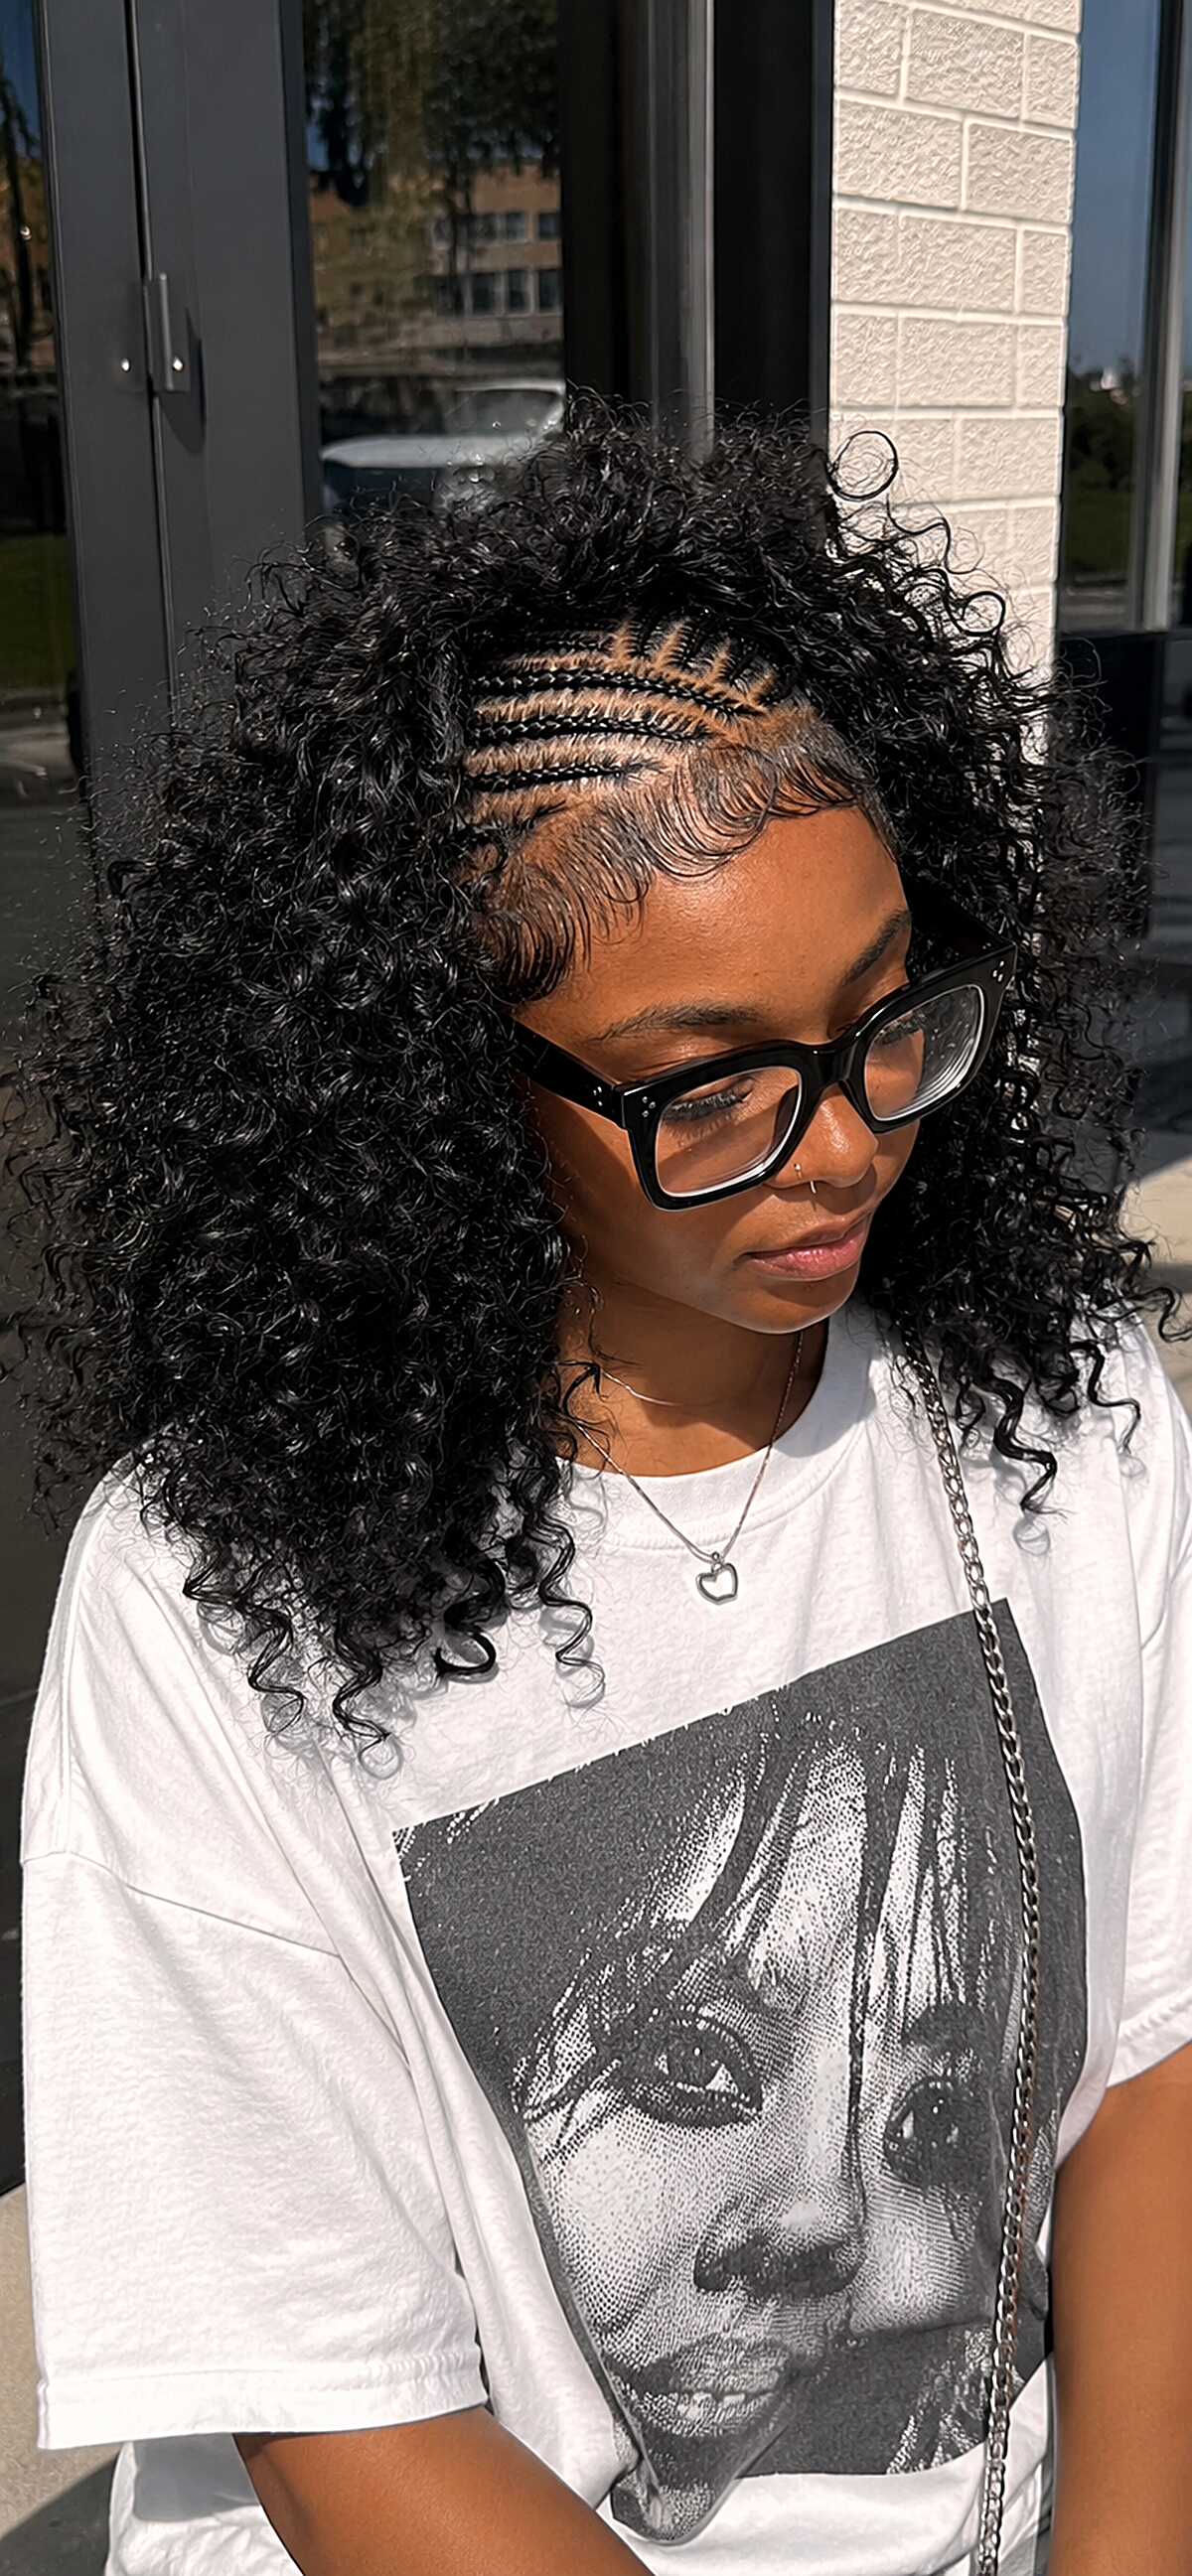
#24 Side-Swept Cornrows with Curly Crochet Extensions
Those cornrows only cover one side, angled from the part toward the ear, and that asymmetry is doing all the work here. The curly crochet hair falls freely everywhere else, which gives the whole look major volume without weighing down the braided section. If your edges are thin or tender along the hairline, this placement will expose that. The braider left the part lines razor clean, and you can see the scalp sections are narrow and even, which means this took a skilled hand and a patient one. Best on medium to thick natural hair that can anchor the crochet without slipping. Frizz will hit fast in humidity, and re-curling the extensions every few days is not optional if you want this finish.
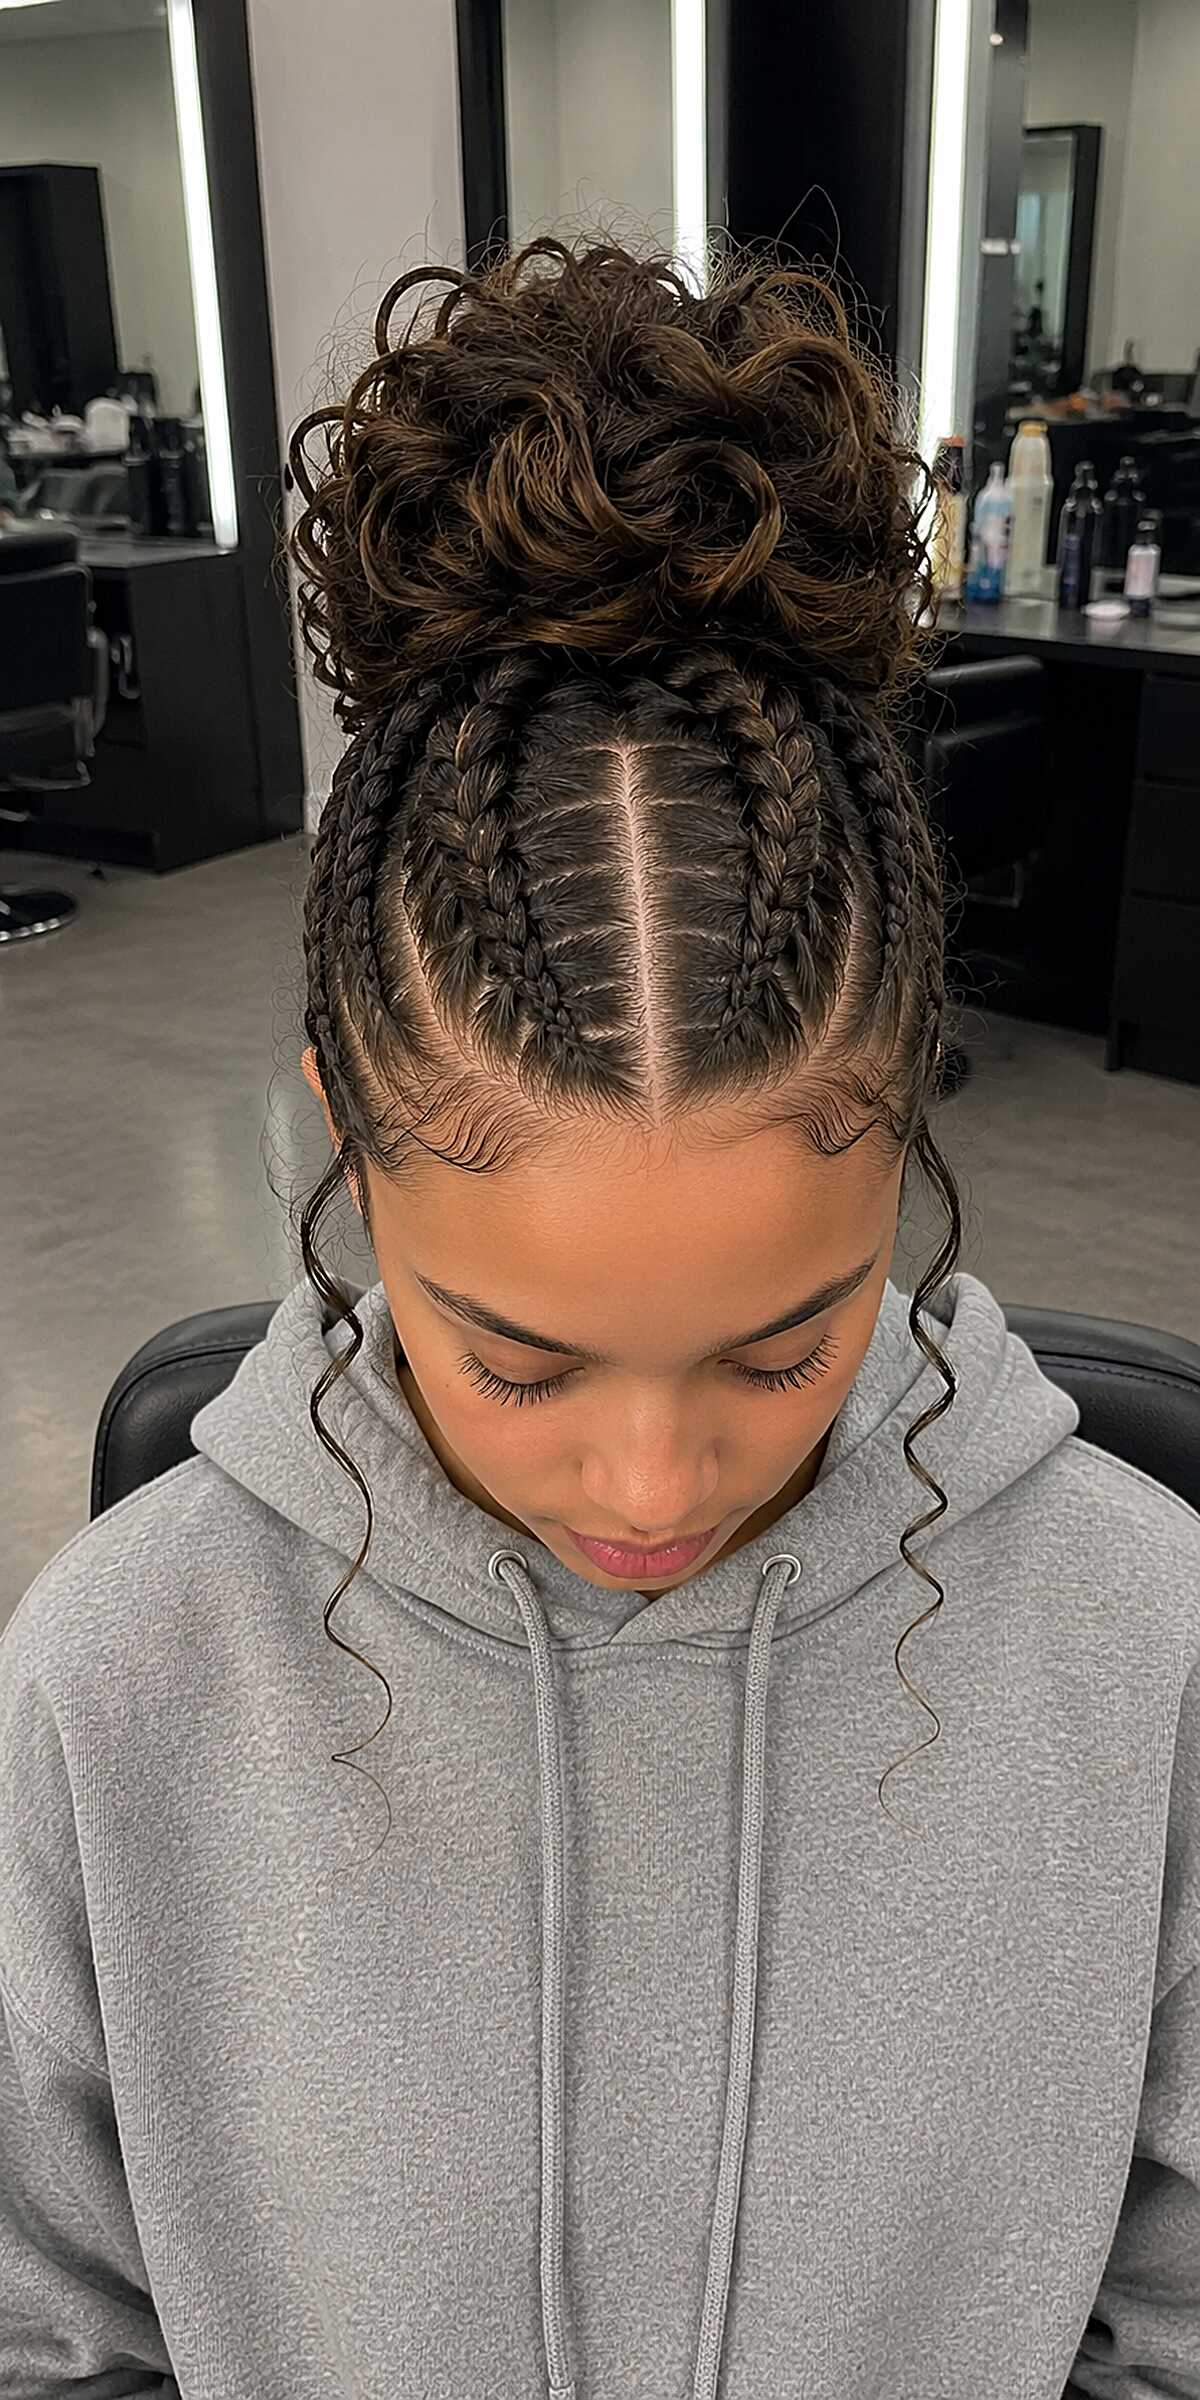
#25 Center-Part Feed-In Cornrows with a Curly High Bun and Loose Tendrils
Those spiral tendrils left out at the temples are doing more work than the bun itself, softening what would otherwise be a very structured, pulled-back look. The feed-in technique here is clean, with the cornrows starting thin at the hairline and gradually thickening as they move toward the crown, which keeps tension low at the most fragile edges. Six cornrows total, evenly parted, all gathering into a curly textured bun that reads relaxed rather than formal. This works beautifully on medium to thick natural hair, type 3 and up, and the curly extensions blended into the bun add fullness without looking obvious. If your hair is fine or your edges are already thinning, skip this one. The upward pull concentrates all the weight at the crown and that stress adds up fast. Face shape barely matters here because those front tendrils customize the frame for almost anyone.
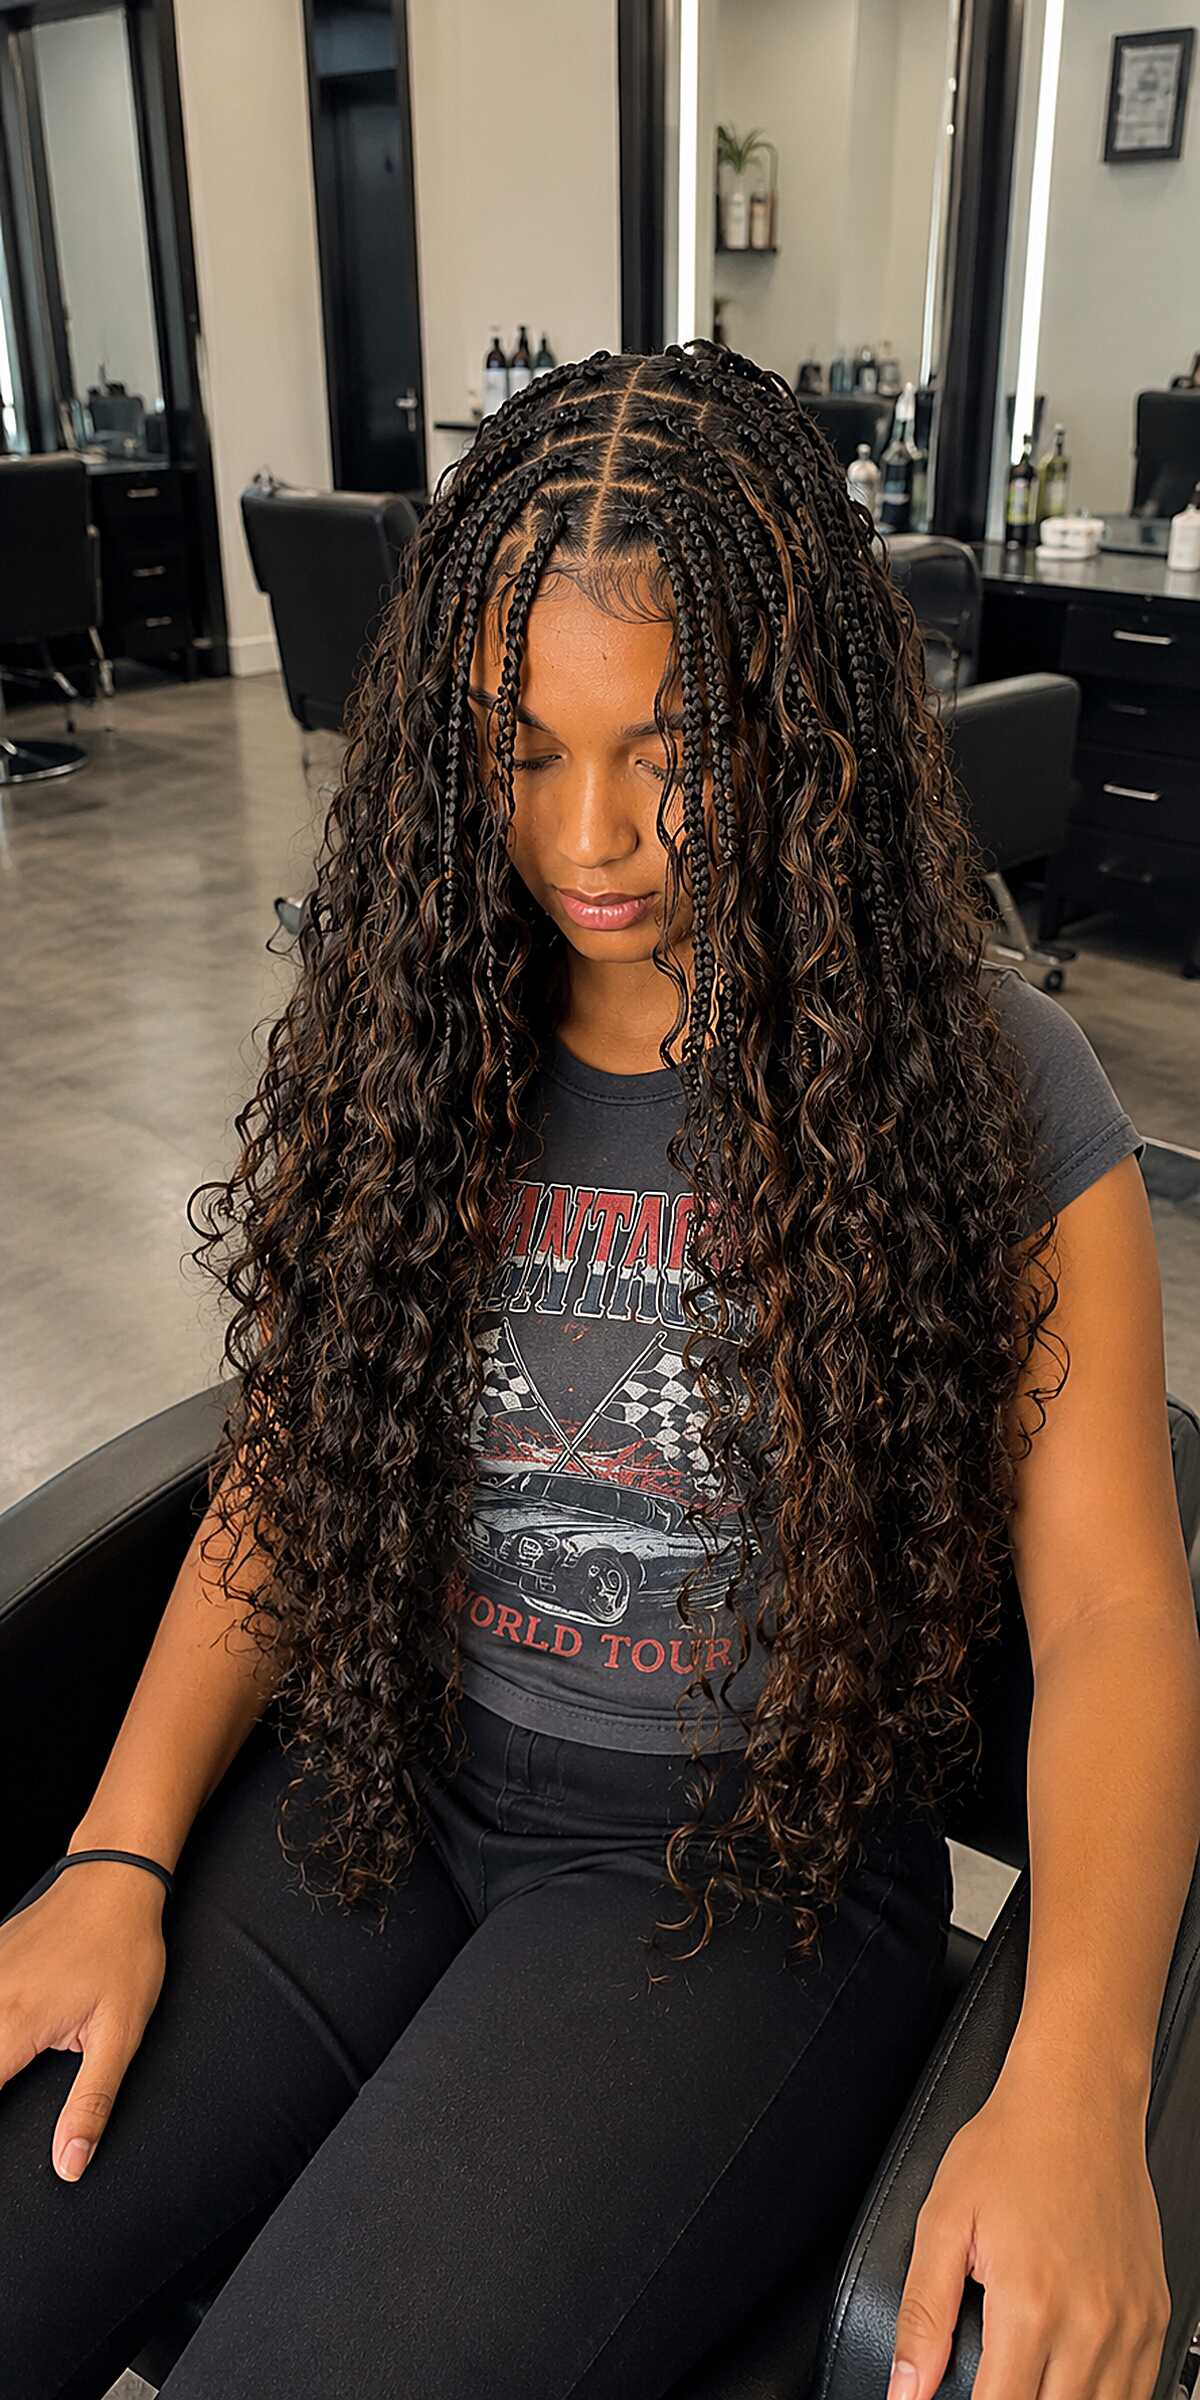
#26 Waist-Length Knotless Braids with Honey-Brown Curly Extensions
That weight will wear on you. This is a full install, medium-sized knotless braids transitioning into loose curly extension hair from roughly chin level down, and the sheer volume at waist length means you’re carrying real heaviness by day three. Worth knowing before you commit. The color work is what caught me though: the braiding hair is jet black at the roots, and the curly portions shift into a warm honey brown that reads like a natural highlight pattern rather than a blocky contrast. Whoever mixed those extension shades knew what they were doing. This suits oval and heart face shapes well because the braids frame without crowding, and the curls add width lower down to balance a narrower chin. If your face is round, all that fullness at the sides will work against you. You need a stylist comfortable with the feed-in technique at the base to keep tension minimal on the hairline, which is clean here. Best on medium to thick natural hair that can anchor the install without stress.
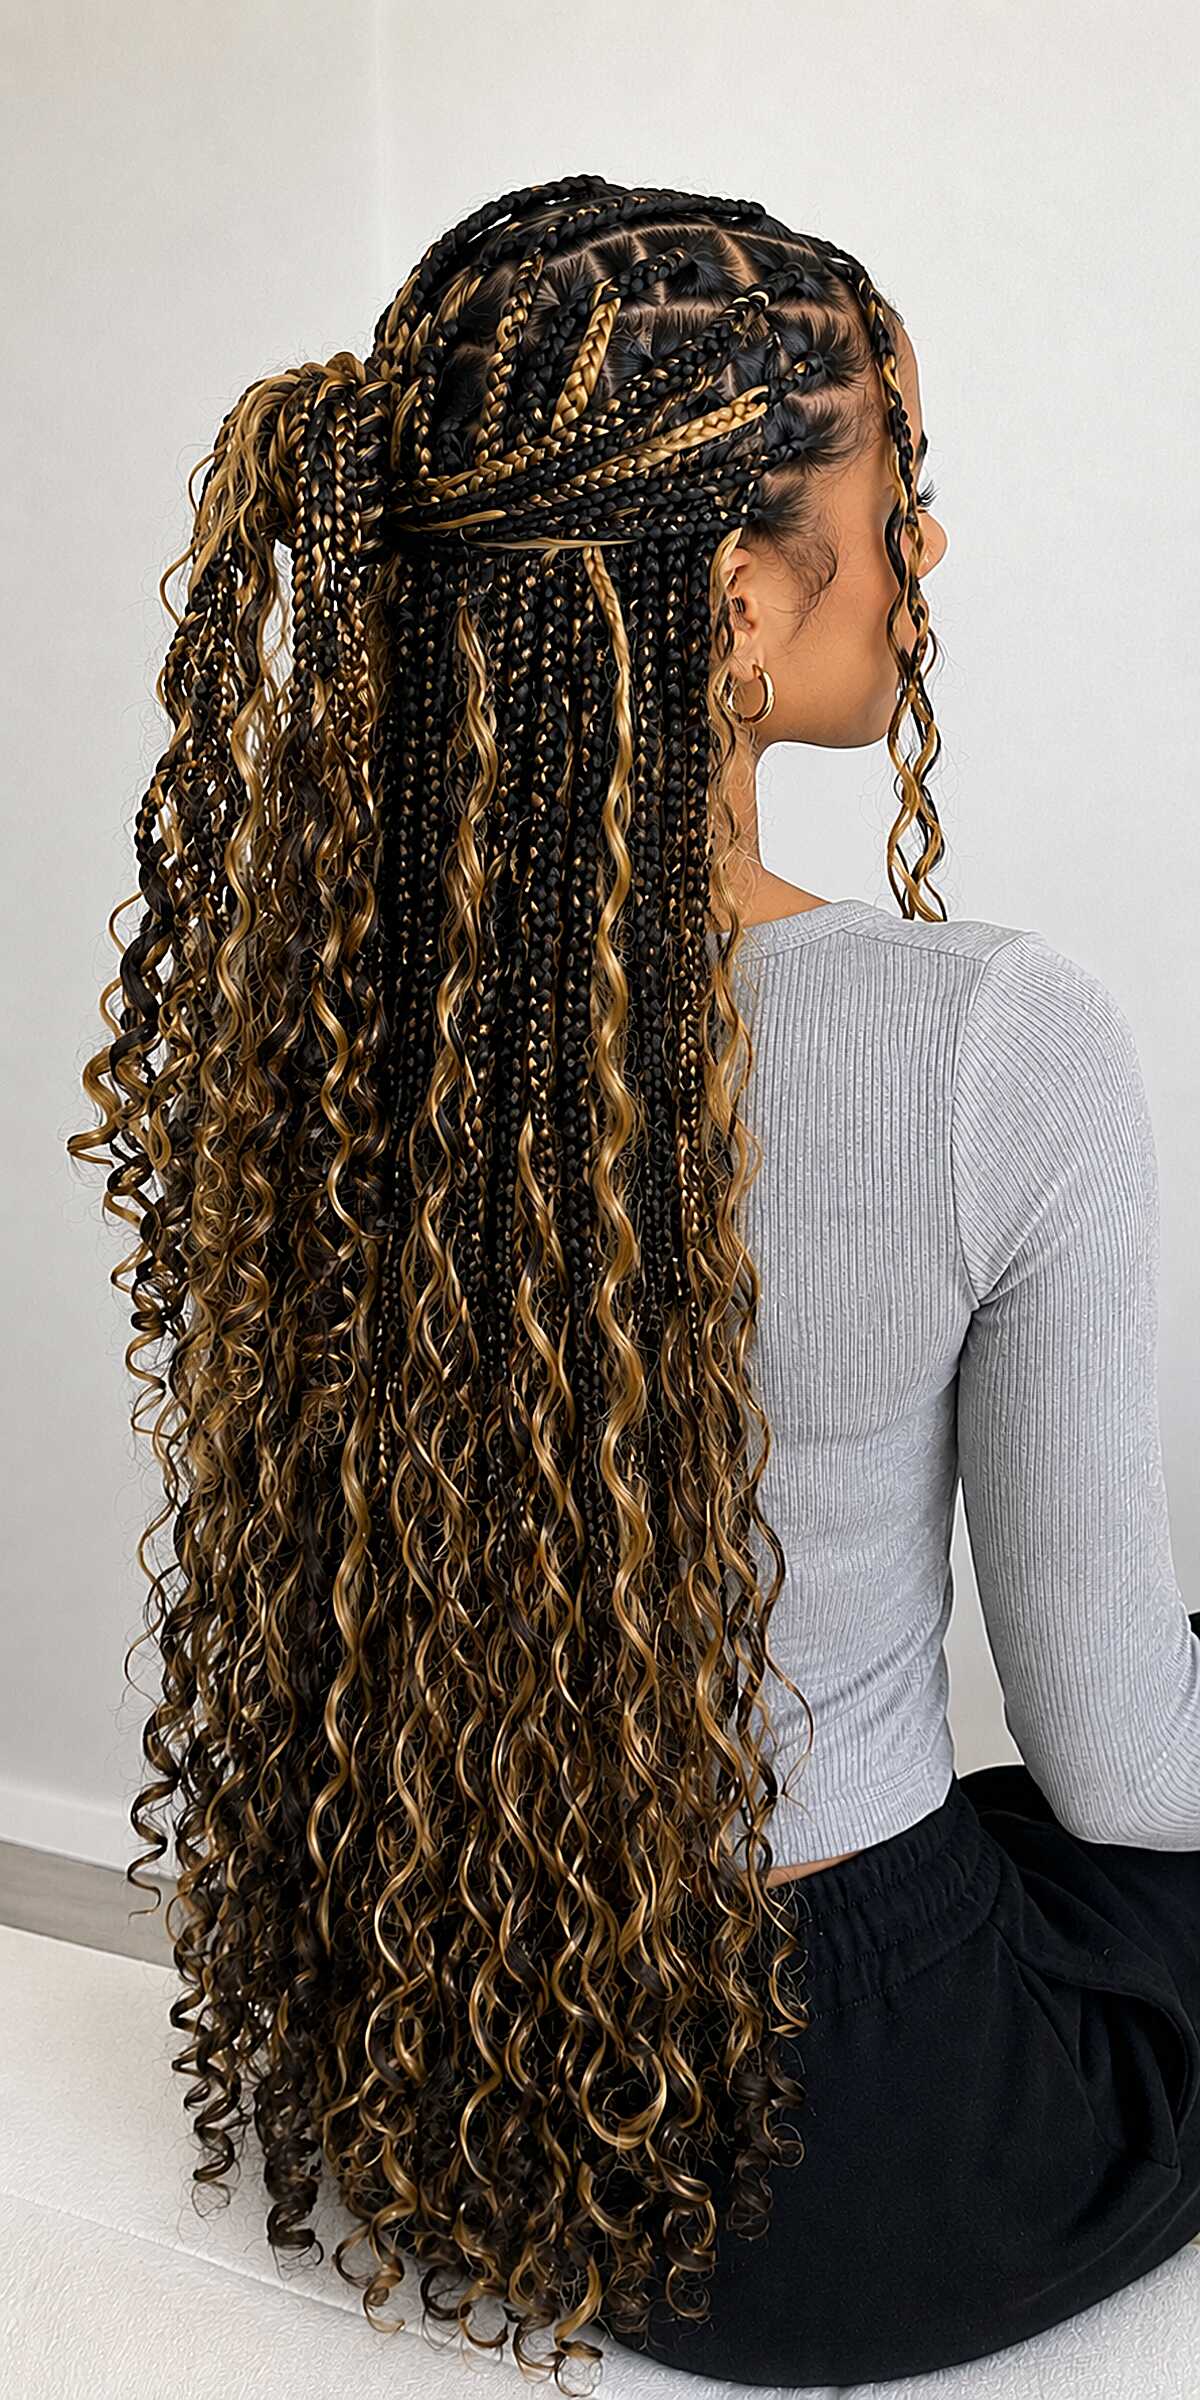
#27 Curved Cornrow Pattern with Black and Blonde Curly Goddess Lengths
The cornrow patterning here is not straight back. It curves and crosses at the crown in a way that takes real skill and adds visual weight to the top of the head, which is why this works well on longer face shapes. The blonde extension hair is woven into the braids themselves, not just tacked on at the ends, so the color reads as intentional from root to tip. That’s heavy hair. If you have a sensitive scalp or neck tension issues, this length will wear on you by day three. Best on medium to thick natural hair that can anchor tight feed-in cornrows without thinning at the hairline. The curly ends carry most of the movement and all of the drama, and they will tangle if you sleep without wrapping.
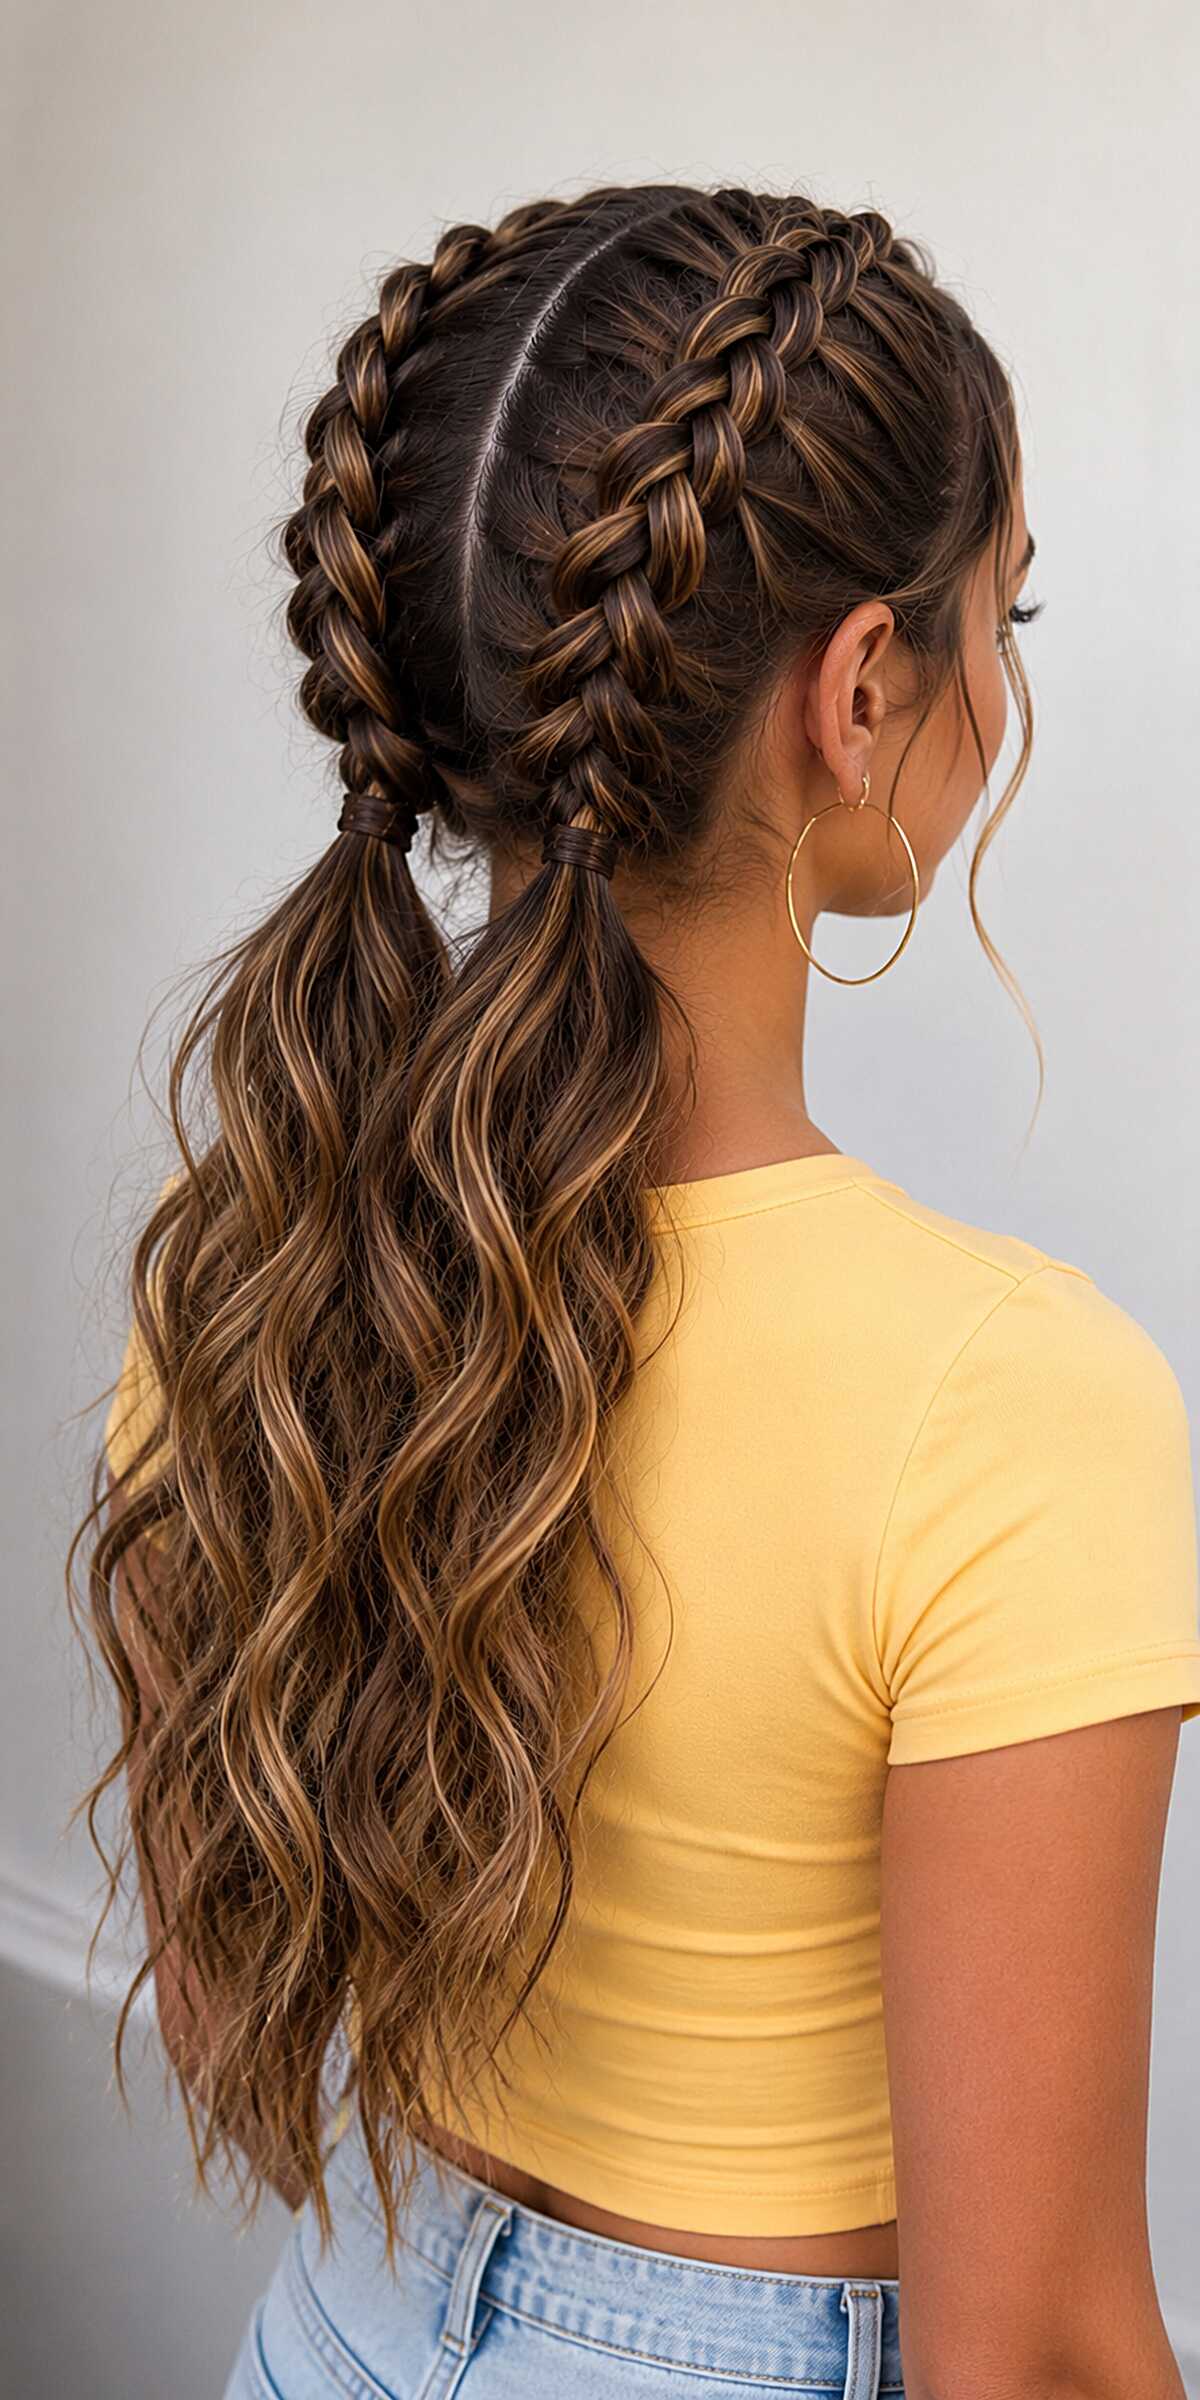
#28 Twin Dutch Braids Released into Wavy Low Pigtails on Highlighted Brunette
Fine hair won’t hold this. The braids need density to stay raised off the scalp like they do here, where each Dutch braid sits thick and full from the center part all the way to the nape. What caught my eye is where the braids stop, right at the hairline behind the ears, secured with small elastics before the rest drops into loose waves. That transition point is doing all the work visually, and if your hair is thinner there, it will look deflated instead of intentional. You need mid-back length minimum, and the balayage highlights through the wave section make the texture pop in a way solid color just wouldn’t. This suits medium to thick hair with some natural wave or curl to hold the loose ends without a ton of product. Face shape is honestly not a factor since the braids pull everything back evenly. The real drawback is time. Getting the Dutch braids this clean and even on yourself takes practice and arm endurance, and most people will need a second person.
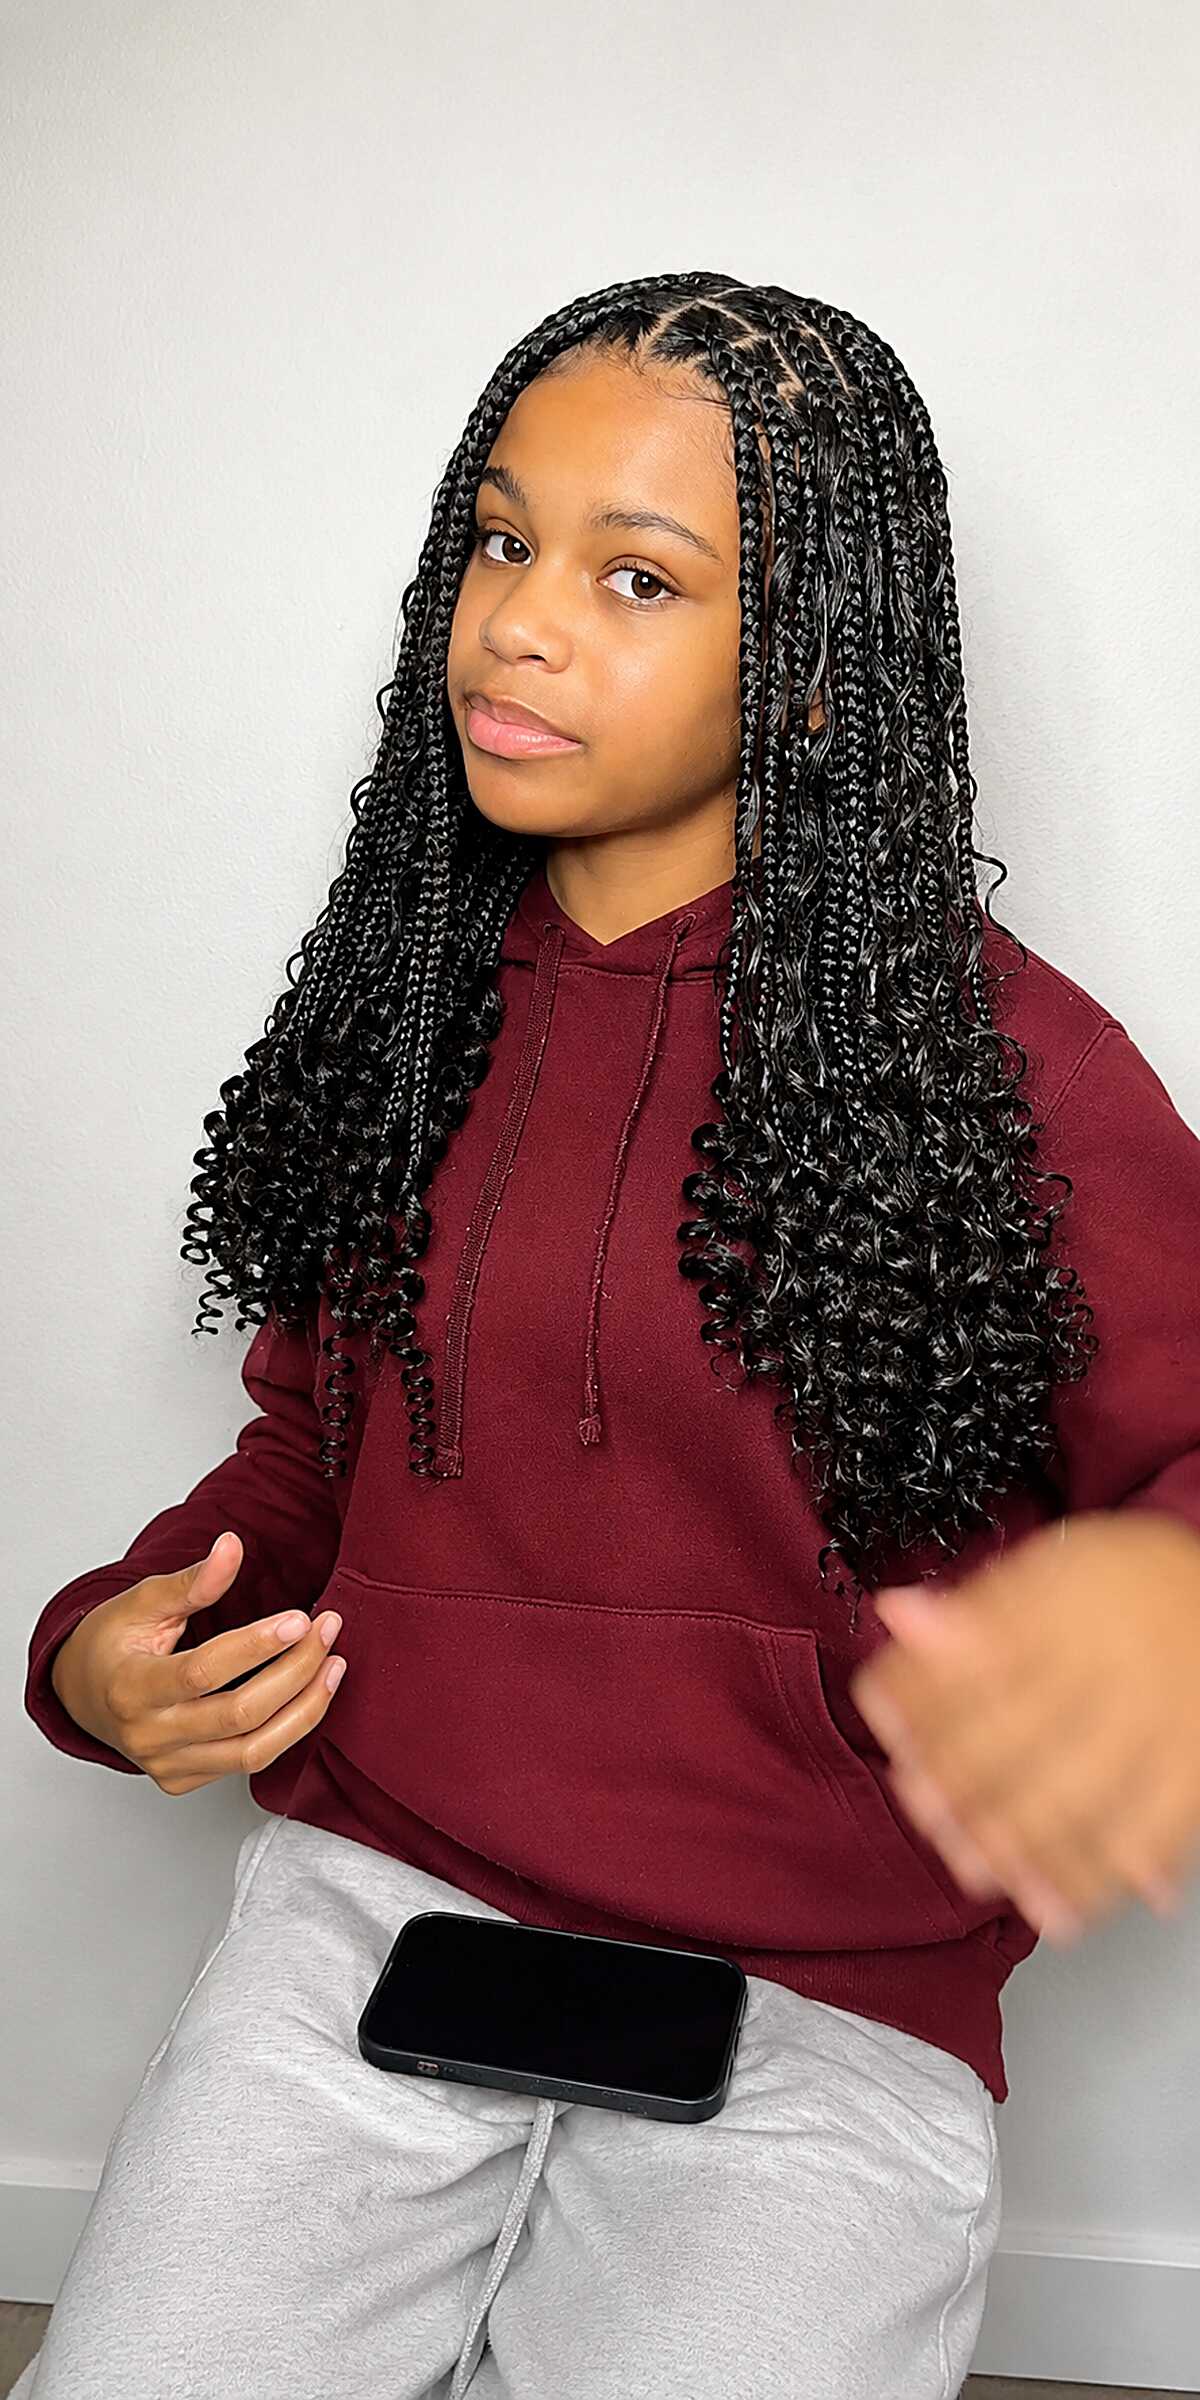
#29 Medium Knotless Box Braids with Curly Ends
The curly ends will frizz. That’s not a maybe, that’s a guarantee by week two, and if you’re someone who needs everything looking fresh constantly, this style will frustrate you. What I notice here is the parting work, which is clean and evenly spaced with small rectangular sections that tell me whoever braided this took their time with the grid before even starting. Knotless technique means each braid starts flat against the scalp with braiding hair gradually fed in, so there’s almost no tension at the root. Great for finer or transitioning natural hair that can’t handle the pull of traditional box braids. The length hits right around the chest, and those pre-curled ends add volume that frames a rounder face really well without you having to do anything extra. If your hair is shorter than about four inches, a skilled braider can still make this work, but the install will take longer. These are heavy. By day three you’ll forget about the weight, but that first night sleeping is going to be an adjustment.
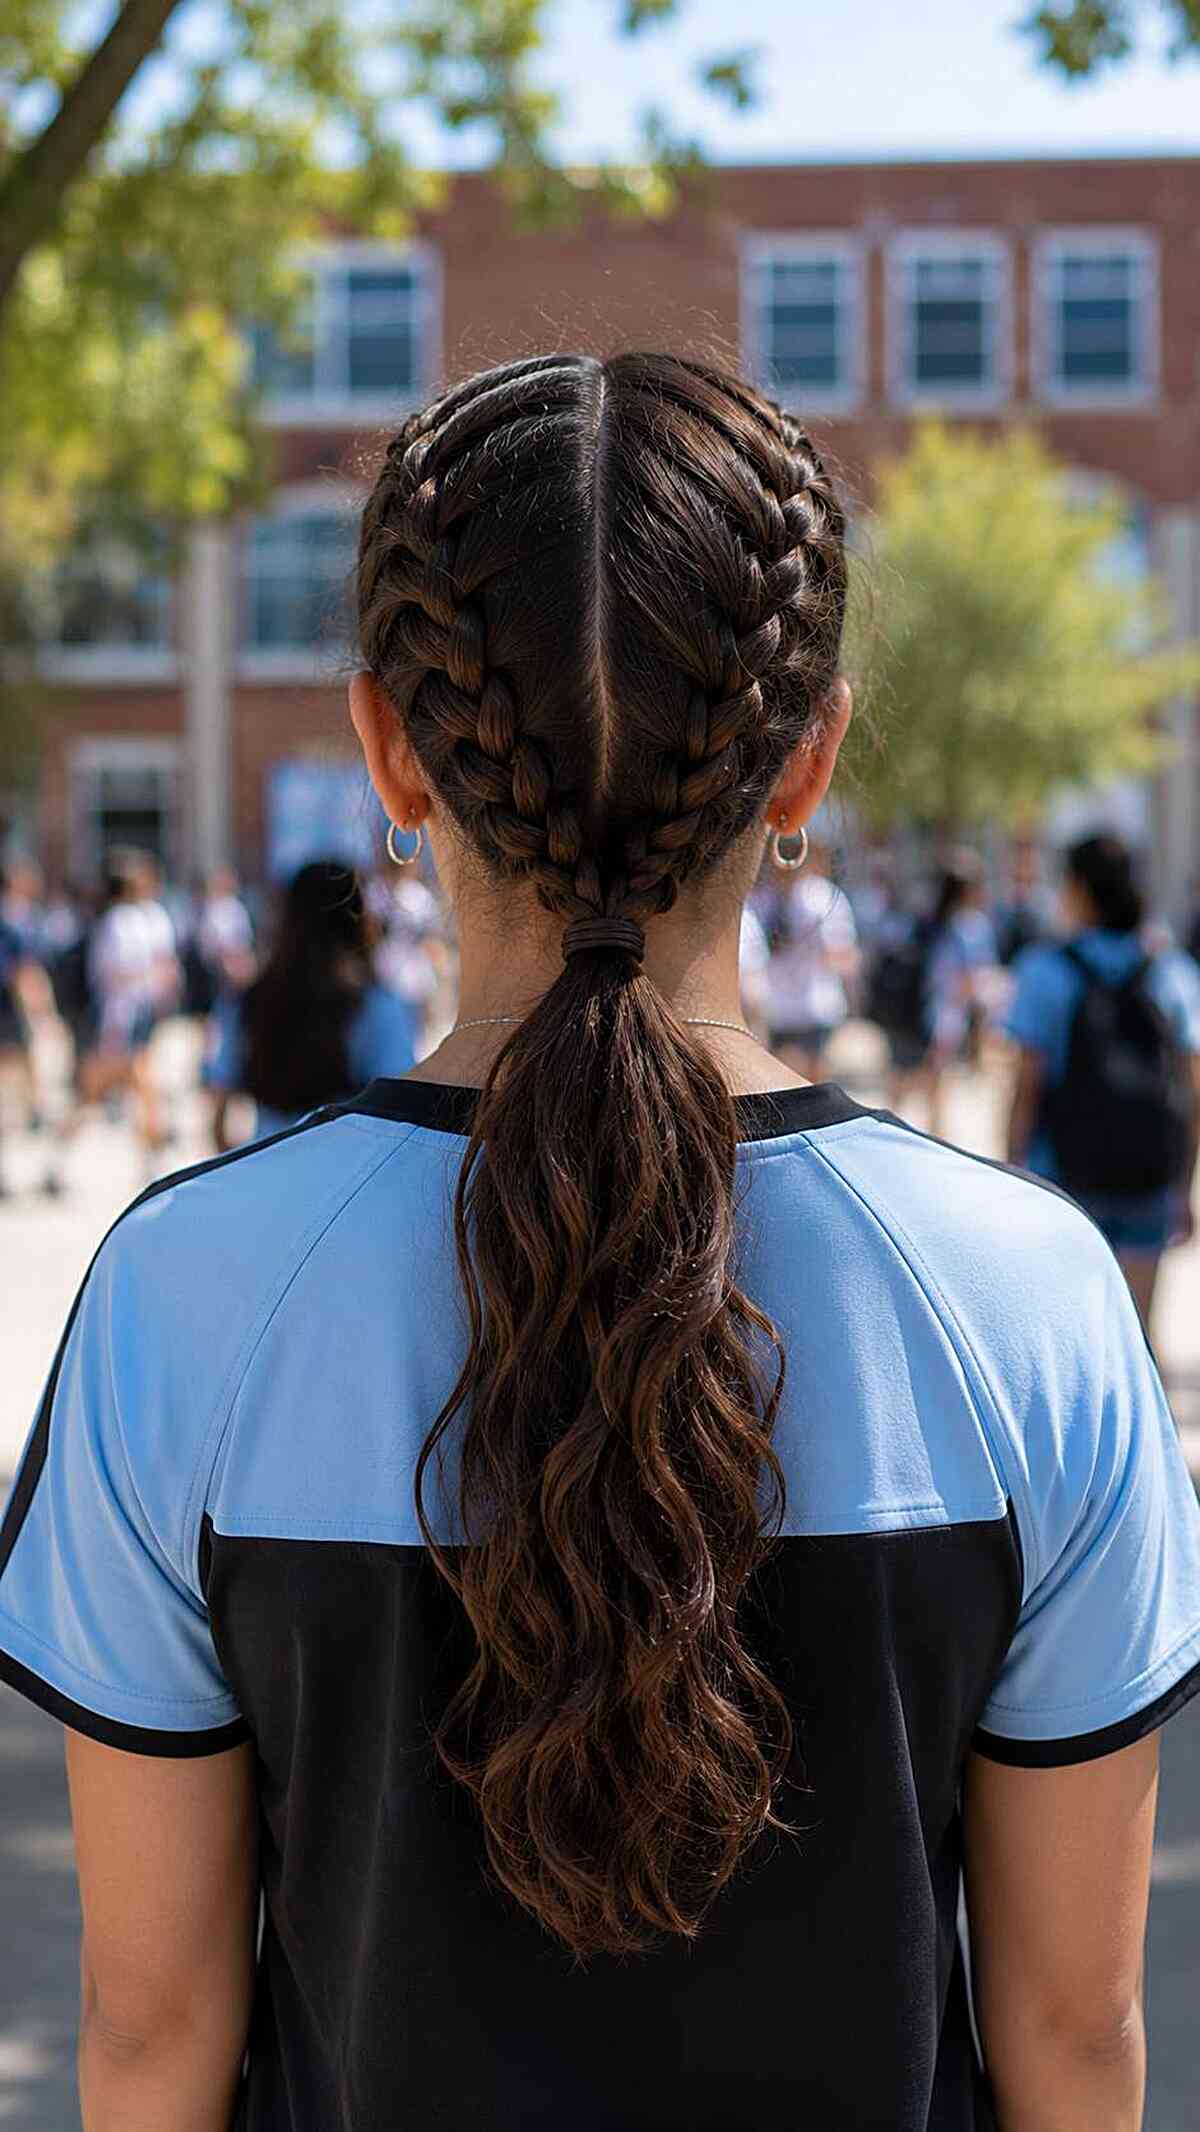
#30: Stylish Double Dutch Braids with Loose Waves
This chic hairstyle features two double Dutch braids that elegantly frame the face, perfect for mid-length to long hair types. The model’s wavy texture adds a playful touch, enhancing the overall look. Ideal for square or oval face shapes, this style is not only visually appealing but also practical for daily wear or active days. To achieve this, consider using a lightweight mousse for volume and a styling cream for definition. Each braid is a unique statement that showcases both creativity and style.
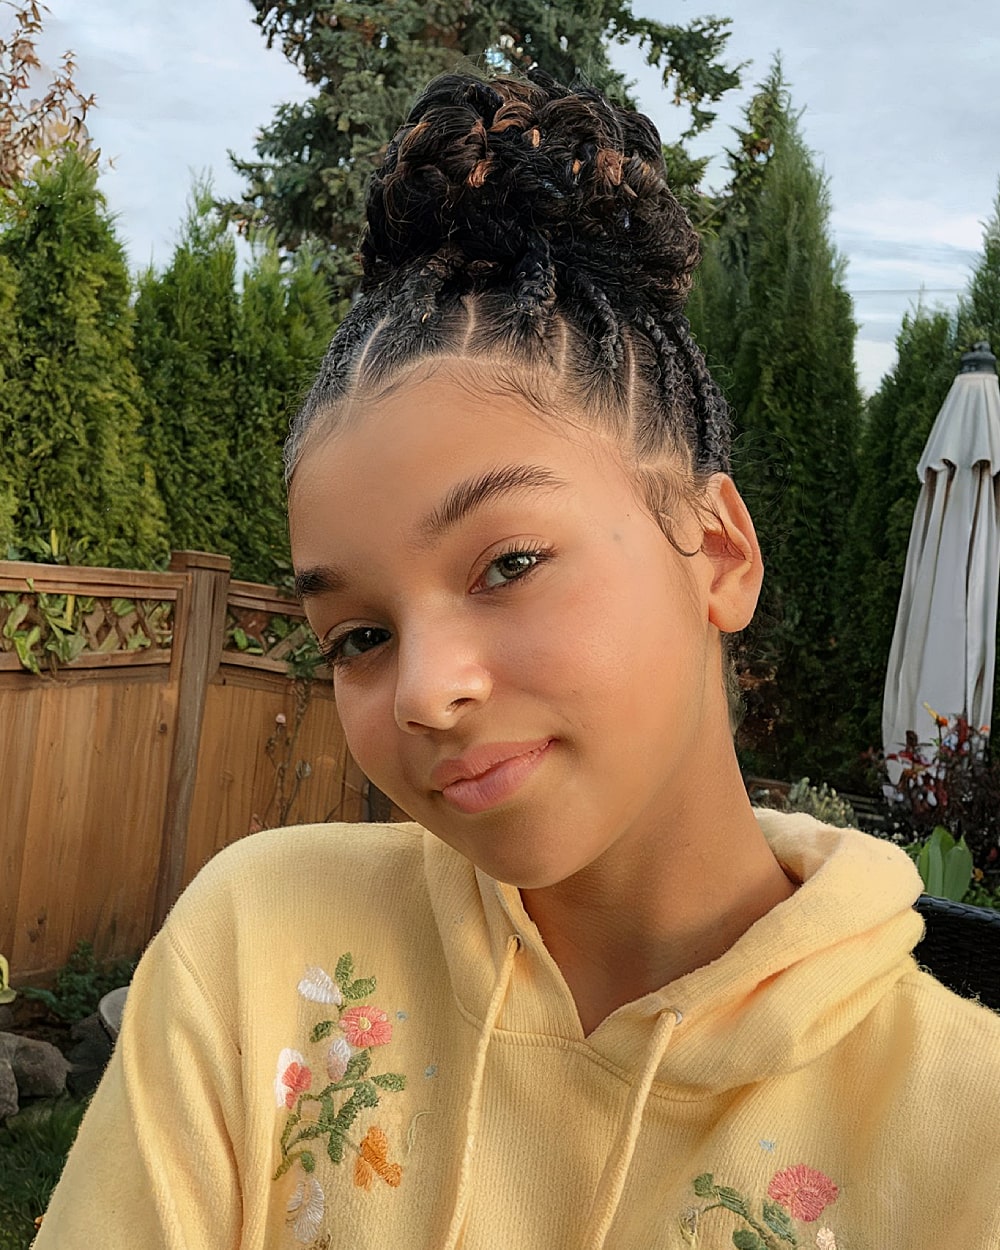
#31 Braided Updo for Round Face Shape
Flattering for round face shapes, this high braided updo features neat cornrows braided straight back into a voluminous topknot. It’s a great choice for medium to high-density hair, especially if you’re working with natural curls. The curly ends add softness and height, helping elongate the face. Great for tweens and teens looking for a polished, protective style. It does take time to install, but it’s low-maintenance once done.
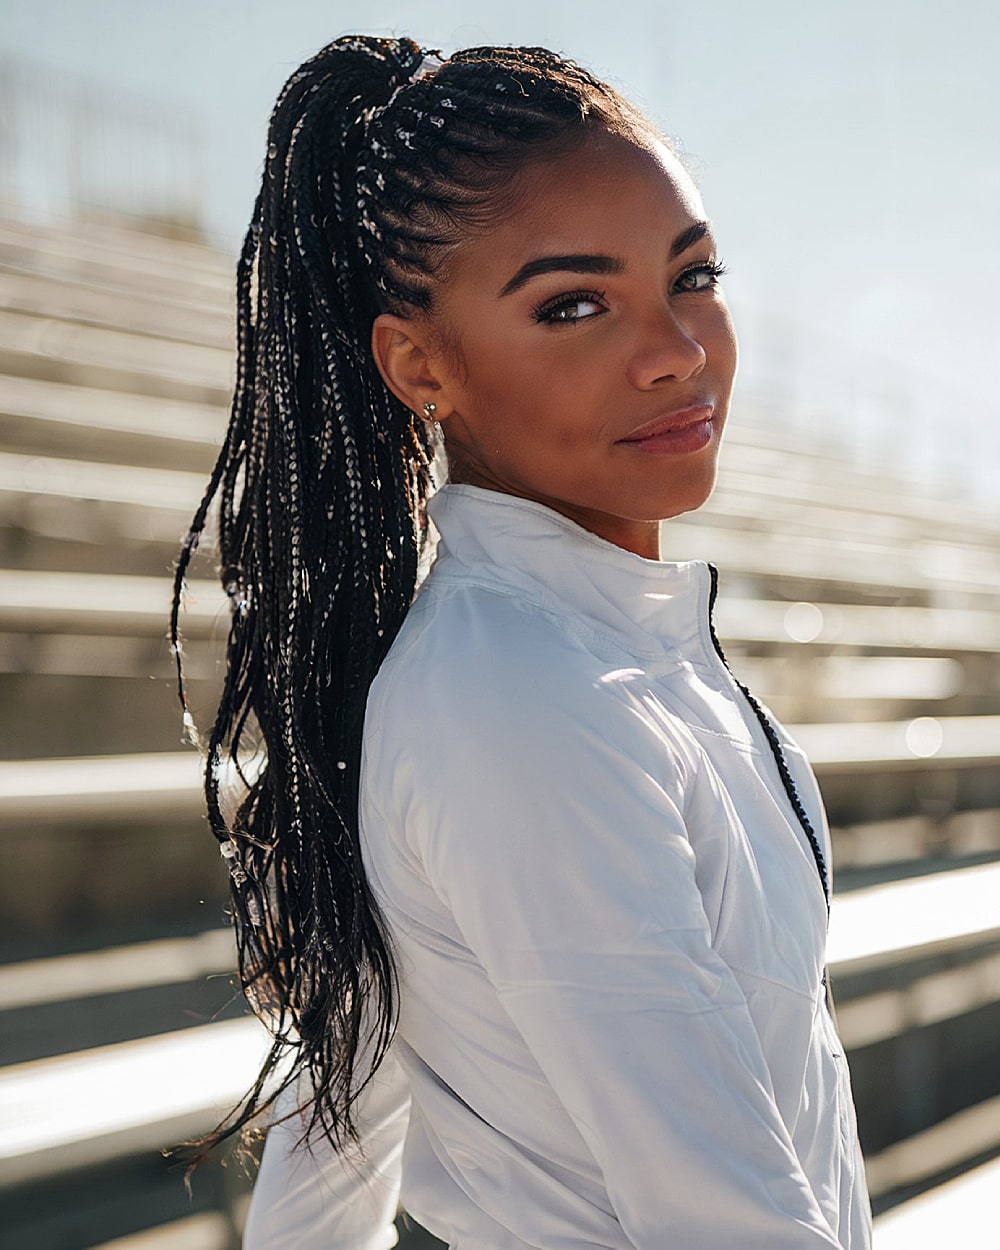
#32 High Braided Ponytail for Black Hair
This athletic-inspired high ponytail combines sleek feed-in braids and added silver accents for a dynamic, fresh look. It’s ideal for teens with thick natural hair or extensions. High tension at the base provides structure but can cause soreness if braided too tight. Silver pieces throughout add a bit of glam, making it gym-to-classroom ready. Use mousse to tame flyaways and preserve style shine.
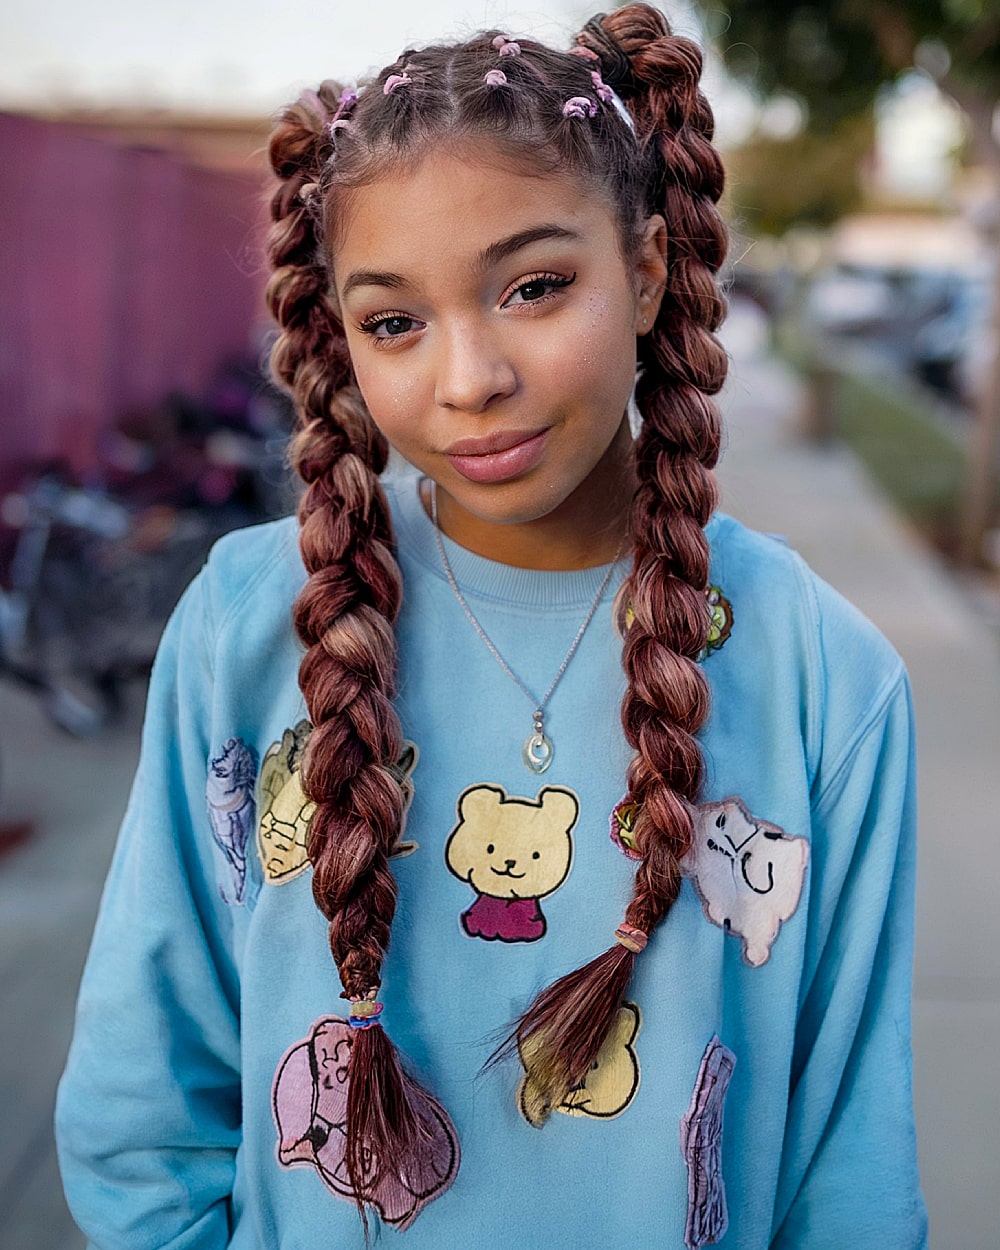
#33 Cute Jumbo Braids with Beads for Teens
Fun and playful, these jumbo braids are styled into pigtails with soft pink bands and feature a slight ombré toward the ends. Best for medium to thick hair or added braiding hair, they’re youthful and great for casual school days. The chunkier size means faster install and less tension on the scalp, but they don’t last as long as smaller braids. Great for teens who like big, bold looks without too much upkeep.
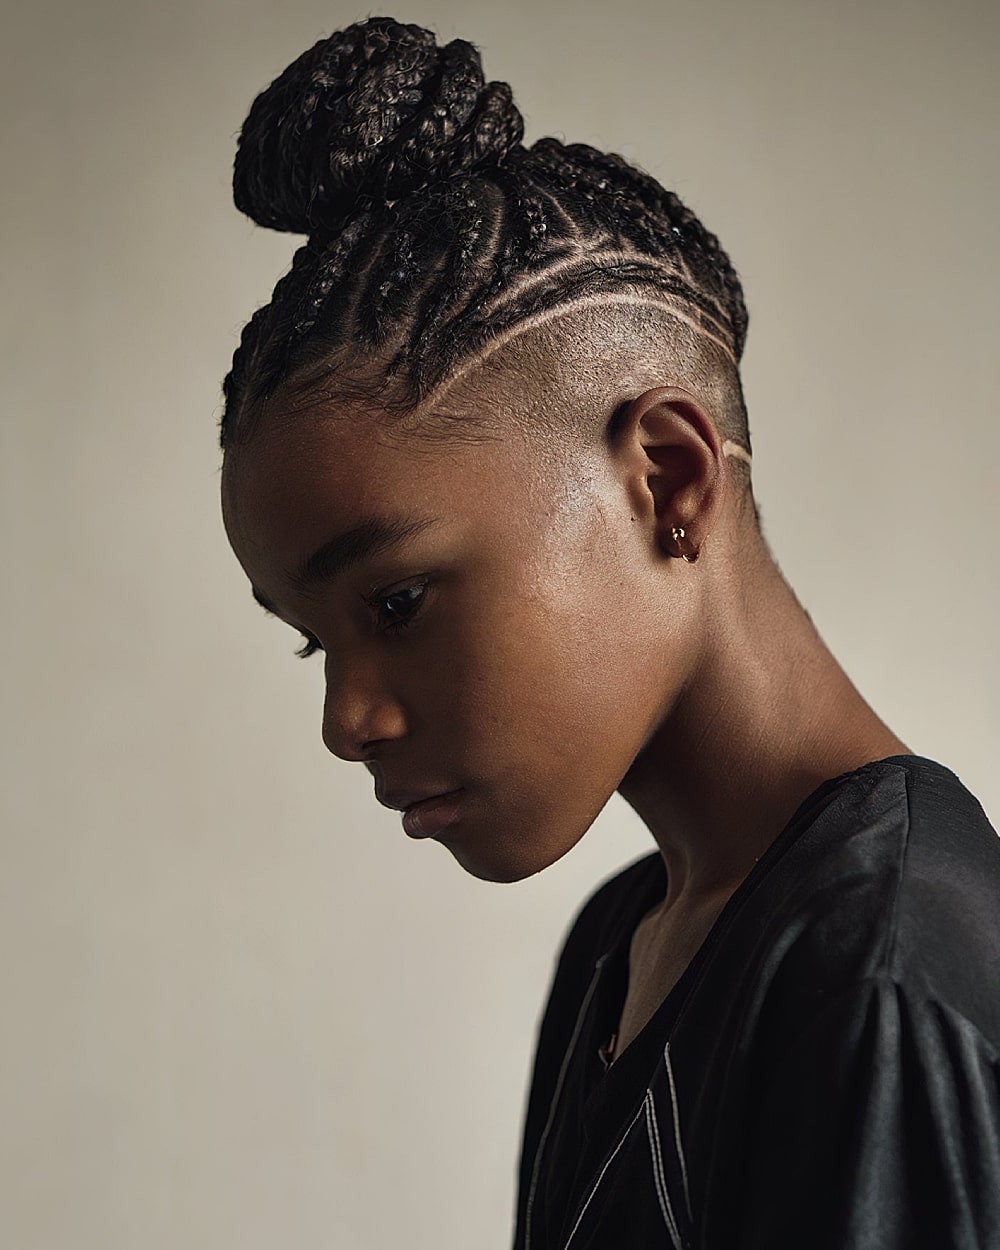
#34 Straight Up Braids with Side Lines
Bold and architectural, this braided updo features straight-back cornrows elevated with sharp curved parting and a high braided bun. It’s a solid choice for teens with thick, textured hair looking for a neat, protective style. The unique side lines give the scalp extra definition, setting it apart from basic cornrow buns. It’s long-lasting and low-maintenance but does need a professional hand to get those parts sharp and clean.
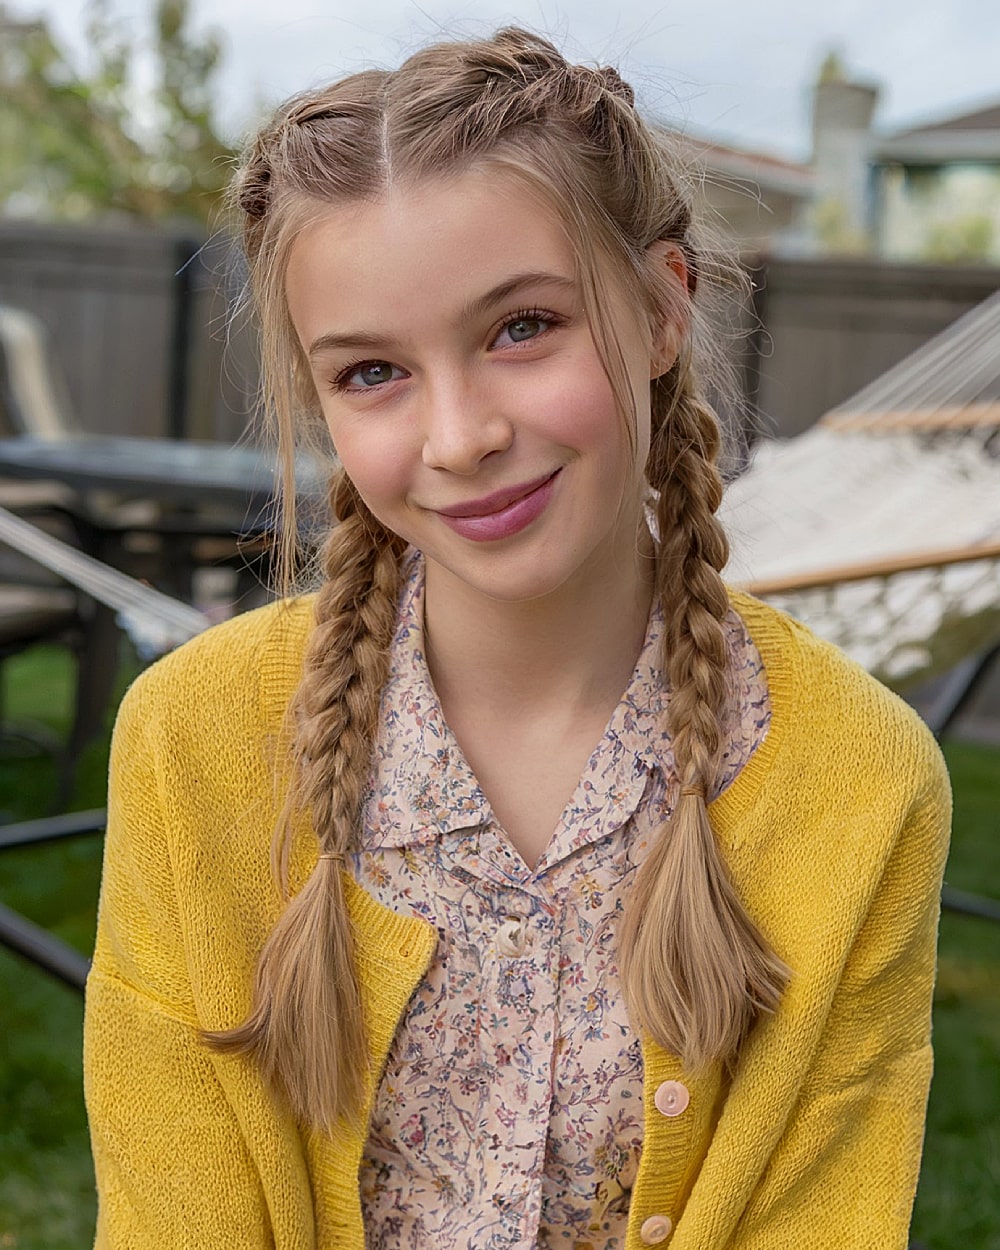
#35 Cute Braids for White Teen Girls with Fine Hair
A sweet and practical choice for fine, straight hair, these Dutch braids transition cleanly into low pigtails. They help keep everything in place without needing much product and are easy enough for school mornings. This look suits finer hair types and round or heart-shaped faces. It’s lightweight, keeps hair off the face, and adds dimension with a basic braid technique. Use dry shampoo or powder for added grip if needed.
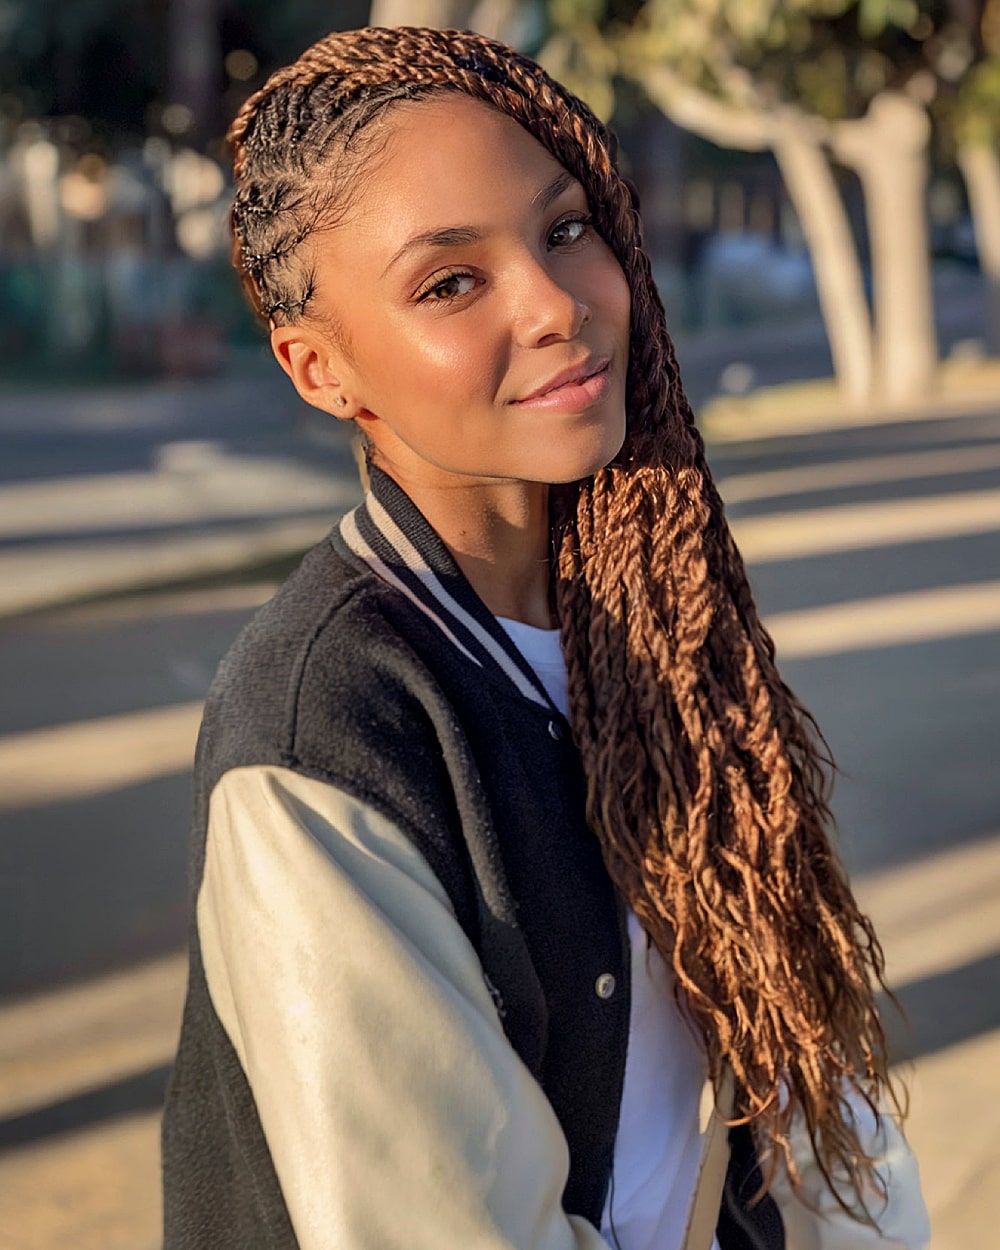
#36 Braided Flip Over Look for Teens
Laid-back and trendy, this side-swept flip-over style features long twist braids that flow over one shoulder, giving it natural volume and movement. It’s ideal for teens who love a casual-chic look with a bit of edge. Great for long, dense natural or extension-based braids. Because of the side part, it flatters round and heart-shaped faces especially well. Keep in mind, it can feel heavier on one side.
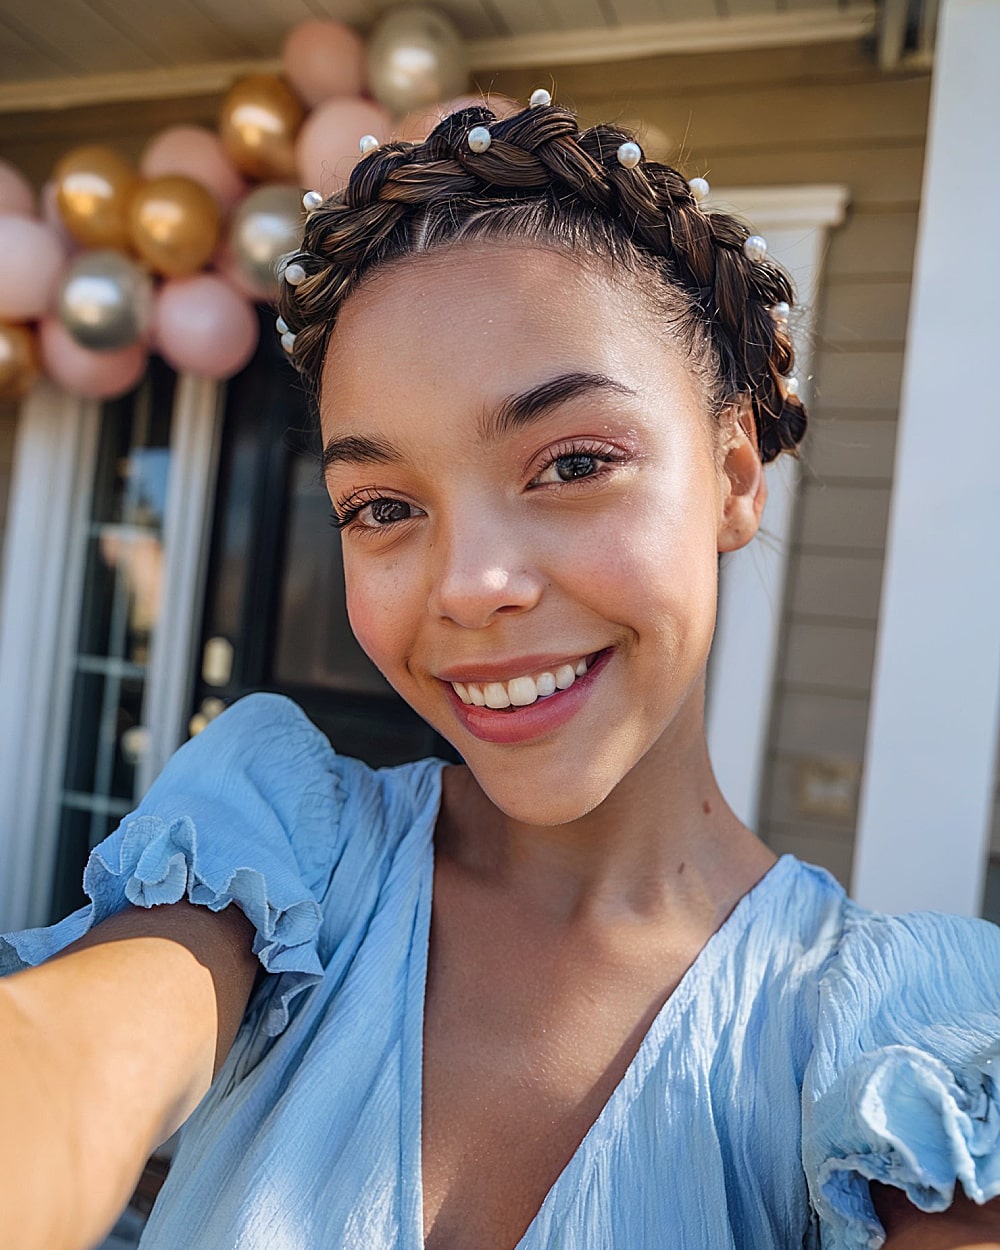
#37 Quick Braided Crown for Graduation Day
Elegant and quick to style, this braided crown wraps evenly around the head and is topped off with dainty pearl pins. A dreamy option for graduation photos or ceremonies, it works well for medium-length hair with a bit of grip. It’s best suited for finer to medium textures and adds instant polish. Just remember to secure it with bobby pins to prevent slippage, especially if you’re dancing or wearing a cap.
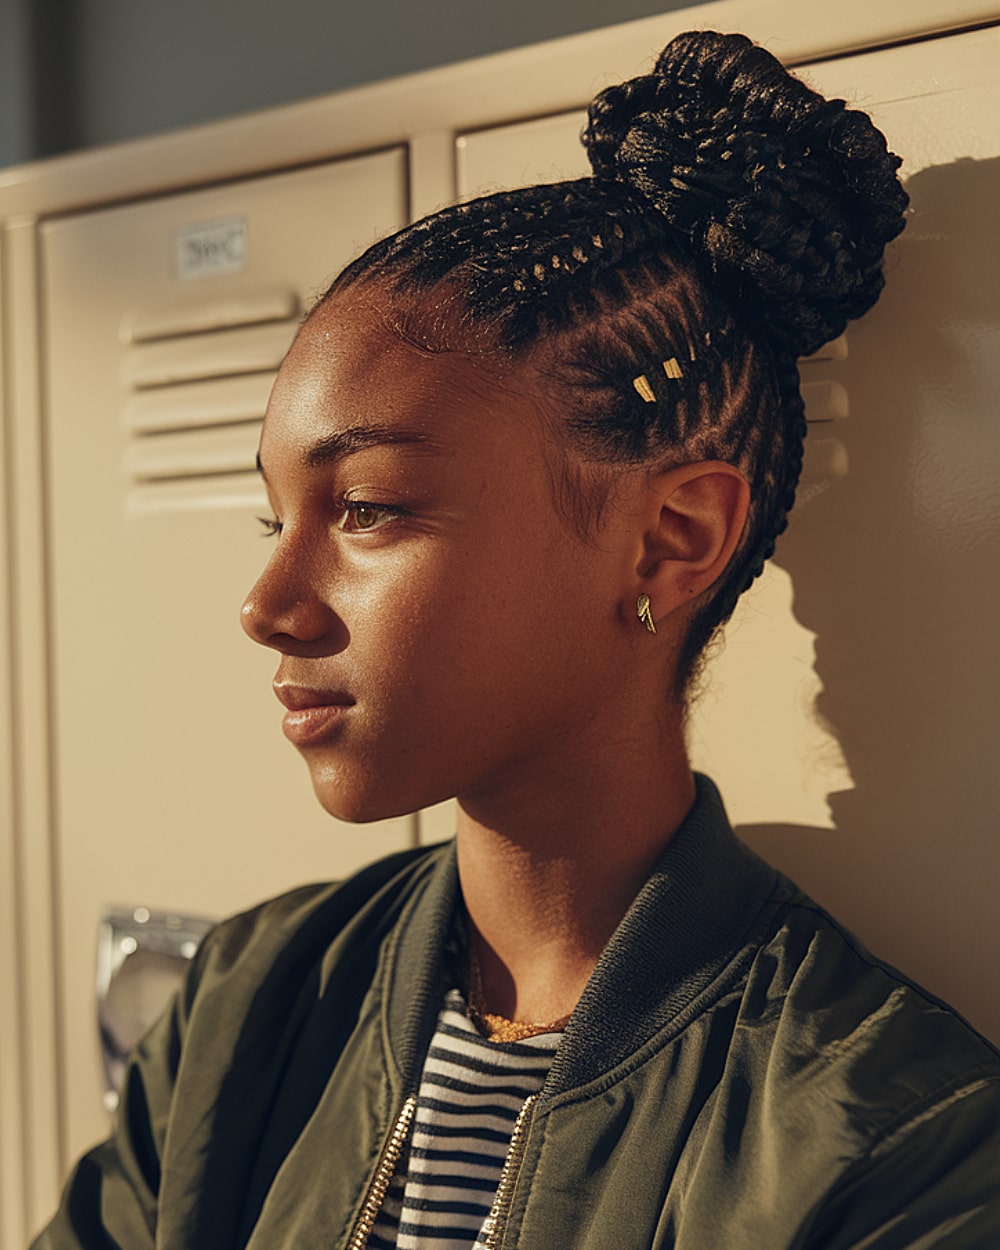
#38 Back to School Braided Bun for Natural Hair
Structured yet stylish, this high braided bun features precise feed-in cornrows with a polished finish and gold cuff accents. A great school-ready look for natural Type 4 hair, especially medium to thick density. This style protects the ends while keeping everything tidy and secure. The install time is longer, but it holds up beautifully through busy weeks. A clean style that doesn’t sacrifice edge or personality.
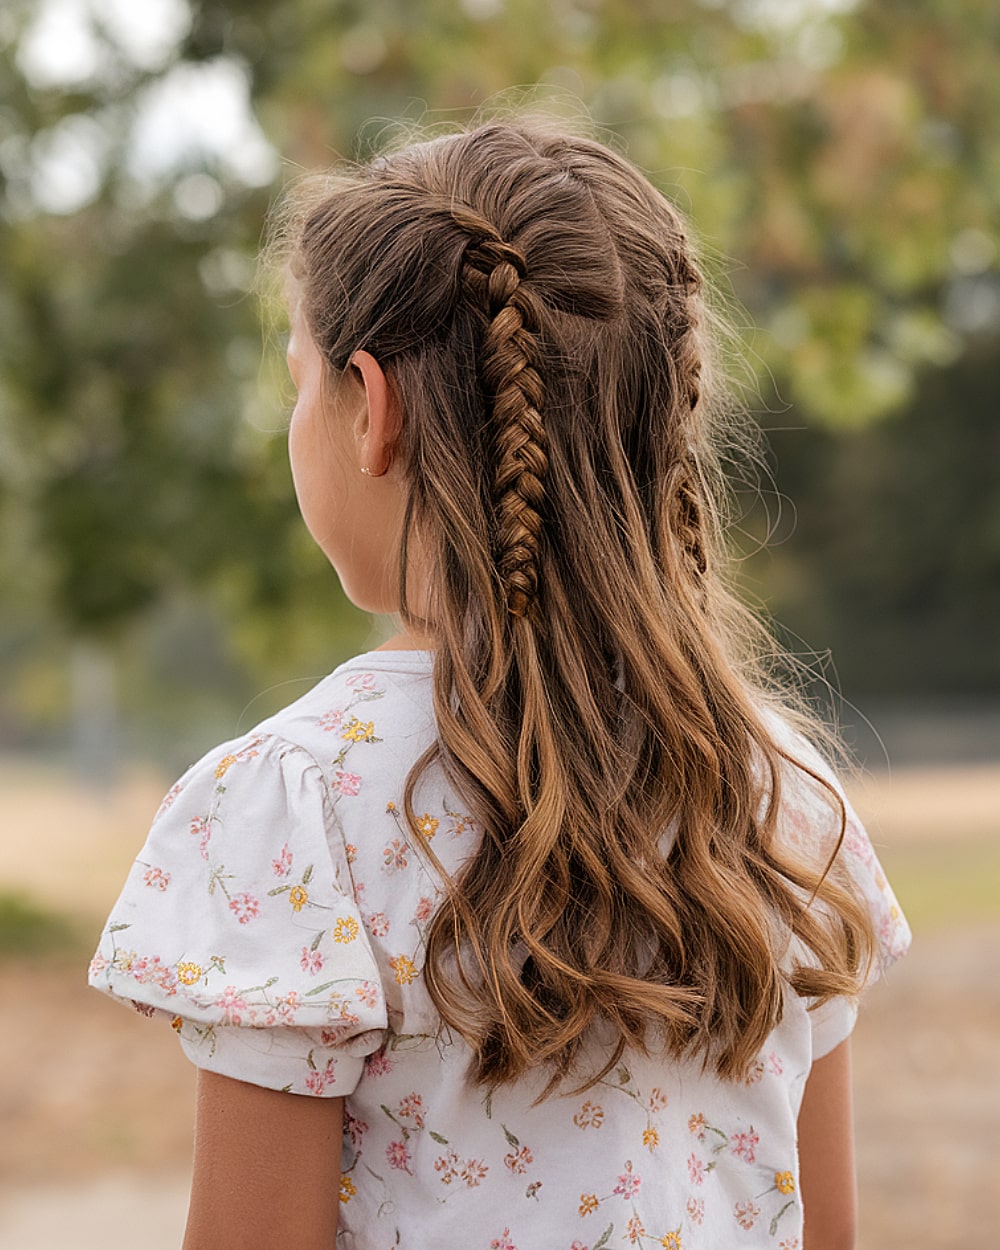
#39 Half Up Half Down Braids for Pre Teens
This gentle and charming half-up half-down style uses two tight braids along the crown, blending into soft, natural waves. It works especially well for fine to medium hair and suits round or oval faces beautifully. It’s a hit for school days or casual outings—easy to dress up or down. Just note, it may not hold all day without light-hold spray on finer hair types.
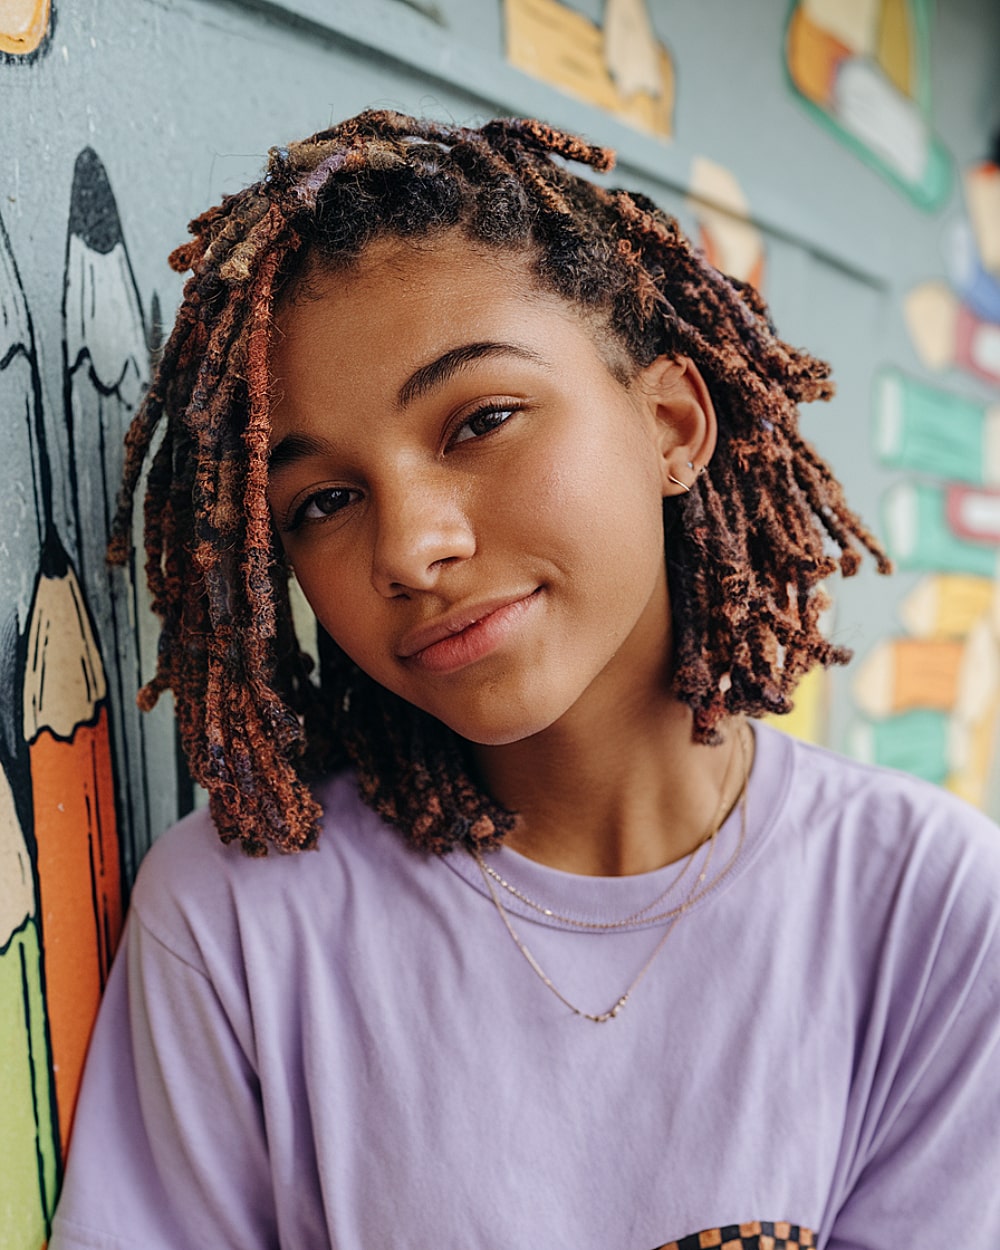
#40 Faux Locs Braided Styles for Teen Girls
Textured and full of character, these shoulder-length faux locs mix warm copper and black tones for a cool, expressive look. This is great for teens wanting low-maintenance protective styles that look edgy and natural. It suits medium to high-density hair and is ideal for those with coily textures. Lightweight and scalp-friendly when installed right, just know they may unravel a bit over time and need occasional retwisting.
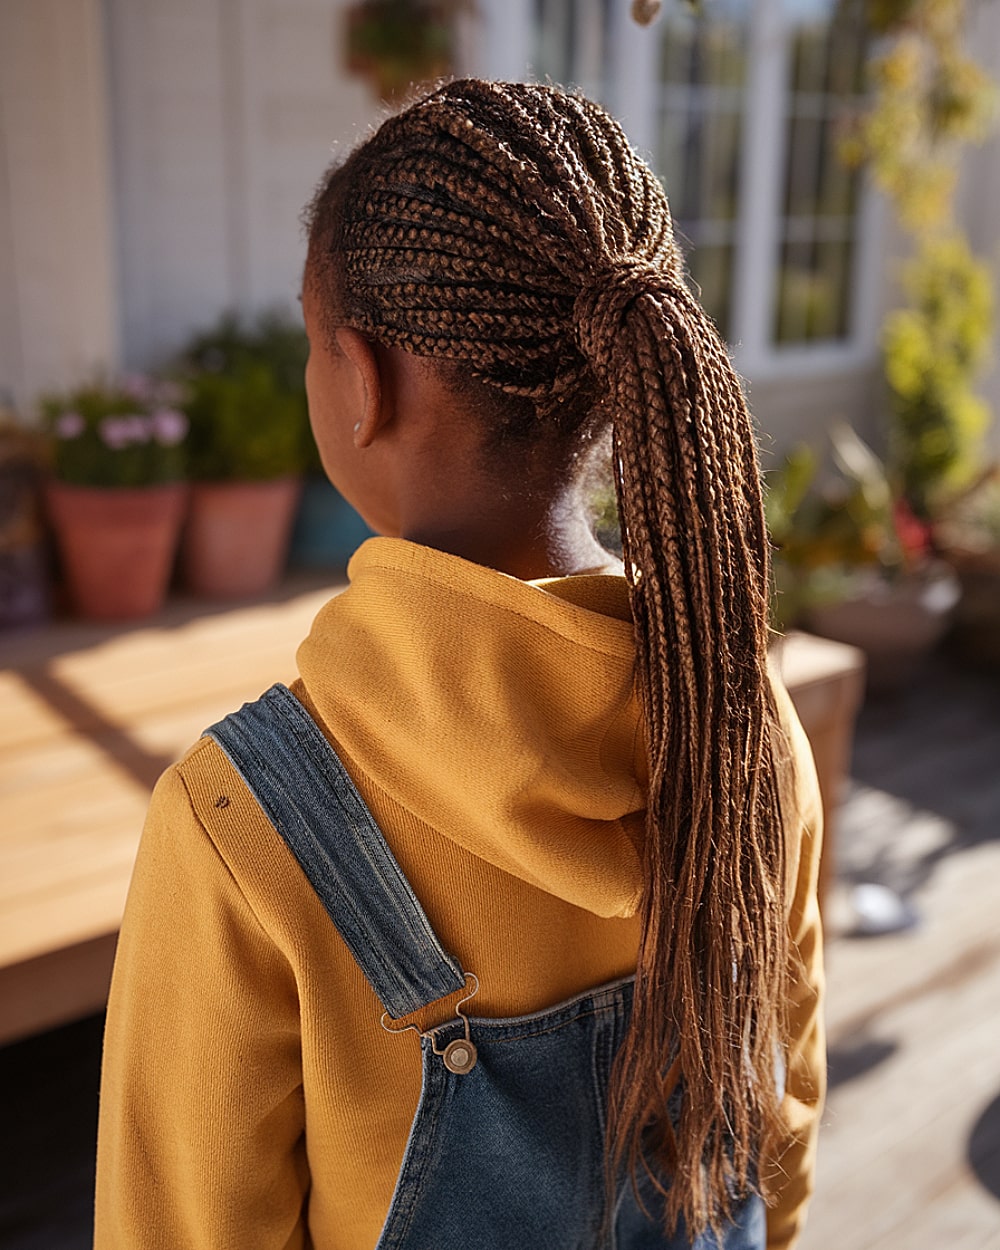
#41 Simple Ponytail Braids for Black Girls
Low-maintenance and neat, this ponytail braid style features tiny micro braids gathered into a low pony. It’s ideal for active teens or those who prefer fuss-free styling. Perfect for high-density hair, it keeps strands controlled and out of the face. The only watch-out is scalp sensitivity—make sure the braids aren’t too tight at the hairline. Works beautifully for any casual setting or school day.
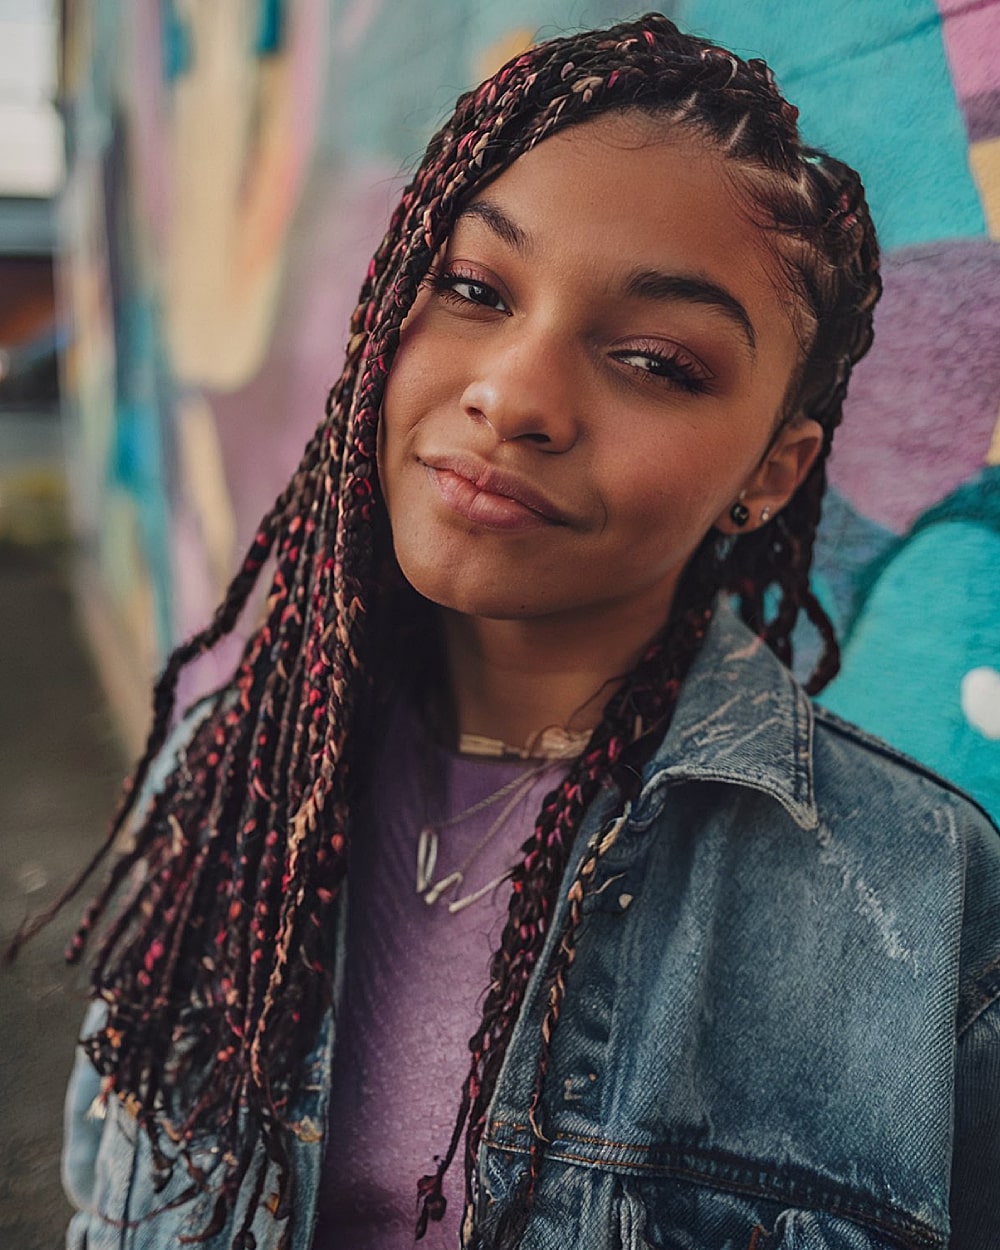
#42 Peekaboo Braids with Maroon Highlights
With a mix of black and deep maroon, these medium-length peekaboo braids give off just enough edge while staying age-appropriate. They’re done with micro to medium box braids and styled loosely for movement. A great option for medium-density hair, especially if you’re experimenting with color without full commitment. Keep in mind, brighter colors like maroon can fade faster, so gentle washing is key.
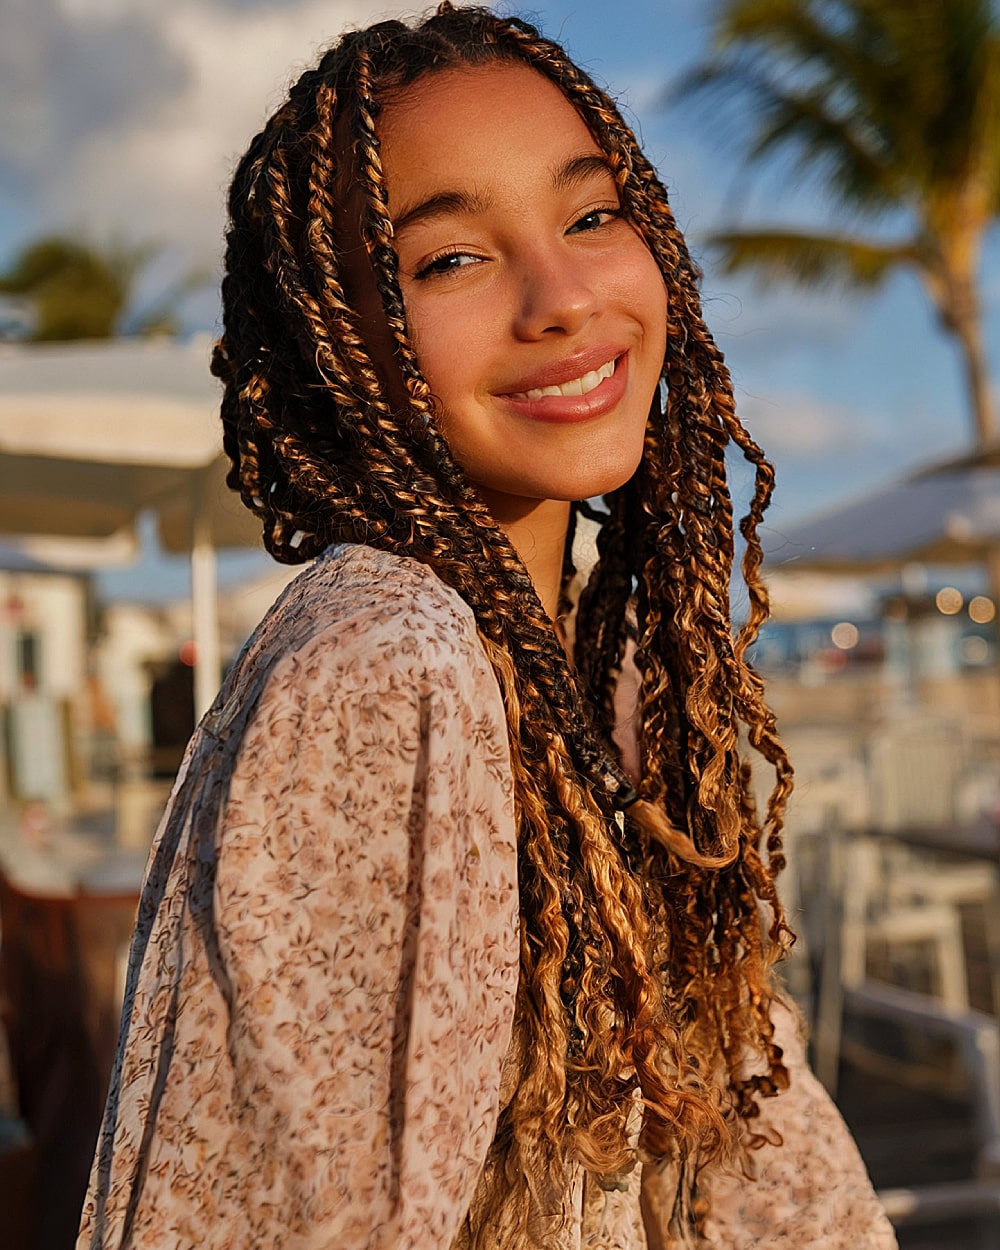
#43 Island Twist Braids for Mixed Teens
Full of texture and visual interest, these island twist braids fall to waist-length with beautifully blended caramel and chocolate brown tones. Perfect for mixed-race teens with thick, curly hair types who want something that’ll last weeks. It’s versatile—wear it down or tie it up. The only downside? It’s a time investment to install and slightly heavier than regular box braids due to the twist volume.
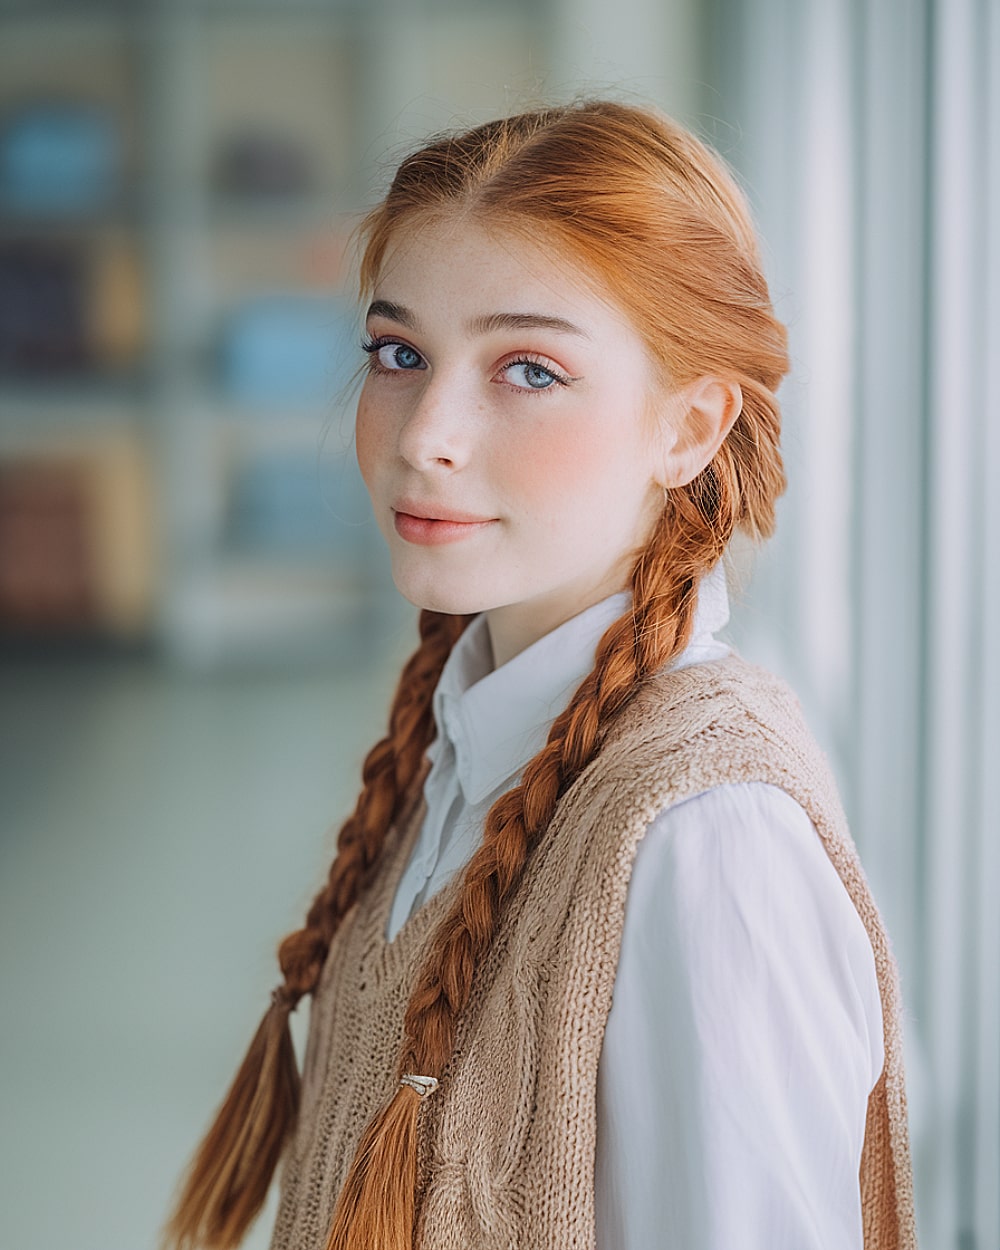
#44 School Braids for Long Red Hair
Simple and timeless, these traditional twin braids are parted cleanly down the middle, perfect for showcasing that stunning natural red hair. Best for long, straight to slightly wavy textures with fine to medium density. It’s a practical look for teens, especially in humid or windy climates where you want to keep hair tidy. It does require consistent brushing to avoid flyaways, but otherwise, it’s a breeze.
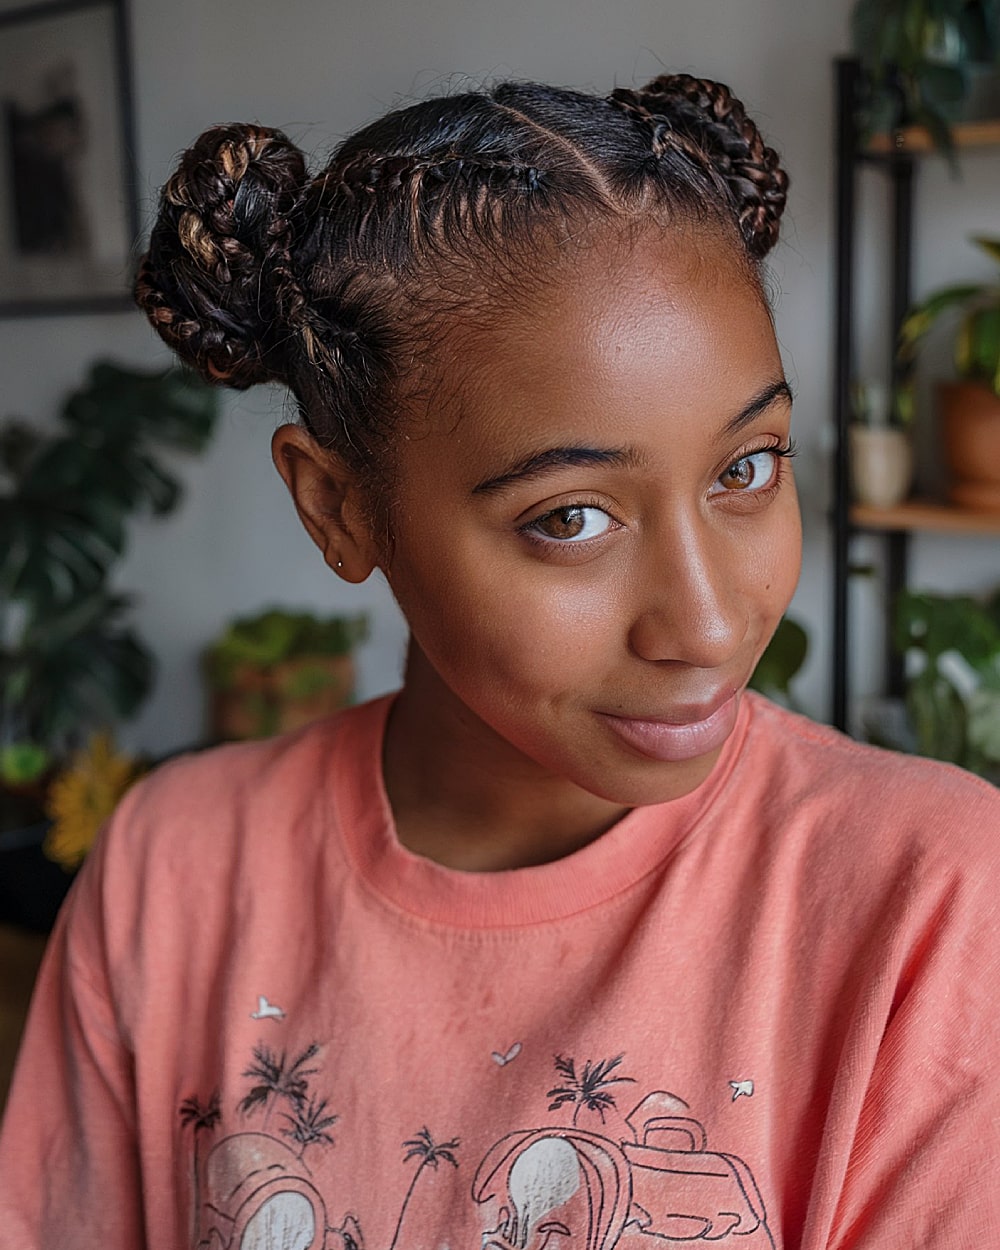
#45 Cute Braided Styles for Black Teens with No Weave
Low-key yet stylish, these double braided buns are done entirely with natural hair—no extensions needed. Cornrows lead into two compact buns, keeping it fun and age-appropriate for teens. Works best on coily or kinky textures with medium density. The benefits? It’s protective, low-maintenance, and keeps hair off the neck. Just note—it may shrink the hair’s length visually, which some might not prefer.
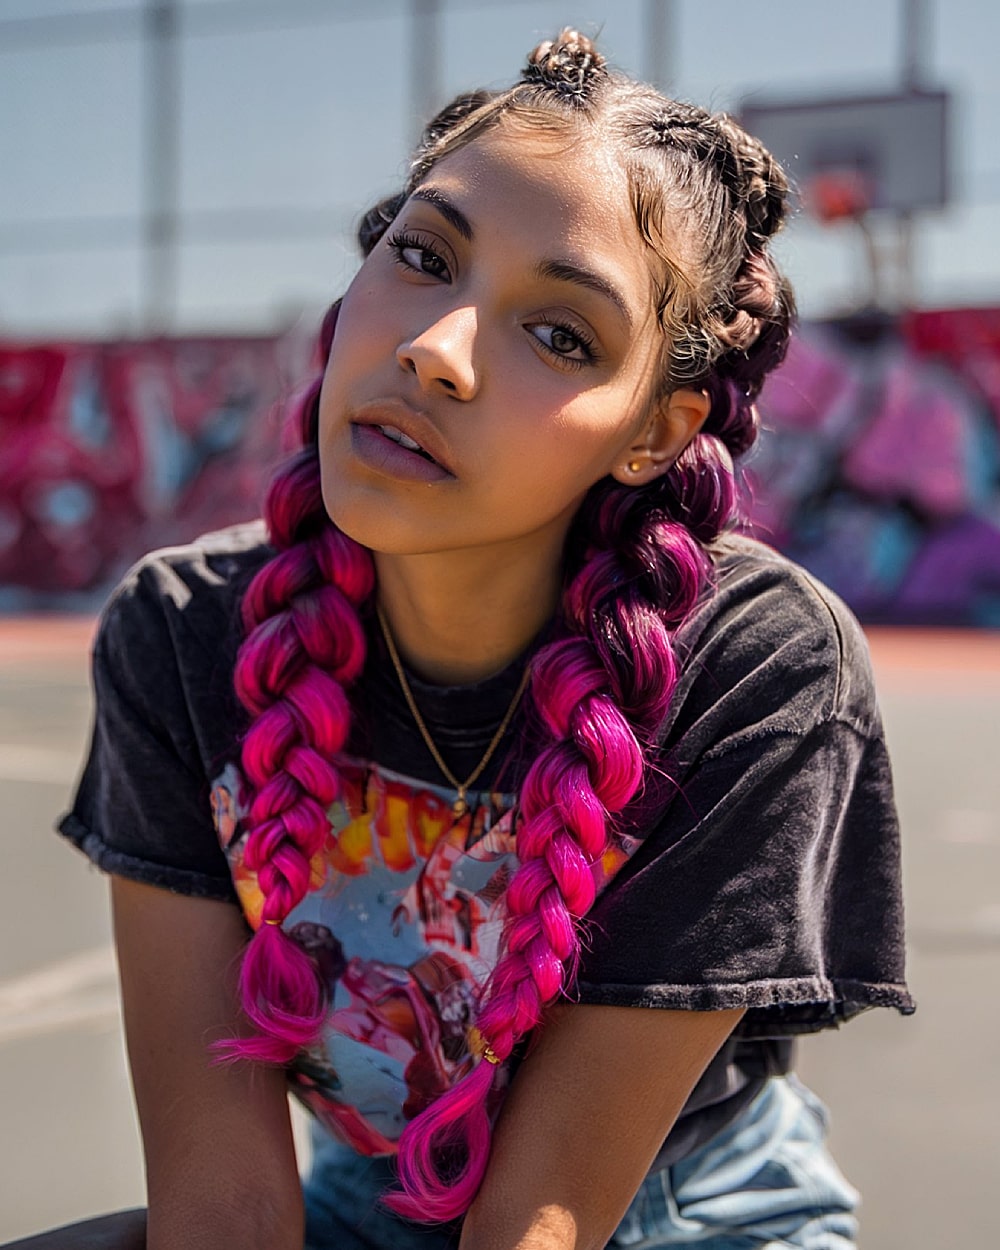
#46 Jumbo Braids with Color Combo for Teens
Bold and youthful, these two jumbo braids pop with a hot magenta ombré fade and playful space buns up top. This look is best on thick or added hair for volume and dramatic contrast. Great for round or oval faces, it blends protective styling with fashion-forward flair. It’s not for those wanting subtle—it’s eye-catching, perfect for school events or fun weekends. Keep color-safe products on hand to maintain that brightness.
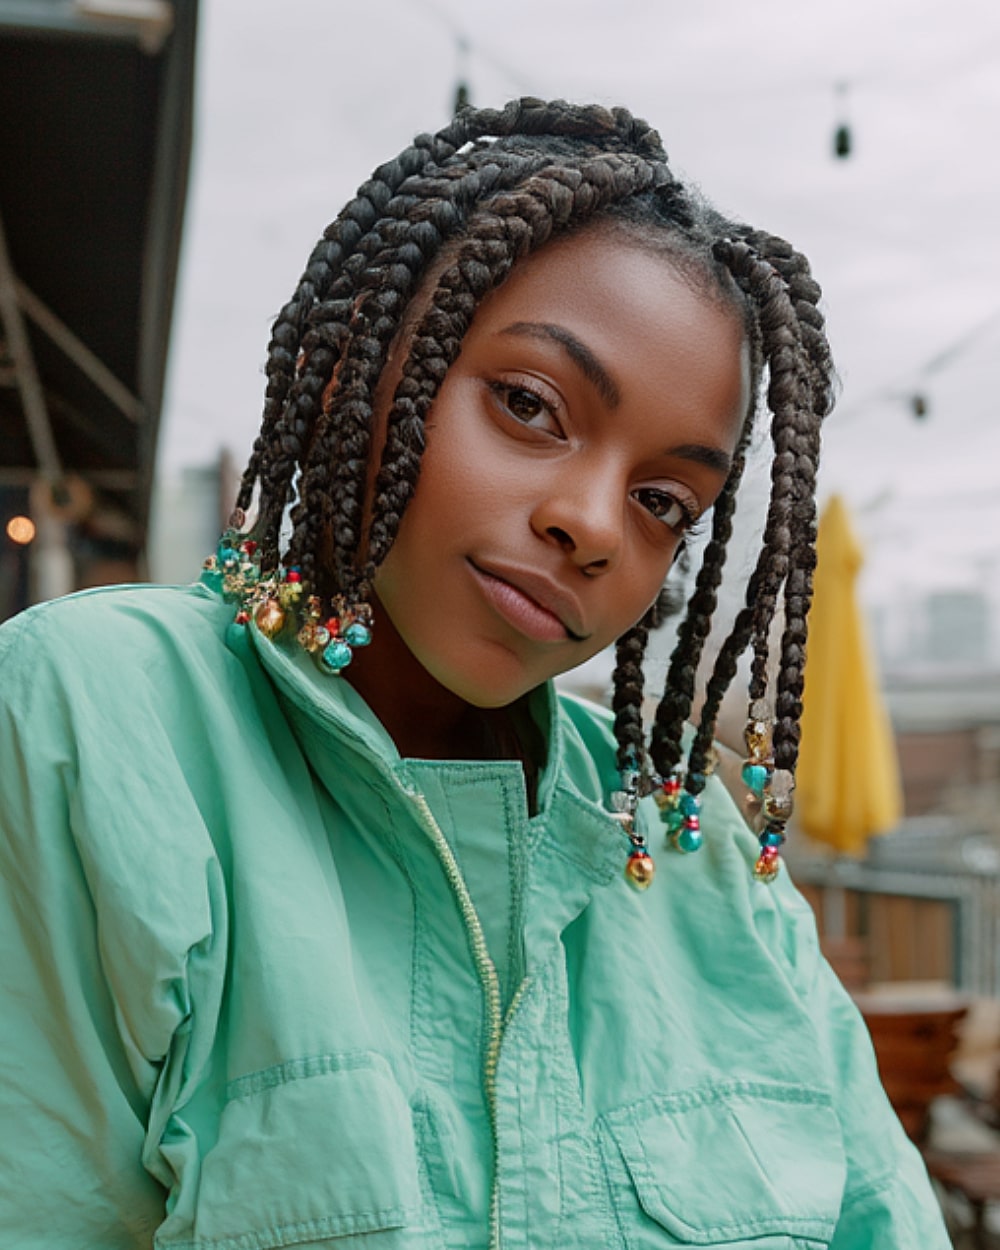
#47 Protective Braided Styles for 4C Hair
A classic protective style for 4C hair, these shoulder-length box braids are dressed up with playful beads that add movement and personality. The neat, medium-sized parts reduce tension on the scalp, making it great for teens with high-density natural hair. While it’s a longer install, it offers several weeks of low-maintenance wear. Just remember to moisturize the scalp weekly to keep things fresh underneath.
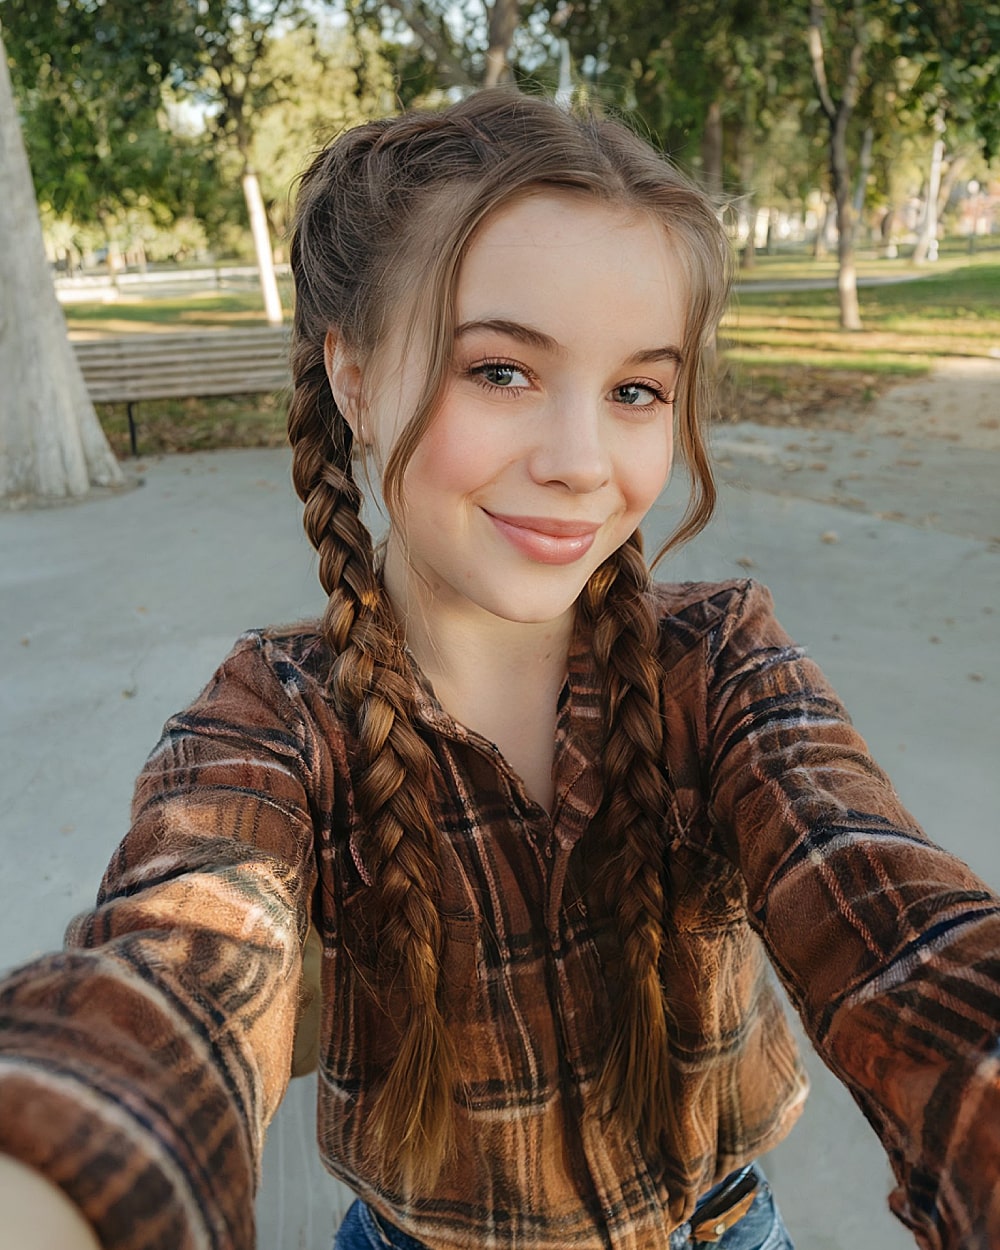
#48 Quick and Easy Dutch Braids for Teens
Great for rushed mornings, these twin Dutch braids are quick to recreate and perfect for long, straight to wavy hair. The clean middle part keeps it structured, while the pulled-out tendrils soften the look and frame the face. It’s a solid option for teens with medium to thick hair density. The key to success here is pre-brushing and sectioning well—just add a touch of gel at the roots if you’re dealing with flyaways.
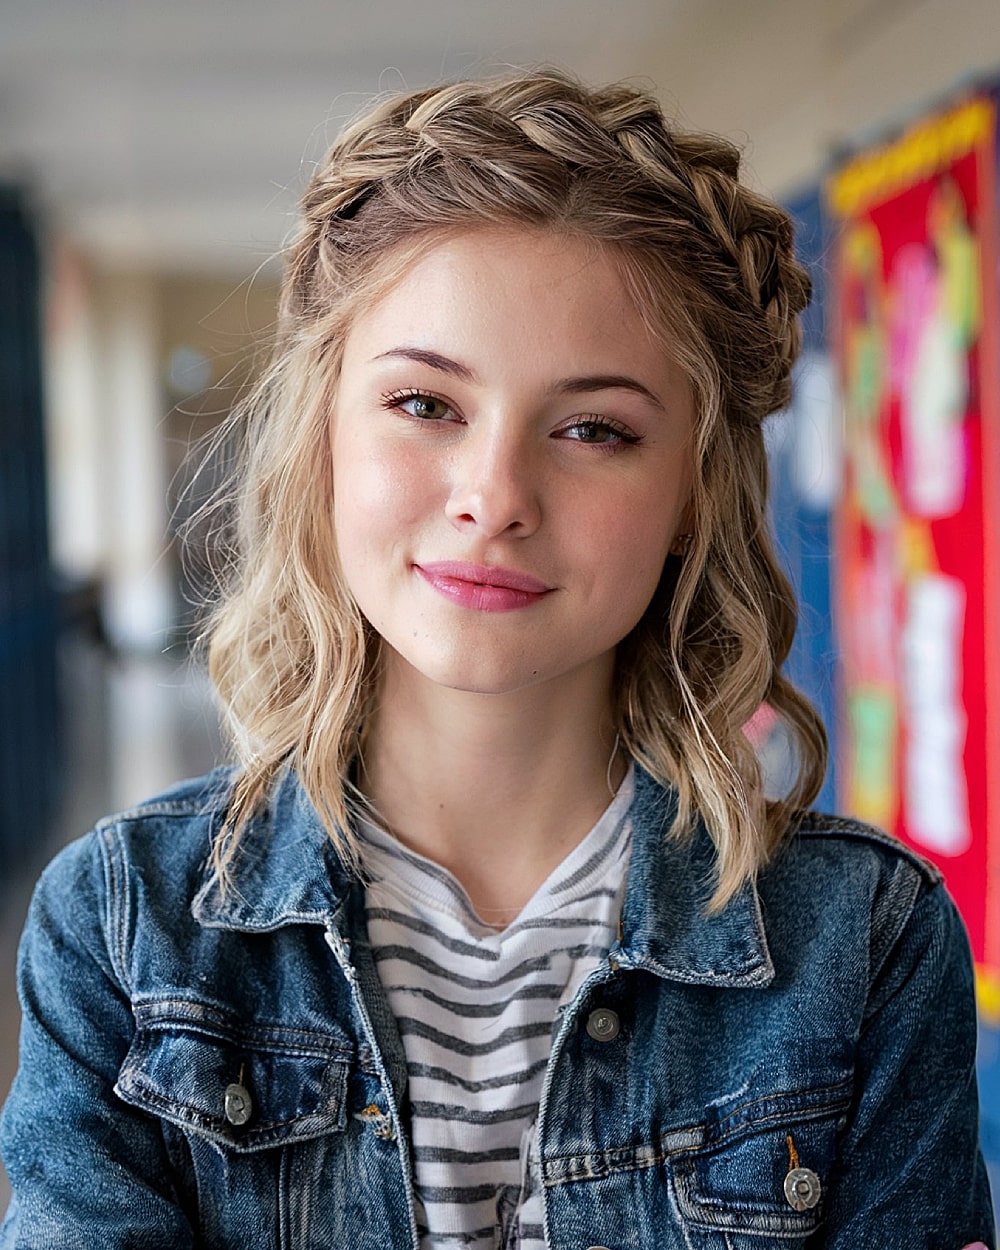
#49 Cute Back To School Braids for Thin Hair
Sweet and school-ready, this half-up braided crown works beautifully on thin, medium-length hair. The loose, relaxed braid on top adds charm without needing heavy styling products, while the soft waves provide body and dimension. It’s ideal for teens who want something girly and low-maintenance. It might not hold long on super fine hair, so a light texture spray can help with grip and longevity.
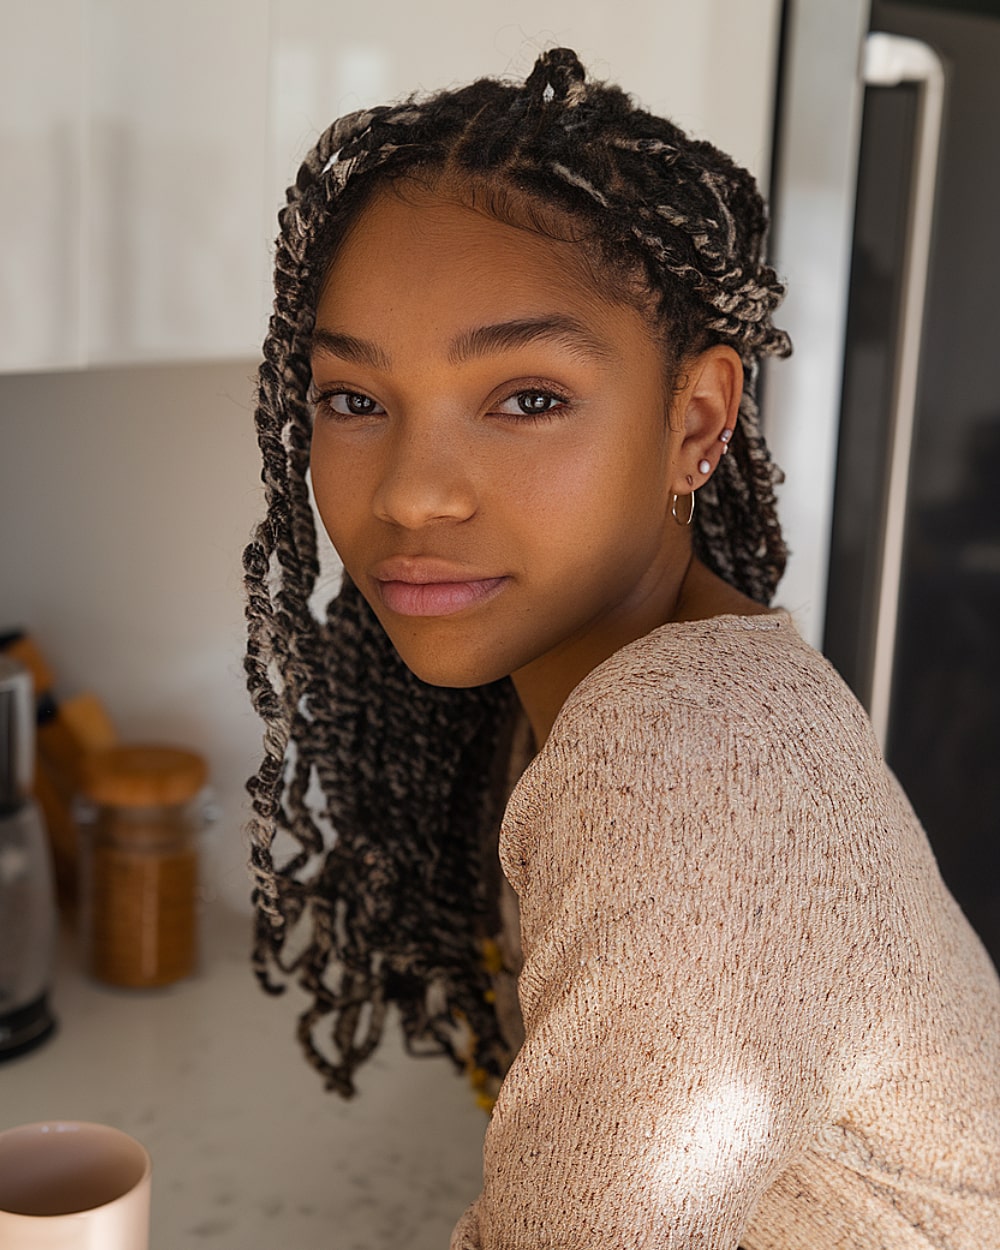
#50 Twistique Hairstyle
This mid-length Twistique style blends two-tone twists with bold black and platinum streaks for dimension. It’s ideal for medium to thick natural hair and perfect for teens wanting a bit of edge. It offers a more laid-back twist pattern compared to tight braids, giving it soft bounce and movement. It’s a bit more prone to unraveling than regular braids, so setting foam is your best friend.
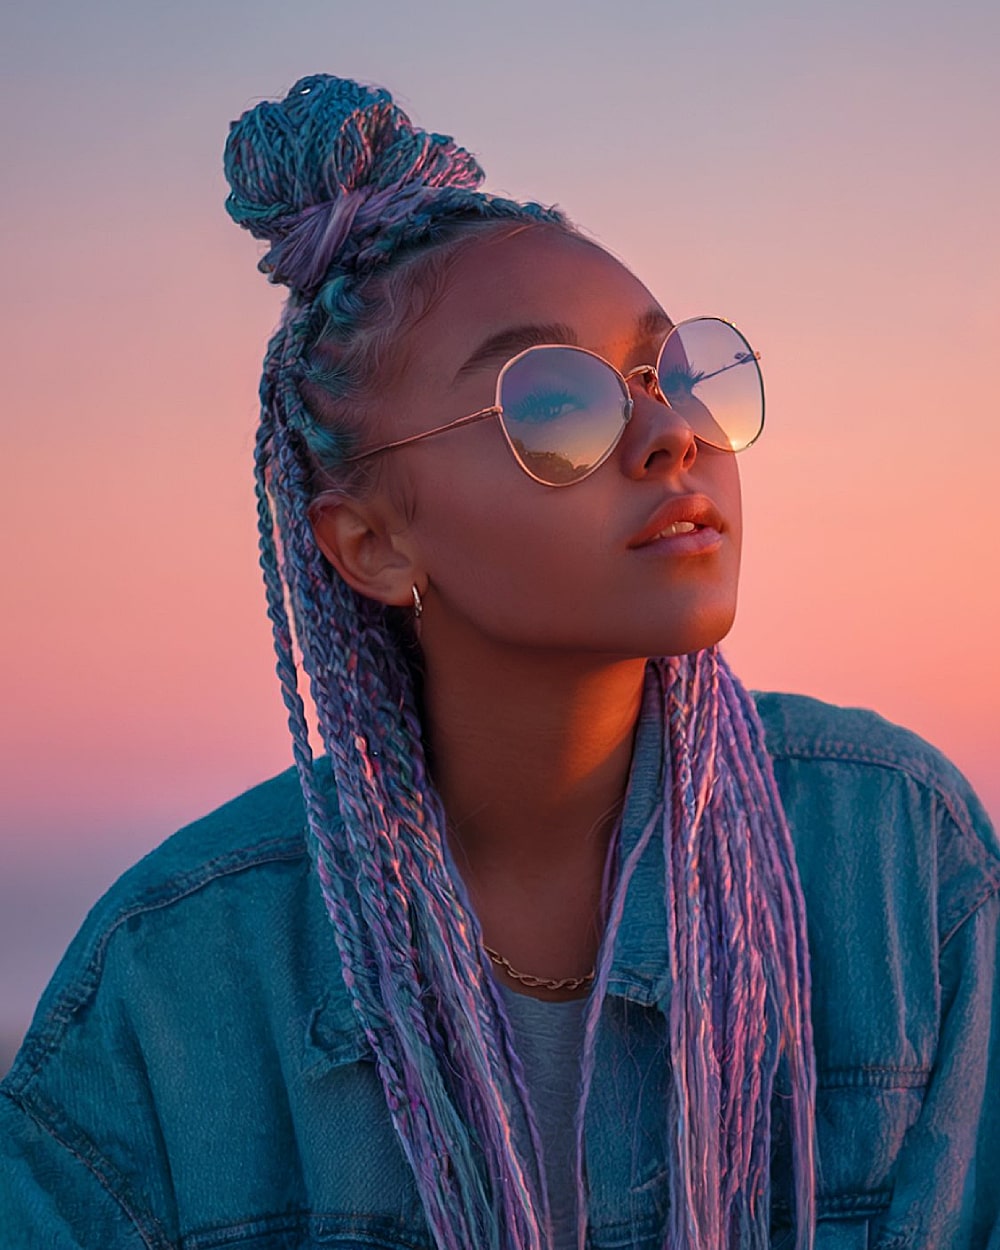
#51 Knotella Hairstyle
Whimsical and bold, the Knotella hairstyle features long micro braids in pastel lavender, aqua, and silver tones, pulled up into a textured top knot bun. It’s a show-stopping look ideal for teens with thick or added hair who love experimenting with fashion-forward color. The braids are lightweight and versatile, but color-treated synthetic hair can be prone to fraying—so gentle handling is key. Perfect for oval and heart-shaped faces, this look turns heads without sacrificing comfort. The high bun adds lift, making it a flattering option for teens looking to elongate their face subtly.
Enter your email and get this picture and description straight to your inbox, and you'll also get new hair ideas ❤️
🔒 We don't spam or sell emails. See our Privacy Policy.